1
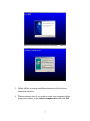
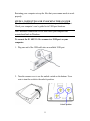
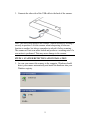
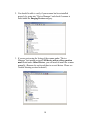
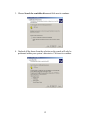
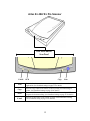
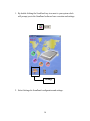
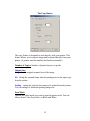
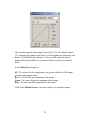
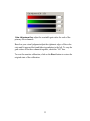
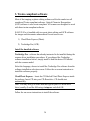
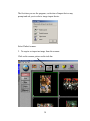
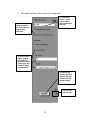
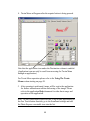
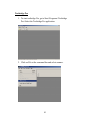
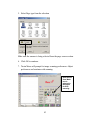
Artec Color Image Scanner Model: E+ 48U/E+ Pro User’s Guide Copyright Information Copyright © 2002 Artronix Technology, Inc., a wholly owned subsidiary of Ultima Electronics Corp. Reproduction, adaptation, or translation without prior written permission is prohibited, except as allowed under the copyright laws. The Artec brand name and logo are registered trademarks of Ultima Electronics Corp. The ScanPanel is copyrighted owned by Ultima Electronics Corp. Ulead Photo Express is a trademark of Ulead Systems, Inc. Textbridge Pro is a registered trademark of ScanSoft, Inc. Microsoft is a U.S. registered trademark of Microsoft Corporation. Windows is a trademark of Microsoft Corporation. All other products mentioned herein may be trademarks of their respective companies. Information is subject to change without notice and does not represent a commitment on the part of Artec. The software described is furnished under a licensing agreement. The software may be used or copied only in accordance with the terms of such an agreement. It is against the law to copy the software on any medium except as specifically allowed in the licensing agreement. No part of this document may be reproduced or transmitted in any form or by any means, electronic or mechanical, including photocopying, recording, or information storage and retrieval systems, or translated to another language, for any purpose other than the licensee’s personal use and as specifically allowed in the licensing agreement, without the express written permission of Artec. Restricted Rights Legend Use, duplicate, or disclosure is subject to restrictions as set forth in contrast subdivision (c)(1)(ii) of the Rights in Technical Data and Computer Software Clause 52.227-FAR14. Material scanned by this product may be protected by governmental laws and other regulations such as copyright laws. The customer is solely responsible for complying with all such laws and regulations. 2 Table of Contents Thank you note…………………………………………………………………………….4 What’s in the Package…………………………………………………………………… 4 System Requirement…………………………………………………………………….. 5 Installation of the scanner software and hardware……………………………………. 5 - Installing the scanner software…………………………………………………………… 5 - Connecting and unlocking the scanner……………………………………………………8 - Scanner detection and installation………………………………………………………... 9 Scanner hardware and software operation……………………………………………... 14 - One touch scanning………………………………………………………………………..14 - ScanPanel settings and configuration…………………………………………..17 - Using the Twain Menu…………………………………………………………………… 22 - Main menu……………………………………………………………………...22 - Advance menu…………………………………………………………………. 24 -Image Enhancement Tools…………………………………………... 24 - Monitor menu…………………………………………………………………...32 - Preference menu……………………………………………………………….. 34 - About menu……………………………………………………………………. 35 - Twain compliant software………………………………………………………………... 36 - Install bundled software……………………………………………………….. 36 - Using the bundle photo and OCR software with the scanner……………………………..37 - Ulead Photo Express……………………………………………………………37 -Textbridge Pro………………………………………………………………….. 41 Troubleshooting and solutions…………………………………………………………... 45 Specification……………………………………………………………………………….. 48 3 Thank You! Thank you for purchasing the Artec E+48U/E+ Pro USB color scanner. Your scanner offers great scanning solution for both pictures, and documents. Additional features include E-mail, OCR (Optical Character Recognition) function, and Copy to printer. What’s in the package? Before starting, check the contents of the box to make sure that all parts and accessories are included. If any items are missing or damaged, contact the dealer where you purchased the scanner. Artec E+ 48U/E+ Pro Color Flatbed Scanner Scanner installation CD, Ulead Photo Express CD USB Cable 4 Users guide System Requirements System requirements for operating the Artec E+ 48U/ E+ Pro Scanner • • • • • • Intel Pentiumtm 2 class 300 Mhz or equivalent Microsoft Windows 95 with USB support, 98, 2000, ME, or XP One available Universal Serial Bus (USB) port Internal memory (RAM) o Windows 95 or 98 – 32 MB or more o Windows ME or 2000 – 64 MB or more o Windows XP – 192 MB or more 95 MB of free hard disk space 8 X CD-ROM drive for software installation Installation of scanner software and hardware Please follow the steps below for proper installation of the scanner. STEP 1: INSTALLING THE SCANNER SOFTWARE____________ Note: You must first install the scanner driver and software before connecting your scanner to your computer. Otherwise, scanner may not install properly and will result in error or problems. To install the scanner driver and software: 1. Start your computer and close any application running, disable Antivirus protection if any. 2. Insert the CD labeled with scanner model name. (E+ 48U/ E+ Pro) Note: If the driver CD does not automatically starts, make sure the CD-ROM drive’s door is completely shut. If CD still doesn’t start, the Autorun option on your computer is turned off. Double click the “My Computer” Icon on your desktop screen. The window shows the system drives available in your computer. Double click on your CDROM drive icon to execute the CD. You may also go to Start>Run and type in your CD-ROM drive letter (usually d) and the following :/setup.exe and click OK. 5 3. A language selection screen will prompt. Select your desired language and continue 4. Program selection screen will prompt. We recommend you to install the software in the following order: i. Scanner driver ii. Textbridge Pro 8.0 iii. Internet Explorer 6.0 (only install if you don’t have an internet browser available.) 6 5. Follow all the on screen installation instruction for the abovementioned software. 6. When a message asks if you want to restart your computer before using your scanner, select restart computer now and click OK. 7 Restarting your computer sets up the files that your scanner needs to work properly. STEPS 2: CONNECTING AND UNLOCKING THE SCANNER The Artec E+ 48U/ E+ Pro scanner connects to any available USB port. Check your computer’s user’s guide for its USB port locations. Note: Hardware connection is to be done when your computer has restarted and back in Windows. To connect the E+ 48U/ E+ Pro scanner to a USB port on your computer: 1. Plug one end of the USB cable into an available USB port. 2. Turn the scanner over to see the unlock switch on the bottom. Use a coin to turn the switch to the unlock position. Unlock position 8 3. Connects the other side of the USB cable to the back of the scanner. Note: The lock switch protects the scanner’s optical module by holding it securely in position. Lock the scanner when transporting it from one location to another, but always remember to unlock it before scanning. The scanner will not scan when locked and produces a cranking noise if a scan action is performed. This may cause damage to the scanner. STEPS 3: SCANNER DETECTION AND INSTALLATION 1. As soon you connect the scanner to the computer, Windows should detect your scanner automatically and install the hardware into your Windows registry. 9 2. You should be able to verify if your scanner has been installed properly by going into “Device Manager” and check if scanner is listed under the Imaging Devices category. 3. If you are not seeing the listing of the scanner under “Device Manager” but instead seeing a USB device with a yellow question mark listed under Other Devices, you will need to install the scanner manually. (Reasons for such result due to several factors. Please see Trouble shooting section for detail.) 10 Please follow the steps below to install scanner manually. 1. Double click the USB device to enter the device property. 2. Click on the Reinstall Driver. Upgrade Device Driver Wizard will then appear. Click next to continue. 11 3. Choose Search for a suitable driver and click next to continue. 4. Uncheck all the boxes from the selection so the search will only be performed within your system’s directories. Click next to continue. 12 5. The search will find and locate a most suitable driver for the scanner in your system’s directories. Click next to continue. 6. Wizard will continue the installation and prompt you to finish the installation process. Click finish and back to “Device Manager”. Now you should be seeing the scanner listed under Imaging Devices. Note: during the installation process, a message about the driver’s Digital Signature Not Found may appear. Please ignore the message and continue with the installation. This message is only informational and will not cause any problems to the proper usage of the scanner. You are now ready to use the scanner. 13 Scanner Hardware and Software Operation There are different ways for getting your images or documents to be scanned into your computer. Here is the list of ways you can do just that. 1) Using the scanner’s one touch scanning buttons located in front of the scanner. 2) Using the Twain Menu for direct scanning to desired destinations. 3) Access the scanner by going through Twain compliant software. Please see the following instruction and explanation on how to use the above-mentioned method for scanning and all the functions and settings for possible ways of scanning your images and documents from your scanner to your computer. 1. One touch scanning Using the One touch Buttons on the scanner will give you fast scanning solution for scanning images, documents, sending attachments to friends by E-mail and printing your scanned images or documents directly to the printer. Note: You must enable the Scan Panel tray icon next to your system clock in order to use the one touch button-scanning feature. Tray icon should be enabled each time you start up your computer unless it is being disabled or removed from the “Start Up” directory. To enable it manually, go to Start>Programs>e+ 48U>ScanPanel. Tray Icon 14 Artec E+ 48U/ E+ Pro Scanner One touch button Scan Panel E-mail OCR Copy Scan Scan Press the Scan button on the scanner for one page automatic scans to the default application. (See ScanPanel settings on page 15 for details) Copy Press the Copy button on the scanner for direct printing of scanned image to printer. (See ScanPanel settings on page 15 for details) OCR Press the OCR button on the scanner for direct document scanning to OCR program for document editing. (See ScanPanel settings on page 15 for details) E-mail Press the E-mail button on the scanner for direct e-mail attachment scanning. (See ScanPanels setting on page 15 for details)l 15 1. By double clicking the ScanPanel tray icon next to your system clock will prompt you to the ScanPanel software base execution and settings. Settings 2. Select Settings for ScanPanel configuration and settings. 16 ScanPanel Settings and Configuration The Scan Button Scan To: Application - Default Twain compliant programs. ScanPanel will detect and set your system’s default twain programs to work with this function. When Application is being selected, all images being scanned in by pressing the Scan button on the scanner will be sent to the selected application directly. You may add twain compliant program into the selection by click on Add. Browse for the software shortcut that you would like to add into the selection. Delete any program that you don’t want by highlighting the program and clicking on Delete. Clipboard – Default temporary image windows directory. By selecting clipboard, your scanned images are available for you to paste on to a twain compliant software file. (Imaging, MS Paint, MS Word, Excel …etc.) Note: this option is only temporary. It will be lost once your system is shut down or restarted. 17 File – Saving your scanned image to a file in your computer. By selecting File, your scanned image will be saved directly to any location you desire on your computer as an image file. Note: Image will not be displayed after scanning. You will need to locate the saved file and execute it for the display of the image. Save As: Options on the file saving location, file name, and the saved format desired. Scan Mode: Options for which mode you want to scan the picture with. You can choose from Color, Gray Scale, or Black and White. Resolution: Image resolution is measured in dots per inch (dpi), determining the effect of the image as it is displayed or printed. Three resolution options are available for the one touch button scanning: 100, 200 or 300dpi. For higher resolution scanning, scan image by going to the Twain Menu direct scanning or through a Twain application. The higher the resolution is set, the bigger the image will appear. Note: Pressing the reset button will reset all settings to the original manufacturer settings. 18 The Copy Button The copy feature is designed to work directly with your printer. This feature allows you to scan an image and be printed directly from your printer. (A printer must be installed and function normally.) Number of Copies: Number of printed copies you prefer. Output Size: Original – the original scanned size of the image. Fit – fitting the scanned image into the printing area on the paper type from the printer. Scaling – setting the scale for the image to be printed from the printer. You can enlarge or shrink the printing image size. Scan Mode: Options for which mode you want to print the picture with. You can choose from Color, Gray Scale, or Black and White. 19 The E-mail Button The E-mail function for the scanner only works with Microsoft Outlook or Outlook Express program as your default E-mail client. If you are using another type of e-mail service or account, consult with their technical support to see if there are settings or options on getting the account to work with Outlook or Outlook Express. Scan Mode: Options for which mode you want to scan the picture with. You can choose from Color, or Gray Scale. Save As: Options on the file saving location, file name, and the saved format desired for the e-mail attachment. Resolution: Image resolution is measured in dots per inch (dpi), determining the effect of the image as it is displayed or printed. Three resolution options are available for the one touch button scanning: 100, 200 or 300dpi. For higher resolution scanning, scan image by going to the Twain Menu direct scanning or through a Twain application. The higher the resolution is set, the bigger the image will appear. 20 The OCR Button OCR (Optical Character Recognition) is a technology designed to scan and recognize fonts and characters on a text document and convert it into an editable text document in your computer. Scan To: Default OCR compliant programs. ScanPanel will detect and set your system’s default OCR programs to work with this function. When Application is being selected, all documents being scanned in by pressing the OCR button on the scanner will be sent to the selected OCR application directly. You may add more OCR compliant program into the selection by click on Add. Browse for the software shortcut that you would like to add into the selection. Delete any program that you don’t want by highlighting the program and clicking on Delete. Save As: Options on the file saving location, file name, and the saved format desired for the text document. Language: choose from a list of languages for the OCR recognition. 21 2. Using The Twain Menu The Twain Menu, software which is mainly being used for the scanner operation within Windows, can work by itself as a stand alone direct scanning software or can be used from the access of a Twain compliant software. (See the Twain complaint application section for detail.) To open the Twain Menu, go to Start>Programs>e+48U. Main Menu Tab Menu for different preference and scan settings Object Type: Select the object type you are scanning normal/photo paper, newspaper, catalog, Magazine, or user define. Scan Mode: Select scan color mode from color, gray scale, or B/W scanning. Destination: Select destination for the scanned image to be sent to. Choose from disk, printer, e-mail, fax, and clipboard. The preview screen Preview Scan Help Cancel Resolution: Choose resolution from 50 to 19200 dpi. The higher the resolution selected, the larger of display and file size will be after scanning. (Refer to the resolution chart on the next page for best resolution selection for different type of object scanning.) Scaling: Choose the scale size for the scanned image from 10% to 1000%. The greater scale size selected, the larger of display and file size will be after scanning. Brightness and contrast: adjusting the brightness and contrast for the scanned image. 22 Cancel: cancel actions. Help: show help documents. Scan: scan image to destinations. Pre-scan: pre-scan image to the preview window. User Reference for resolution settings Resolution is measured in dots per inch (dpi), which is used to represent the image detail in a given area. The available resolution ranges for the scanner is from 50 to 19200 dpi. Generally, the higher the resolution means the sharper and higher the quality of the scanned image. However, in some cases, the highest resolution cannot be achieved due to a of limitation several factors: image type, the original image's resolution, the output device's resolution (printer in this case), the available memory space in your hard disks …etc. Normally you should choose a resolution that matches the resolution of the output device. The following list is some suggestion: 72 - 100 dpi for CRT Display (monitors) 72 - 216 dpi for 9-pin Dot Matrix Printer 100 - 400 dpi for 25-pin Dot Matrix Printer 100 - 600 dpi for Laser and Inkjet Printer 100 - 400 dpi for Facsimile Image resolution is also the key for proper setting of the scan resolution: Types of Image Recommended Image Type Selection Recommended resolution for scanning Photograph Normal/Photo 300 dpi Small Photograph to be enlarge Normal/Photo 300 to 1200 dpi Magazine Magazine/Catalog 300 dpi Newspaper Normal/Newspaper 300 dpi Text document (Text only) Normal (with gray scale mode selected) 300 to 600 dpi 23 Advance Menu A pre-scan image must be scanned to the Preview area before you can utilize the advance options. Image Enhancement Tools Gamma - When you wish to adjust the brightness of mid-tones of the scanned image while keeping shadow and highlight areas relatively unchanged. The Gamma correction function allows you to increase or decrease the intensity of the middle gray tones. Pressing the button will open up the Gamma correction setting window. A will be marked on the lower right-hand corner of the icon reminder if you change the default setting. 24 as a The available gamma value ranges from 0.01 to 7.99. The default value is 1.0. Changing the gamma value above 1.0 will brighten the mid-tones, and below 1.0 will darken the mid-tones. You can either enter the desired gamma value in the edit box or use the scroll bar to select your desired value. In the Channel checking box: All - To correct all color components (red, green, and blue) of the image with the same gamma value. Red - To correct the red component of the image. Green - To correct the green component of the image. Blue - To correct the blue component of the image. Click on the Default button to reset the setting to its original settings. 25 Hue & Saturation - allow you to adjust the hue and saturation of its pixels in an image while keeping the brightness level unchanged. Hue is the wavelength of light reflected directly from an image, and it is represented by the name of colors. Adjusting the hue changes the whole color appearance of the image. Saturation is the strength of the color, referring to how far the color is from a gray of equal intensity. Adjusting the saturation changes the degree of the purity in proportion to the hue. Hue adjustment: In the “Hue” box, specify an angle value (you can either directly enter the desired value in the edit box or use the scroll bar to select your desired value). The specified angle value represents a move around the color wheel. (Remember that hues are specified as angles on the color wheel. If you are not familiar with the notation of color wheel, please refer to any relevant book about color.) Saturation adjustment: In the “Saturation” box, specify a desired percentage value of the saturation. A value of –100 converts the image completely to a grayscale image and a value of +100 shows the image with fully saturated hues. A will be marked on the lower right-hand corner of the icon as a reminder if you change the default setting. 26 Tone Adjustment - For the purpose of correcting image distortions that take place during scanning, you use the Tone adjustment to make the compensation on scanned images. Tone adjustment allows you control the conjunction between the shadows, mid-tones, and highlights of your image. Use it to restore detail that is lost in shadows or highlights, to correct over or under-exposure, and to improve the tonal quality of your image. You can adjust the tone value by using the mouse cursor to reshape the tone. Curve-based editing enables you to find out a problem area and make subtle or notable change in that image area. The available range for Tone Adjustment is from 0 to 255. The Tone Curve takes an original pixel brightness value X as input and Y as a new output brightness value. The resulting curve is a visual representation of the balance between shadows, mid-tones, and highlights. A will be marked on the lower right-hand corner of the icon as a reminder if you change the default setting. 27 Mirror - lets you change the horizontal orientation of a pre-scan image to one that mirrors the current orientation of the image view across a vertical imaginary line. Note: This function applies to all the scan areas defined in the Batch Scan function at the same time. That is, when it is disabled, none of the defined scan areas are mirrored; when it is enabled, all the scan areas are mirrored. Zoom - lets you enlarge the view of the image in the Preview window. However, the zoom function can only enlarge the image view with one predefined factor. Click on icon again to restore the image. Invert - enables you to view and scan a positive scanned image to negative or a negative image to positive. By applying this function, the brightness value of each pixel will change to an inverse value on 256-color scale. Levels - convert colors of the scan document spread over a 256-color scale. 28 Check on the Enable Levels box to enable level adjustment. You can choose channels from All, Red, Green, and Blue level for adjustment between 0 – 255. Filter – This feature has been omitted from these scanner models. Effect – options for sharpening or to blurring your scanned image. Five options are available: None, Blur, Blur More, Sharpen, and Sharpen More. None - No sharpen or blur effects are to be applied. Blur - slightly soften all or part of an image. Blur More - Blur More softens the image moderately. Sharpen - Sharpen gives emphasis to the color differences between adjacent pixels of different colors. It is used to electronically strengthen the focus of blurry images by means of increasing the contrast of adjacent pixels. Sharpen More - moderately sharpen the image. A will be marked on the lower right-hand corner of the icon as a reminder if you change the default setting. 29 Color Correction: Check this option to acquire of fidelity image. Batch Scan: allows you to define multiple areas with different image settings in the Preview windows and to scan the define area in a single operation. Please remember to pre-scan the image before applying the Batch Scan function. Add – To add a scan area selection: Press this button to scan more than one image to the designated destination. Please drag a new rectangle to define another scan area in the Preview area and define the image setting. Delete – To delete the active (selected) scan rectangle. Property – To show the property of the active area. Batch Scan List –All the defined scan areas will be listed in the Batch Scan box. Please be aware that the number of images to be scanned corresponds to the number of images in the Batch Scan box. When a defined area is selected/activated, it will be marked with a Black boundary in the Preview Window. You can define up to as many as 20 scan rectangles in a Preview Window. Simply drag the box in the scroll bar or click on the arrow icon on the right of the Batch Scan box to view the rectangle areas more than four scan rectangles are defined. After defining several scan areas, if you would like to scan only one, simply uncheck the Batch Scan box. The information of all other scan areas in the Batch Scan List becomes gray except for the active area. Click on the area you would like to scan then press the scan button. Scanner will then acquire the selected image area. Note: You can always change the image setting for the activate scan area at your own discretion. The activated area is the one surrounded by dashing broken lines. 30 Define the scan area To define a scan area, move the cursor to the Preview window when the first pre-scan is done. The cursor changes to a cross in the Preview Window. Click and hold the left button of your mouse to drag a rectangle around the desired scan area of the image. Release the mouse button. Repeat the same step to re-define a scan area. For multiple areas, please refer to Batch scan. To discard the scan area, simply click the left mouse button outside the rectangle anywhere in the Preview Window. Defined scan area rectangle can be maneuvered by placing your cursor inside it. When the cursor changes to a four-way arrow, hold down the left button of your mouse and drag the rectangle to the desired area on the preview image. Dragging any of the four edges or corners on the defined rectangle when the cursor becomes a two-way arrow at the edge can also change the size of the defined area. You can also directly type values in the Width and Height box to outline the rectangle. These values are measured with the unit specified in the unit box on the lower left corner of the Preview Window. 31 Monitor Menu The Monitor menu allows you to calibrate the monitor color by adjusting the gamma value and gain parameters of your monitor to increase the visual perception. Gamma Adjustment box - adjust for a suitable value for each of the primary color channels used by the monitor. The value in the number box varies on your visual judgment until the colors of the two areas come to one. To vary the gamma values of the three channels together, check the “All” box. 32 Gain Adjustment box adjust for a suitable gain value for each of the primary color channels. Based on your visual judgment adjust the rightmost edges of this color strip until it appears black and fades in gradation to the left. To vary the gain values of the three channels together, check the “All” box. To reset the monitor calibration, click on the Reset button to restore the original state of the calibration. 33 Preference Menu Prescan Image Area Auto Detection – Placing a check mark in the box, enable the auto detection of the pre-scanned image’s original scanned area. This feature will eliminate the extra steps for cropping the original scanned image area when performing a scan. Calibration – Scanner optical module will reset its calibration automatically after each scan. From time to time, the preview-scanned image will have uneven vertical lines or an incorrect color registration. The optical module of the scanner is misaligned or is not completely calibrated. Therefore, scanner must need to reset to the original state manually. Use this button to rectify the original value and to acquire better screen display. Color/Gray Depth – Select color and gray depth between 24/8 bits or 48/16 bits. This function is only available to application scanning. Please be aware that some twain applications are only 24 bits. Changing the settings to 48 bits will result in disturbed color images when scanning to application. 34 Default Destination Settings These settings define the location to print and/or fax your scan result to. To configure these settings, at least one printer and one fax application most installed in your computer to perform these functions. By default, related devices and application in your system will be detected and set to these destinations when you install the scanner driver and software. Note: If you have multiple printing devices or fax applications, the default printing device and application will be selected for these settings. To change destinations, Press the printer or fax picture to enter the selection setting. About Menu - Display of the scanner model, driver version, and all region contact information. 35 3. Twain compliant software Most of the imaging or photo editing software sold in the market are all considered Twain compliant software. Optical Character Recognition (OCR) software is also twain compliant. All scanners are designed to work with these twain compliant software. E+48U/E+Pro is bundled with two great photo editing and OCR software for images and documents enhancement for end users to use. 1) Ulead Photo Express (Photo) 2) Textbridge Pro (OCR) Install the bundled software Textbridge Pro - software has already instructed to be installed during the scanner driver installation procedures. If you skipped the Textbridge software installation before, simply install it from the driver CD labeled with the scanner model. Select the language; choose to install the Textbridge Pro software from the software installation selection screen. Follow the on screen instruction to install the software properly. Ulead Photo Express – locate the CD labeled Ulead Photo Express inside the package. Insert CD into your CD-Rom drive. CD should start automatically. Note: You may also go to Start>Run and type in your CD-ROM drive letter (usually d) and the following :/setup.exe and click OK. Follow the on screen instructions to install the software. 36 Using the Bundled photo and OCR software with the scanner Note: Please be aware that bundled software is free software, which Artec purchased the distribution licenses from the respective manufacturer of the software. We do not have any software structure or advanced operation knowledge on this software. The following is the simple walkthrough on how to get the bundled software started and how to acquire the image or document from the scanner through the application. Therefore, any further questions on the usage or technical support for the software please contact the software manufacture for assistance. Ulead Photo Express 1. To start the program, go to Start>Programs>Ulead Photo Express>Select the Ulead Photo Express Application . 37 The first time you use the program, a selection of import device may prompt and ask you to select a image import device. Select Flatbed scanner. 2. To acquire or import an image from the scanner: Click on the scanner picture on the task bar. 38 3. The right hand side of the screen will change into: 1) Select data source – make sure e+ 48U is being selected in this box. 2) Select this option to enable the Twain Menu to appear when acquiring. 3) Select save to album, naming the image file, and select saved format type. JPG format is highly recommended. 4) Click on the acquire button to activate scanner. Twain menu will prompt shortly. Click on this icon for help. 39 4. Twain Menu will appear after the acquire button is being pressed. Note that the application icon under the Destination column is enabled. (Application icon can only be used from accessing the Twain Menu through an application.) For Twain Menu operation please refer to the Using The Twain Menu section starting on page 20. 5. After scanning is performed, image will be sent to the application for further enhancement edition and saving of the image. Please refer to the application Help document for other basic usage and operation of the application. Note: To add Ulead Photo Express as one of the default application for the One Touch button function, go to the ScanPanel settings and add the Photo Express executable icon into the list. 40 Textbridge Pro 1. To start textbridge Pro, go to Start>Programs>Textbridge Pro>Select the Textbridge Pro application. 2. Click on File at the command bar and select scanner. 41 3. A scanner selection screen will prompt. Select the Twain category and select the scanner from the list. Click OK to continue. 4. Click on Auto processing. 42 5. Select Page type from the selection Make sure the scanner is being selected from the page source section. 6. Click OK to continue. 7. Twain Menu will prompt for image scanning preferences. Adjust preferences and continue with scanning. Note that the Scan Mode now is selected in B/W mode for OCR scanning. 43 8. After Scanning, a window will prompt and ask for more page scanning or end session. Select the “no more” button if no further scanning is needed. 9. Scanned document will then be sent to textbridge for proofread edition. 10. After Proofread is done, save your document for future usage. 44 Troubleshooting and solutions This section gives you some general idea on some troubleshooting and problem solving for most of the encountered issues with the scanner. Hardware Why is my scanner not moving when I execute the scanner in any ways? Please double check the following: 1) Is your scanner plugged in properly? 2) Is your scanner unlocked? 3) Is the light on the scanner is on? My scanner is installed and some problem with the operation on my laptop computer. There are some older laptops that do not meet the power consumption requirement on the USB port. In that case, when the USB port on the laptop is not supplying enough power to the scanner. Error or problems may occur. Try to purchase a Power USB hub for the solution of this power issue with the laptop’s USB port in conjunction usage of the scanner. My scanner was working properly after installation, but fail to operate after I use it again on the following days. This problem may occur when your system BIOS did not enable the plug and play OS feature. Your USB port will reset the plug and play status every time when you reboot your computer or after shutting down. To enable the plug and play OS feature from the BIOS, please consult with your computer’s manufacture or the Motherboard manufacture. 45 After I install the scanner, I plug in the scanner to the computer. Nothing happened, why? Possible reason is because your USB port is not yet enabled in the system BIOS. Please contact your computer or motherboard manufacture for the instruction on how to enable your USB port in the system BIOS. It is hard to unlock the scanner. Why? Plastic material may not be identical all the time when doing massive production. Some conjunction parts may become unbalance. Try only using a larger coin (like a quarter) to unlock the scanner while applying some pressure when twisting the switch. If still no available, get a product exchange from the retailer. Scanner will not move after I press scan button on both the software and the one touch button. Why? Please try relocking the scanner and unlocking it again. Make sure the scanner is fully unlocked. Software Installed driver for the scanner, scanner appears to installed properly in Device Manager. How come I still receiving error messages? If you have other imaging devices like another scanner previously installed, a digital camera, a web cam… etc. can cause conflicts between each other. Try removing the previously installed imaging devices and the scanner. Reinstall the scanner first. After scanner is confirmed to work properly, install other imaging devices back. Note: when removing devices software or drivers, ensure your will not delete any shared windows component from your computer. The best way is when Windows prompt out messages for some shared component deletion, select no to all so Windows will retain those shared components in your system. 46 After I followed the installation instruction, I try scanning, but a twain error message comes out. Why? Please double check if the scanner hardware has been install properly by going into the Device Manager. (See page 8 for detail.) Scanner button is not working, why? Check is the ScanPanel tray Icon next to your system clock is enabled or not. Enable it by going to Start>Programs>e+ 48U>ScanPanel How come the image being print out from the printer is so small or is so large when I press the Copy button on the scanner? Please make sure you have set the printing preferences under the ScanPanel settings. Details see page 18. When I scan an image, it become very large. Why? Large image display result by scanning in too high resolution; saved scanned image into large image format like Bitmap or Tiff…etc. to resolve this problem, reduce the resolution when scanning or save the image to a more compressed format like Jpeg or Gif. When I use the e-mail function on the scanner, it is not responding or giving mail service client error. Why? The e-mail function for the scanner will only works with Microsoft Outlook or Outlook Express program. You will need to configure your mail account to use with the mentioned program. Please contact your Internet service provider or e-mail service provider on how to configure your mail account to work with Outlook or Outlook Express. 47 Artec E+ 48U / E+ Pro Scanner Specification Scanning Area 8.5 inches x 11.7 inches Optical resolution E+ 48U – 600 x 1200 dpi E+ Pro – 1200 x 2400 dpi Maximum Resolution 19200 dpi (S/W interpolated) Scan Mode Color: 48bit (internal) Gray: 16bit (internal) Text/Line Art: 1bit Scan Method Single-pass with CIS Interface Universal Serial Bus (USB bus power) Color Depth 48bit true color Power Consumption 2.5w + 5 % Weight 1.8kg (body only) Physical Dimensions 420mm(L) 276mm(W) 42mm(H) Software Supported Twain compliant software Bundled Software Ulead Photo Express Textbridge Pro Operating System Supported Windows 95 with USB support Windows 98/ME/2000/XP 48 Declaration of Conformity According to 47CFR, Part 2 and 15 for Class B Personal Computers and Peripherals; and/or CPU Boards and Power Supplies used with Class B Personal Computers: We: Artronix Technology, Inc. Located at: 350 Ranger Ave. # C Brea, CA 92821 Telephone: (714) 854-7738 Declare under sole responsibility that the product identified herein, complies with 47CFR Part 2 and 15 of the FCC rules as a Class B digital device. Each product marketed, is identical to the representative unit tested and found to be compliant with the standards. Records maintained continue to reflect the equipment being produced can be expected to be within the variation accepted, due to quantity production and testing on a statistical basis as required by 47CFR §2.909. Operation is subject to the following two conditions: (1) this device may not cause harmful interference, and (2) this device must accept any interference received, including interference that may cause undesired operation. Trade Name: Artec Type of Product: USB Flatbed Scanner Model: e+ 48U / e+ Pro Warranty Artronix Technology, Inc. Limited Warranty What Is Covered: Artronix Technology, Inc. (“Artec”) warrants to the first end user customer of the Artec product enclosed with this limited warranty statement, that the product if purchased and used in the United States or Canada, conforms to the manufacturer’s specifications and will be free from defects in workmanship and materials for a period of one year from the date of original purchase. For warranty service, you must provide proof of the date of original purchase. What Artec Will Do To Correct Problems: Should your Artec product prove defective during the warranty period, please send in a RMA number request form available on our website or by request on Fax along with proof of the date of original purchase. Upon received of the issued RMA number, send the product securely packaged in its original container or an equivalent to the above listed address or unless specified. You are responsible for all costs (shipping, insurance, travel time) in getting the product to the facility of Artronix Technology, Inc. Artec will, at its option, repair or replace on an exchange basis the defective unit, without charge for parts or labor. When warranty service involves the exchange of the product or of a part, the item replaced becomes Artec property. The replacement unit may be new or refurbished to the Artec standard of quality, and at Artec’s option, the replacement may be another model of like kind and quality. Artec’s liability for 49 replacement of the covered product will not exceed the original retail-selling price of the covered product. Exchange or replacement products or parts assume the remaining warranty period of the product covered by this limited What This Warranty Does Not Cover: This warranty covers only normal use in the United States and Canada. This warranty does not cover damage to the Artec product caused by parts or supplies not manufactured, distributed or certified by Artec. This warranty is not transferable and will not apply to products purchased from an end user. This warranty does not cover third party parts, components or peripheral devices added to the Artec product after its shipment from Artec, e.g., dealer-added boards, chips or drives. Artec is not responsible for warranty service should the Artec label or logo or the warranty label or serial number be removed or should the product fail to be properly maintained or fail to function properly as a result of misuse, abuse, improper installation, neglect, improper shipping, damage caused by disasters such as fire, flood, and lightning, improper electrical current, software problems, interaction with non-Artec products, or service other than by an Artec Authorized Service facility or technician. If a claimed defect cannot be identified or reproduced in service, you will be held responsible for costs incurred. THE WARRANTY AND REMEDY PROVIDED ABOVE ARE EXCLUSIVE AND IN LIEU OF ALL OTHER EXPRESS OR IMPLIED WARRANTIES INCLUDING, BUT NOT LIMITED TO, THE IMPLIED WARRANTIES OF MERCHANTABILITY OR FITNESS FOR A PARTICULAR PURPOSE. SOME LAWS DO NOT ALLOW THE EXCLUSION OF IMPLIED WARRANTIES. IF THESE LAWS APPLY, THEN ALL EXPRESS AND IMPLIED WARRANTIES ARE LIMITED TO THE WARRANTY PERIOD IDENTIFIED ABOVE. UNLESS STATED HEREIN, ANY STATEMENTS OR REPRESENTATIONS MADE BY ANY OTHER PERSON OR FIRM ARE VOID. IN THE EVENT THE REMEDIES ABOVE FAIL, ARTEC’S ENTIRE LIABILITY SHALL BE LIMITED TO A REFUND OF THE PRICE PAID FOR THE ARTEC PRODUCT COVERED BY THIS LIMITED WARRANTY. EXCEPT AS PROVIDED IN THIS WRITTEN WARRANTY, NEITHER ARTRONIX TECHNOLOGY, INC. NOR ITS AFFILIATES SHALL BE LIABLE FOR ANY LOSS, INCONVENIENCE, OR DAMAGE, INCLUDING DIRECT, SPECIAL, INCIDENTAL, OR CONSEQUENTIAL LLV\IAGES, RESULTING FROM THE USE OR INABILITY TO USE THE EPSON PRODUCT, WHETHER RESULTING FROM BREACH OF WARRANTY OR ANY OTHER LEGAL THEORY. In Canada, warranties include both warranties and conditions. Some jurisdictions do not allow limitations on how long an implied warranty lasts and some jurisdictions do not allow certain exclusions or limitations on damages, so the above limitations and exclusions may not apply to you. This warranty gives you specific legal rights, and you may also have other rights which vary from jurisdiction to jurisdiction. 50