1
Trust Direct Webscan 19200
UK
TRUST DIRECT WEBSCAN 19200
User’s Manual
Version 1.0
Trust Direct Webscan 19200
Thank you
Thank you very much for purchasing this product from the Trust range. We wish you hours of fun
with it. Please read this manual carefully before using the product.
Registration
Register your purchase now at the Trust Internet site, www.trust.com, so that you are able to
receive optimal guarantee and service support. You will be automatically informed of
developments to your product and of other Trust products. You will also have the chance to win
some spectacular prizes.
Copyright statement
No part of this instruction manual may be reproduced or transmitted, in any form or by any means,
electronic or mechanical, including photocopying, recording, or information storage and retrieval
systems, for any purpose other than the purchaser's own personal use, without prior written
permission from the manufacturer.
Disclaimer statement
The manufacturer specifically disclaims all warranties, either express or implied, including, but not
limited to, implied warranties for the marketability and suitability for a particular purpose, with
respect to the software, the accompanying product manual(s) and written material, and all other
accompanying hardware. The manufacturer reserves the right to revise or make improvements to
its product at any time and without obligation to notify any person of such revisions or
improvements.
In no event shall the manufacturer be liable for any consequential or incidental damages, including
any loss of business profits or any other commercial damages, arising out of the use of its
products.
All company or product names are trademarks or registered trademarks of their respective
owners.
01 UK 12389CDMANUAL
Trust Direct Webscan 19200
Table of Contents
1.
Introduction ..................................................................................................................................... 2
1.1
Conventions used in this manual........................................................................................... 2
1.2
Contents of the package.......................................................................................................... 2
1.3
Minimum system requirements .............................................................................................. 2
2.
Safety................................................................................................................................................ 3
3.
Installation ....................................................................................................................................... 4
4.
3.1
Installation TWAIN setup program ......................................................................................... 4
3.2
Installation Fine Reader 4.0 Sprint ......................................................................................... 8
3.3
Photo Express 3.0 installation .............................................................................................. 10
3.4
Connecting the Direct Webscan 19200 to your PC............................................................. 13
Using the scanner ......................................................................................................................... 14
4.1
Direct Scan application.......................................................................................................... 14
4.2
TWAIN interface screen ......................................................................................................... 15
4.3
TWAIN settings....................................................................................................................... 20
4.3.1
Scan Mode Settings (Main)............................................................................................. 20
4.3.2
Advanced Settings (Enhance)........................................................................................ 21
4.3.3
Image Settings (Filters)................................................................................................... 22
5.
Maintenance .................................................................................................................................. 23
6.
Troubleshooting............................................................................................................................ 24
7.
Specifications ................................................................................................................................ 27
8.
Trust Customer Care Centres ...................................................................................................... 28
1
UK
Trust Direct Webscan 19200
1. Introduction
This instruction manual is intended for users of the Trust Direct Webscan 19200. Some prior knowledge of
computers is necessary for installing this product. If you have any questions, please consult one of the Trust
Customer Care Centres. You can find more information about these Customer Care Centres on the last page
of this electronic manual, as well as at the back of the quick installation manual.
1.1
Conventions used in this manual
The following conventions have been used in this manual to indicate instructions:
<key>
Here you should press a key. The name of the key is given between brackets.
‘System’
This is a specific term used in a program. These are the terms used by, for example,
Microsoft Windows 98.
[DIR]
Key in the text shown in square brackets [….].
{term}
The text between the parentheses {….} is the English term, e.g. {File} used in the figure
referred to.
Additional information will be shown as follows:
NOTE:
If you connect the scanner to a USB HUB, then the USB HUB should have its own power supply.
The examples assume that the letter “D” has been assigned to your CD-ROM drive. If your system uses a
different drive letter for your CD-ROM drive, for example “E”, you should replace “D” by “E”.
1.2
Contents of the package
Check the contents of the package. It must contain:
• Scanner;
• USB cable;
• CD-ROM with setup programs and applications;
• CD-ROM with Photo Express 3.0;
• Quick installation manual.
If anything is missing or damaged, please contact one of the Trust Care Centres. You can find more
information at the back of this instruction manual.
1.3
Minimum system requirements
• Intel Pentium 166MMX CPU
• 1 free USB port
• 16 MB memory
• 100 MB free hard disk space (extra HDD space necessary for applications)
• 4 Speed CD-ROM player
• Windows 98, ME or 2000
2
Trust Direct Webscan 19200
2. Safety
Read the following instructions carefully before use:
1.
Do not use this equipment in humid environments such as bathrooms, damp basements, swimming
pools, etc.
2.
Never insert objects into the openings on the outside of the device as you can come into contact with live
electrical components. This can cause fire or give strong electrical shocks.
3.
Do not try to repair the equipment yourself. When opening or removing the casing you may accidentally
come into contact with live parts. There are other risks as well.
4.
Under the following circumstances have the device repaired by qualified personnel:
a) The cable or plug is damaged or worn;
b) Liquid has entered the device;
c) The device has fallen and/or the casing has been damaged.
5.
Position the device so that the cables cannot be damaged.
3
UK
Trust Direct Webscan 19200
3. Installation
Note:
3.1
To install Trust Direct Webscan 19200, you must first install the software and then connect the
scanner to the USB port of the scanner.
Installation TWAIN setup program
1.
Make sure Windows is started up.
2.
Insert the CD-ROM with setup programs and applications in your CD-ROM player.
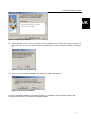
3.
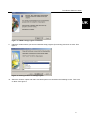
The CD-ROM automatically starts up the Trust Software Installer (see figure 2). If yours does not start
up automatically, select ‘Run’ in the Windows start menu. See figure 1.
Figure 1: starting up installation
4.
Type in [D:\SETUP.EXE] and click on ‘OK’ to start up the Trust Software Installer.
Figure 2: Trust Software Installer
5.
In the left window, select the language you wish to use during installation. See figure 2.
6.
Click on the ‘Direct Webscan 19200’ button to start up installation of the TWAIN setup program.
7.
Select the language version of the TWAIN setup program you want and click on ‘OK’.
8.
Click on ‘Next’ to continue installation. See figure 3.
4
Trust Direct Webscan 19200
UK
Figure 3: TWAIN setup program installation
9.
Indicate a location where you want to install the setup program (if necessary) and click on ‘Next’. See
figure 4.
Figure 4: entering location of setup program
10. Select the ‘Custom’ option and make sure both options are checked in the following screen. Then click
on ‘Next’. See figure 5.
5
Trust Direct Webscan 19200
Figure 5: selecting the necessary options
11. Indicate a location where the program icons will be located (if necessary) and click on ‘Next’. See figure
6.
Figure 6: indicating program icon location
12. Click on ‘Start Install’ to copy the files to the location indicated. See figure 7.
6
Trust Direct Webscan 19200
UK
Figure 7: beginning installation
13. After installation, click on ‘Yes’ if your want to view the hardware tour, in which the scanner connection is
presented. Click on ‘No’ if you want to skip the hardware tour in order to complete installation. See figure
8.
Figure 8: Follow the hardware tour
14. Click on ‘OK’ to complete installation and restart your system. See figure 9.
Figure 9: completing installation
You have completed installation of the setup program. For installation of the necessary software and
connecting the scanner, proceed with the following chapters.
7
Trust Direct Webscan 19200
3.2
Installation Fine Reader 4.0 Sprint
For the complete operation of the OCR function (Optical Character Recognition) of the scanner, you need to
install the application Fine Reader 4.0 Sprint. Fine Reader is a program to scan text and to convert it to a text
document. This can subsequently be processed in a word processing program. A very detailed manual of the
program can be found on the CD-ROM and can be started easily from the Trust Software Installer menu. See
figure 2.
Follow the directions below for the installation:
1.
Follow steps 1 to 5 of chapter 3.1 once again to start the Trust Software Installer.
2.
Click on the ‘Fine Reader 4.0 Sprint’ button to start the installation.
3.
Select the language you want to use for the installation and click on ‘Next’.
4.
Click on ‘Agree’ to accept the license agreement and continue installation.
5.
Enter your name and, if you wish, your company name and click on ‘Next’. See figure 10.
Figure 10: enter personal data
6.
Click on ‘Next’ once again to confirm your data.
7.
Click on the ‘Full installation’ button to install all options. See figure 11.
Figure 11: installing the selected options
8.
8
Indicate a location where you want FineReader to be installed and click on ‘Next’. See figure 12.
Trust Direct Webscan 19200
UK
Figure 12: indicating program file location
9.
Click on ‘Next’ once more to confirm the location indicated.
10. Click on ‘Go’ to copy the program to the indicated location. See figure 13.
Figure 13: beginning copying files
11. After installation you will be given the opportunity to register online. Click on ‘Skip’ to skip the registration
See figure 14.
Figure 14: skipping online registration
9
Trust Direct Webscan 19200
12. You have completed installation. Click on ‘OK’ to finish installation.
3.3
Photo Express 3.0 installation
The enclosed Ulead Photo Express 3.0 SE enables you to process your scanned images extensively, for
instance:
-
Changing and adding colours;
-
Adding text to the image;
-
Implement various effects in the image, such as ‘Morphing’, for example;
-
Creating postcards and greeting cards from the image;
-
etc.
For an extensive description of all possibilities of this program, see the Ulead Photo Express user manual.
After installing the program you can find this manual in the Windows Start menu at the location ‘Start programs - Ulead Photo Express 3.0 SE - Screenbook’.
Note:
The extensive Ulead Photo Express manual can also be simply selected in the menu, which starts
up automatically when inserting Ulead CD-ROM; the program also includes an extensive help
function.
Follow the directions below for the installation:
1.
Place the Ulead Photo Express 3.0 CD-ROM in your CD-ROM player.
2.
The installation screen of this program starts automatically. If this does not happen in your case, go to
‘Start - Perform’ and type in [D:\SETUP.EXE]. Then click on ‘OK’.
3.
Click on ‘Install’ in the menu to start the installation.
4.
Select the language you wish to use during the installation and click on ‘OK’.
5.
Click on ‘Next’ to continue with the installation. See figure 15.
Figure 15: installation Ulead Photo Express 3.0 SE
6.
10
Click on ‘Yes’ to accept the license agreement and continue installation. See figure 16.
Trust Direct Webscan 19200
UK
Figure 16: accepting the license agreement
7.
If you wish, indicate a location for Photo Express to be installed and click on ‘Next’. See figure 17.
Figure 17: indicating program file
8.
Click on the ‘Typical’ button to install the selected program options. See figure 18.
11
Trust Direct Webscan 19200
Figure 18: selecting the program options you want
9.
If you wish, indicate a location for the program icons and click on ‘Next’. See figure 19.
Figure 19: indicate location for program icon
10. Click ‘Next’ once more to confirm all settings
11. After installation, switch off the ‘Online registration’ option to skip registration and click on ‘Finish’ to
complete the installation. See figure 20.
12
Trust Direct Webscan 19200
UK
Figure 20: cancelling online registration and completing installation
12. Click on ‘OK’ to close the information screen.
13. Click on ‘Finish’ to restart your system. See figure 21.
Figure 21: completing installation and restarting the system
You have completed installation of Ulead Photo Express 3.0 SE. Proceed to the following chapter.
3.4
Connecting the Direct Webscan 19200 to your PC.
Connect the scanner after installing the software.
A USB appliance is hot-swappable. This means that the appliance can be connected to and disconnected
from your computer while this is switched on.
1. Ensure that Windows has been started up.
2. Connect one end of the enclosed USB cable to the scanner.
3. Connect the other end of the USB cable to a free USB port of the computer.
4. The new hardware is found and the scanner is automatically installed.
Your scanner is now ready for use.
13
Trust Direct Webscan 19200
4. Using the scanner
You can scan in 2 ways with the Trust Direct Webscan 19200, i.e. via the Direct Scan application (easiest)
and via the TWAIN interface screen (more possibilities). For using the scanner, see the chapters below:
4.1
Direct Scan application
The ‘Direct Scan’ application is the easiest way to scan. You can scan a photo or document and open them in
a photo-processing program (Photo Express), open them in an OCR application (Fine Reader), print them on
your printer or send them by e-mail with one push of the button, in combination with the buttons on the
scanner. Follow the instructions below:
1.
After the installation of the software, a ‘Direct Scan’ icon will appear on the Windows task bar. If the icon
does not appear, go to ‘Start - Program’s - Trust - Direct Webscan 19200’ and select ‘Direct Scan’ in the
menu.
The scanner buttons can now be used to scan.
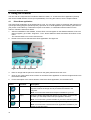
2.
Double click on this to start the Direct Scan application. See figure 22.
Figure 22: Direct Scan application
3.
Place an image with the part to be scanned on the glass plate and close the cover.
4.
Click on one of the buttons of the scanner or the Direct Scan application to scan the image and send it to
the location indicated.
5.
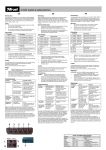
For the description of the various buttons of the Direct Scan application, see the table below:
Button
Function
Description
A
Scan
Scans the image and sends this directly to the application Photo
Express in which the image can be processed and stored in the
computer.
Note: You must have Ulead Photo Express installed on your PC.
B
Copy
Scans the image and sends this directly to your printer. A new screen
on which you can adapt various set-ups appears in advance.
Note: You must have a printer installed on your PC to use this option.
C
Fax
Scans the image and sends this directly to your fax application.
Note: You must have a modem and a fax application installed on your
system to use this option.
14
Trust Direct Webscan 19200
Button
Function
Description
D
E-mail
Scans the image and sends this directly to your standard e-mail
program. The image is attached as JPG file to your mail.
E
OCR
Scans the document with text and sends this to your standard OCR
application (Fine Reader 4.0 Sprint), where the document is converted
to a text file. The text file can now be processed with a word processor.
Note: You must have FineReader Sprint installed on your system.
F
Exit
Closes the Direct Scan application.
G
Personal Style With this button you can change various Windows components as you
wish; alter your start-up screen, desktop, system logo, screensaver,
closing screen, mouse indicator, etc.
H
Help
Starts the help function of the Direct Scan application.
I
Settings
Changes the settings of the Direct Scan application. Here you can
change the scan, OCR and e-mail settings.
For a more detailed description of the various options of the ‘ScanPanel’ application, consult the help function
(H).
4.2
TWAIN interface screen
The TWAIN interface screen provides you with very extensive possibilities for changing your scan settings.
You can open the TWAIN window by selecting it from the Windows Start menu or by selecting it from
TWAIN-compatible applications such as Ulead Photo Express. Follow the instructions below:
Note:
The Ulead Photo Express manual is on the CD-ROM enclosed; the program also includes an
extensive help function.
1.
Start up the ‘Ulead Photo Express’ program.
2.
The ‘Device Type’ screen will appear once. Select the ‘Flatbed scanner’ option to select the Trust Direct
Webscan 19200 and click on ‘OK’. See figure 23.
Figure 23: selecting the scanner
3.
The Photo Express main screen will appear. Click on the ‘Get’ button and then select ‘Scanner’. See
figure 24.
15
UK
Trust Direct Webscan 19200
Figure 24: requesting the scanner in Photo Express
4.
A number of scanner options will appear in the Photo Express window on the right. At ‘Select data
source’ (A), select ‘Trust Direct Webscan 19200’. See figure 25.
Figure 25: activating the scanner
16
Trust Direct Webscan 19200
5.
Indicate a name for the image to be scanned at ‘File name’ (B). See figure 25.
6.
Indicate a file format for the image to be scanned at ‘File type’ (C). See figure 25.
7.
Click on the ‘Acquire’ button (D) to request the TWAIN interface screen of the scanner. See figure 25.
8.
Click on the ‘Preview’ button in the TWAIN interface screen to create a scan preview of the image on the
glass plate. This will be visible in the window on the right. See figure 26.
Figure 26: TWAIN interface screen
9.
A dotted line will appear automatically around the scan preview of the image. This is the area that will be
used when creating the scan. You can also select a scan area yourself by dragging the mouse across
the scan preview. (Keeping the left mouse button pressed down).
10. Change the settings in the left window to your liking and then click on the ‘Scan the image’ button to
scan the selected scan area with your settings. For the various TWAIN settings, see chapter 4.3.
11. When the scan has been created, close the TWAIN interface screen. The scanned image will have
automatically been sent to the work Photo Express window. Double-click on the image in order to
process it. See figure 27.
17
UK
Trust Direct Webscan 19200
Figure 27: processing the scanned image
12. Click on the ‘Share’ button and select the ‘Save’ option to save the image. See figure 28.
Figure 28: saving the scanned image
13. Indicate the location (A), file name (B) and file format (C) and click on the ‘Save’ button (D) in the righthand Photo Express window. See figure 29.
18
Trust Direct Webscan 19200
UK
Figure 29: image data
You have completed creating a scan. See the Ulead Photo Express manual for a description of all the
possibilities of this program. The manual can also be simply selected from the menu, which starts up
automatically when inserting the Ulead CD-ROM in your CD-ROM player.
19
Trust Direct Webscan 19200
4.3
TWAIN settings
There are several buttons (see figure 26) in the TWAIN interface screen. See the table below for the
description of the buttons:
Button
Function
Selection framework (Cropping
Tool)
Select the area in the preview window.
Zoom (Zoom)
Enlarging or reducing the image in the preview window.
Batch scan
Create several scans of a random part of the document.
Language
Setting the TWAIN language on the screen.
Help
Information about the scanner and the software functions.
Exit
Close the TWAIN dialog window.
Preview
Scan preview
Scan
Creating a scan of the selected area and settings
Load
Load the settings
Save
Save the settings
Previous
Reload the previous settings
Reset
Reset the standard settings
Info
Provides information about the settings
The TWAIN interface screen also includes a number of menus for the various settings. For the description of
the various menus, see the chapters below.
4.3.1
Scan Mode Settings (Main)
The ‘Main; Scan Mode Settings’ menu includes the settings necessary for specifying scan parameters (see
figure 26). For the various possibilities, see the table below:
Function
Options
Description
Scan mode
LineArt
•
Scanning texts.
•
Scanning black/white drawings.
•
Using OCR-software.
•
Scanning images with greyscale.
•
Scanning a colour original, which must
be converted to greyscale.
Greyscale (Grey)
Colour (Colour)
Scanning images in colour.
24 or 48 bits
Scan Source
Overview*
Scanning an image which is not transparent
(e.g. a photo)
Scan Size
A4
Set scansize to 21 x 29.6 cm
A5
Set scansize to 14.8 x 21 cm
20
Trust Direct Webscan 19200
Function
Resolution
Descreen
Colour Match
Options
Description
Letter
Set scansize to 8.5 x 11 inches
Custom
Determine the scan area in the selection
window yourself.
50 - 19200
Selecting programmed resolutions.
Custom
Inputting a custom resolution between 50
and 19200 DPI. (Only whole numbers)
None
No descreen pattern set
Newspaper
Set descreen pattern for newspaper
Magazine
Set descreen pattern for magazine / printed
matter.
Art magazine
Setting descreen pattern for printed
artwork.
Switched on
Present true image colours.
Switched off
Larger range of colours. Image may deviate
from the original.
Colour Balance
Balancing the colours between the brightest and darkest colours.
Scaling
Enlarging or reducing the format of the image.
Width & Height
Present the height and width of the selected area.
Image Size
Indicates the computer memory or hard disk space necessary for
scanning / saving the selected area.
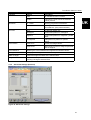
4.3.2
UK
Advanced Settings (Enhance)
Figure 30: Advanced settings
21
Trust Direct Webscan 19200
The ‘Enhance; Advanced settings’ folder includes settings you can apply to the image of the original before
you create the final scan.
This folder also contains 2 small images of the scan preview. All changes made in this folder are visible in the
image on the right. For the various settings, see the table below:
Function
Options
Description
Channel selection
Master
Adding or reducing all colours equally.
Red, Green or Blue
Adding or reducing the quantity of the
colour selected.
Brightness
Setting the image brightness.
Contrast
Setting the image contrast.
Level
Setting the level of brightness, medium tones and shadows
Curve
Improving the image quality of greyscale and colour images.
Hue
Adapting red, yellow, green, blue, violet.
Saturation
Setting the purity of a colour. .
4.3.3
Image Settings (Filters)
Figure 31: Monitor calibration
The ‘Filters; Image Settings’ folder includes settings which enable you to obtain special effects. This folder
also contains 2 small images of the scan preview. The selected effect becomes visible in the image on the
right. For the various settings, see the table below:
Options
Description
None
Standard setting. No filter switched on.
22
Trust Direct Webscan 19200
Blur
Reduces the sharpness of the image.
Sharpen
Bringing more detail to blurry images.
Invert
Converting colours into their complement.
Flip
Flipping the image horizontally.
Emboss
Dropping or raising components.
Unsharp Mask
Looks for angles in the image and emphasises them.
UK
5. Maintenance
Clean the glass plate regularly with a soft clean cloth to remove dust, fingerprints and other dirt. A clean glass
plate is important because all the dirt on the glass plate becomes visible in the scanned image.
Note:
Do not use any aggressive fluids, liquid cleansers or sprays to clean the scanner/glass plate.
23
Trust Direct Webscan 19200
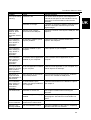
6. Troubleshooting
Problem
Cause
Scanner does not
function after being
connected to USB
port.
Scanner connected to the USB Remove the scanner from the USB port, first install
port of the computer before the the TWAIN setup program and the applications,
TWAIN setup programs were and then connect the scanner. See chapter 3.
installed.
If the scanner was connected to an ISB port first,
refer to the setup program (inf-file) from the
directory ‘Win98’, ‘WinMe’ or ‘Win2000’ of the CD.
Then install the TWAIN and applications.
Scanner cannot be You have no ‘administrator’
installed in
rights to the Windows 2000
Windows 2000.
system.
Windows does not
detect any new
hardware after the
scanner is
connected.
Possible solution
Make sure you are logged on as ‘administrator’
before installing the scanner
The USB port is switched off in Consult the manual of your computer for switching
the BIOS of your computer.
on the USB port.
The scanner has already been Start up the computer in the safe mode, delete all
partially installed in your
setup program files of the scanner and restart the
computer.
computer.
The computer does Scanner is not correctly
not recognise the
connected to the computer.
scanner.
Wrong Windows version in the
computer.
Connect the scanner to the USB port of the
computer correctly (see chapter 3).
The USB scanner will not function in Windows 95
and NT. Only use the scanner in Windows 98, Me
or 2000.
The error report
USB cable is not correctly
Connect the USB cable correctly. See chapter 3.
‘The scanner is not connected.
connected’
The setup program of the
Reinstall the TWAIN setup program. See chapter
appears.
scanner has not been installed 3.
correctly.
The scan
command is not
carried out.
Scanner not correctly
connected to the computer.
Check whether the scanner is connected correctly.
See chapter 3.
Computer crashes
when using USB.
USB scanner interferes with
other USB devices.
Set the other devices to a different address in the
BIOS of the computer or switch them off. Consult
the manual of your computer for this.
Scan result is too
dark.
Monitor is set too dark.
Change the monitor’s brightness.
The number of colours of your
screen is set too low.
Set your screen adapter to a minimum of 65,535
colours (16 bits)
Resolution set too low.
Set the resolution to a minimum of 300 DPI.
Number of colours of your
screen adapter is set too low.
Set your screen adapter to a minimum of 65,535
colours (16 bits).
Scan result is poor
quality.
Surface of the glass is dirty. All Clean the glass of the scanner thoroughly. See
dirt on the glass plate is visible chapter 5.
in the image.
Scanner functions
slowly.
24
Set for a very high resolution.
In practise, a resolution of 600dpi, at maximum, is
sufficient. Use higher solutions only for small
original images.
Insufficient memory.
You need a minimum of 16MB RAM memory.
32MB or more is recommended.
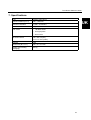
Trust Direct Webscan 19200
Problem
Cause
Possible solution
Error report during
scanning.
Hard disk is full.
You need 3 times the space of the image to be
scanned as free space on the hard disk. Free up
more space on the hard disk or select a lower
resolution.
Resolution is too high.
In practise, a resolution of 600dpi, at maximum, is
sufficient. Use higher solutions only for small
original images.
Question mark
visible in ‘Direct
Scan’ icon,
application doesn't
start.
Scanner is not correctly
connected to the USB port.
Connect the scanner correctly to the USB port. See
chapter 3.
Error notification
when clicking on
‘Scan’ button in
Direct Scan
application.
No operation software (Photo
Express) installed.
Install the processing software Ulead Photo
Express. See chapter 3.
Error notification
when clicking on
‘Copy’ button in
Direct Scan
application.
No printer installed on your
computer.
Install a printer on your computer.
Error notification
when clicking on
‘Fax’ button in
Direct Scan
application.
No modem and fax-application Install a modem and fax-application on your
installed on your computer.
computer.
Error report when
clicking on ‘E-mail’
button in Direct
Scan application.
No E-mail application installed
in your computer.
Install an E-mail application in your computer, e.g.
Outlook Express or Netscape.
USB printer no
longer functions
after installation of
USB scanner.
Setup program of the scanner
may cause problems.
First uninstall the printer and scanner, install the
scanner, then reinstall the USB printer.
Error notification
when clicking on
‘OCR’ button in
Direct Scan
application.
No OCR-software (Fine
Install the OCR-software ‘Fine Reader 4.0 Sprint’.
Reader 4.0 Sprint) installed on See chapter 3.
your computer.
Poor OCR result.
Resolution is set too low.
Use a higher resolution when scanning the
document.
Incorrect recognition language
installed.
Install the necessary recognition languages for the
OCR program. See manual of ‘Fine Reader 4.0
Sprint’.
Scanner doesn't
work in notebook.
Battery voltage of notebook is
insufficient for USB scanner.
Use an external USB-hub with mains adapter.
Scanner is not
correctly installed.
Anti virus software is active.
During the installation of the scanner, temporarily
disconnect the anti virus software.
25
UK
Trust Direct Webscan 19200
Problem
Cause
After use of a USB A USB cable may be
extension cable the maximum 3 to 5 metres long.
scanner no longer
works
Possible solution
Remove the USB extension cable.
Check the FAQ's on the Internet (www.trust.com). You can also register your product at www.trust.com so
that you can receive optimal guarantee and service support.
You will be automatically informed of developments to your product and other Trust products. You will also
have the chance of winning some spectacular prizes.
If you still have problems after trying these solutions, please contact one of the Trust Customer Care Centres.
You can find more information at the back of this instruction manual. Please have the following information
available:
• The article number. This is: 12389
• Control system
• Hardware configuration:
CPU (MHz)
Memory (MB)
Free space on hard disk (MB)
Screen adapter: resolution and number of colours
• Scanner settings:
Scan mode (colour: grey, black-white)
Resolution (DPI)
Send to (application, printer, etc.)
Size (A4, B5, etc.)
• TWAIN interface version (see readme.txt on the CD-ROM)
Name and version of the application software.
• A good description of what precisely does not work.
• A good description of when precisely the problem takes place.
26
Trust Direct Webscan 19200
7. Specifications
Type
Flatbed, CIS scanner
Optical resolution (H x V)
600 x 1,200 DPI
Maximum resolution
19,200 x 19,200 DPI
Scan Method
Single Pass
Scan mode
•
1 bit black-white
•
12 bit greyscale
•
48 bit colour
Document format
UK
216 x 297 mm (A4)
8.5 x 11.7 inch (Letter)
Interface
USB
Dimensions (B x H x L)
269 x 52 x 414 mm
Weight (not including
packaging)
2.0 Kg
27
Trust Direct Webscan 19200
8. Trust Customer Care Centres
Inhabitants of Great Britain and Ireland should contact:
GB Office
Internet
www.trust.com
From:
E-mail
[email protected]
9:30 – 17:00
Fax
+44-(0)1376-514633
Tel.
+44-(0)1376-500000
Inhabitants of Italy should contact:
Italian Office
From:
Internet
www.trust.com
[email protected]
9:00 – 13:00 E-mail
Fax
051-6635843
/ 14:00 –
Tel.
051-6635947
18:00
Inhabitants of France and North Africa should contact:
French Office
From:
Internet
www.trust.com
[email protected]
9:00 – 17:00 E-mail
Fax
+33-(0)1-48174918
Tel.
+33-(0)803-083080
Inhabitants of Germany should contact:
German Office
From:
Internet
www.trust.com
[email protected]
9:00 – 17:00 E-mail
Fax
02821-58873
Tel.
0800-00TRUST (=0800-0087878)
Inhabitants of Spain should contact:
Spanish Office
From:
Internet
www.trust.com
[email protected]
9:00 – 17:00 E-mail
Fax
+31-78-6543299
Tel.
+31-902 160937
Inhabitants of the Netherlands should contact:
Dutch Office
From:
Internet
www.trust.com
[email protected]
9:00 – 17:00 E-mail
Fax
078-6543299
Tel.
0800-BELTRUST (=0800-23587878) of 078-6549999
Inhabitants of all other European countries should contact:
European Head Office
From:
Internet
www.trust.com
[email protected]
9.00 – 17.00 E-mail
Fax
+31-78-6543299
Tel.
+31-78-6549999
28