1
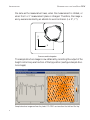
Operating Instructions
easyScan DFM
(Version 1.1)
1
TEXT & LAYOUT: ROBERT SUM, PIETER VAN SCHENDEL
ENGLISH: VICKI CONNOLLY
‘NANOSURF’ AND THE NANOSURF LOGO ARE TRADEMARKS OF NANOSURF AG, REGISTERED AND/OR
OTHERWISE PROTECTED IN VARIOUS COUNTRIES.
© JAN. 2003
2
BY
NANOSURF AG, SWITZERLAND, PROD.:BT00963, R1.3
Table of contents
Introduction
5
What is DFM? ....................................................................................... 5
Scanning with the ‘easyScan DFM’ ...................................................... 7
(Un)packing and Installation
9
Unpacking the instrument ................................................................... 10
Storing the Instrument ........................................................................ 12
Hardware installation .......................................................................... 13
Software installation ............................................................................ 15
System requirements
15
Installation Procedure
15
Simulated microscope
18
Preparing for Measurement
19
Installing the sensor ............................................................................ 19
Selecting a sensor
20
Inserting the sensor in the scan head
20
Installing the sample ........................................................................... 23
Preparing the Sample
23
Stand-alone measurements
24
The small sample stage
25
A First Measurement
26
Starting the microscope ...................................................................... 26
Approaching the sample ..................................................................... 28
1. Coarse approach by hand
28
2. Fine approach by linear motor
29
3. Automatic final approach
30
Starting a measurement ..................................................................... 31
Adjusting the sample’s tilt coordinates ............................................... 32
Optimising resolution .......................................................................... 34
Snapshots of images ........................................................................ 37
Judging the quality of the images ....................................................... 38
Finish measuring ................................................................................ 39
Maintenance
40
Scan head
Scan electronics
40
40
3
Problems and Solutions
Sensor Fail LED
Image quality suddenly deteriorates
‘No connection to microscope!’
Technical Data
4
41
41
41
42
43
WHAT IS DFM?
INTRODUCTION
Introduction
This manual gives instructions on how to set up and use your easyScan
DFM system. This introduction chapter gives some general information on
the atomic force microscopy technique, and its implementation in the easyScan DFM. The next chapter, (Un)packing and Installation, should be read
when installing your easyScan system. The chapters Preparing for Measurement and A First Measurement should be read by all users, because they
contain useful instructions for everyday measurements. The other chapters
give more information for advanced users. Those who need a more detailed
description of the functions of the easyScan software should refer to the
Software Reference manual.
What is DFM?
Microscopy is one of the most exciting scientific techniques. The insight
into small dimensions has led to a new understanding of the structure of
materials and forms of life.
With the invention of the scanning tunnelling microscope (STM) in the
early eighties it became possible to look into the fascinating world of atoms. The STM was developed by Gerd Binnig and Heinrich Rohrer in the
early 80’s at the IBM research laboratory in Rüschlikon, Switzerland. For
this revolutionary innovation Binnig and Rohrer were awarded the Nobel
prize in Physics in 1986.
However, the STM technique is restricted to electrically conducting surfaces. A further development of the STM called the Atomic Force Microscope (AFM) was developed by Gerd Binnig, Calvin Quate and Christoph
Gerber. The AFM extended the abilities of the STM to insulating material.
Both the AFM and the STM microscopy techniques works without optical
focusing elements. Instead, a small sharp probing tip is scanned very closely
across the sample’s surface. The distance between the tip and the sample
surface is so small, that atomic-range forces act between them. The tip is
attached to the end of a cantilever in order to measure these forces. The
force acting on the tip can then be determined by detecting the deflection
of this cantilever.
5
WHAT IS DFM?
INTRODUCTION
The measurement of the cantilever deflection can be used to control the
tip-surface distance on an atomic scale. Thus, an enormous resolution can
be achieved, such that even atomic arrangements of surfaces can be ‘probed’.
This measurement is a so-called static measurement mode, in which the
static deflection of the cantilever is used. Generally, the forces acting on the
tip will cause it to snap onto the sample, which result in an effective, nanometer-range flattening of the tip, and friction and stiction between the tip
and the sample.
To circumvent the aforementioned problems, the so-called dynamic measurement modes can be used, as was already pointed out by the AFM’s inventors. The cantilever is vibrating during the operation in these
measurement modes. In the dynamic modes, changes in the free resonance
frequency and the damping of the cantilever vibration caused by the forces
between the tip an the cantilever can be measured, and used for a controlling the tip-sample distance.
However, ultra-clean and flat surfaces prepared in highly sophisticated
vacuum systems were needed to achieve atomic resolution. Nevertheless,
even measurements in air can already give useful results for many technically relevant surfaces. In this manual, the use of the dynamic modes in air,
on technically such surfaces will be described.
easyScan
electronics
DFM system: Computer, Cantilever with deflection measurement system scanning the sample.
6
SCANNING WITH THE ‘EASYSCAN DFM’
INTRODUCTION
Scanning with the ‘easyScan DFM’
The easyScan dynamic force microscope (DFM) is an atomic force microscope that can be used in both static and dynamic operating modes. The
AFM sensor is a microfabricated cantilever with an integrated tip mounted
on a sensor holder chip (see figure Cantilever).
....
Cantilever: 228 µm long microfabricated silicon cantilever with integrated tip
When the sensor tip comes in contact with the sample, a repulsive force acts
on it, that increases with decreasing tip-sample distance. In the static force
operating mode, the cantilever bending due to the force acting on the tip is
measured using a laser beam deflection system.
In dynamic operating modes, the cantilever is excited using a piezo element. This piezo is oscillated with a fixed amplitude at an operating frequency close to the free resonance frequency of the cantilever. The repulsive
force acting on the tip will increase the resonance frequency of the cantilever. This will cause the vibration amplitude of the cantilever to decrease.
The vibration of the cantilever is also detected using the laser beam deflection system.
The measured laser beam deflection or cantilever vibration amplitude can
now be used as an input for a feedback loop that keeps the tip-sample interaction constant by changing the tip height. The output of this feecback
loop thus corresponds to the local sample height.
The tip scans parallel to the sample in order to measure the sample height at
different positions. The directions of the x- and y-axes of the scanner are
shown in the figure Scanner coordinate system. The scanner axes may not be
7
SCANNING WITH THE ‘EASYSCAN DFM’
INTRODUCTION
the same as the measurement axes, when the measurement is rotated, or
when the X or Y measurement plane is changed. Therefore, the image xand y-axes are denoted by an asterisk to avoid confusion (i.e. X*, Y*).
y
x
Scanner coordinate system
The sample structure image is now obtained by recording the output of the
height control loop as a function of the tip position (see figure Sample structure images).
Sample structure images: surface of a plastic CD-ROM as views from the ‘side’ and the ‘top’
8
(UN)PACKING AND INSTALLATION
(Un)packing and Installation
In the following sections describe the installation of the easyScan DFM.
Important!
To make high quality measurements, the following precautions must be
taken to keep equipment clean:
• Never touch the sensor tips, the cantilevers (figure Components, 15), or
the open part of the scan head (figure Components, 9).
• Ensure that the surface to be measured is free of dust and possible residues.
• Note that the scan head is fixed onto the small-sample stage by three
levelling screws (figure Scan head mounting, left). ALWAYS secure the
scan head in this way for transportation or storage.
Scan head mounting: left: transport position - right: operating position
9
(UN)PACKING AND INSTALLATION
UNPACKING THE INSTRUMENT
Unpacking the instrument
Before unpacking the instrument suitcase, check for the following items:
1
2
5
9
6
12
13
a
b
7
8
11
10
15
14
c
16
d
e
Components: The easyScan DFM system
10
4
3
UNPACKING THE INSTRUMENT
(UN)PACKING AND INSTALLATION
The easyScan DFM system consists of the following components:
1 - Power supply LPS-1
2 - Mains cable
3 - Cable, connects the easyScan SPM electronics to the DFMDrive
4 - RS232 cable, connects the easyScan SPM electronics to the computer’s
serial port
5 - Helix cable, connects the DFM scan head to the DFMDrive
6 - Small sample stage
7 - easyScan SPM electronics
8 - DFMDrive electronics
9 - DFM scan head
10 - Software installation disks
11 - HeadGuard
12 - Sample holder
13 - Protection feet
14 - XYZ calibration grid
15 - 2 Sets of 10 sensors (1x type NCLR, 1x type CONTR)
16 - DFM tool set containing: a: DropStop - b: sensor insertion tool - c:
Allen key - d: tweezers - e: screwdriver. The sensor insertion tool is normally mounted inside the DropStop.
- A calibration certificate for your DFM scan head and electronics
- Software Reference manual
- This Operating Instructions manual
- Instrument suitcase
In addition, a computer is needed that meets the requirements described in
the section Software Installation.
11
(UN)PACKING AND INSTALLATION
STORING THE INSTRUMENT
Storing the Instrument
If you have to send in the instrument, transport it or if you are not using it
for some time, please pack it in the instrument suitcase. Then the instrument is protected from dust, and the rubber feet of the sample stage (vibration isolation) are relieved.
- Turn off the instrument as described in the section finish measuring, and
remove all cables.
- Fix the microscope in the transport position and fix the HeadGuard with
its two screws (see figure Scan head mounting).
- Pack all components as shown in figure Packing.
Important!
Before transport, always secure the microscope to the small sample stage,
and put it in the original nanoSurf case.
Packing: The DFM system packed in the instrument suitcase
12
(UN)PACKING AND INSTALLATION
HARDWARE INSTALLATION
Hardware installation
Important!
- Please check that your local mains voltage corresponds to that of the power
supply (figure Components, 1).
- Make sure that your mains connection is protected against excess voltage
surges.
- Choose a steady table where you can work undisturbed. To ensure optimal operation of the DFM it has to be isolated from vibrations, heat
emission and air current. We also recommend covering the instrument
with a box to shield it from ‘near infrared’ light from artificial light sources,
because this light may cause noise in the cantilever deflection detection
system. If the vibration isolation of your table is insufficient for your
measurement purposes, an optional active vibration isolation table is available.
Measurement setup: complete with small sample stage
13
(UN)PACKING AND INSTALLATION
HARDWARE INSTALLATION
- Keep the DFM scan head (figure Components, 9) in the transport position
(figure Scan head mounting: left) on the small sample stage (when using
small sized samples) (6). Fix the helix cable (5) to the plug using the
screwdriver (16 e). The helix cable is used to isolate the scan head from
vibrations of the table it is standing on. Take care that it is lying loosely on
the table to ensure proper operation, and avoid stretching it.
- Connect the helix cable (5) to the DFMDrive electronics (8).
- Connect the SPM Electronics (7) to the DFMDrive (8) using cable (3).
- Make sure your computer is turned off. Then connect the SPM electronics (7) to a free serial port (COM-Port) on your computer with the RS232
cable (4). If you are using the ‘USB adapter for easyScan electronics’, DO
NOT connect it.
- Connect the power supply (1) to the SPM electronics (7). For optimal
system performance, put the power supply some distance away from the
instrument and the electronics.
- Plug in the power supply (1) with the mains cable (2) and turn it on.
- Finally remove the HeadGuard (11) and unscrew the scan head, and put
it in the operating position (figure Scan head mounting: right)
Warning !
This product contains a
Class 1 Laser
Invisible laser radiation !
The laser is located behind the sensor.
Although the optical power should do no damage when the instrument is
assembled, avoid looking directly into the laser beam.
Laser source information:
Wavelength: 830 nm
Optical power: <0.4 mW
Class one Laser
14
SOFTWARE INSTALLATION
(UN)PACKING AND INSTALLATION
Now the electronics and the microscope are connected. The Power LEDs
in the Nanosurf logo should now be flashing and remain flashing until the
control electronics has been initialized. The sensor status LEDs can be ignored for now.
Software installation
System requirements
The System requirements for the easyScan E-Line software are:
• PC with a Pentium 133 MHz processor or higher
• a free COM-Port or USB port.*
• Windows 95 or higher
• 8 MB RAM or more (16 MB recommended)
• graphics adapter with 800 x 600 resolution and 16-bit colours (‘high
color’) or better (resolution of 1024 x 768 recommended)
* The Nanosurf ‘USB Adapter for easyScan’ option must be acquired to
use the USB port.
Installation Procedure
- Turn on your computer and start Windows.
Do not run any other program while installing the scan software.
- If you want to use the USB Adapter for easyScan, install it first following
the instructions included with the adapter.
- Insert (the backup copy of ) your DFM Software Disk 1 (Figure Components, 10) into the disk drive.
Windows NT/2000/XP
- Make sure you have administrator privileges before software installation.
15
(UN)PACKING AND INSTALLATION
SOFTWARE INSTALLATION
All operating systems
- Start the file ‘setup.exe’ on the disk, the following screen will now appear:
- Select the button ‘Install’, to install the data acquisition program ‘easyScan’ on your computer.
Setup will ask for the directory in which the program files are to be copied:
16
SOFTWARE INSTALLATION
(UN)PACKING AND INSTALLATION
- Put them in the proposed directory, unless the ‘Program Files’ directory
has a different name in your language of the Windows operating system.
Afterwards setup will ask for the start menu entry or program group in
which the easyScan DFM software is to be placed:
- Accept the proposed name by clicking ‘OK’ or type another name.
The installation setup will now ask for the ’COM-Port’:
- Select the serial port to which you have connected the control electronics
(5). (See section hardware installation)
The setup program will start copying files onto your hard-disk. After some
time the installation will ask you to insert the second DFM Software Disk:
- Insert the disk, then click ‘OK’.
17
(UN)PACKING AND INSTALLATION
SOFTWARE INSTALLATION
After successful installation you will get this confirmation:
Important!
The the second disk contains calibration information specific to your
instrument, therefore you should keep (a backup copy of ) the CD delivered
with the instrument.
Simulated microscope
You can start the easyScan software without having the microscope connected to your computer. We recommend using this simulation to explore
the easyScan-system (measurements and software) ‘off-line’.
When the simulate microscope mode is started, the following dialog box
appears:
By clicking ‘Start Simulation’ a simulation of the microscope is started.
This imitates most of the functions of the real microscope. The sample is
replaced by a mathematical description of a surface. You can now follow the
instructions in the chapter A first measurement.
- To explore the system in the ‘Simulate Microscope’ mode with the microscope connected, activate it in the menu ‘Options’.
18
INSTALLING THE SENSOR
PREPARING FOR MEASUREMENT
Preparing for Measurement
This chapter describes actions that you perform on a day-to-day basis as a
preparation for your measurements. These steps are changing the sensor,
selecting a sample stage, and preparing the sample.
Installing the sensor
To maximise ease of use, the Nanosurf DFM is designed so that the sensor
can be installed and removed without having to readjust the cantilever deflection detection system. This is possible because an alignment system is
used that consists of an alignment chip and matching grooves in the back
side of the sensor. This positions the sensor with micrometer accuracy (see
figure Sensor, Left). Note though, that this accuracy is only guaranteed when
the sensor and the mounting chip are absolutely clean. Installation of the
sensor should therefore still be carried out with great care because good
results are strongly dependant on the accuracy of this process.
Sensor: Left: Sensor alignment system, Middle: Sensor chip viewed from the top, Right:
cantilever 450 µm long, 50 µm wide with integrated tip
Important!
• Nothing should ever touch the sensor, especially the tip end!
• The sensor holder spring in the open part of the scan head (see figure
mounting the sensor) is very delicate and should not be bent!
19
PREPARING FOR MEASUREMENT
INSTALLING THE SENSOR
Selecting a sensor
First determine which operating mode you wish to use. It is recommended
to use the dynamic operating mode, unless you wish to do force-distance
spectroscopy measurements. Now select the proper sensor type for the
measurement mode you wish to use. A sensor with a stiffer, short cantilever is used for the dynamic operating mode, a sensor with a weaker, long
cantilever for the static operating mode. If you change the cantilever when
changing the operating mode, do not forget to also change the operating
mode in the dialog reached using the menu ‘Options/Operating mode...’,
and to change the spring constant in the dialog reached using+
the menu ‘Options/Config Sensor’. (See section starting the microscope)
The sensor should have the following properties:
• The bottom of the sensor chip must have grooves that fit into the alignment chip.
• The cantilever should have a nominal length of 225 µm or more, and a
width of 40 µm or more.
• The backside of the cantilever must have a reflective coating. Uncoated
cantilevers transmit much of the infrared light of the deflection detection
system.
Presently, only sensors from the companies NanoWorld and NanoSensors
can be used. Type CONTR sensors can be used as weak cantilevers, various
types NCLR and NCLPt cantilevers can be used as stiff cantilevers.
Inserting the sensor in the scan head
1. Turn the scan-head upside-down.
Installing the DropStop
20
INSTALLING THE SENSOR
PREPARING FOR MEASUREMENT
2. Take the DropStop (figure Contents, 16 a), and remove the sensor insertion tool. Gently snap the DropStop over the scan head (see drawing
Installing the DropStop).
3. Plug the sensor insertion tool (Components, 16 b) into the hole behind the
sensor holder (figure mounting the sensor, top right). The sensor holder
flap opens.
4. Use the tweezers to take the sensor out of its box. The sensor is now
oriented face up.
5. Let the sensor carefully slide into the silver alignment chip in the scan
head. Make sure the sensor lies precisely in the alignment chip (figure
mounting the sensor, bottom left).
Mounting the sensor: top left: The sensor holder spring, top right: Plugging in the sensor insertion
tool, bottom left: inserting the sensor. Bottom right: a correctly built in sensor.
21
PREPARING FOR MEASUREMENT
INSTALLING THE SENSOR
6. GENTLY pull the sensor insertion tool out of the hole; the sensor holder
flap closes and holds the sensor chip tightly (figure mounting the sensor,
bottom right).
7. Remove the DropStop from the scan head. Please note that the laser
beam is blocked by the DropStop as long as it is in place. The sensor
LED on the DFMDrive only displays the actual status of the sensor after
removing the DropStop .
8. The green ‘OK’ sensor control LED on the DFM Drive electronics should
now be on. If this is not the case refer to Chapter Problems and Solutions.
Sensor status LEDs
Important!
When you change the cantilever without turning off the electronics, it is
recommended to perform a coarse search for the resonance frequency:
- Open the ‘DFM Modes Configuration’ dialog , using the menu ‘Options/Config DFM Modes...’.
- Click
.
INSTALLING THE SAMPLE
PREPARING FOR MEASUREMENT
Installing the sample
Preparing the Sample
The DFM can be used to examine any material with a surface roughness
that does not exceed the height range of the scanning tip. Nevertheless the
choice and preparation of the surface can influence the surface-tip interaction.
Examples of influencing factors are excess moisture, dust, grease etc. Because of this some of the samples need special preparation to clean its surface.
Generally, clean as little as possible.
If the surface is dusty, try to measure on a clean area between the dust. It is
possible to blow coarse particles away with dry, oil free air, but small particles generally stick so well to the surface, that they can not be removed.
Note that bottled pressurized air is generally dry, but pressurised air from
an in-house supply is generally not. In this case an oil filter should be installed. Blowing dust away by breath is not advisable, because it is not dry.
If some surface contaminant, such as grease or oil is present, the surface
should be cleaned with a solvent. Suitable solvents are distilled or
demineralised water, alcohol or acetone, depending on the contaminant.
The solvent should be very pure, in order to prevent the collection of impurities on the surface when the solvent evaporates. The sample should be
cleaned several times to remove solved and redeposited contaminants if it is
very contaminated. Delicate samples can be cleaned in an ultrasound bath.
XYZ Calibration grid
The XYZ calibration grid supplied with the instrument (figure Components,
9) is meant as a test sample that can also be used to check the correctness of
the instrument calibration. The grid is manufactured using a standard silicon process that creates silicon oxide squares on a silicon substrate. The
grid period is 10 µm for the large scan head, and 660 nm for the high
resolution head. The height of the squares is approximately 100 nm for the
large scan head, and 149 nm for the high resolution head. The exact period
and height (with 3 % accuracy) are given on the box. Certified XYZ calibration grids are available as an option.
The calibration grid should be kept in its box. Then it should be unnecessary to clean it. Cleaning is not advisable, because the grid is rather delicate.
PREPARING FOR MEASUREMENT
INSTALLING THE SAMPLE
Calibration grid: A measurement on the calibration structure
Stand-alone measurements
You can either use the instrument with the supplied small-sample stage, or
as a stand-alone instrument. Use the small-sample stage if possible, and
limit the stand-alone operation to samples that are too large. For standalone measurements, the scan head itself can be put directly on top of the
sample. Small plastic protection feet for under the three metallic feet are
provided to protect delicate samples from scratching (figure components,
13).
Left: DFM used as Stand-Alone - right: use with protection feet
24
INSTALLING THE SAMPLE
PREPARING FOR MEASUREMENT
The small sample stage
The small-sample stage can be used to comfortably position the sample. An
x-y positioning table with micrometer screws is available as an option.
Small-Sample Stage
- Mount the small sample onto the sample holder. The simplest way to do
this is to use put the sample on the sticky side of a Post-it® note that is
attached to the sample holder using double sided adhesive tape. It is advantageous to measure the standard samples using the small sample stage,
because it allows better positioning.
Sample mounted onto the sample holder
Important!
Avoid all mechanical impact on the sensor when placing the sample holder
under the scan head. Any impact will damage the tip.
25
A FIRST MEASUREMENT
STARTING THE MICROSCOPE
A First Measurement
Preparations are now complete: The instrument has been assembled and
the software installed. A dynamic force mode sensor and the calibration
grid sample (figure Components, 14) are ready for measurement.
In this chapter, step by step instructions are given as to how to operate the
microscope and get your first pictures. More detailed explanations for the
software and the system are given in the software reference manual.
Important!
• Never touch the sensor or the surface of the sample ! Good results rely
heavily on the accuracy of the preparation of the tip and the sample.
• Avoid exposing the system to direct light during measuring. This could
influence the sensor unit and deteriorate the quality of the measurement.
Starting the microscope
- Check that the power supply (1) is connected to the AC mains power
supply, and that the power supply is on.
The red LEDs of the control electronics (7) are flashing and the green ‘Sensor OK’ LED is shining.
- Start the ‘easyScan DFM’ software on your computer.
The main program window and a message box appear:
Now, your computer is communicating with the control electronics to initialise the system. This process is repeated every time the control electronics
is turned off and on again. When download is completed, the electronic’s
red LEDs change from flashing to constantly shining, some control panels
appear (see figure Main program window)..
26
STARTING THE MICROSCOPE
A FIRST MEASUREMENT
Main program window
- To change the measurement mode, open the ‘Operating Mode’-dialog
using the menu ‘Options/Operating mode...’. Select the dynamic force
mode.
- Open the ‘DFM Modes Configuration’-dialog using the menu ‘Options/
Config DFM modes...’, and set the ‘Operating amplitude’ of the cantilever vibration to 0.25 V.
27
A FIRST MEASUREMENT
APPROACHING THE SAMPLE
Approaching the sample
To start measuring, the sensor’s tip must come within a fraction of a nanometer of the sample, without touching it with to much force. To achieve
this, a very careful and sensitive approach of the sensor is required. This
delicate operation is carried out in three steps: Coarse approach by hand,
fine approach by motor, and the automatic final approach.
If the sample is reflective, the different stages of the approach are best observed using the side view of the integrated optics of the scan head (figure
Integrated optics, right). You can use the cantilever as a ‘yardstick’ to judge
distances in the views of the integrated optics.
Integrated optics: left: view through the magnifier from top, right: side view
An optional video camera is available, that allows you to see both views
from your chair. This camera is particularly useful when the microscope is
in a position that is difficult to reach, or when you do not wish to contaminate the sample with dust particles from your body. Click
for the topfor the side view. Use the illumination control
to
view, click
adjust the light level.
1. Coarse approach by hand
- Ensure a large enough distance is available between sensor and sample
surface so as not to break the cantilever off, then push the sample holder
(12) carefully under the sensor.
28
- Use the three levelling screws to lower the scan head so that the sensor is
within 1-2 mm of the sample. (Figure coarse approach) Take care that all
screws are moved approximately the same distance, so that the scan head
remains levelled.
APPROACHING THE SAMPLE
A FIRST MEASUREMENT
Coarse approach with the levelling screws
When the sample is reflective, the mirror image of the cantilever should be
visible in the side view of the integrated optics. When the sample is not
reflective, the shadow of the cantilever may be visible. If neither a mirror
image nor a shadow are visible, change the lighting conditions until it is
visible, for example by changing the illumination, or by shading the light
from bright surfaces in the room or outside.
2. Fine approach by linear motor
- Choose the menu ‘Panels’ in the ‘easyScan’ program.
- Open the ‘Approach Panel’.
- Watch the distance between tip and sample in the side view of the intein the ‘Approach Panel’ to move
grated optics. Now click and hold
the tip towards the sample, to a distance of a fraction of a millimetre.
The distance between the cantilever and its mirror image should now be
around a cantilever length (depending on the type of cantilever).
29
A FIRST MEASUREMENT
APPROACHING THE SAMPLE
3. Automatic final approach
- Open the ‘Feedback Panel’ in the menu ‘Panels’.
- Check that the correct settings are used.
• ‘SetPoint’ (Cantilever vibration amplitude relative to its free vibration amplitude, far away from the sample): approx. 60%,
• ‘Loop-Gain’: 11 for large scan head, 15 for high resolution head.
When you have to change the instrument settings in any panel, you can use
the following methods to change them:
• Activate any input by clicking in it with the mouse pointer, or by selecting it with the Tab-key.
• The value of an activated input can be increased and decreased using the
up and down arrow keys on the keyboard. The new value is automatically
used after one second.
• The value of a numerical input can also be increased and decreased by
clicking the arrow buttons with the mouse pointer. The new value is
automatically applied after one second.
• The value of an active numerical input can be entered using the keyboard. The entered value must be confirmed by pressing the ‘Enter’ or
‘Return’ key, or by clicking
with the mouse pointer.
• The selection of a drop-down menu (e.g.:
) can be changed
using the mouse. The selected value must be confirmed by pressing the
with the mouse pointer.
‘Enter’ or ‘Return’ key, or by clicking
in the ‘Approach Panel’.
- Click
The instrument will now automatically determine the operating point of
the dynamic mode (for more details see Software Reference, section Menu
Options, Config DFM Modes). Then the sensor holder is moved towards the
sample with the help of a linear motor. The motion continues until the
30
STARTING A MEASUREMENT
A FIRST MEASUREMENT
measured signal crosses the threshold value given in the ‘SetPoint’ input of
the feedback panel. From now on the distance between sample and sensor is
controlled automatically by the electronics. The dialogue box ‘Approach
done’ appears when the approach has been completed.
- Click ‘OK’.
Starting a measurement
After a successful approach the instrument starts measuring automatically.
In the scan panel enter an image size of about half the maximum scan range
of your scan head in the ‘scan range’ input.
An image of the measurement will be drawn on your screen, showing a line
in the ‘LineView’ and a plane in the ‘TopView’. Watch the displays for a
while until about a quarter of the ‘TopView’-image has been measured.
A ‘nervous’ line in the ‘LineView’ indicates too many vibrations, too much
acoustic noise or direct light shining onto the sensor. This means that you
should stop measuring and reduce or eliminate the disturbances:
- Click
tions.
and follow the instructions of the chapter Problems and Solu-
When the line in the ‘LineView’ is calm and reproduces consistently you
can continue with the next section.
31
A FIRST MEASUREMENT
ADJUSTING THE SAMPLE’S TILT COORDINATES
Adjusting the sample’s tilt coordinates
Ideally, the plane of the measurement and the sample surface lie in the x-yplane of the scanner. But mostly the sample plane is tilted with respect to
that ideal plane. In this case, the sample cross section in the x* measurement
direction, as shown in the ‘LineView’ window, has a certain slope. This
slope depends on the direction of the x* direction and therefore on the
rotation of the measurement, as shown in figure Tilt, position A and B. It is
desirable that the measurement plane is parallel to the sample plane, because this makes it easier to see smaller details in the measurement, and
because the z-feedback loop functions more accurately in this case. Therefore, the sample plane should be made parallel to the sample plane by properly setting the values of ‘X-Slope’ and ‘Y-Slope’. It is also possible to align
32
ADJUSTING THE SAMPLE’S TILT COORDINATES
A FIRST MEASUREMENT
the x-y-plane of the scanner with the sample plane using the three coarse
approach screws on the scan head, but this should not be done when the tip
is approached to the sample.
Tilt: Sample’s and measurement orientation before tilt adjustment
You can align the measurement plane using the following procedure:
- Alter the value of ‘X-Slope’ using the arrow buttons until the x-axis of the
scan line lies parallel to the x-axis of the sample. You can measure the
slope in the LineView using the angle tool (see Software Reference).
- Enter the value 90 in the ‘Rotation’ input to scan along the y-direction of
the scanner i.e. the sample’s tilt as shown in the schematics view B. If the
input for ‘Rotation’ is not visible, you can make it visible by clicking .
- If the scan line is not horizontal, alter the value for ‘Y-slope’ until the yaxis of the scan lies parallel to the y-axis of the sample.
- Reset the ‘Rotation’ to 0°. The ‘LineView’ shows the X-slope again.
33
A FIRST MEASUREMENT
OPTIMISING RESOLUTION
Displays after adjusting the slopes
The value of the ‘Z-Offset’ varies slightly during measurement. This is correct because the option ‘Auto. Adjust Z-Offset’ in the menu ‘Options’ should
be active.
Optimising resolution
You have prepared your measurement so that the scan line in the centre of
the ‘LineView’ reproduces stably. Now the scan range has to be reduced and
the measured signals amplified in order to observe the surface structure.
Reminder: Measurements on the micrometer/nanometer scale are very sensitive. Direct light, fast movements causing air flow and temperature variations near the scan head can influence and disturb the measurement.
The following procedure applies to measurements on the XYZ calibration
grid (figure components, 14):
34
OPTIMISING
A FIRST MEASUREMENT
RESOLUTION
1. Reduce the data range by reducing ‘Z-Range’ in the ‘Scan Panel’ to about
0.3 µm in order to improve the resolution of the measured data.
Diminishing ‘Z-Range’ amplifies the signal in Z-direction
2. Reduce the scan range as follows:
- click the ‘TopView’-Display to activate it: its title bar should be the same
colour as the title bar of the scan panel.
- click
opens.
: The mouse pointer becomes a cross and the ‘Tool Info Panel’
- look for an ‘interesting’ region in ‘TopView’ and make a square there with
the mouse pointer. The size of the square is shown in the ‘Tool Info Panel’.
35
A FIRST MEASUREMENT
OPTIMISING RESOLUTION
- Release the mouse button when the square’s size is for example about 20
µm.
- Confirm the selection by double clicking the display using the left mouse
button. Now the selection is enlarged to the whole display size. You can
abort the zoom function by clicking the right mouse button.
3. The best resolution very much depends on the tip-sample conditions
(effective tip radius, sample cleanness etc.) In the following, an example
is given on the XYZ calibration grid to examine the step quality.
- Reduce the Z-range so that the signal displayed in the ‘LineView’ window
does not exceed the upper or lower limits. Then lower the scan range to
between 2-5 µm
- Set the values in ‘Scan Panel’ one after the other. Experiment with these
values, they can be reduced even further. Between changes always allow
the computer to scan a couple of lines before continuing.
- Pay attention to the height of the signal in the ‘LineView’ window. It
should not exceed the window height, if it does, the z-Range is set too
small and should be increased.
4. In the ‘TopView’ window, values which do not fit in the selected colour
range appear ‘saturated’ i.e. they become white or black.
- To improve image display quality, open the ‘View Panel’ and click
in the ‘Visible Input Range’ section. This improves the contrast.
36
SNAPSHOTS OF
A FIRST MEASUREMENT
IMAGES
Images of a successful measurement
Snapshots of images
When you are satisfied with your image and would like to keep it, you can
take a snapshot and save it for later:
- During the measurement, you can select
in the ‘ScanPanel’. After
having completed the actual frame, a copy of the measured image is taken
and displayed in a separate window behind the ‘ScanPanel’.
- If you would like to take the snapshot of the view as it appears during the
measurement without waiting to finish the frame, stop the scanning using
and generate a copy of the view using
.
After finishing the measurements you can store the ‘photographs’ of your
measurements in a storage medium e.g. your PC’s hard drive (see section
Finish measuring).
37
A FIRST MEASUREMENT
JUDGING THE QUALITY OF THE IMAGES
Judging the quality of the images
From the quality of the measured images the quality of the tip can be observed. A good tip quality is necessary for high quality images of high resolution.
• When the image quality deteriorates dramatically during a previously
good measurement, the tip has most probably picked up some particles.
- See section ‘Problems an Solutions: Image quality suddenly deteriorates’
In the following cases the sensor has to be replaced in order to re-establish
high image quality:
• images in the top view consist of uncorrelated lines only.
• images appear blurred
- First follow the suggestions in section ‘Problems an Solutions: Image
quality suddenly deteriorates’. If these do not help, the cantilever should
be changed.
• If all peaks in the image have the same, usually trianglar shape, the tip is
no longer sharp and has to be replaced. The measured structure is called
a tip artefact.
Image containing tip artifacts
38
FINISH
A FIRST MEASUREMENT
MEASURING
Finish measuring
- Click
to stop measuring.
- You can retract the sensor to a safe and visible distance from the sample by
in the ‘Approach Panel’, and afterward clicking
clicking
for some time.
- Close all panels in order to see the saved ‘snapshots’.
- Activate the measurement document you would like to save by clicking it.
Select the menu ‘File->Save as...’. Select the name and the folder where
you would like to store the measurement.
These stored measurements can be reload with the ‘easyScan’ software, and
then viewed, analysed and printed (see also Software Reference manual) any
time.
Turning off the instrument
- Exit the ‘easyScan DFM’ program after having stored all desired images.
If you leave the program without saving some data the program asks if
you wish to save them:
- Turn off the power supply.
If you perform measurements regularly
Leave the instrument and cover the scanner to protect it from dust.
If you do not operate the instrument for several weeks
Put the instrument back into the instrument suitcase. (See also: Storing the
Instrument)
39
MAINTENANCE
Maintenance
To ensure fault free operation of the microscope the following instructions
for maintenance have to be followed.
Scan head
It is very important to keep the sample holder and the open part of the
scanner clean. If exposed to moisture (high humidity), corrosion will appear.
- Clean the sensor holder adjustment chip by blowing away dust using dry,
oil free air.
Scan electronics
Clean the case and the controls with a soft cloth lightly moistened with a
mild detergent solution. Do not use any abrasive pads or solvents like alcohol or spirits.
40
PROBLEMS AND SOLUTIONS
Problems and Solutions
Sensor Fail LED
The red ‘Sensor Fail’ LED on the DFMDrive electronics can be caused by a
misaligned sensor chip.
• Check that the sensor chip is lying perfectly in the alignment chip.
• Remove the sensor using the sensor insertion tool (16 b). Blow away
dust from the alignment chip and the sensor’s back side using dry, oil
free air. Remount the sensor.
Check the menu ‘Options/Microscope Diagnosis’ for further information.
Image quality suddenly deteriorates
• When a scan line suddenly starts reproducing badly, the tip may have
picked up some particles:
• Continue measuring for a while (1-2 images), the tip may eventually
loose these particles again.
then perform a new ap• Retract the sensor by clicking
proach.
• Try to induce changes in the tip’s end: While measuring increase the
force ‘SetPoint’, or decrease the amplitude ‘SetPoint’ in the ‘Feedback Panel’. Restore the set point to its old value when the contrast
improves, or nothing happens after scanning several lines.
Change the sensor if no improvement can be seen after these procedures.
• If the scan line in the ‘LineView’ suddenly disappears, the tip has lost
contact:
• Increase the value of ‘Z-Range’ in the ‘Scan Panel’
• Increase the force load (Set Point).
• Click
in the ‘Approach Panel’ then repeat the steps in chapter ‘Start measurement’.
41
PROBLEMS AND SOLUTIONS
‘No connection to microscope!’
This error message appears when the scanning software is waiting for an
answer from scan electronics. This can have various reasons:
• The microscope is not connected:
- If you wish to perform a simulated measurement select
Otherwise check the connection and select
.
.
• The easyScan SPM electronics is not connected to the power supply:
- check that the power LEDs on the electronics are on.
- check the connection.
• The easyScan SPM electronics is not connected to the computer:
- check the connection.
• The wrong COM-port has been selected during software installation:
- Use
, and select the correct COM-port in the dialog:
• The scan electronics is performing a task which lasts an unforeseen length
of time causing a time-out. Using Windows NT this can happen when
the system is occupied with itself and blocks the serial port:
- Use
.
• The electronics is damaged.
- Contact your dealer.
42
TECHNICAL DATA
Technical Data
The specifications given here are typical values of the Nanosurf products.
The exact specifications vary somewhat from instrument to instrument,
and are given on the calibration certificate delivered with the instrument.
Scan ranges and resolution
large scan
high resolution
Maximum X-Y-Scan range
110 µm
10.0 µm
Maximum Z-range
22 µm
1.8 µm
Drive resolution XY
1.7 nm
0.15 nm
Drive resolution Z
0.34nm
0.027nm
Dynamic measurement Z noise RMS 0.4 nm
0.07 nm
XY-Linearity Mean Error
<1.0 %
<1.0 %
Manufacturing tolerances for scan range are 10% for large scan heads, and
15% for high resolution heads. Drive resolution is calculated by dividing
the scan range over 16 bits.
Common Scanner Features
Tripod stand alone design
Automatic approach range :
Max. approach speed :
Sample size :
Sample observation optics :
Optical magnification :
Field of view :
Sample illumination :
Electrical connection to tip:
Alignment of cantilever :
Scan head weight:
5 mm
0.1 mm/s
Unlimited
Dual lens system (top view / side view)
top x12, side x10
top 4x4 mm, side 3x5 mm
White LEDs (variable brightness 0-100%)
Available
Automatic adjustment
350 g
43
TECHNICAL DATA
easyScan electronics
Available Measurement Modes:
- Static Force Mode
- Dynamic Force Mode
- Phase Contrast Mode
- Force Modulation Mode
Modulation of tip potential
Measuring of tip potential
Measuring of tip current
Additional User ADC Input
Max. scan speed:
feedback loop bandwidth:
Dynamic Force freq. range:
Dynamic Force freq. resolution:
Phase contrast range:
Phase contrast resolution:
Phase reference range:
Electronic weight:
Power consumption:
Standard
x
x
x
x
x
-
modeExtension
x
x
x
x
x
x
x
x
1800 data points per second
3 kHz
15-300 kHz
<0.1 Hz
-+90°
<0.05°
0-360°
2.5 kg
25 VA
Compatible cantilevers
Manufacturers:
Static Force Modes:
Dynamic Force Modes:
Available tips:
Typical static load :
Typical dynamic freq. :
44
NanoSensors, NanoWorld
0.2 N/m, Type: CONTR, LFMR
48 N/m, Type: NCLR
Standard, SuperSharpSilicon,
HighAspectRatio, Diamond
10 nN
190 kHz
RS232
CPU
Custom
prog.
Logic
Scan
Z-Feedback
Approach
Spectroscopy
ROM
Host PC
16 Bit DAC
Gap/Tip Voltage
12 Bit DAC
Approach speed
3*16 Bit DAC
16
BitBitDAC
3*16
DAC
X/Y/Z-Axis
16Bit DAC
Set Point
ADC 12Bit
Channel 0
ADC 12Bit
Channel 2
+
+-12V
- +-10V
+-10V
+-12V
1..256
+-10V
AUX I/O
Aux. InOut
Crossbar
Lever Amp
Lever Sig
Phase
Detector
Lever Phase
VIDEO OUT
Video
Multiplexer
Head Status
Supervisor
2 x digital
Oscillator
Amplitude
Detector
Deflection
Detector
DFMDrive
Channel 2
Input
CH2 INPUT
VIDEO IN
Stage Status
Coil Drives
Amplifier
Calibration
Sensor Status
DFM Scan Head
Z-Approach
User Signal
DC-Motor
Extension
Area
Detector
Piezo
easyScan SPM Electronics
RAM
Laser Drive
Cantilever
Laser
modeExtension (Optional)
TECHNICAL DATA
Schematic of the easyScan electronics
45
XYZ - Coil Scanner