1
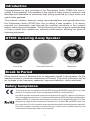
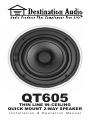
QT605
THIN LINE IN-CEILING
QUICK MOUNT 2-WAY SPEAKER
Installation & Operation Manual
Introduction
Congratulations on your purchase of an Destination Audio QT605 thin line inceiling 2-way speaker! Your speaker is the result of many years of research and
development dedicated to producing high quality products for home audio and
audio/video systems.
This manual contains features, setup recommendations and specifications for
the Destination Audio QT605 thin line in-ceiling 2-way speaker. It is recommended you thoroughly read through the material contained in this manual
before connecting your speaker. This will ensure you have a good understanding
of how to install your speaker for optimum performance; allowing for years of
listening enjoyment.
QT605 In-ceiling 2-way Speaker
Front View
Front With Grille On
Back View
Break In Period
Allow several hours of listening time to adequately break in the speaker. As the
speaker breaks in, the driver suspension will loosen. The result of break-in will be
an increase in low frequency response, improved definition, clarity and detail.
Safety Compliance
These products are in compliance with the EMC Directive 89/336/EEC and Article 10 (1) of the
directive, in compliance with Technical Regulations EN55013-1 and EN50082-1.
Any RoHS compliant component is tested for the presence of Lead (Pb), Cadmium (Cd), Mercury
(Hg), Hexavalent chromium (Hex-Cr), Polybrominated biphenyls (PBB), and Polybrominated diphenyl ethers (PBDE). For Cadmium and Hexavalent chromium, there must be less than 0.01% of the
substance by weight at raw homogeneous materials level. For Lead, PBB, and PBDE, there must
be no more than 0.1% of the material, when calculated by weight at raw homogeneous materials.
Any RoHS compliant component must have 100 ppm or less of mercury and the mercury must
not have been intentionally added to the component.
1
Features
The QT605 is the budget-minded answer for both residential and commercial
in-ceiling speaker applications. The QT605 employs a 6½-inch polygraphite woofer
cone and a 1-inch swivel fabric dome tweeter for great sound on a budget. The
QT605 speaker is manufactured with high quality components and engineered
to accurately reproduce music. Mounting flush to a wall or ceiling, architectural
speakers are ideal for many applications where traditional speakers may be
impractical or impossible. The QT605 is especially well suited for distributing
sound throughout the entire home and can be used to enhance surround sound
systems. When properly installed, the QT605 will provide you with years of
entertainment pleasure.
The QT605 speaker is packaged with an L-shaped quick installation and removal
tool, grille adhesive, the hole cutout and paint mask templates. No other tools
except wire strippers are required to install the QM-615 speaker once the hole has
been cut in the ceiling or wall.
Painting the Speakers
A paint shield is included with your QT605 speaker. This shield can be used to protect
the speaker when painting the speaker rim (frame). If you plan to paint your speaker,
we recommend that it be done prior to installation. If you decide to paint your speaker
sometime in the future, it is best to remove it by following the simple instructions
on page 5. When painting the speaker, the paint shields provided in the packaging
must be installed in place of the grille. The grille can also be painted. Painting the
speaker grille should be done with a paint sprayer set to fine. Remove the grille from
the speaker, peel off the grille fabric on the back of the grille and set aside. Place the
grille on a flat surface. Do not use a brush or roller on the speaker grille as it will
clog the holes. This will greatly reduce the sound quality of the speakers. Do not paint
the grille while attached to the speaker. Be sure to remove the paint shield from the
speaker and replace the grille fabric to the back of the grille before reinstalling the grille
and using the speakers.
2
Speaker Placement
With nearly endless placement options, careful consideration for placement of the
QT605 in-ceiling speaker needs to be considered, as installation requires cutting a
hole in your wall or ceiling! When using the QT605 in home theater applications follow
the guidelines illustrated below.
Swivel Tweeter Placement
The QT605 has a swivel tweeter allowing sound to be directed toward or away from
the listening area depending on the application. A tweeter aimed toward your listening position improves imaging and detail. When using the QT605 as front/main home
theater speakers or as stereo speakers in a distributed audio system, aim the tweeter
toward the main listening position. For rear/surround speakers installed in walls or
ceilings, aim the tweeter toward the nearest reflecting surface (an adjacent wall or
ceiling) for a more diffuse sound field (for more direct sound, aim the tweeter at your
listening position).
3
Installation
CAUTION: Be certain there are no electrical wires, water pipes, heating ducts or
any other obstructions in the planned area of installation before starting to drill or
cut into the ceiling or wall. If there is an electrical outlet nearby, turn off the circuit
breaker to avoid possible injury.
1. These speakers are designed to be mounted between the framing
members. Use a stud finder to locate the positions of joists and rafters.
Make sure you have a 2-inch clearance from the outside of the cutout hole
from joists and rafters.
2. Drill a 1/4-inch hole in the center of the area you plan to mount the speaker.
Cut or bend a piece of wire (a coat hanger works well) to a 90-degree angle.
Insert the wire into the pilot hole and fish around to make sure there are not
obstructions which will interfere with the installation.
NOTE: If you must choose another location the pilot hole can be easily patched.
3. Once a suitable location is found, use masking tape to temporarily place the
supplied cutout template on the ceiling or wall, centered over the pilot hole.
Draw a circle around the inside edge of the template.
4. Carefully cut the hole with the appropriate cutting tool to remove the
material inside the circle inscribed by the template.
5. Confirm the speaker easily fits into the hole, without any gaps.
6. The speaker terminals will accommodate any speaker wire up to 14-gauge.
Select an appropriate wire gauge from the following chart:
18 gauge for up to 50-feet
16 gauge for up to 100-feet
14 gauge for up to 200-feet
Pull the speaker wire out of the hole and connect the speaker. Split the two
conductors of the speaker wire apart about 3-inches so they form a “Y”.
Using wire strippers, remove about 1/2-inch of insulation from each of the
two conductors of the wire to expose the bare metal and twist each of the
conductors into a single unfrayed strand.
NOTE: When connecting a speaker it is very important to retain the correct
polarity (improper polarity will cause reduced bass performance and
unnatural imaging effects). To do this, be sure the wire attached to the
positive terminal on the speaker (marked [+] or colored red) connects to the
positive terminal on the amplifier. Similarly, the negative terminal (marked
[-] or colored black must connect to the negative terminal on the amplifier.
7. Place the speaker into the hole you previously cutout. Using the circular
small end of the L-shaped quick installation tool or screwdriver simply push
upward the four mounting tabs. The mounting tabs will then rotate very
quickly 180-degrees clockwise to fasten the speaker to the ceiling or wall.
4
Installation (continued)
8. Using the supplied grille adhesive, apply an ample amount of adhesive
around the grille. Gently push the grille onto the speaker securing the grille
to the speaker.
9. To remove the speaker, insert the L-shaped tool’s hex-end into the tab hole
to engage cam mechanism, turn counterclockwise until cam locks in open
position. Repeat for remaining cams then remove speaker.
5
Specifications
Model:
QT605
Series:
Builders Thin Line Quick Mount
System Type:
In-ceiling 2-way Speaker
Frequency Response:
56Hz-20kHz ±3dB
Sensitivity:
88dB (2.83V/1 meter)
Recommended Power:
2-60 Watts
Woofer(s):
(1) 6½” (165mm) Polypropylene Cone
Tweeter(s):
(1) 1” (25mm) Swivel Fabric Dome
Crossover Frequencies:
3,000 Hz
Crossover Slope:
12dB/Octave
Impedance:
8 Ohm
Cabinet/Color:
White Frame (paintable)
Grille:
White Powder Coated Steel (paintable)
Cutout Dimensions:
8.375” (213mm) Dia.
Finished Dimensions:
9.375” (238mm) W
3” (76mm) D
Weight:
2.55 lbs. (1.16 Kg)
Warranty:
10 Years (Warranted from date of purchase to be free
from defects and workmanship.)
6
Troubleshooting
Situation
No sound from speakers.
No sound from one speaker.
Probable Cause
Speaker wire not connected.
Solution
Make sure wire is properly
connected at both the
speaker and the amplifier
observing proper polarity.
Speaker selector on amplifier
is not on.
Activate proper speaker
selector on amplifier.
Balance control on receiver or Place balance control in
preamp is not centered.
the center.
Speaker wire not completely
connected.
Very little bass and/or imaging. Speakers are wired
out of phase.
Check all connections at
amplifier and speakers.
Check entire system for
proper polarity and make
adjustments as necessary.
Warranty
Your QT605 In-ceiling 2-way speaker is covered by a limited warranty against
defects in materials and workmanship for a period of 10 years. This warranty
is provided by the authorized Destination Audio dealer where the speaker was
purchased. Warranty repair will be performed only when your purchase receipt
is presented as proof of ownership and date of purchase. Defective parts will be
repaired or replaced without charge by your dealer’s store or the location designated by your dealer authorized to service Destination Audio products. Charges
for unauthorized service and transportation cost are not reimbursable under
this warranty. This warranty becomes void if the product has been damaged by
alteration, misuse or neglect. Destination Audio assumes no liability for property
damage or any other incidental or consequential damage whatsoever which may
result from the failure of this product. Any and all warranties of merchantability and
fitness implied by law are limited to the duration of this express warranty. Some
states do not allow limitations on how long an implied warranty lasts, so the above
limitations may not apply to you. Some states do not allow the exclusion or limitation of incidental or consequential damages, so the above limitation or exclusion
may not apply to you.
7
This page was left blank intentionally
8
382 Marshall Way, Layton, Utah • USA • 84041
Phone: (801) 660-2400 • Fax: (801) 543-3300
www.destinationaudio.com
It is Destination Audio policy to continuously incorporate improvements into our products;
all specifications are subject to change without notice.
Copyright © 2010 Destination Audio. All Rights Reserved.