1
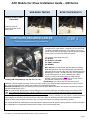
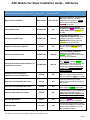
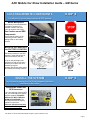
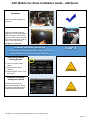
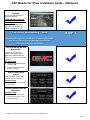
ADC Mobile CS-GM1210 GM Series Installation Guide
ADC Mobile Car Show Installation Guide – GM Series
NOTICE OF INTENDED INSTALLATION AND USE
THE CARSHOW MULTI-MEDIA NAVIGATION SYSTEMS CONTAIN AN INTERNAL VIDEO PLAYER, WHICH
IS NOT INTENDED FOR VIEWING BY THE DRIVER. THE VIDEO PLAYER IS DISABLED WHEN THE
VEHICLE IS IN MOTION THROUGH A CONNECTION TO THE PARKING BRAKE.
THE INSTALLER OF THIS PRODUCT MUST INSURE THE VIDEO DISABLE CONNECTION IS
WORKING PROPERLY PRIOR TO DELIVERY OF THE VEHICLE.
IMPROPER INSTALLATION COULD DISTRACT THE DRIVER OR INTERFERE WITH SAFE OPERATION
OF THE VEHICLE, WHICH COULD RESULT IN SERIOUS INJURY OR DEATH, AND COULD ALSO
VIOLATE STATE AND/OR FEDERAL LAW.
CARSHOW DISCLAIMS ANY LIABILITY FOR ANY BODILY INJURY OR PROPERTY DAMAGE THAT MAY
RESULT FROM ANY IMPROPER OR UNINTENDED INSTALLATION AND/OR USE.
STOP
Damage to the vehicle may occur
Do not proceed until process has been completed
CAUTION
CAUTION
Process must be carefully observed in order to reduce
the risk of damage to the accessory or vehicle
CRITICAL
Process must be carefully observed in order to ensure a
quality installation
TOOLS and EQUIPMENT
Specific tools and equipment recommended for this
process
SAFETY RISK
Observe safe practices, this process can be dangerous
and there is a risk of personal injury
TESTING and TROUBLESHOOTING
Content specific testing and troubleshooting points
ADC Mobile Car Show GM1210 Multi-Media Navigation System Installation Guide
Page 1
ADC Mobile Car Show Installation Guide – GM Series
PREPARING FOR THE INSTALLATION
STEP 1
Before you start, please read these critical steps below
BEFORE YOU START THE
INSTALLATION,
READ THIS GUIDE!
We know, you never read
the instructions, but you
need to read this BEFORE
you start the installation!
CHECK THE BATTERY
Test the battery voltage to make
sure it’s fully charged
This only takes seconds and can
save hours of troubleshooting
later.
TURN THE VEHICLE OFF
Keep the Vehicle Off during the
installation to avoid setting
various Vehicle Faults.
KEEP THE VEHICLE OFF
DURING THE
INSTALLATION
Failure to follow this may cause
the AIRBAG FAULT SENSOR to
become enabled. Dealer Service
Departments charge a significant
fee to reset the Fault Sensor.
ADC Mobile Car Show GM1210 Multi-Media Navigation System Installation Guide
Page 2
ADC Mobile Car Show Installation Guide – GM Series
REMOVE THE FACTORY RADIO
STEP 2
You will need to remove multiple interior trim components prior to removing the
factory radio. The following steps will help guide you through this process.
Tools Required:
•
•
•
7mm nut-driver
Plastic Panel pry tool – available at most auto parts stores
DO NOT USE METAL PRY TOOLS OR SCREWDRIVERS –
DAMAGE TO THE VEHICLE TRIM WILL RESULT!
NON-BOSE TRUCKS
BOSE TRUCKS/SUV’S
Basic Install Video:
Basic Install Video:
https://www.youtube.com/watch?v=oWFL9aK-OT4
https://www.youtube.com/watch?v=LIh2Wjaz0t4
Carefully Remove
Right Dash Trim
Remove the right side dash
trim using thin pry tool
Start in top center and
work your way out to right
top corner on Bose
vehicle trim
Lower Shift Lever
Make sure parking brake
is engaged!!
Carefully pull shift lever
down to ease dash panel
removal.
(N/A on Bose vehicle)
N/A
Remove Dash Trim
Cautiously remove dash
trim using caution not to
break plastic. Pull dash trim
towards you.
(Use extreme caution with
this step on Bose
vehicle!)
ADC Mobile Car Show GM1210 Multi-Media Navigation System Installation Guide
Page 3
ADC Mobile Car Show Installation Guide – GM Series
NON-BOSE TRUCKS
BOSE TRUCKS/SUV’S
Unplug Dash Panel
Harnesses
Carefully unplug dash panel
harnesses on Non-Bose
vehicle
(N/A on Bose vehicle)
N/A
Remove Climate
Controls
Use 7mm socket to remove
2 x 7mm bolts to remove
climate control assembly
(Remove lower switch
plate and HVAC controls
on Bose vehicle)
Climate Controls
Climate controls can be
unplugged (Non-Bose) or
simply moved to the side
(Bose) (use a towel or
other padding to keep
from scratching the
control assembly or the
dashboard).
Remove Radio
Mounting Bolts
Use 7mm socket to remove
4 x 7mm radio
mounting bolts
ADC Mobile Car Show GM1210 Multi-Media Navigation System Installation Guide
Page 4
ADC Mobile Car Show Installation Guide – GM Series
NON-BOSE TRUCKS
BOSE TRUCKS/SUV’S
Unplug factory radio
harnesses
Carefully unplug all
harnesses at back of the
factory radio.
CONFIGURE REQUIRED CABLES
STEP 3
Set up the right harnesses for your vehicle
Factory Plugs: The picture at left shows a typical plug
arrangement in a GM vehicle – depending on your trim level
and factory installed accessories, your vehicle may or may
not have all of these plugs present. Use this photo as a guide
for the proper use of the Car Show connectors.
The colors of these plugs may vary:
X1: BLACK
X2: BLACK or YELLOW
X3: GRAY or BLACK
X4: BROWN
Main Harness: Car Show Main Harness plugs into factory
X1 & X2 connectors. Car Show XM/OnStar output harness
plugs into BLACK port on radio and UART harness plugs into
BROWN port on radio. The Main Harness is pre-configured
for Non-Bose systems. If you are installing into a Bose
system, you will need to disconnect the main harness
speaker connector (this has PINK label on it) and use the
Factory GM Connectors (L-R): X4 / X3 / X2 / X1
PP-GM1210-8 harness as outlined below.
GPS Antenna: You will use the GPS antenna in every
installation, and we suggest mounting it in the FACTORY location (see GPS mounting diagrams below or visit our online
tech support to determine the location and method of mounting GPS antenna)
Bluetooth microphone: If you are planning on using the Car Show Bluetooth system, we HIGHLY recommend using the
external microphone (PP1011)
USB: On systems that already have a factory USB port, the Car Show USB input will plug directly into the factory USB
cable. On systems that DO NOT have a factory USB port, you must add an optional mini-male USB to standard female
USB cable or a factory USB receptacle in order for USB to function.
Camera: If you are replacing a factory navigation system and have a factory installed rear view camera, or have the factory
camera display in the mirror, the camera may be used on the GM1210. However, the GM1210 does not come with an
adaptor to allow a plug and play connection. See our online instructions for hooking up the factory camera.
The Car Show GM1210 comes with all of the harnesses to replace almost all types of factory systems. In order to configure
your combination of components and harnesses correctly, refer to the following chart.
ADC Mobile Car Show GM1210 Multi-Media Navigation System Installation Guide
Page 5
ADC Mobile Car Show Installation Guide – GM Series
FACTORY SYSTEM CONFIGURATION OR
ADDITIONAL ACCESSORIES INSTALLED
Main Harness w/Data Box
Factory BOSE audio
Factory Centerpoint audio
Outboard (non-factory) amplifiers
HARNESSES
REQUIRED
FACTORY
CONNECTOR?
NOTES
YES: X1 & X2
Used in all installations. Plugs into X1 &
X2 factory connectors. Car Show
XM/OnStar output plugs into BLACK
port on radio & UART data plugs into
BROWN port on radio
NO
Unplug Main Harness speaker
connector (has PINK label) and plug
in this cable. Plugs into YELLOW port
on radio
PP-GM1210-7
YES: X4
Leave Main Harness speaker
connection as shipped. Single RCA
subwoofer output plug connects to
BROWN X4 factory plug. Plugs into
YELLOW port on rear of radio
PP1007
NO
Main Harness
PP-GM1210-8
L/R - F/R RCA’s plus two subwoofer
RCA’s. Plugs into YELLOW port on
radio
YES: X3
Use factory BLACK or GRAY X3
factory plug – NOT X4! Plugs into
GREEN & GRAY ports on radio & open
port on the end of data box.
PP-GM1210-6
YES: X3
Use factory BLACK or GRAY X3 factory
plug – NOT X4! Plugs into GREEN &
GRAY ports on radio & open port on the
end of data box. Also contains rear
camera input. Please see online tech
support or call for factory camera
wiring instructions
Aftermarket rear entertainment
(Headrests or Overhead Monitors)
PP1009
NO
L/R/Video output RCA’s plus IR remote
input for use with Car Show headrest
monitors. Plugs into GRAY port on radio
AUX1 input for aftermarket A/V source
PP1012
NO
L/R/Video input RCA’s to 3.5mm
adaptor. Plugs into 3.5mm input port on
face of radio
AUX2 input for aftermarket A/V source
PP1008
NO
L/R/Video input RCA’s plus camera
input. Plugs into GREEN port on radio
Factory Rear Entertainment
Factory Rear Entertainment with factory or
aftermarket rear camera
PP-GM1210-6
Factory or aftermarket rear camera
PP1008
NO
L/R/Video input RCA’s plus camera input.
Aftermarket camera will plug right in.
Please see online tech support or call
for factory camera wiring instructions
Bluetooth Microphone
PP1011
NO
Plugs into PURPLE port on radio.
Recommended on ALL installations
YES
If vehicle has factory USB port, it plugs
into Car Show USB input. If vehicle does
not have factory USB port, you must
source additional cables
USB input cable
On radio
ADC Mobile Car Show GM1210 Multi-Media Navigation System Installation Guide
Page 6
ADC Mobile Car Show Installation Guide – GM Series
LOCATING REMOTE COMPONENTS
STEP 4
You will need to mount the microphone & GPS antenna
Mount Microphone
We normally mount the Bluetooth
microphone clipped to the
headliner near the rear view
mirror to minimize road noise.
Use Caution around SRS
Components
Ensure that the routing of the
harnesses do NOT obstruct
airbags, SRS or other safety
devices.
Mount the GPS antenna in
the FACTORY LOCATION
The factory location for the GPS
antenna in most GM vehicles is
under the defroster vent trim.
Lift up on the passenger side
defroster trim and you will see a
small tray area where the GPS
antenna can lay flat.
All other GM vehicles have similar
GPS antenna mounting locations.
NON-BOSE
INSTALL THE SYSTEM
BOSE
STEP 5
You will need to prepare the Car Show Navigation System for
installation in the vehicle.
Connect the Power and
GPS Harnesses
If you are replacing a factory GPS
unit, you will already have a GPS
antenna installed. YOU MUST
REPLACE IT WITH THE CAR
SHOW GPS ANTENNA! The
GPS harness must be properly
seated into connector.
Failure to follow this step may
result in poor GPS signal
ADC Mobile Car Show GM1210 Multi-Media Navigation System Installation Guide
Page 7
ADC Mobile Car Show Installation Guide – GM Series
Connect Optional
Harnesses such as iPod,
Satellite Radio, Camera
These harnesses must be fully
engaged prior to the system
installation. Plug in and gently
tug on the harness to insure
that it is fully locked into the
chassis.
Parking Brake wire must be
connected to vehicle parking
brake lead so that viewing video
is only available while vehicle’s
parking brake is engaged.
Vehicle Harness
Connections
Be sure to securely connect all
harnesses, including the factory
USB cable (if you have the factory
USB jack)
USB Connections
If you do not have the factory
USB jack, your USB connection
can be made by routing a “minimale USB to female standard
USB cable” (not supplied) to the
location of your choice, or by
adding a factory power port GM
USB jack and connecting with a
“mini-male to mini-male” USB
cable
Mini-male to female USB cable
Factory GM USB parts
Available on EBay for under $35
Main Speaker Harness
CarShow Main Harness comes
pre-configured for Non-Bose
systems. If your vehicle is
equipped with Bose amplification
(“Bose” on speaker grills), you will
need to disconnect the Main
Harness mid-cable connector and
connect the PP-GM-1210-8 amp
harness (shown at right).
This harness connects to the
YELLOW “amp pre-out” port on
back of CarShow unit.
Bose Systems - Use this harness:
Non-Bose systems – no
changes to Main Harness are
neccessary
ADC Mobile Car Show GM1210 Multi-Media Navigation System Installation Guide
Page 8
ADC Mobile Car Show Installation Guide – GM Series
CAN Module Placement
The foam-wrapped CAN module
contains the speaker that
reproduces the chime and turn
signal sounds. Depending on
where this is placed will
determine speaker volume.
CHECK CHIME AND TURN
SIGNAL VOLUME BEFORE
FINALIZING THE
INSTALLATION!
Reinsert Radio into Dashboard
You will notice that there are many more harnesses and connectors on the Car Show
system than there were on the factory radio – these all now need to find a home in order
for the radio to fit properly in the dash. Take your time and be patient
locating the harnesses and connectors in the dashboard!
They will all fit – trust us! Bose vehicles generally use more of the supplied harnesses
and have less room to fit them all into – On Bose vehicles, we recommend that you
PATIENTLY locate all connectors and harnesses out the bottom “slot” in the radio
opening. It is CRITICAL that no harnesses or connectors be located directly behind the
radio chassis – the radio WILL NOT FIT in the radio opening if there is any obstruction
behind it, and you may damage the radio if you force it into the opening!
Re-install Radio Mounting
Bolts
Use 7mm socket to re-install 4 x
7mm radio mounting bolts
Re-install Climate
Controls
Use 7mm socket to re-install 2 x
7mm radio mounting bolts
Turn the vehicle ON and
confirm the unit is fully
operational
With the connectors Fully
Engaged, turn the vehicle on and
press the RESET located at lower
right corner of radio face
ADC Mobile Car Show GM1210 Multi-Media Navigation System Installation Guide
Page 9
ADC Mobile Car Show Installation Guide – GM Series
Reconnect Dash Panel
Harnesses
Carefully reconnect dash panel
harnesses
Re-install Dash Trim
Cautiously re-install dash trim
using caution not to break plastic.
NOTE: Non-Bose vehicles may
require removing upper “eyebrow”
panel above instrument cluster in
order to clear upper left trim
Non-Bose (L) - Bose (R)
Enable Installer Settings
STEP 6
You will need to select certain Installer setting based on any
Optional Equipment that you may have installed
Launch the Installer
Setting Screen
1) From any Screen, select
“Menu”
2) From the Menu select
“Settings”
3) Press “Keypad,” Press “1120”
and “Enter”
Select the individual
settings as needed
Selectable options vary by
product and installation. Select
the options as applicable for the
installed optional components.
ADC Mobile Car Show GM1210 Multi-Media Navigation System Installation Guide
Page 10
ADC Mobile Car Show Installation Guide – GM Series
ResLink Sat Radio
Settings
Be sure that OE Sat option is
configured properly.
If OEM XM radio is retained,
“Factory Sat” option needs to
be set to “ON.”
If “aftermarket” Sirius tuner
(SXV200) is being used, set
“Factory Sat” option to “Off.”
Perform Functionality Tests
STEP 7
You will need to perform several tests to ensure all functions
operate as intended prior to finalizing the installation.
Some equipment may be optional.
Turn the vehicle ON and
System ON
Confirm the unit starts up
properly. ADC Mobile has a
splash screen library online to
allow you to install custom splash
screens.
Troubleshooting
1) Reset the System while the
Vehicle is ON
2) Confirm all connectors are
properly installed
Select Radio as the
source
Confirm that the AM and FM
reception are as expected
Troubleshooting
1) Confirm Antenna is properly
connected.
Select Satellite Radio as
the source
Troubleshooting
1) Confirm the “Factory Sat”
option is set to “On” to use
factory XM tuner
ADC Mobile Car Show GM1210 Multi-Media Navigation System Installation Guide
Page 11
ADC Mobile Car Show Installation Guide – GM Series
Select iPod as the source
Confirm iPod is communicating
and playback is OK
Troubleshooting
1) Confirm the harnesses are
properly engaged
Select CD as the source
Confirm CD audio playback
Troubleshooting
1) Confirm the disc is store
bought and in good condition
Select DVD as the source
Confirm DVD video playback
Troubleshooting
1) Ensure the Parking Brake is
set to view video
2) Confirm the disc is store
bought and in good condition
Confirm the Video Disable
Circuit is properly
operating.
The Brake Wire must be
connected to the Park Brake
Indicator Wire to complete a
ground when the brake is
engaged.
Select Phone as the
source
Confirm Phone Pairing is
successful
Consult Quick Start Guide for
Bluetooth pairing instructions
Note: This screen will NOT
appear if OEM BT is being used
ADC Mobile Car Show GM1210 Multi-Media Navigation System Installation Guide
Page 12
ADC Mobile Car Show Installation Guide – GM Series
Select Reverse Camera
Confirm the backup camera
screen shows in reverse
Troubleshooting
1) Confirm “Reverse Trigger” is
set to ON in the Installer
Settings
2) Confirm the Camera is
receiving 12VDC as required
Confirm OnStar Operator
is heard
Troubleshooting
1) Confirm the OnStar
Connector (BLACK) is
engaged in the unit
Steering Wheel Controls,
Chimes & Turn Signals
Troubleshooting
1) Confirm Can Module is
connected and not
unplugged
2) Check RESLink FW
Service and Optional Parts List
Part Number
PP-GM1210-2
CS-GM1012-12
CS108
PP-GM1210-5
PP-GM1210-6
PP-GM1210-7
PP-GM1210-8
PP-GM-LINK
PP1005
PP1006
PP1007
PP1008
PP1009
PP1011
PP1012
PP1014
PP1010
DP-1047
VM-201
EV-GMTH
EV-GMTR
Description
Harness, GM-Series Main
Installation Guide, GM-Series
Quick Start Guide. GM-Series
Control, Remote GM-Series
Harness, Rear Video
Harness, Bose Subwoofer (Centerpoint)
Harness, STD Bose
GM Can Module
Antenna, GPS, 5 meters
Ground Plate, GPS Antenna
Harness, Line Level Pre-Out w/ Sub
Harness, AUX IN/Cam In**
Harness, AUX Out**
Harness, External BT Mic
Harness, AUX in 3.5/RCA
Display Cleaning Cloth
Harness, Sirius Tuner*
GPS Antenna Windshield Mount *
Camera, Lip Mount*
Camera, Tailgate 2014 Silverado/Sierra 1500*
Camera, 2007-2013 Silverado/Sierra 1500, 2007-2014 Silverado/Sierra HD*
* Optional Accessories
** Cannot be used in vehicles equipped with OEM Rear Seat Entertainment
ADC Mobile Car Show GM1210 Multi-Media Navigation System Installation Guide
Page 13
ADC Mobile Car Show Installation Guide – GM Series
Harness Diagram
Back Of CarShow Unit
ADC Mobile Car Show GM1210 Multi-Media Navigation System Installation Guide
Page 14
ADC Mobile Car Show Installation Guide – GM Series
ADC Mobile Car Show GM1210 Multi-Media Navigation System Installation Guide
Page 15
ADC Mobile Car Show Installation Guide – GM Series
CAUTION:
The External Power Outputs (#14) may be used to provide a fused constant 12V source (yellow) and
ground (black), but the red lead cannot support a draw of more than 500ma and cannot be used as
an accessory source of power without the use of a relay!
DO NOT HOOK ANY ACCESSORIES SUCH AS A CAMERA OR REAR ENTERTAINMENT
DIRECTLY TO THIS LEAD! UNPREDICTABLE OPERATION AND/OR SYSTEM FAILURE WILL
RESULT!
ADC Mobile Car Show GM1210 Multi-Media Navigation System Installation Guide
Page 16