1
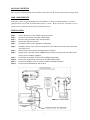
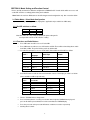
Neo ProLink v2
IPOD TO ACURA/HONDA – PODACU15XL-V2
IPOD CONNECTION KIT
INSTRUCTION MANUAL
FEATURES
Text Display – Text can be displayed while the kit is used in SAT mode except on navigation vehicles.
Direct Connect - iPod plugs directly into car radio’s external device port.
Track Control - Change iPod songs from XM or CD Changer buttons on car radio.
Direct Mode - Direct access and control of every playlist, song, artist and menu setting from your iPod
Advanced Mode - Access up to 5 playlists or Playlists, Artists and Albums from the radio buttons.
Charging and Power – The iPod is powered and charging while in use, auto stops after 1/2 hour of non use.
Auxiliary input - Add a DVD, Satellite radio or any audio device in conjunction with iPod.
COMPATIBILITY
The Neo ProLink is compatible with all iPods with a DOCK connection located on the bottom of the iPod. This
includes the following iPods; iPhone, Classic, Touch, 4th Generation, Mini, Photo, Nano and Video. Future iPod
and/or firmware versions may affect the functionality of the kit.
Models Compatible
Yrs Compatible
Modes
Notes
Acura MDX/TL
2005 – 2009
CDC or SAT
Navigation Radios use part PODACU15XL-V2
Acura RDX
2007 – 2009
CDC or SAT
Navigation Radios use part PODACU15XL-V2
Acura RL
2005 – 2009
CDC or SAT
Navigation Radios use part PODACU15XL-V2
Acura TSX
2004 – 2009
CDC or SAT
Navigation Radios are not compatible
Element LX is not compatible
Honda Accord/Element
2003 – 2009
CDC or SAT
Honda Civic
2006 – 2009
CDC or SAT
Honda CRV
2005 – 2009
CDC or SAT
Honda Fit
2007 – 2009
CDC
Honda Odyssey
2005 – 2008
CDC or SAT
Honda Pilot/Ridgeline
2006 – 2008
CDC or SAT
Honda S2000
2004 – 2008
CDC
•
Radio must be compatible with SAT for SAT mode to be used
•
Internal CD or CDC player will be retained.
1
WARNING!
Do not allow the Apple iPod to distract you from driving! Only operate the unit when stationary or ask
passengers to operate it for you. Neither Neo Car Audio Inc., Apple Computer, Inc., its regional offices,
distributors or resellers accept any responsibility for any damage or injury as a result of using Neo iPod
Integration Kits. The use of this product constitutes your acceptance of our terms and conditions. Please return
the kit immediately if you do not agree. Use only the iPod connector cable which comes with the Neo Adapter.
Do NOT plug in any other iPod cable from any other kit. Other cable’s may look similar, but can cause damage
to iPod and especially to the Neo adapter.
Exercise good judgment and keep your eyes on the road at all times!
NEO CAR AUDIO verified the published radio and vehicle application to the best of our ability. Due to uncontrollable factors, NEO CAR
AUDIO can not 100% guarantee every published applications. These factors include variables such as, anomalies within a factory radio, factory radio
heretofore unknown to NEO CAR AUDIO and partial model year changes.
IMPORTANT INSTALLATION INSTRUCTIONS - PLEASE READ BEFORE INSTALLING
Before you begin the installation, you need to set the dip switches to the correct settings – depending on how
you choose to use it. They can be changed at ANY time if you change your mind. Make sure Power is OFF
and box is unplugged before making changes. Also, NEVER permanently hide the box, it should be
placed somewhere for you to access easily.
The Neo ProLink connects your iPod directly to your stereo by connecting to the external device port on the
back of the radio. It will replace the external 6-disc CD changers or one of the XM sources. External CD
changers plug into the actual radio and therefore it is not possible to have both an external 6-disc CD changer
and the Neo ProLink connected at the same time. The CD player/changer which is an “in-dash” built into the
radio will not be affected.
ABOUT THIS INTERFACE
This interface connects an iPod, iPhone or iTouch directly to your ACURA sound system for the best audio
quality possible. The factory installed Navigation and Sat radio will continue to work a long with the Ipod
from your factory radio and steering wheel controls.
On vehicles without SAT capability, CDC mode must be used and the external CD changer disconnected.
This interface will charge both 12v (Firewire) and 5v (USB) iPods and iPhones. It will stop charging the iPod
30 minutes after the car is turned off.
When using this interface in SAT mode, text information from the iPod can be displayed on the radio screen.
Artist name and Song name will be displayed much like how it’s shown when using the factory SAT radio. In
CDC mode the radio is not capable of doing this.
It is recommended that this kit be installed by a professional installer. It is also suggested that the module be
mounted or placed in a position that can be accessed by the user for future DIP switch configuration changes,
AUX or iPod cable replacements and Firmware Updates.
2
PACKAGE CONTENTS
The complete kit PODACU15XL-V2 will include a radio harnesses, iPod cable and the interface adapter itself.
IPOD COMPATIBILITY
Although we always suggest upgrading all iPods and iPhones to the latest available firmware, we cannot
guarantee future versions will work with all the features of our kit. Please contact Neo Car Audio if you are
unsure about an update after the kit has been installed and tested.
INSTALLATION
Step 1.
Set the dip switches on the module to the desired mode
Step 2.
Remove or eject all CDs from radio or CD Changer
Step 3.
Disconnect the ground wire (Neg-) from the battery
Step 4.
Remove the radio from the dash
Step 5.
Set the DIP switches to the appropriate configuration
Step 6.
Unplug the factory 14 pin connector from the back of the radio (some vehicles may not have this
connection in use)
Step 7.
Plug the female connection into the XM prewired connection
Step 8.
Plug the male connection from the PODACU15XL-V2 into the factory female connection on the
factory sat tuner module if equipped.
Step 9.
Connect the 18 pin Molex connector into the NEO Prolink module.
Step 10.
Connect the 10 pin mini-din connector into the NEO Prolink module.
Step 11.
Connect any Auxiliary source or extension cable into the RCA AUX inputs.
Step 12.
Test kit and reinstall radio back into the dash.
3
!!!!! IMPORTANT!!!!!
It is strongly recommended that the adaptor is installed in an easy accessible location, so that it can later be
easily reset or upgraded. Eject ALL CDs from the built-in CD player or CD changer before removing the radio
from dash board. SAFETY NOTE: You should always give full attention to driving. Do NOT operate the feature
or function of PODACU15XL-V2 in such a way that distracts you while driving.
SECTION 1. ABOUT INTERFACE
1-1 Introduction
a) This interface connects an iPod (includes the “iPod” on iPhone) directly to your HONDA or ACURA
audio system for optimal playback sound quality.
b) This interface enables iPod to co-exist with HONDA navigation system, CD changer, XM radio receiver
and DVD system, and controls iPod via both car radio and steering wheel control.
c) PODACU15XL-V2’s on board software translates commands from your CD changer control or XM
Band control into commands that the iPod understands.
i)
You can either use the XM control or CD changer control of radio to work with iPod and iPhone. Use
XM control if text display is desired. Radio must have XM button to use XM control.
ii) When use XM control, XM1 is for iPod and XM2 is retained for XM broadcast reception.
iii) ACURA navigation radios are not supported to use XM control configuration. PODACU15XL-V2
should be used for ACURA navigation systems.
d) This interface charges iPod while it is playing and charging stops automatically half hour after iPod is
paused.
e) Future iPod firmware update may affect the features and functions described in this manual.
1-2 Text Display of Song Information
a) Artist name and song title can be displayed on radio by configuring PODACU15XL-V2 to work with XM
buttons on radio.
b) Only DISC number and track number are displayed on radio (Disc number = Playlist number) when use
PODACU15XL-V2 with radio’s CD or AUX button.
1-3 Package Content
PODACU15XL-V2 contains one each of PODACU15XL-V2 interface adaptor, CAS-H2y, CAS-HXM and
CB-PA105.
1-4 Compatibility
Future iPod and iTunes software updates may affect the features and functions described in this owner’s
manual and NEO CAR AUDIO web pages.
4
SECTION 2. Playlist Mode, Direct Mode, Folder Mode and AUX Option
PODACU15XL-V2 provides two ways to control your iPod through car radio, namely (Playlist Mode +
Direct Mode) and (Folder Mode + Direct Mode.).
2-1 Direct Mode
Search and select music on iPod just as you would in portable use. Use the track up/down, fast forward, fast
reverse on radio and steering wheel to control.
Direct Mode is supported in either XM control or CD changer control configuration.
When PODACU15XL-V2 is configured to XM control, XM1-8 is dedicated to Direct Mode.
When PODACU15XL-V2 is configured to CD changer control, DISC# 8 is dedicated to Direct Mode.
In direct Mode, screen and click wheel keypad on iPod is unlocked and functional. No text display on
radio regardless of PODACU15XL-V2is configured to XM control or CD changer control.
Application Tip: Direct Mode makes the playing of free wi-fi music stream such as Pandora.com®
from your iPhone or iTouch to car stereo easy.
2-2 Playlsit Mode
Operate and control the iPod like it is a CD changer. This mode allows you to access five Playlists on iPod
from radio. iPod screen always display “OK to disconnect” or “Attached to accessory” and iPod’s keypad is
not functional or locked. See section 4-2 and 4-3 of this manual for more information.
Playlist Mode is supported in either XM control configuration or CD changer control configuration.
Radio displays artist name and song title only when adaptor is configured to control iPod with XM
buttons on radio.
When PODACU15XL-V2 is configured to use XM control, CH01 to CH06 are Playlists and CH07 is All
Songs on iPod..
When PODACU15XL-V2 is configured to use CD changer control, DISC #1 to DISC #6 are Playlists
and DISC #7 is All Songs on iPod..
If your iPod has more than 6 Playlists, see Playlist Naming in Section 5 of this manual...
2-3 Folder Mode
Access 3 Folders, namely Playlist, Artist and Album on iPod from radio and allows text based song search by
the title of Artist, Album and Playlist. See section 3-1 for more information.
Folder Mode is applicable only when PODACU15XL-V2 is configured to use XM control. And, radio
must have XM button or XM ready.
XM1- 1 accesses Playlist Folder. Display on radio is: PL- name of Playlsit
XM1- 2 accesses Artist Folder. Display on radio is: AR- name of artist
XM1- 3 accesses Album Folder. Display on radio is AL- album name
CAUTION: Do NOT operate text based song search feature when it is distractive or distracting from
giving full attention to driving or to the road. Safe driving is your responsibility.
2-4 AUX Input Option
In addition to iPod, PODACU15XL-V2 also can connect a second audio source to car radio. Connect the
second audio source to the RCA jack labeled AUX INPUT. AUX input is enabled by setting the DIP
switch #1 to ON position at the side of the interface adaptor to ON position.
5
SECTION 3. Mode Setting and Function Control
Please carefully read the three different configuration of PODACU15XL-V2 and decide which one to use and
set the DIP switches accordingly before doing the installation.
Note: Radios do not have XM button can be CD changer control configuration only. See 4-3 section below.
3-1 Folder Mode + Direct Mode Configuration
(Note: this configuration supports text display but is applicable only to radio it has XM button.)
3-1-1 Set DIP switches as follow:
DIP # 2
DIP # 3
DIP # 4
OFF
ON
OFF
Note: DIP switch #1 is only related to RCA AUX option setting and it
is independent from these DIP switches’ setting.
3-1-2 Functions and Radio Buttons
Press XM button on radio to access iPod at XM1
Press XM button on radio to access XM stations at XM2. There will be a time delay when switch
from XM1 to XM2. The period of delay varies by radio model.
Use radio Preset buttons to access iPod Folders, Direct Mode and RCA AUX as follow:
Push….
Radio
Displays
Radio Plays
Preset # 1
XM1- 1
Playlist Folders
Preset # 2
XM1- 2
Artist Folders
Preset # 3
XM1- 3
Album Folders
Preset # 4
XM1- 4
All Songs Folder
Preser # 5
XM1- 5
iPod Direct
Preset # 6
XM1- 6
RCA AUX
Remark
IF DIP #1= ON
Push DISP button on radio to view text information of music. Text display on radio is as follow:
(Note: available on XM ready radio only.
DISP
Prefix Text
Button
form Radio
Text from iPod
1st Push →
XM CHannel NUMBER
track number
2nd Push →
XM CATEGORY
folder type & name
3rd Push →
NMAE
artist name
4th Push →
TITLE
album name
4th Push →
Note
title of music
XM CHannel NAME
Turn the TUNING knob to change track.
Press-and-hold (about 2 seconds) preset button #2 to begin the RANDOM track play and
press-and-hold the preset #2 button 2nd time to terminate the RANDOM play.
Press the preset #3 or the preset #4 will retreat or advance 10 tracks respectively.
Steering wheel control:
6
Several different steering wheel XM control designs are available form Honda and Acura. Some of
the designs allow PODACU15XL-V2 does track up and track down while others only allow Playlist or
Folder change from steering wheel remote control.
In general, it is able to do track up or down if the CH+ and CH- keys on steering wheel are
double-function type. Double-function means the CH+ and CH- buttons can perform two different
tasks depends on the time length of it is being pressed.
3-1-3 iPod Connecting and Playing
When the iPod is connected to interface adaptor and XM1 on radio is pushed, iPod
o
begin play at XM1-CH4.
XM1- CH4 will continue play the track in the Folder which was played prior iPod is connected to
o
PA15-HON2. As soon as the last track if the Folder is completed of playing, iPod will go to the first
track of All Songs folder.
When return to XM1-CH7 from a Folder (i.e. any CH amongXM1-CH1 to XM1-CH3), XM1-CH4
o
will play the track where was left but points to All Songs folder regardless which Folder or Playlist
was played at XM1-CH7 previously.
When return to XM1-CH4 from Direct Mode, XM1-CH4 will continue the track and the folder being
o
played at XM1-CH5 (Direct Mode). As soon as the last track of the folder is completed, iPod will go
to All Songs folder.
3-2 Playlist Mode (with Text Display) + Direct Mode Configuration
(Note: this configuration supports text display but is applicable only to radio it has XM button.)
3-2-1 Set DIP switches as follow:
DIP # 2
DIP # 3
DIP # 4
OFF
ON
ON
Note: DIP switch #1 is only related to RCA AUX option setting.
3-2-2 Functions and Radio Buttons
Press XM button on radio to access iPod at XM1
Press XM button on radio to access XM stations at XM2. There will be a time delay when switch
from XM1 to XM2. The period of delay varies by radio model.
Use DISC+ or DISC- button on radio to access Playlists, Direct Mode and RCA AUX as follow:
(note: DISC- is Preset button #5 and DISC+ is Preset button #6)
At….
Radio Plays
XM1- 1
Playlist # 1
XM1- 2
Playlist # 2
XM1- 3
Playlist # 3
XM1- 4
Playlist # 4
XM1- 5
Playlist # 5
XM1- 6
Playlist # 6
XM1- 7
All Songs
XM1- 8
Direct Mode
XM1- 9
RCA AUX
Remark
IF DIP #1= ON
7
Push DISP button on radio to view text information of music. Text display on radio is as follow:
(Note: available on XM ready radio only)
DISP
Prefix Text
Text from iPod
Note
Button
form Radio
1st Push →
XM CHannel NUMBER
track number
(1)
2nd Push →
XM CATEGORY
folder type & name
3rd Push →
NMAE
artist name
4th Push →
TITLE
album name
4th Push →
title of music
XM CHannel NAME
Turn the TUNING knob to change track.
Press preset button #2 to begin the RANDOM track play and press the preset #2 button 2nd time
to terminate the RANDOM play.
Press the preset #3 or the preset #4 will retreat or advance 10 tracks respectively.
Steering wheel control:
Several different steering wheel XM control designs are available form Honda and Acura. Some of
the designs allow PODACU15XL-V2 does track up and track down while others only allow Playlist or
Folder change from steering wheel remote control.
In general, it is able to do track up or down if the CH+ and CH- keys on steering wheel are
double-function type. Double-function means the CH+ and CH- buttons can perform two different
tasks depends on the time length of it is being pressed.
3-2-3 iPod Connecting and Playing
o
When iPod is connected to interface adaptor and XM on radio is pressed, iPod
will begin play at XM1-4 (some radio design displays XM1-CH 4).
o XM1- CH7 will continue play the track in the Folder which was played prior iPod
is connected to PODACU15XL-V2. As soon as the last track if the Folder is completed of playing,
iPod will go to the first track of All Songs folder.
o When return to XM1-CH7 from a Playlist (i.e. any CH amongXM1-CH1 to
XM1-CH6), XM1-CH7 will play the track where was left but points to All Songs folder regardless which
Folder or Playlist was played at XM1-CH7 previously.
o When return to XM1-CH7 from Direct Mode, XM1-CH7 will continue the track and
the folder being played at XM1-CH8 (Direct Mode). As soon as the last track of the folder is
completed, iPod will go to All Songs folder.
o If iPod has more than 6 Playlists, see Section 5 of this manual for Playlist Naming
instructions.
3-3 Playlist Mode (without Text Display) + Direct Mode Configuration
Note: Radio without a XM button must use this configuration of PODACU15XL-V2.
3-3-1 Set DIP switches as follow:
DIP # 2
DIP # 3
DIP # 4
ON
ON
ON
Note: DIP switch #1 is only related to RCA AUX option setting.
8
3-3-2 Functions and Radio Buttons
Press CD or AUX button on radio to access iPod.
Use DISC+ or DISC- button on radio to access Playlist, Direct Mode and RCA AUX as follow:
At….
Radio Plays
Disc 1
Playlist # 1
Disc 2
Playlist # 2
Disc 3
Playlist # 3
Disc 4
Playlist # 4
Disc 5
Playlist # 5
Disc 6
Playlist # 6
Disc 7
All Songs
Disc 8
Direct Mode
Disc 9
RCA AUX
Remark
IF DIP #1= ON
Track up and down from steering wheel remote control is supported.
3-3-3 iPod Connecting and Playing
When iPod is connected to interface adaptor and CD button is pressed, iPod will play at DISC # 7.
DISC #7 will continue play the track in the Folder which was played prior iPod is connected to
PA15-HON2. As soon as the last track if the Folder is completed of playing, iPod will go to the first
track of All Songs folder.
When return to DISC #7 from a Playlist (i.e. any DISC among DISC #1 to DISC #6), DISC 7 will
play the track where was left but points to All Songs folder regardless which Folder or Playlist was
played previously.
When return to DISC #7 from Direct Mode, DISC #7 will continue the track and the folder being
played at DISC #8 (Direct Mode). As soon as the last track of the folder is completed, iPod will go
to All Songs folder.
If iPod has more than 6 Plylists, see section 5 for the instruction of Playlist.
SECTION 5. Playlist Naming
5-1 When iPod is connected to your radio via PA15-HON2, the adaptor scan all available Playlists and
Folders on iPod and looks for designated HONDA Playlists which are created with iTune for direct
access from HONDA / ACURA radio. The designated HONDA Playlists should be named as follow if
your iPod has more than 6 Playlists.
Playlist # 1: HONDA1
Playlist # 2: HONDA2
Playlist # 3: HONDA3
Playlist # 4: HONDA4
Playlist # 5: HONDA5
Playlist # 6: HONDA6
The word HONDA must be in capital letters and there can be no spaces between the word HONDA
and numbers. You may append text to the designated HONDA Playlist names. Example:
HONDA1-jazz, HONDA3_Favorite3, HONDA5podcast, etc.
9
5-2 If no designated HONDA Playlists are created with iTune, PODACU15XL-V2adaptor will
automatically relates the first 6 available Playlists on iPod to Playlist # 1 to # 6 regardless how the
Playlists are named.
5-3 If less than 6 designated HONDA Playlists are created, PODACU15XL-V2will automatically fill up the
rest of Playlist numbers beginning with the first available Playlist on iPod. Example: if only 3
designated HODA1, HONDA3 and HONDA5 Playlists are created, the Playlist # will be:
Playlist # 1: HONDA1….
st
Playlsit # 2: (the 1 available Playlist on iPod)
Playlist # 3: HONDA3…
Playlist # 4: (the 2nd available Playlist on iPod)
Playlist # 5: HONDA5….
Playlist # 6: (the 3rd available Playlist on iPod)
XM is a registered trade name of XM Satellite Radio Inc.
iPod, iTune are the registered trade name of Apple Computer Inc.
Honda and Acura are registered trade mark of Honda Motor Corporation.
10