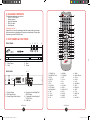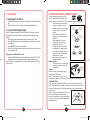
1
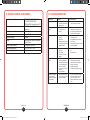
DVD-110
Portable DVD Player
User Manual
DVD-110 User Manual - JH 2009.11.23.indd 1
11/23/2009 10:59:31 AM
Table of Contents
1. Important Safety Instructions
2. Package Contents
3. Part Names & Functions
4. Key Functions
5. Setup & Installation
6.
7.
5.1 Remote Control Battery Installation 5.2 Connect to Television / Sound System
System Settings
6.1 Menu Operation
6.2 System Settings Page
6.3 Language Settings Page
6.4 Audio Settings Page
6.5 Video Settings Page
6.6 Speaker Settings Page
6.7 Digital Settings Page
Playback
7.1 Read and Play Discs
7.2 Playing MP3/MPEG4 Discs
Handling DVDs & Compact Discs
Specifications & Features
8.
9.
10. Troubleshooting
11. Warranty
DVD-110 Portable DVD Player
2
4
4
6
9
9
9
10
10
10
11
11
11
11
11
Thank you for purchasing the Califone® Model DVD-110 Portable DVD
Player.
We encourage you to visit our website www.califone.com to register your
product for its warranty coverage, to sign up to receive our
newsletter, download our catalog, and learn more about the complete
line of Califone audio visual products, including portable and installed
wireless PA systems, multimedia players and recorders, headphones
and headsets, computer peripheral equipment, visual presentation
products and language learning materials.
12
12
12
13
14
15
16
califone.com
1
DVD-110 User Manual - JH 2009.11.23.indd 2-1
11/23/2009 10:59:31 AM
1. IMPORTANT SAFETY INSTRUCTIONS
Before using this product, read the instruction manual for important safety
information. Please retain this manual for future reference and warranty
information.
Troubleshooting & Servicing
Do not attempt to service or repair the device yourself. Refer all servicing
to qualified service personnel. Do not attempt to modify the device in any
way. Doing so could invalidate your warranty.
Moisture and heat sources
Do not use this apparatus near water (for example, sinks, baths, pools) or
expose it to rain, moisture, dripping or splashing liquids. Do not expose
the unit to high temperatures, high humidity or direct sunlight.
Cleaning
When cleaning the device, please use a soft, dry cloth. Never use
benzene, paint-thinner, or other chemicals on the device.
Location
Place the device in stable location, so it will not fall causing damage to
the device or bodily harm.
Intended use
The product may only be used with the original parts intended for it. The
product may only be used in closed and dry rooms. The intended use
includes adherence to the specified installation instructions. The
manufacturer accepts no liability for damage arising due to improper use.
WARNING: Changes or modifications to this unit not expressly approved
by the party responsible for compliance could void the user’s authority to
operate the equipment.
IMPORTANT
This device complies with Part 15 of the FCC Rules. Operation is subject
to the following two conditions:
(1) This device may not cause harmful interference, and (2) this device
must accept any interference received, including interference that may
cause undesired operation.
The unit’s circuitry may cause interference to nearby radios. To prevent
interference, either switch the unit off or move away from the affected
radio.
NOTE: This equipment has been tested and found to comply within the
limits for a class B digital device, pursuant to Part 15 of the FCC Rules.
These limits are designed to provide reasonable protection against
harmful interference in a residential installation. This equipment
generates, uses and can radiate radio frequency energy and, if not
installed and used in accordance with the instructions, may cause
harmful interference to radio communications. However, there is no
guarantee that interference will not occur in a particular installation. If this
equipment does cause harmful interference to radio or television
reception, which can be determined by turning the equipment off and on,
the user is encouraged to try to correct the interference by one or more of
the following measures:
•
•
•
•
Reorient or relocate the receiving antenna.
Increase the separation between the equipment and receiver.
Connect the equipment into an outlet on a circuit different from
that to which the receiver is connected.
Consult the dealer or an experienced radio / TV technician for
help.
NOTE: Shielded cables may be required to be used with this unit to ensure compliance with the Class B FCC limits.
SAFETY CERTIFICATION
This Compact Disc Player is made and tested to meet safety standards
of the FCC, requirements and compliance with safety performance of
the U.S. Department of Health and Human Services, and also with FDA
Radiation Performance Standards 21 CFR Subchapter J.
INVISIBLE LASER
RADIATION WHEN
OPEN AND INTERLOCK
FAILED OR DEFEATED.
AVOID DIRECT EXPOSURE TO LASER BEAM.
DVD-110 User Manual - JH 2009.11.23.indd 2-3
LASER SAFETY
This unit employs an optical laser beam system in the CD mechanism,
designed with built-in safeguards. Do not attempt to disassemble; refer to
qualified service personnel. Exposure to this invisible laser light beam may be
harmful to the human eye.
THIS IS A CLASS-1 LASER PRODUCT. USE OF CONTROLS, OR ADJUSTMENTS OR PROCEDURES OTHER THAN THOSE SPECIFIED HEREIN,
MAY RESULT IN HAZARDOUS LASER LIGHT BEAM EXPOSURE.
califone.com
califone.com
2
3
11/23/2009 10:59:31 AM
2. PACKAGE CONTENTS
2
23
Unpacking the Unit
Inspect the unit once the packaging has been opened for any damage
that occurred during shipping and contact us immediately. Please keep
the packing material for further use.
3. PART NAMES & FUNCTIONS
1
FRONT PANEL
1. Open/ Close
2. Play/ Pause
3. Stop
2 3 4 5
4. Previous
5. Next
6. Power
BACK PANEL
4
6
DVD-110 User Manual - JH 2009.11.23.indd 4-5
5
3 2 1
1. S-Video Output
2. RCA Video Output
3. Coaxial Digital Audio Output
22
1
The following materials are included.
• DVD-110 DVD Player
• Remote control
• 2pcs AAA batteries
• RCA A/V cable
• User Manual
4. Analog Audio Left/Right (ML/
MR) Outputs
5. Component Video Outputs (Y,
Pr/Cb, Pr/Cr)
6. USB Port
6
3
4
5
6
7
8
9
10
11
12
13
14
15
16
17
18
19
20
21
24
25
26
27
28
29
30
31
32
33
34
35
36
37
38
39
DVD-110
1. STANDBY/ ON
14. REWIND 27. MENU
28. RIGHT ARROW
2. NUMBER BUTTONS
15. FORWARD
3. AUDIO 16. STEP 29. ZOOM
4. SUBTITLE
17. SLOW 30. PAUSE
31. OSD
5. SETUP 18. R/L
6. TITLE
19. N/ P 32. PROGRAM
33. NEXT
7. UP ARROW
20. VOLUME 34. PREVIOUS
8. LEFT ARROW
21. VIDEO
35. MUTE
9. DOWN ARROW
22. OPEN/ CLOSE
36. STOP
10. PBC
23. GOTO
37. DVD/ USB
11. PLAY
24. CLEAR
38. REST
12. REPEAT
25. ANGLE
39. VOLUME +
13. A-B 26. ENTER
califone.com
califone.com
4
5
11/23/2009 10:59:32 AM
4. KEY FUNCTIONS
Note: Some of the following buttons are on the remote control, and some
are only on the machine. The button may also function differently on the
machine or remote control.
PLAY
Press this key to begin playback or to resume normal playback from
pause, fast forward, or fast reverse states.
STANDBY / ON
Press this key to turn on the dvd player and to bring it to standby.
PAUSE
Press this key to pause playback, and then press this key or press
[ ] to resume normal playback.
OPEN / CLOSE
Press this key to open and close the disc tray
ZOOM
Press this key to zoom. Three different levels of zoom are available.
GOTO
Press this key and then use the direction keys or number keys to select
a specific title, chapter, song, title time, chapter time or song time to play.
REPEAT
Press this key to change the repeat mode.
AUDIO
Press this key to select the audio settings.
SUBTITLE
Press this key to switch between any available subtitles on the DVD.
ANGLE
Press this key to switch between different video angles available on the
DVD.
CLEAR
Press this key to clear an entry or exit a mode.
SETUP
Press this key to setup the system.
TITLE
Press this key to return to display the DVD title content.
A-B
Press this key to set the starting point (A) and then press again to set
the ending point (B). The machine will repeat the content from point A
to point B. Press the A-B key a third time and it will cancel and resume
normal playback.
PROGRAM
Press this key to program specific song/chapters to play.
OSD
Press once to enter the system settings main menu, and then press
again to withdraw from the system settings menu. In the menu, the
number keys can be used to enter the corresponding options or select
the appropriate chapters or tracks.
FAST REVERSE (REV)
Press this key for fast backward search. You can select the speed of
2X, 4X, 8X, 20X.
MENU
Press this key to return to the DVD menu.
FAST FORWARD (FWD)
Press this key for fast forward search. You can select the speed of 2X,
4X, 8X, 16X, and 32X.
PBC
Plays DVDs interactively by following the menu on the TV screen.
SKIP BACKWARD (PREV)
Press this key to skip to the previous chapter or song.
DVD-110 User Manual - JH 2009.11.23.indd 6-7
califone.com
califone.com
6
7
11/23/2009 10:59:32 AM
SKIP FORWARD (NEXT)
Press this key to skip to the next chapter or next song.
STEP
This button pauses playback. Then every time it is pressed, playback
proceeds one frame at a time.
SLOW
Press this key when the disc is playing to play the images/frames slowly.
You can select the speed of 1/2X, 1/3X, 1/4X, 1/5X, 1/6X, and 1/7X.
STOP
Press this key once to pause, and then press [
] to continue playing.
Press this key twice continuously to stop playback entirely.
MUTE
Press this key to mute the audio. Press again to unmute the audio.
R/L
When playing a VCD, press this key to switch between left and right
speakers.
N/P
Press this button to switch between NTSC and PAL outputs.
RESET
Press this button to reset the settings to factory default.
DVD / USB
To switch between different sources, first stop playback of the DVD.
Then press the DVD/USB key. Next, use the up/down keys to select the
desired signal source.
5. SETUP & INSTALLATION
5.1 REMOTE CONTROL BATTERY INSTALLATION
1. Open the battery compartment cover and insert two AAA alkaline
batteries inside the battery compartment. Follow the polarity as
indicated in the battery compartment.
2. Close the battery compartment cover.
Caution:
• Do not attempt to recharge, short-circuit, disassemble, heat or
throw the batteries into a fire.
• During extended storage please be sure to remove batteries
from remote to avoid possible damage caused by leakage and/or
corrosion.
• Do not mix alkaline, standard (carbon-zinc), or rechargeable
batteries.
• Do not try to recharge batteries that are not intended to be
recharged; they can overheat and rupture. (Follow the battery
manufacturer’s directions).
• Dispose of old batteries properly in accordance with local laws.
Low Battery
When batteries are low the remote will not function properly and
the batteries must be replaced.
5.2 CONNECT TO TELEVISION / SOUND SYSTEM
1. Connect Video Output (RCA / S-Video / Component) to Video input
of TV or monitor.
2. Connect Analog Audio Outputs using RCA cables (red on top,
white on bottom) to the audio input of the TV or PA / sound system.
Optionally, connect the COAX output from the DVD player to the
Digital Audio input of the PA / sound system.
VOLUME + / Press [VOL +] to increase volume, press [VOL-] to reduce the volume.
VIDEO
Press this button set the video settings.
DVD-110 User Manual - JH 2009.11.23.indd 8-9
califone.com
califone.com
8
9
11/23/2009 10:59:32 AM
6. SYSTEM SETTINGS
Resume
• Use this to turn the resume function on or off.
6.1 MENU OPERATION
1. Press [SETUP] to display the system settings menu. The MENU
page allows setting to be changed for: System, Language, Audio,
Video, Speaker, and Digital Output.
2. Press the up/down direction keys to select the settings page.
3. Press the right direction key to enter the page. Then use the up/down
keys to select the specific menu item and press [ENTER] or [OK] to
confirm the selection and change the setting.
4. Press [SETUP] again to exit the system settings menu.
6.2 SYSTEM SETTINGS PAGE
TV System
• Select NTSC, PAL, or Auto.
Screen Saver
• Turn the screen saver on or off.
Video
• Select Interlace-YUV, PScan or S-Video.
TV Type
• Select the size of the TV screen.
Password
• Select the Password function to change the password used for the
Parental Control function.
• When selecting the Set Password function, first the old password
must be entered. A message will appear when the corect password
has been entered. Then select the Set Password function again. A
prompt will be displayed to enter the new password. Once the new
password is entered, it has been set and can be used immediately.
Rating
• Use this function to set the maximum MPAA rating of discs allowed to
play on the unit.
• Note: The default password is “0000”.
• Use the right direction key and then the up/down direction keys to
select the maximum playable MPAA rating. (Kid Safe, G, PG, PG-13,
PG-R, R, NC-17, Adult)
• When a disc is inserted that is higher than this rating, a message will
appear asking whether to play the disc or not. If YES is selected, the
user must enter the password for playback to begin.
Default
• Use this to restore the factory default settings.
DVD-110 User Manual - JH 2009.11.23.indd 10-11
6.3 LANGUAGE SETTINGS PAGE
Select the language for the OSD (ON SCREEN DISPLAY), Audio,
Subtitle, and Menu. Language options include English, German,
Spanish, French, Poruguese, Italian, and Dutch.
6.4 AUDIO SETTINGS PAGE
Audio Out
• Select Raw / PCM / Off depending on the type of digital audio input
settings of equipment you are connecting to the COAX (digital
audio).
6.5 VIDEO SETTINGS PAGE
Select the settings for the Brightness, Contrast, Hue, and Saturation.
6.6 SPEAKER SETTINGS PAGE
Downmix
• Allows settings to be changed to LT/ RT, STEREO, or VSS.
6.6 DIGITAL SETTINGS PAGE
OP Mode
• Select to setup the Line Out, RF and Remod.
Dynamic Range
• The Dynamic Range reduces the dynamics of the sound allowing the
loud passages and quite passages to play at similar levels.
Dual Mono
• Select to set Stereo, Mono L, Mono R, and Mix Mono.
califone.com
califone.com
10
11
11/23/2009 10:59:32 AM
7. PLAYBACK
8. HANDLING DVDs & COMPACT DISCS
7.1 READ AND PLAY DISCS
1. Press [OPEN] to open the disc tray. Insert the CD or DVD (label side
up).
2. Close the disc tray. The machine will automatically play disc.
7.2 PLAYING MP3/MPEG4 DISCS
This DVD player can read MP3 and MPEG4 discs. When such a disc
is inserted in the machine, the disc contents will be displayed on the
screen.
1. Press the up and down direction keys to select a file or folder.
2. Press [ENTER] to enter the selected folder and display the contents
of the folder.
3. Press [ENTER] to play the selected file.
4. When the disc stops, press the left direction key to return back to the
disc contents menu.
Playing from a USB flash/hard disk
• Connect USB flash/hard disk to the USB jack. Press [DVD / USB],
then press up and down direction keys to select the file to play.
Note: If there are no playable files, the machine will display the “Empty”
on the screen.
This unit is designed to play only DVDs
and CDs bearing the identification logos.
Other discs may not conform to the CD standard and may not play properly.
• Dirty, scratched or warped discs
may cause skipping or noise.
INSERT WITH
PRESS THE CLAWS
• Handle the disc only by the edges.
THE LABEL
AT THE CENTER OF
FACING UP.
THE DISC CASE.
To keep clean, do not touch its
surface.
• Discs should be stored in their
PRESS THE
LIFT OUT WITHOUT
DISC GENTLY
TOUCHING THE
cases after use to avoid serious
TO INSERT IT.
RECORDED SURFACE.
scratches.
• Do not expose disc to direct
sunlight, high humidity, high
INCORRECT
temperature, dust, etc.
Prolonged exposure to extreme
temperatures can warp the disc.
CORRECT
INCORRECT
• Do not stick or write anything on
either side of disc. Sharp writing
FROM THE CENTER TO THE EDGE
instruments or the inks
used in some felttip pens may
damage its surface
Remove the disc
• To pick up the disc, hold the edge
and gently press the center pivot
as illustrated.
Caution:
Wait for the disc to stop rotating before
pressing the OPEN button.
Note: This unit can play 3” (8cm) single
CDs without an adapter. Do not use a CD single adapter for these discs.
CLEANING DISCS
Finger prints should be carefully wiped from the surface of disc with a soft
cloth. Unlike conventional records, compact discs have no grooves to collect
dust and microscopic debris, so gently wiping them with a soft cloth should
remove most
particles. Wipe in a straight motion from the
center to the edge. Never use thinner,
benzine, record cleaner or anti-static spray on
a compact disc. Such chemicals can damage
its plastic surface.
califone.com
12
DVD-110 User Manual - JH 2009.11.23.indd 12-13
13
11/23/2009 10:59:32 AM
9. SPECIFICATIONS & FEATURES
File/Disc Compatibility
DVD/ DVD-R/ DVD-RW/ VCD/
CD/ CD-R/ CD-RW/ MP3/
MPEG4/ JPEG/ Kodak Picture CD
Video Output
PAL/NTSC, 1Vp-p / 75 Ohm unbalanced
Audio Frequency Response
20Hz - 20kHz
Audio Output
2Vrms / 10kOhm
Dynamic Range
> 100dB
Laser
Semiconductor laser, wave length:
650nm/795nm
Power Requirements
100-240VAC~50-60Hz
Product Dimensions
8.875” x 8.125” x 1.875”
Product Weight (incl. accessories)
2 lbs. 6 oz.
10. TROUBLESHOOTING
Symptoms
Reasons
Corrective Action
No power
•
Power cord is not
securely connected to
power outlet.
•
Insert the power cord securely to the power outlet.
No image on TV
screen
•
Video cable
connection is not
secure.
•
Firmly insert one end of AV
cable into the machine (A/V
OUT jack) and the other end
into the TV’s A/V IN jack.
No sound
•
Volume is on lowest
setting
Mute is on.
Machine is in the fastforward /fast-backward
playback state.
•
Press [Volume +] key to
increase volume.
Press [Mute] key to resume
the volume.
Press the [Play] key to resume
normal playback.
Disc is inserted improperly.
Disc is dirty.
The disc is not compatible.
•
The remote control
is not pointed at the
window on the bottom
front of the machine.
Remote control is
too far away from the
machine
Low/no battery.
•
The USB drive / memory card may not have
proper formatting.
•
•
•
Cannot play discs
•
•
•
Remote control
failure
•
•
•
Inserting USB drive
or memory card
causes DVD player
to freeze/halt
DVD-110 User Manual - JH 2009.11.23.indd 14-15
•
•
•
•
•
•
•
califone.com
califone.com
14
15
Insert disc with the label facing
up.
Clean the disc.
Point the remote.
control at the IR window.
Use remote control within 6
meters of machine.
Replace the battery.
Power off and then on again.
Turn off the machine, unplug.
Reconnect power and then
turn on the power. Try a
different USB drive / memory
card.
11/23/2009 10:59:33 AM
11. WARRANTY
Califone warrants this product to be free from defective material
and workmanship for one year from the purchase date. Our “Project
Intercept” Customer Satisfaction program will replace defective parts and
repair malfunctioning equipment under this warranty when the defect
occurs under normal use.
All Damage Claims Must Be Made With the Freight Carrier
Notify the freight carrier immediately if you observe any damage to the
shipping carton or product. Repack the unit in the carton and await
inspection by the carrier’s claim agent. Notify your dealer of the pending
freight claim.
Returning Your Unit for Service or Repairs
Should your unit require service, contact our Customer Service
Department online at califone.com/techsupport or via email warranty@
califone.com or by phone at 800-722-0500 / 818-407-2400 to first obtain
an RA (Return Authorization) number before returning it to Califone. The
unit must be returned to our factory via prepaid transportation only after
the factory issues an RA number, which must be clearly written on the
outside of the box.
DVD-110 User Manual - JH 2009.11.23.indd 16-17
califone.com
califone.com
16
17
11/23/2009 10:59:33 AM
Califone® International, Inc.
1145 Arroyo Avenue, #A
San Fernando, CA 91340 USA
Toll Free 800.722.0500 | Toll Free Fax 877.402.2248
International Customers call 818.407.2400 or Fax 818.407.2405
califone.com
Califone DVD-110 Rev 01 1109
DVD-110 User Manual - JH 2009.11.23.indd 18
11/23/2009 10:59:33 AM