1
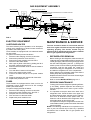
12 Volts DC Connection
This refrigerator model is not designed for 12 volt DC
operation of the cooling system; however, a continuous
12 volt DC must be supplied to the refrigerator to operate
the controls. Use a minimum of a 14 gauge wire
between the battery and refrigerator to supply the
control voltage. The connection is made to the positive
(+) and negative (-) terminals of the terminal block on
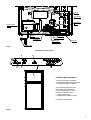
the back of the refrigerator. (See FIG. 1).
Correct polarity must be observed when connecting to
the DC supply.
DO NOT use the chassis or vehicle frame as one of the
conductors. Connect two wires at the refrigerator and
route to the DC supply.
INSTALLING REFRIGERATOR IN
ENCLOSURE
NOTE: DO NOT install the appliance directly on
carpeting. Carpeting must be removed or
protected by a metal or wood panel beneath the appliance which extends at least
full width and depth of the appliance.
The refrigerator must be installed in a substantial enclosure and must be level. When installing the refrigerator
in the enclosure, all areas within the recess in which the
refrigerator is installed must be sealed.
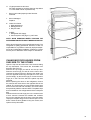
Make sure that there is a complete seal between the
front frame of the refrigerator and the top, sides and
bottom of the enclosure. A length of sealing strip is
applied to the rear surface of the front frame for this
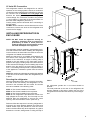
purpose. Also apply a sealing strip to the foremost floor
of the enclosure and apply a second sealing strip to the
bottom of the trim strip on the front base as shown in
FIG. 4. The sealing should provide a complete isolation
of the appliance’s combustion system from the vehicle
interior.
NOTE: Be careful not to damage the sealing strip applied
to the floor of the enclosure when the refrigerator is put
in place.
Securing the refrigerator
After the refrigerator is put in place, (ensuring a combustion seal at the front frame), the refrigerator is to be
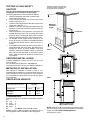
secured in the enclosure with six screws. The screws
have to be installed in the following order:
STEP 1: Two Screws installed on front base.
STEP 2: Two Screws installed in the top frame.
STEP 3: Two Screws installed in the rear base.
STEP 4: The refrigerator is provided with a lower front
strip (shipped as a loose part). The front strip is to be
attached after the refrigerator is set into the cutout
opening, and secured with 3 screws. (See FIG. 5).
FIG. 4
3 rd.
2 nd.
1 st.
FIG. 5
4 th.
the refrigerator greater den 1-1/2 inches should be
blocked.
The heat produced at the rear of the refrigerator will
become trapped in this space, making the top of the
refrigerator hot and reduce the efficiency of the refrigerator.
Failure to follow the sequence in securing refrigerator in
enclosure can cause leakage between the frame and
cabinet. Plastic caps are provided to cover the screw
holes in the decoration strip, at the top frame. Any space
between the counter, storage area or ceiling and top of
5