1
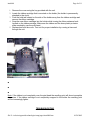
inst4000
Page 1 of 11
The PTR-4000 Payroll Time Recorder records and summarizes weekly, BI-weekly (requires
one time card per week per person), semi-monthly or monthly payroll information for up to 100
employees. The PTR-4000 uses bar-coded time cards (item #44100-10) that are prenumbered 1 to 100. For each pay period an individual is assigned one pre-numbered (located
in the upper right hand corner) time card. New time cards must be issued after every pay
period.
Note: Do not use duplicate time card numbers during a given pay period. In addition, use only
Rev. D or greater time cards (noted at the bottom of each time card). If you have lower
revision level cards, please contact our Technical Service Dept. at 1-888-479-7264.
Each PTR-4000 is equipped with an internal memory backup that will protect payroll data for
up to one month.
SET-UP INSTRUCTIONS
STEP 1 – UNPACKING
1. Remove the PTR-4000 from its box and place it on a firm surface.
2. Plug unit into an outlet.
3. Locate key packaged with the unit, unlock and remove the front cover of the unit. Locate
the programming buttons which are labeled SELECT, UP, and DOWN.
STEP 2 – PROGRAMMING THE PTR-4000
The PTR-4000 is shipped pre-programmed with a sample setup for a weekly payroll beginning
on Monday and ending on Sunday. Programming the PTR-4000 to your specific payroll needs
is very easy and can be done in 3 easy steps.
1. To change or set a feature, press the SELECT button until the desired feature is
displayed.
2. Use the UP or DOWN button to change the feature.
file://L:\websites\pyramid-technologies\temp\pages\inst4000.htm
10/24/2002
inst4000
Page 2 of 11
3. After the displayed feature is changed, press the SELECT button to change other
features and to return to the main display.
Note: Selecting YES for the SET-UP PAY feature will clear all recorded payroll data. If YES is
selected, new time cards must be issued.
STEP 3 – READY TO GO
Reinstall front cover and lock unit and you are ready to use your PTR-4000.
FEATURE TABLE
LANG=ENGLISH – Use the UP or DOWN key to select the desired language to print and
program the Model 4000. Select English, Spanish, French or German.
SET YEAR – Use the UP or DOWN key to set the desired year (default set at current year).
SET MONTH – Use the UP or DOWN key to set the desired month (default set at current
month).
SET DAY – Use the UP or DOWN key to set the desired day of month (default set at current
date).
DAYLIGHT SAV=USA – Allows the Model 4000 to automatically adjust to daylight savings
time. There are 4 options you can select with the UP or DOWN key:
1. USA-Automatically adjusts time to United States daylight savings time.
2. EURO-Automatically adjusts time to European daylight savings time.(Begins last
Sunday in March and ends on the last Sunday in October)
3. OTHER-Allows you to select a custom start and end Sunday for automatic daylight
savings time changes. After SELECTING OTHER, use the UP or DOWN key to
select the desired Sunday (only Sundays are allowed) you wish to START daylight
savings time, press SELECT and again use the UP or DOWN key to select the
desired Sunday to END daylight savings time. Note: The time will automatically
change at 2 a.m. on the selected Sundays. Press SELECT and the TIME
STD=LINE option will appear. Press SELECT again to advance to the next option.
(Note: The TIME STD=LINE option should only be changed for areas where there
is frequency variation in the power lines, however, this does not occur in the US. If
you are operating this unit in an area that has problems with power line frequency
file://L:\websites\pyramid-technologies\temp\pages\inst4000.htm
10/24/2002
inst4000
Page 3 of 11
resulting in the unit loosing or gaining time or you are running the unit off a
generator/inverter, use the UP or DOWN key to change the TIME STD to
CRYSTAL which will cause the unit to keep time using an internal device.)
4. OFF- Unit will not adjust time for daylight savings time.
DSPLY FMT=AM/PM – Selects how the time will be displayed on the front of the unit. Using
the UP or DOWN keys, select one of the following options:
1. AM/PM - Standard time (1-12 hours).
2. MIL - Military time (0-23 hours).
PRINT FMT=AM/PM – Selects how time will be printed on the time card. Using the UP or
DOWN keys, select one of the following options:
1. AM/PM - Standard time(default setting) (i.e. 3:30 PM).
2. MIL- Military time (i.e. 3:30 PM = 15:30).
3. ATAAP-Military time with minutes expressed in hundredths of hour (i.e. 3:30 PM =
15.50).
SET HOUR – Sets the current hour of day by using the UP or DOWN key.
SET MINUTES – Sets the current minute of day by using the UP or DOWN key.
Note: The PTR-4000 has an internal clock. Changing any of the features listed above will not
effect the time totals even if an individual is clocked in during the change. Changing any of the
features listed below will clear all the stored payroll data including time totals. At this point
new time cards must be issued.
SETUP PAY ? NO – This feature allows you to set other features that affect how the PTR4000 calculates the time totals. By selecting YES with the UP or DOWN key, the below listed
features can be modified. By selecting NO, you will return to the main display and you will
have accepted all the default features as listed below.
ARE YOU SURE ? NO – This feature is listed to remind an individual that all the stored
payroll data will be cleared. By selecting YES with the UP or DOWN key, the below listed
features can be modified. By selecting NO, you will return to the main display.
file://L:\websites\pyramid-technologies\temp\pages\inst4000.htm
10/24/2002
inst4000
Page 4 of 11
TOTAL FMT = HR:MIN – Sets the format as to how the individual and running totals will be
displayed on the time card. Using the UP or DOWN keys, select one of the following options:
1. HR:MIN – Standard hour and minute format (default setting) (8 hours and 30
minutes total would be displayed as 8:30)
2. HR.HUN - Standard hour with minutes in hundredths of hour (8 hours and 30
minutes total would be displayed as 8.50)
RESET=WEEKLY – Use the UP or DOWN key to select one of the following pay periods.
Press the SELECT key after you arrive at the required pay period.
1. RESET=WEEKLY – SELECT this option for weekly payroll. Once selected the
clock will then indicate RESET DAY=SUN. Use the UP or DOWN key to select the
last day of your pay period which will be referred to as the reset day. This is the
day that the PTR-4000 will reset all stored payroll data. New time cards must be
issued after this time. Using the UP or DOWN key, you can select Sunday (SUN)
through Saturday (SAT). New time cards must be issued after each reset period
(weekly). This features allows two IN/OUT punches per day average or 28 total
punches per period.
2. RESET=BI-MONTHLY – SELECT this option for bi-monthly payroll (two times per
month). Use the UP or DOWN key to select one of the following reset days.
1. 15th& LAST – 15th and last day of the
month
2. RST=14th&LAST-1 – 14TH and 1 day
before the last day of the month
3. RST=13th&LAST-2 – 13th and 2 days
before the last day of the month
4. RST=12th&LAST-3 – 12th and 3 days
before the last day of the month
5. RST=11th&LAST-4 – 11th and 4 days
before the last day of the month
6. RST=10th&LAST-5 – 10th and 5 days
before the last day of the month
7. RST=16th&1st – 16th and 1st day of
the month
New time cards must be issued after each reset period. This
features allows two IN/OUT punch per day average or 64
total punches per period (2 per line).
file://L:\websites\pyramid-technologies\temp\pages\inst4000.htm
10/24/2002
inst4000
Page 5 of 11
4
1. RESET=2 WEEKS – SELECT this option for a payroll administered every 2 weeks.
Use the UP or DOWN key to select the last date of your 2 week pay period which
will be referred to as the reset day. This is the date that the PTR-4000 will reset all
stored payroll data. The clock will also reset automatically every two weeks from
the chosen date.
New time cards must be issued after this time. This features allows two IN/OUT
punch per day average or 64 total punches per period (2 per line).
2. RESET=MONTHLY – Select this option for a monthly payroll. Use the UP or
DOWN key to select the last day of your pay period which is known as reset day:
1. RESET DAY=LAST - last day of the
month
2. RESET DAY=LAST-1 - 1 day before
the last day of the month
3. RESET DAY=LAST-2 - 2 days before
the last day of the month
4. RESET DAY=LAST-3 - 3 days before
the last day of the month
5. RESET DAY=LAST-4 - 4 days before
the last day of the month
6. RESET DAY=LAST-5 - 5 days before
the last day of the month
7. RESET DAY=1st – 1st day of the
month.
New time cards must be issued after each reset period This
features allows one IN/OUT punch per day average or 64
total punches per period (2 per line).
RESET HOUR = 10PM – Sets the reset hour for the day (days) outlined above using the UP
or DOWN key. The default setting is 10PM.
Note: In some three-shift operations, an individual might punch in prior to the reset period but
will not punch out until after the reset period. This is not a problem. The PTR-4000 will not
file://L:\websites\pyramid-technologies\temp\pages\inst4000.htm
10/24/2002
inst4000
Page 6 of 11
will not punch out until after the reset period. This is not a problem. The PTR-4000 will not
reset that card until the individual punches out, however, the card number (upper right hand
corner of card) should not be issued to any other employee until he/she punches out.
MAX HRS/PUNCH = 13 – The purpose of this feature is to guard against an individual who
forgets to punch out. This feature sets the number of hours allowed between punches. For
example, if 13 hours is selected using the UP or DOWN key and an individual punches in and
then forgets to clock out, the PTR-4000 will print the next line as an "in" punch if more than 13
hours have elapsed. The time card will show the "in" punch followed below by a space were
the "out" punch would have been located and then followed by the correct "in" punch. Hours
can be set from 10-99. The default is set at 13 hours.
ROUNDING = NONE – This feature is known as rounded time, flex time, or grace period and
only affects how the PTR-4000 calculates the clock in/out totals and the running totals but
does not affect the printed punch in/out time. Many businesses allow a "grace" period for
employees when they clock in or out. This is done either to allow for variations in the time
shown on different clocks, watches and time recorders throughout a company, or just to make
the calculation of payable time simpler by "rounding off" the times recorded on a time clock.
Use the UP or DOWN key to select one of the four options listed below:
1. NONE – Turns rounding off. With this option, the PTR-4000 will calculate the clock
in/out totals and running totals using the actual clock in/out times.
2. 15 MIN – This option is known as the "15 minute rule" or the "7/8 rule" and is the
most commonly used. With this option, the clock in/out and running totals will be
rounded to the nearest 15 minute mark, therefore, up to 7 minutes before the 15
minute mark, the starting time used to calculate the pay totals will move ahead to
the nearest 15 minute mark.
Up to 8 minutes after every 15-minute mark, the starting time used to
calculate the pay totals will move back to the nearest 15 minute mark.
For example, if a person clocks in at 7:52, the PTR-4000 will calculate
the time totals starting at 7:45, however, if the next individual clocks in
at 7:53, the PTR-4000 will calculate the time totals starting at 8:00.
Conversely, if an individual clocks in at 8:07, the time totals will
calculate assuming an 8:00 start time. If the next individual clocks in at
8:08, then the totals will be calculated assuming an 8:15 start time.
1. 10 MIN – This is the "10 minute rule". With this option, the clock in/out and running
totals will be rounded to the nearest 10 minute mark and will round "forward" at 5
minutes before the 10 minute mark and will round "back" up to 5 minutes after
every 10 minute mark.
2. 5 MIN – This is the "5 minute rule". With this option, the clock in/out and running
totals will be rounded to the nearest 5-minute mark and will round "forward" at 2
minutes before the 5-minute mark and will round "back" up to 3 minutes after every
5-minute mark.
file://L:\websites\pyramid-technologies\temp\pages\inst4000.htm
10/24/2002
inst4000
Page 7 of 11
Press SELECT to return to the main display.
NEED HELP? If you have any questions, please call Pyramid Technologies Technical Service
toll free at 1-888-479-7264.
TIME CARDS
The PTR-4000 uses custom time cards (item #44100-10) that are pre-numbered 1-100. As
noted prior, you cannot use two of the same numbered time card during the same pay period.
Do not cover the black rectangles on the left side of the time cards. The same time card is
used for weekly, bi-weekly, semi-monthly, and monthly pay periods; however, the print format
will be different as noted below:
WEEKLY– In this mode the time card will accept up to 28 punches per period which will allow
for 7 days and four punches per day, however it is not necessary to use all 28 punches nor is
it necessary to have 4 punches per day. The only constraint is 28 punches per period. For biweekly payroll, two cards must be issued.
Print format is as follows:
Clock in – Month, Day, Clock in time, "IN", Day of week
Clock out - Month, Day, Time, Clock in/out time total, Running
time total
SEMI-MONTHLY. 2 WEEKS, BI-WEEKLY AND MONTHLY- In these modes the time card will
accept up to 64 punches per period (2 per line, for a total of 32 lines maximum). Print format is
as follows (both clock in/out is on same line of the time card):
Clock in – Day of week, Clock in time
Clock out - Clock out time, Clock in/out time total, running time total
CHANGING THE PRINT RIBBON
file://L:\websites\pyramid-technologies\temp\pages\inst4000.htm
10/24/2002
inst4000
Page 8 of 11
1. Remove the cover using the key provided with the unit.
2. Locate the ribbon cartridge that is mounted on the holder (the holder is permanently
attached to the clock).
3. Push the hold tab located on the side of the holder away from the ribbon cartridge and
remove the ribbon cartridge.
4. Snap the new ribbon cartridge into the holder while turning the ribbon advance knob
located on the ribbon cartridge. Make sure the ribbon and the clear plastic protector
slide completely over the print head.
5. Replace and lock the cover. Test unit for proper installation by running a time card
through the unit.
Note: If the ribbon is not completely over the print head the resulting print will show incomplete
characters. If the ribbon cartridge is not completely snapped in the holder the resulting print
will be increasingly lighter.
TROUBLESHOOTING
file://L:\websites\pyramid-technologies\temp\pages\inst4000.htm
10/24/2002
inst4000
Page 9 of 11
The PTR-4000 is programmed with a number of error codes that will help troubleshoot the
unit. The error code will typically indicate on the front display for several seconds. Error codes
are as follows:
CARD FEEDS WITH NO PRINT OR ERROR MESSAGE –1. Check that the ribbon cartridge
is snapped completely down and the ribbon is over the print head. 2. Make sure the black bars
on the left side of the time card are not covered or damaged.
ERROR 1 – Indicates time card stuffing. If an individual tries to force a card into the unit, the
PTR-4000 will accept the card but will not print or store any payroll data. If this situation
occurs, an ERROR 1 will show on the front display and the card will not be "punched".
Solution: Rerun the time card through the time recorder without pushing on the card.
ERROR 2,5,6 – Indicates a time card feed or jam. If an individual tries to load a time card into
the PTR-4000 sideways or if the card is extremely damaged, the time card may temporarily
jam the transfer mechanism but will not store any payroll data. If this situation occurs an
ERROR 2,5 or 6 will show on the front display and the card will not be "punched". Solution:
Inspect the time card, straighten if necessary and rerun the time card through the time
recorder.
ERROR 3 – Indicates unit is not reading the bar codes on the time card. An ERROR 3 will
show on the front display. Solution: Inspect the time card, straighten if necessary and rerun
the time card through the time recorder.
ERROR 7 – Indicates print head position error. This error occurs if the print head is not in its
proper position. If this situation occurs, an ERROR 7 will show on the front display and the
card will not be "punched". Solution: Rerun the time card through the time recorder.
ERROR 14,15,50,51 – Indicates internal electronic error. Contact Pyramid Technical Service.
file://L:\websites\pyramid-technologies\temp\pages\inst4000.htm
10/24/2002
inst4000
Page 10 of 11
MASTER RESET – This procedure will clear the entire time clock memory and reset the
program to the original factory defaults. This procedure should only be used if the time clock
is behaving completely erratic. Master reset is accomplished by unplugging the unit and then
plugging the unit back in while depressing the center programming button (the UP button).
Hold the center button until the front display is visible. All time, set-up, and payroll data will be
set to the original factory defaults.
Frequently Asked Questions
Q: When do I need new Time Cards?
A: New time cards are needed on the first day of each new pay period or immediately after
making any changes in the "SETUP PAY" feature.
Q: Do I have to use consecutive numbered time cards during a pay period?
A: No, however, we strongly recommend you distribute time cards in consecutive order to
prevent the use of the same or duplicate numbered time card in a given pay period.
Q: Why are some punches on top of other punches or there is a large space between
punches?
A: There are a number of issues that can cause this problem and are listed below in order of
most common occurrence. In either case a master reset must be performed to correct this
problem-ref. MASTER RESET of this instruction booklet:
1. The same or duplicate numbered cards is used in the same pay period.
2. The "SETUP PAY" feature is changed during a pay period and new time cards are not
used.
3. An employee forgot to punch in or out and the time between punches has exceeded the
hours set in the "MAX HRS/PUNCH" feature. A master reset is not required, however,
the totaled hours must be manually adjusted at the end of the pay period.
4. If you are running a 3 shift, 24-hour operation with more than 50 employees, please call
customer assistance at Pyramid Technologies for set-up assistance on this issue.
Q: Does the PTR-4000 Time Recorder calculates overtime?
file://L:\websites\pyramid-technologies\temp\pages\inst4000.htm
10/24/2002
inst4000
Page 11 of 11
A: The PTR-4000 Time Recorder will provide you a running total for all hours worked.
Because overtime policies vary from company to company, overtime must be calculated
manually.
Q: Does the PTR-4000 Time Recorder have an automatic lunch deduction feature?
A: The PTR-4000 Time Recorder provides a running total of hours between punches and
therefore any payroll deductions must be made manually at the end of a pay period.
Q: What does ATAAP mean?
A: ATAAP is the acronym used by the U.S. government that describes how time is accounted
for using hundredths of hour (i.e. one and quarter hours equals 1.25 hours).
Copyright © 2000 Pyramid Technologies, LLC
file://L:\websites\pyramid-technologies\temp\pages\inst4000.htm
10/24/2002