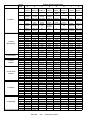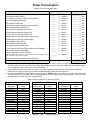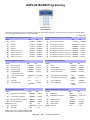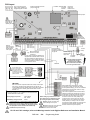
1
Digiplex 48-Zone Control Panel (DGP-848)
Programming Guide
Software Version 4.13
Includes DGP-641BL/RB
Programming Guide
DGP-848
Default Installer Code
000000 (see section [800] on page 39)
Default System Master code
123456
How Do I Enter Programming Mode?
1.
2.
3.
4.
Press and hold the [0] key.
Enter your [INSTALLER CODE].
Enter 3-digit [SECTION].
Enter required [DATA].
Decimal and Hexadecimal Programming Table
Certain sections may require the entry of one or more Hexadecimal values from 0 to F.
For LCD keypads:
[0] to [9]
[STAY]
[FORCE]
[ARM]
[ENTER]
= values 0 to 9 respectively
=A
=B
=C
= Save current data and advance to next section
[DISARM]
[BYP]
[MEM]
[CLEAR]
=D
=E
=F
= Exit section without saving
For Grafica keypads:
[0] to [9] = values 0 to 9 respectively
= A to F (press the [#] key until the desired letter
appears)
[# ]
DGP-848
Right Action Key (Exit)
= Exit section without saving
Center Action Key (Save) =Save current data and advance to next
section
-1-
Programming Guide
Table of Contents
Serial Number List ................................................................................................................................................................. 3
Zone Programming................................................................................................................................................................ 5
Keyswitch Programming........................................................................................................................................................ 8
Access Control .................................................................................................................................................................... 11
Programmable Outputs ....................................................................................................................................................... 14
Other Settings...................................................................................................................................................................... 17
Zone Labels......................................................................................................................................................................... 17
System Options ................................................................................................................................................................... 18
Partition 1: Options .............................................................................................................................................................. 20
Partition 2: Options .............................................................................................................................................................. 21
Partition 3: Options .............................................................................................................................................................. 22
Partition 4: Options .............................................................................................................................................................. 23
Dialer Options...................................................................................................................................................................... 24
Partition 1: Event Call Direction........................................................................................................................................... 25
Partition 2: Event Call Direction........................................................................................................................................... 26
Partition 3: Event Call Direction........................................................................................................................................... 27
Partition 4: Event Call Direction........................................................................................................................................... 28
System Event Call Direction ................................................................................................................................................ 29
Global Access Control Features.......................................................................................................................................... 29
Communication Settings...................................................................................................................................................... 30
Report Codes ...................................................................................................................................................................... 31
Other Settings and Modes................................................................................................................................................... 39
Power Consumption ............................................................................................................................................................ 42
Hardware Connections ........................................................................................................................................................ 43
DGP2-641BL/RB Programming........................................................................................................................................... 46
Trouble Display.................................................................................................................................................................... 52
DGP-848
-2-
Programming Guide
Serial Number List
All modules connected to the control panel’s combus have an 8-digit serial number. Remove the extra serial number sticker
from the modules’ PC board and affix in the appropriate spaces provided below (Max. 95 Modules).
Module Type & Details
Serial #
Module Type & Details
Serial #
1:_________________________ ___________
24:________________________ ___________
2:_________________________ ___________
25:________________________ ___________
3:_________________________ ___________
26:________________________ ___________
4:_________________________ ___________
27:________________________ ___________
5:_________________________ ___________
28:________________________ ___________
6:_________________________ ___________
29:________________________ ___________
7:_________________________ ___________
30:________________________ ___________
8:_________________________ ___________
31:________________________ ___________
9:_________________________ ___________
32:________________________ ___________
10:________________________ ___________
33:________________________ ___________
11:________________________ ___________
34:________________________ ___________
12:________________________ ___________
35:________________________ ___________
13:________________________ ___________
36:________________________ ___________
14:________________________ ___________
37:________________________ ___________
15:________________________ ___________
38:________________________ ___________
16:________________________ ___________
39:________________________ ___________
17:________________________ ___________
40:________________________ ___________
18:________________________ ___________
41:________________________ ___________
19:________________________ ___________
42:________________________ ___________
20:________________________ ___________
43:________________________ ___________
21:________________________ ___________
44:________________________ ___________
22:________________________ ___________
45:________________________ ___________
23:________________________ ___________
46:________________________ ___________
DGP-848
-3-
Programming Guide
Module Type & Details
Serial #
Module Type & Details
Serial #
47:________________________ ___________
72:________________________ ___________
48:________________________ ___________
73:________________________ ___________
49:________________________ ___________
74:________________________ ___________
50:________________________ ___________
75:________________________ ___________
51:________________________ ___________
76:________________________ ___________
52:________________________ ___________
77:________________________ ___________
53:________________________ ___________
78:________________________ ___________
54:________________________ ___________
79:________________________ ___________
55:________________________ ___________
80:________________________ ___________
56:________________________ ___________
81:________________________ ___________
57:________________________ ___________
82:________________________ ___________
58:________________________ ___________
83:________________________ ___________
59:________________________ ___________
84:________________________ ___________
60:________________________ ___________
85:________________________ ___________
61:________________________ ___________
86:________________________ ___________
62:________________________ ___________
87:________________________ ___________
63:________________________ ___________
88:________________________ ___________
64:________________________ ___________
89:________________________ ___________
65:________________________ ___________
90:________________________ ___________
66:________________________ ___________
91:________________________ ___________
67:________________________ ___________
92:________________________ ___________
68:________________________ ___________
93:________________________ ___________
69:________________________ ___________
94:________________________ ___________
70:________________________ ___________
95:________________________ ___________
71:________________________ ___________
DGP-848
-4-
Programming Guide
Zone Programming
Zone Numbering
Zone Parameters
Sections [001] to [048] represent zones 1 through
48. This feature tells the control panel where the
detection device is connected and which of the 48
zones is assigned to that device.
Sections [101] to [148] represent zones 1 through 48. This
feature defines the type of zone, its partition assignment and
the zone’s options.
DGP-848
Enter 3-digit [INPUT NUMBER] of the Module to which
the hardwired detection device is connected.
NOTE: An input number is not required for Keypad
Zones (DGP2-641BL/RB, DGP2-640, DGP2-648,
DNE-K07), Combus Motion Detectors (DGP2-50,
DGP2-60, DGP2-70, DG85W), Door Contact
Modules (DGP2-ZC1), 1-Zone Expansion Modules
(DGP2-ZX1), and the Access Control Modules
(DGP-ACM11).
When option [7] in section [502] is enabled for
PGM1 to act as a zone input for two-wire smoke
detectors, the control panel will recognize PGM1
as input number 255.
-5-
Zone
Description
Module
Enter the 8-digit [SERIAL NUMBER] of the Combus
Detector or Module to which the hardwired
detection device is connected.
Section
8-digit Serial Number
Zone Definitions
Zone Options
0 - Disabled (Default)
1- Entry Delay 1
8- 24Hr Burglary
2- Entry Delay 2
9- Delayed 24Hr Fire
3- Entry Delay 3
A- Standard 24Hr Fire
4- Entry Delay 4
B- Stay Delay 1
5- Follow
C- Stay Delay 2
6- Instant
D- Stay Delay 3
7- 24Hr Buzzer
E- Stay Delay 4
[1] Auto Zone Shutdown Enabled
[2] Bypass Enabled (Default)
[3] Stay Zone
[4] Force Zone
Zone Partition Assignment
[7] Intellizone
[8] Delay before transmission
[5]
off
off
on
on
1- Zone Assigned to Partition1 (Default)
2- Zone Assigned to Partition 2
3- Zone Assigned to Partition 3
4- Zone Assigned to Partition 4
[6]
off
on
off
on
Zone Alarm Type
Steady Alarm
Pulsed Alarm
Silent Alarm
Report Only
Input#
Section
Define
Assign
Zone Options
Programming Guide
1
________________ __________
[001]
__/__/__/__/__/__/__/__
__/__/__
[101]
___
___
1 2 3 4 5 6 7 8
2
________________ __________
[002]
__/__/__/__/__/__/__/__
__/__/__
[102]
___
___
1 2 3 4 5 6 7 8
3
________________ __________
[003]
__/__/__/__/__/__/__/__
__/__/__
[103]
___
___
1 2 3 4 5 6 7 8
4
________________ __________
[004]
__/__/__/__/__/__/__/__
__/__/__
[104]
___
___
1 2 3 4 5 6 7 8
5
________________ __________
[005]
__/__/__/__/__/__/__/__
__/__/__
[105]
___
___
1 2 3 4 5 6 7 8
6
________________ __________
[006]
__/__/__/__/__/__/__/__
__/__/__
[106]
___
___
1 2 3 4 5 6 7 8
7
________________ __________
[007]
__/__/__/__/__/__/__/__
__/__/__
[107]
___
___
1 2 3 4 5 6 7 8
8
________________ __________
[008]
__/__/__/__/__/__/__/__
__/__/__
[108]
___
___
1 2 3 4 5 6 7 8
9
________________ __________
[009]
__/__/__/__/__/__/__/__
__/__/__
[109]
___
___
1 2 3 4 5 6 7 8
10
________________ __________
[010]
__/__/__/__/__/__/__/__
__/__/__
[110]
___
___
1 2 3 4 5 6 7 8
11
________________ __________
[011]
__/__/__/__/__/__/__/__
__/__/__
[111]
___
___
1 2 3 4 5 6 7 8
12
________________ __________
[012]
__/__/__/__/__/__/__/__
__/__/__
[112]
___
___
1 2 3 4 5 6 7 8
Zone
Description
Module
Section
8-digit Serial Number
Input#
Section
Define
Assign
Zone Options
DGP-848
-6Programming Guide
13
________________ __________
[013]
__/__/__/__/__/__/__/__
__/__/__
[113]
___
___
1 2 3 4 5 6 7 8
14
________________ __________
[014]
__/__/__/__/__/__/__/__
__/__/__
[114]
___
___
1 2 3 4 5 6 7 8
15
________________ __________
[015]
__/__/__/__/__/__/__/__
__/__/__
[115]
___
___
1 2 3 4 5 6 7 8
16
________________ __________
[016]
__/__/__/__/__/__/__/__
__/__/__
[116]
___
___
1 2 3 4 5 6 7 8
17
________________ __________
[017]
__/__/__/__/__/__/__/__
__/__/__
[117]
___
___
1 2 3 4 5 6 7 8
18
________________ __________
[018]
__/__/__/__/__/__/__/__
__/__/__
[118]
___
___
1 2 3 4 5 6 7 8
19
________________ __________
[019]
__/__/__/__/__/__/__/__
__/__/__
[119]
___
___
1 2 3 4 5 6 7 8
20
________________ __________
[020]
__/__/__/__/__/__/__/__
__/__/__
[120]
___
___
1 2 3 4 5 6 7 8
21
________________ __________
[021]
__/__/__/__/__/__/__/__
__/__/__
[121]
___
___
1 2 3 4 5 6 7 8
22
________________ __________
[022]
__/__/__/__/__/__/__/__
__/__/__
[122]
___
___
1 2 3 4 5 6 7 8
23
________________ __________
[023]
__/__/__/__/__/__/__/__
__/__/__
[123]
___
___
1 2 3 4 5 6 7 8
24
________________ __________
[024]
__/__/__/__/__/__/__/__
__/__/__
[124]
___
___
1 2 3 4 5 6 7 8
25
________________ __________
[025]
__/__/__/__/__/__/__/__
__/__/__
[125]
___
___
1 2 3 4 5 6 7 8
26
________________ __________
[026]
__/__/__/__/__/__/__/__
__/__/__
[126]
___
___
1 2 3 4 5 6 7 8
27
________________ __________
[027]
__/__/__/__/__/__/__/__
__/__/__
[127]
___
___
1 2 3 4 5 6 7 8
28
________________ __________
[028]
__/__/__/__/__/__/__/__
__/__/__
[128]
___
___
1 2 3 4 5 6 7 8
29
________________ __________
[029]
__/__/__/__/__/__/__/__
__/__/__
[129]
___
___
1 2 3 4 5 6 7 8
30
________________ __________
[030]
__/__/__/__/__/__/__/__
__/__/__
[130]
___
___
1 2 3 4 5 6 7 8
31
________________ __________
[031]
__/__/__/__/__/__/__/__
__/__/__
[131]
___
___
1 2 3 4 5 6 7 8
32
________________ __________
[032]
__/__/__/__/__/__/__/__
__/__/__
[132]
___
___
1 2 3 4 5 6 7 8
33
________________ __________
[033]
__/__/__/__/__/__/__/__
__/__/__
[133]
___
___
1 2 3 4 5 6 7 8
34
________________ __________
[034]
__/__/__/__/__/__/__/__
__/__/__
[134]
___
___
1 2 3 4 5 6 7 8
Zone
Description
Module
Section
8-digit Serial Number
Input#
Section
Define
Assign
Zone Options
DGP-848
-7Programming Guide
35
________________ __________
[035]
__/__/__/__/__/__/__/__
__/__/__
[135]
___
___
1 2 3 4 5 6 7 8
36
________________ __________
[036]
__/__/__/__/__/__/__/__
__/__/__
[136]
___
___
1 2 3 4 5 6 7 8
37
________________ __________
[037]
__/__/__/__/__/__/__/__
__/__/__
[137]
___
___
1 2 3 4 5 6 7 8
38
________________ __________
[038]
__/__/__/__/__/__/__/__
__/__/__
[138]
___
___
1 2 3 4 5 6 7 8
39
________________ __________
[039]
__/__/__/__/__/__/__/__
__/__/__
[139]
___
___
1 2 3 4 5 6 7 8
40
________________ __________
[040]
__/__/__/__/__/__/__/__
__/__/__
[140]
___
___
1 2 3 4 5 6 7 8
41
________________ __________
[041]
__/__/__/__/__/__/__/__
__/__/__
[141]
___
___
1 2 3 4 5 6 7 8
42
________________ __________
[042]
__/__/__/__/__/__/__/__
__/__/__
[142]
___
___
1 2 3 4 5 6 7 8
43
________________ __________
[043]
__/__/__/__/__/__/__/__
__/__/__
[143]
___
___
1 2 3 4 5 6 7 8
44
________________ __________
[044]
__/__/__/__/__/__/__/__
__/__/__
[144]
___
___
1 2 3 4 5 6 7 8
45
________________ __________
[045]
__/__/__/__/__/__/__/__
__/__/__
[145]
___
___
1 2 3 4 5 6 7 8
46
________________ __________
[046]
__/__/__/__/__/__/__/__
__/__/__
[146]
___
___
1 2 3 4 5 6 7 8
47
________________ __________
[047]
__/__/__/__/__/__/__/__
__/__/__
[147]
___
___
1 2 3 4 5 6 7 8
48
________________ __________
[048]
__/__/__/__/__/__/__/__
__/__/__
[148]
___
___
1 2 3 4 5 6 7 8
To clear a zone’s numbering (sections [001] to [048]):
For LCD keypads:
1.Enter a section number between [001] and [048].
2.Press [0] and then [ENTER] to save and exit.
For Grafica keypads:
1.Enter a section number between [001] and [048].
2.Press [0] to clear the serial number.
3.Using Grafica’s scroll keys, highlight the input number and then press [0] to clear the data.
4.Press Grafica’s center action key (Save) to save and exit.
Keyswitch Programming
Keyswitch Numbering
Keyswitch Parameters
Sections [049] to [056] represent keyswitches 1 to 8
respectively. This feature tells the control panel where
the keyswitch is connected and which of the 8
keyswitch locations is assigned to that device.
Sections [149] to [156] represent keyswitches 1 to 8
respectively. This feature defines the keyswitch’s
partition assignment and arming method.
DGP-848
Enter 3-digit [INPUT NUMBER] of the
Module to which the keyswitch is
connected.
Keyswitch Partition Assignment
1- Keyswitch Assigned to Partition 1
2- Keyswitch Assigned to Partition 2
3- Keyswitch Assigned to Partition 3
4- Keyswitch Assigned to Partition 4
Enter 8-digit [SERIAL NUMBER] of the
Module to which the keyswitch is
connected.
Keyswitch Definitions
1- Momentary Keyswitch
2- Maintained Keyswitch
3- Generates Utility Key Event on
Open only
4- Generates Utility Key Event on
Open & Close
Keyswitch Options
[4] Stay/Instant Disarm
[5] On = Arm Only
Off = Arm/Disarm
[6] *Stay Arming
[7] *Force Arming
[8] *Instant Arming
* Select only one. If all are off
keyswitch will regular arm
-8Keyswitch
Location
Module
Section
8-digit Serial Number
Input#
Programming Guide
Section
Define
Assign
Keyswitch
Options
1
_______________ __________
[049]
__/__/__/__/__/__/__/__
__/__/__
[149]
___
___
14 5 6 7 8
2
_______________ __________
[050]
__/__/__/__/__/__/__/__
__/__/__
[150]
___
___
14 5 6 7 8
3
_______________ __________
[051]
__/__/__/__/__/__/__/__
__/__/__
[151]
___
___
14 5 6 7 8
4
_______________ __________
[052]
__/__/__/__/__/__/__/__
__/__/__
[152]
___
___
14 5 6 7 8
5
_______________ __________
[053]
__/__/__/__/__/__/__/__
__/__/__
[153]
___
___
14 5 6 7 8
6
_______________ __________
[054]
__/__/__/__/__/__/__/__
__/__/__
[154]
___
___
14 5 6 7 8
7
_______________ __________
[055]
__/__/__/__/__/__/__/__
__/__/__
[155]
___
___
14 5 6 7 8
8
_______________ __________
[056]
__/__/__/__/__/__/__/__
__/__/__
[156]
___
___
14 5 6 7 8
System Timers
Section #
Description
Default
[200]
___/___/___ seconds (min. = 10sec.)
Decimal Value (000 to 255)
INTELLIZONE DELAY
10sec.
[201]
___/___/___ x 20 msec.
INPUT SPEED
001=PANEL TERMINAL 1
600 msec.
[202]
___/___/___ x 20 msec.
INPUT SPEED
002=PANEL TERMINAL 2
600 msec.
[203]
___/___/___ x 20 msec.
INPUT SPEED
003=PANEL TERMINAL 3
600 msec.
[204]
___/___/___ x 20 msec.
INPUT SPEED
004=PANEL TERMINAL 4
600 msec.
[205]
___/___/___ x 20 msec.
INPUT SPEED
005=PANEL TERMINAL 5
600 msec.
[206]
___/___/___ x 20 msec.
INPUT SPEED
006=PANEL TERMINAL 6
600 msec.
[207]
___/___/___ x 20 msec.
INPUT SPEED
007=PANEL TERMINAL 7
600 msec.
[208]
___/___/___ x 20 msec.
INPUT SPEED
008=PANEL TERMINAL 8
600 msec.
[209]
___/___/___ x 20 msec.
INPUT SPEED
009=PANEL DOUBLER 1
600 msec.
[210]
___/___/___ x 20 msec.
INPUT SPEED
010=PANEL DOUBLER 2
600 msec.
[211]
___/___/___ x 20 msec.
INPUT SPEED
011=PANEL DOUBLER 3
600 msec.
[212]
___/___/___ x 20 msec.
INPUT SPEED
012=PANEL DOUBLER 4
600 msec.
[213]
___/___/___ x 20 msec.
INPUT SPEED
013=PANEL DOUBLER 5
600 msec.
[214]
___/___/___ x 20 msec.
INPUT SPEED
014=PANEL DOUBLER 6
600 msec.
[215]
___/___/___ x 20 msec.
INPUT SPEED
015=PANEL DOUBLER 7
600 msec.
[216]
___/___/___ x 20 msec.
INPUT SPEED
016=PANEL DOUBLER 8
600 msec.
[217]
___/___/___ (max.=15)
AUTO ZONE SHUTDOWN
Disabled
[218]
___/___/___ (max.=15)
AUTO TROUBLE SHUTDOWN
Disabled
[219]
___/___/___ seconds
RECENT CLOSING DELAY
Disabled
[220]
___/___/___ tries
# OF INVALID CODE BEFORE LOCKOUT
Disabled
[221]
___/___/___ minutes (000 = report only)
KEYPAD LOCKOUT DURATION
Report Only
[222]
___/___/___ x15 minutes
NO MOVEMENT TIMER PARTITION
1
Disabled
[223]
___/___/___ x15 minutes
NO MOVEMENT TIMER PARTITION
2
Disabled
[224]
___/___/___ x15 minutes
NO MOVEMENT TIMER PARTITION
3
Disabled
[225]
___/___/___ x15 minutes
NO MOVEMENT TIMER PARTITION
4
Disabled
[226]
___/___/___ seconds
EXIT DELAY PARTITION
1
60 sec.
[227]
___/___/___ seconds
EXIT DELAY PARTITION
2
60 sec.
[228]
___/___/___ seconds
EXIT DELAY PARTITION
3
60 sec.
[229]
___/___/___ seconds
EXIT DELAY PARTITION
4
60 sec.
[230]
___/___/___ seconds
ENTRY/STAY DELAY
1
30 sec.
[231]
___/___/___ seconds
ENTRY/STAY DELAY
2
60 sec.
[232]
___/___/___ seconds
ENTRY/STAY DELAY
3
90 sec.
[233]
___/___/___ seconds
ENTRY/STAY DELAY
4
120 sec.
[234]
___/___/___ minutes
BELL CUT-OFF TIMER PARTITION
1
4 min.
[235]
___/___/___ minutes
BELL CUT-OFF TIMER PARTITION
2
4 min.
[236]
___/___/___ minutes
BELL CUT-OFF TIMER PARTITION
3
4 min.
[237]
___/___/___ minutes
BELL CUT-OFF TIMER PARTITION
4
4 min.
DGP-848
-9-
Programming Guide
Section #
Decimal Value (000 to 255)
Description
Default
[238]
___/___/___ zone(s)
MAX. BYPASS ENTRIES PARTITION
1
Unlimited
[239]
___/___/___ zone(s)
MAX. BYPASS ENTRIES PARTITION
2
Unlimited
[240]
___/___/___ zone(s)
MAX. BYPASS ENTRIES PARTITION
3
Unlimited
[241]
___/___/___ zone(s)
MAX. BYPASS ENTRIES PARTITION
4
Unlimited
[242]
___/___/___ minutes
RECYCLE DELAY PARTITION
1
Disabled
[243]
___/___/___ minutes
RECYCLE DELAY PARTITION
2
Disabled
[244]
___/___/___ minutes
RECYCLE DELAY PARTITION
3
Disabled
[245]
___/___/___ minutes
RECYCLE DELAY PARTITION
4
Disabled
[246]
___/___/___ recycle(s)
# OF RECYCLES PARTITION 1
Unlimited
[247]
___/___/___ recycle(s)
# OF RECYCLES PARTITION 2
Unlimited
[248]
___/___/___ recycle(s)
# OF RECYCLES PARTITION 3
Unlimited
[249]
___/___/___ recycle(s)
# OF RECYCLES PARTITION 4
Unlimited
[250]
___/___/___ see section [503]
PGM1 DELAY
5 sec.
[251]
___/___/___ see section [503]
PGM2 DELAY
5 sec.
[252]
___/___/___ see section [503]
PGM3 DELAY
5 sec.
[253]
___/___/___ see section [503]
PGM4 DELAY
5 sec.
[254]
___/___/___ see section [503]
PGM5 DELAY
5 sec.
[255]
___/___/___ x2 sec. (min. = 32sec.)
TLM FAIL TIMER
32 sec.
[256]
___/___/___ seconds
DELAY ALARM TRANSMISSION TIMER
Instant
[257]
___/___/___ attempts
MAXIMUM DIALING ATTEMPTS
8 attempts
[258]
___/___/___ seconds
DELAY BETWEEN DIALING ATTEMPTS
20 sec.
[259]
___/___/___ seconds (max. 60 sec.)
PAGER DELAY BEFORE DATA TRANSMISSION
Disabled
[260]
___/___/___ minutes
DELAY POWER FAILURE REPORT
30 min.
[261]
___/___/___ days
AUTO TEST REPORT
Disabled
[262]
___/___/___ 001 to 255 days; 000 = disabled
CLOSING DELINQUENCY TIMER PARTITION
1 Disabled
[263]
___/___/___ 001 to 255 days; 000 = disabled
CLOSING DELINQUENCY TIMER PARTITION
2 Disabled
[264]
___/___/___ 001 to 255 days; 000 = disabled
CLOSING DELINQUENCY TIMER PARTITION
3 Disabled
[265]
___/___/___ 001 to 255 days; 000 = disabled
CLOSING DELINQUENCY TIMER PARTITION
4 Disabled
Hours (00 to 23) & Minutes (00 to 59)
[270]
___/___:___/___
AUTO TEST REPORT TIME OF DAY
[271]
___/___:___/___
AUTO ARM TIME PARTITION
1
[272]
___/___:___/___
AUTO ARM TIME PARTITION
2
[273]
___/___:___/___
AUTO ARM TIME PARTITION
3
[274]
___/___:___/___
AUTO ARM TIME PARTITION
4
DGP-848
- 10 -
Programming Guide
Access Control
Assigning the Door to an Access Control Module
These doors are used to program the Access Level in sections [341] to [355]. If you want an Access door to be linked to the
alarm system, install a door contact and assign it to a zone through Zone Programming.
Section
Door
[301]
01
[302]
02
[303]
03
[304]
04
[305]
05
[306]
06
[307]
07
[308]
08
[309]
09
[310]
10
[311]
11
[312]
12
[313]
13
[314]
14
[315]
15
[316]
16
[317]
17
[318]
18
[319]
19
[320]
20
[321]
21
[322]
22
[323]
23
[324]
24
[325]
25
[326]
26
[327]
27
[328]
28
[329]
29
[330]
30
[331]
31
[332]
32
Description
Access Module Serial Number
____________________________________________
____________________________________________
____________________________________________
____________________________________________
____________________________________________
____________________________________________
____________________________________________
____________________________________________
____________________________________________
____________________________________________
____________________________________________
____________________________________________
____________________________________________
____________________________________________
____________________________________________
____________________________________________
____________________________________________
____________________________________________
____________________________________________
____________________________________________
____________________________________________
____________________________________________
____________________________________________
____________________________________________
____________________________________________
____________________________________________
____________________________________________
____________________________________________
____________________________________________
____________________________________________
____________________________________________
____________________________________________
DGP-848
- 11 -
Programming Guide
__/__/__/__/__/__/__/__
__/__/__/__/__/__/__/__
__/__/__/__/__/__/__/__
__/__/__/__/__/__/__/__
__/__/__/__/__/__/__/__
__/__/__/__/__/__/__/__
__/__/__/__/__/__/__/__
__/__/__/__/__/__/__/__
__/__/__/__/__/__/__/__
__/__/__/__/__/__/__/__
__/__/__/__/__/__/__/__
__/__/__/__/__/__/__/__
__/__/__/__/__/__/__/__
__/__/__/__/__/__/__/__
__/__/__/__/__/__/__/__
__/__/__/__/__/__/__/__
__/__/__/__/__/__/__/__
__/__/__/__/__/__/__/__
__/__/__/__/__/__/__/__
__/__/__/__/__/__/__/__
__/__/__/__/__/__/__/__
__/__/__/__/__/__/__/__
__/__/__/__/__/__/__/__
__/__/__/__/__/__/__/__
__/__/__/__/__/__/__/__
__/__/__/__/__/__/__/__
__/__/__/__/__/__/__/__
__/__/__/__/__/__/__/__
__/__/__/__/__/__/__/__
__/__/__/__/__/__/__/__
__/__/__/__/__/__/__/__
__/__/__/__/__/__/__/__
Door Access Mode
Each door can be programmed to grant access only to cards assigned to all the door’s assigned partitions (“AND” Door
Access Mode) or to cards assigned to at least one of the door’s partitions (“OR” Door Access Mode). Enable the option
corresponding to the door to be set in “OR” Door Access Mode. Options that remain disabled represent doors set in the
“AND” Door Access Mode.
Section
Door Access Mode (turn ON for “OR” Door Access Mode):
[340]
First Screen
Doors 01 to 08
Second Screen
Doors 09 to 16
Third Screen
Doors 17 to 24
Fourth Screen
Doors 25 to 32
1 2 3 4 5 6 7 8
1 2 3 4 5 6 7 8
1 2 3 4 5 6 7 8
1 2 3 4 5 6 7 8
Programming Access Levels
Each Access Level is a combination of Access Control doors. Use Feature Select Programming (page 14) to enable or
disable options. For example, if option [1] in the First Screen is enabled in section [341], Level 01 will allow access only to
Door 01. Access Level 00 = access to all doors.
Section
Level
Access to Doors (turn ON or OFF access):
First Screen
Doors 01 to 08
Second Screen
Doors 09 to 16
Third Screen
Doors 17 to 24
Fourth Screen
Doors 25 to 32
[341]
01
1 2 3 4 5 6 7 8
1 2 3 4 5 6 7 8
1 2 3 4 5 6 7 8
1 2 3 4 5 6 7 8
[342]
02
1 2 3 4 5 6 7 8
1 2 3 4 5 6 7 8
1 2 3 4 5 6 7 8
1 2 3 4 5 6 7 8
[343]
03
1 2 3 4 5 6 7 8
1 2 3 4 5 6 7 8
1 2 3 4 5 6 7 8
1 2 3 4 5 6 7 8
[344]
04
1 2 3 4 5 6 7 8
1 2 3 4 5 6 7 8
1 2 3 4 5 6 7 8
1 2 3 4 5 6 7 8
[345]
05
1 2 3 4 5 6 7 8
1 2 3 4 5 6 7 8
1 2 3 4 5 6 7 8
1 2 3 4 5 6 7 8
[346]
06
1 2 3 4 5 6 7 8
1 2 3 4 5 6 7 8
1 2 3 4 5 6 7 8
1 2 3 4 5 6 7 8
[347]
07
1 2 3 4 5 6 7 8
1 2 3 4 5 6 7 8
1 2 3 4 5 6 7 8
1 2 3 4 5 6 7 8
[348]
08
1 2 3 4 5 6 7 8
1 2 3 4 5 6 7 8
1 2 3 4 5 6 7 8
1 2 3 4 5 6 7 8
[349]
09
1 2 3 4 5 6 7 8
1 2 3 4 5 6 7 8
1 2 3 4 5 6 7 8
1 2 3 4 5 6 7 8
[350]
10
1 2 3 4 5 6 7 8
1 2 3 4 5 6 7 8
1 2 3 4 5 6 7 8
1 2 3 4 5 6 7 8
[351]
11
1 2 3 4 5 6 7 8
1 2 3 4 5 6 7 8
1 2 3 4 5 6 7 8
1 2 3 4 5 6 7 8
[352]
12
1 2 3 4 5 6 7 8
1 2 3 4 5 6 7 8
1 2 3 4 5 6 7 8
1 2 3 4 5 6 7 8
[353]
13
1 2 3 4 5 6 7 8
1 2 3 4 5 6 7 8
1 2 3 4 5 6 7 8
1 2 3 4 5 6 7 8
[354]
14
1 2 3 4 5 6 7 8
1 2 3 4 5 6 7 8
1 2 3 4 5 6 7 8
1 2 3 4 5 6 7 8
[355]
15
1 2 3 4 5 6 7 8
1 2 3 4 5 6 7 8
1 2 3 4 5 6 7 8
1 2 3 4 5 6 7 8
Schedule Programming
Each Schedule determines when users are permitted access. Holidays are programmed in sections [381] to [392]. Schedule
00 = access granted at all times.
Section
Schedule
[361]
01
[362]
02
[363]
03
[364]
04
[365]
05
Intervals
Start Time (from)
End Time (to)
Days (turn ON or OFF)
S
M
T
W
T
F
S
H
Interval A
___ ___: ___ ___
___ ___ : ___ ___
1
2
3
4
5
6
7
8
Interval B
___ ___ : ___ ___
___ ___ : ___ ___
1
2
3
4
5
6
7
8
Interval A
___ ___ : ___ ___
___ ___ : ___ ___
1
2
3
4
5
6
7
8
Interval B
___ ___ : ___ ___
___ ___ : ___ ___
1
2
3
4
5
6
7
8
Interval A
___ ___ : ___ ___
___ ___ : ___ ___
1
2
3
4
5
6
7
8
Interval B
___ ___ : ___ ___
___ ___ : ___ ___
1
2
3
4
5
6
7
8
Interval A
___ ___ : ___ ___
___ ___ : ___ ___
1
2
3
4
5
6
7
8
Interval B
___ ___ : ___ ___
___ ___ : ___ ___
1
2
3
4
5
6
7
8
Interval A
___ ___ : ___ ___
___ ___ : ___ ___
1
2
3
4
5
6
7
8
Interval B
___ ___ : ___ ___
___ ___ : ___ ___
1
2
3
4
5
6
7
8
DGP-848
- 12 -
Programming Guide
Section
Schedule
[366]
06
[367]
07
[368]
08
[369]
09
[370]
10
[371]
11
[372]
12
[373]
13
[374]
14
[375]
15
Intervals
Start Time (from)
End Time (to)
Days (turn ON or OFF)
S
M
T
W
T
F
S
H
Interval A
___ ___ : ___ ___
___ ___ : ___ ___
1
2
3
4
5
6
7
8
Interval B
___ ___ : ___ ___
___ ___ : ___ ___
1
2
3
4
5
6
7
8
Interval A
___ ___ : ___ ___
___ ___ : ___ ___
1
2
3
4
5
6
7
8
Interval B
___ ___ : ___ ___
___ ___ : ___ ___
1
2
3
4
5
6
7
8
Interval A
___ ___ : ___ ___
___ ___ : ___ ___
1
2
3
4
5
6
7
8
Interval B
___ ___ : ___ ___
___ ___ : ___ ___
1
2
3
4
5
6
7
8
Interval A
___ ___ : ___ ___
___ ___ : ___ ___
1
2
3
4
5
6
7
8
Interval B
___ ___ : ___ ___
___ ___ : ___ ___
1
2
3
4
5
6
7
8
Interval A
___ ___ : ___ ___
___ ___ : ___ ___
1
2
3
4
5
6
7
8
Interval B
___ ___ : ___ ___
___ ___ : ___ ___
1
2
3
4
5
6
7
8
Interval A
___ ___ : ___ ___
___ ___ : ___ ___
1
2
3
4
5
6
7
8
Interval B
___ ___ : ___ ___
___ ___ : ___ ___
1
2
3
4
5
6
7
8
Interval A
___ ___ : ___ ___
___ ___ : ___ ___
1
2
3
4
5
6
7
8
Interval B
___ ___ : ___ ___
___ ___ : ___ ___
1
2
3
4
5
6
7
8
Interval A
___ ___ : ___ ___
___ ___ : ___ ___
1
2
3
4
5
6
7
8
Interval B
___ ___ : ___ ___
___ ___ : ___ ___
1
2
3
4
5
6
7
8
Interval A
___ ___ : ___ ___
___ ___ : ___ ___
1
2
3
4
5
6
7
8
Interval B
___ ___ : ___ ___
___ ___ : ___ ___
1
2
3
4
5
6
7
8
Interval A
___ ___ : ___ ___
___ ___ : ___ ___
1
2
3
4
5
6
7
8
Interval B
___ ___ : ___ ___
___ ___ : ___ ___
1
2
3
4
5
6
7
8
The Start and End Time of an Interval cannot cross over into another day. For example, to program a shift from
10:00 p.m. one day to 6:00 a.m. the next morning, you must program Interval 1A: Start Time 22:00 and End
Time 23:59 then program Interval 1B Start Time 00:00 and End Time 06:00. The schedule will not be interrupted
between 23:59 and 00:00.
Holiday Programming
The holidays are determined in these sections. When [H] is enabled in sections [361] to [375], access is permitted to users
during the days programmed in sections [381] to [392].
Section
Month
Days Programmed (turn ON or OFF access):
First Screen
Days 01 to 08
Second Screen
Days 09 to 16
Third Screen
Days 17 to 24
Fourth Screen
Days 25 to 31
[381]
January
1 2 3 4 5 6 7 8
1 2 3 4 5 6 7 8
1 2 3 4 5 6 7 8
1 2 3 4 5 6 7*
[382]
February
1 2 3 4 5 6 7 8
1 2 3 4 5 6 7 8
1 2 3 4 5 6 7 8
1 2 3 4 5 * * *
[383]
March
1 2 3 4 5 6 7 8
1 2 3 4 5 6 7 8
1 2 3 4 5 6 7 8
1 2 3 4 5 6 7*
[384]
April
1 2 3 4 5 6 7 8
1 2 3 4 5 6 7 8
1 2 3 4 5 6 7 8
1 2 3 4 5 6 **
[385]
May
1 2 3 4 5 6 7 8
1 2 3 4 5 6 7 8
1 2 3 4 5 6 7 8
1 2 3 4 5 6 7*
[386]
June
1 2 3 4 5 6 7 8
1 2 3 4 5 6 7 8
1 2 3 4 5 6 7 8
1 2 3 4 5 6 **
[387]
July
1 2 3 4 5 6 7 8
1 2 3 4 5 6 7 8
1 2 3 4 5 6 7 8
1 2 3 4 5 6 7*
[388]
August
1 2 3 4 5 6 7 8
1 2 3 4 5 6 7 8
1 2 3 4 5 6 7 8
1 2 3 4 5 6 7*
[389]
September
1 2 3 4 5 6 7 8
1 2 3 4 5 6 7 8
1 2 3 4 5 6 7 8
1 2 3 4 5 6 **
[390]
October
1 2 3 4 5 6 7 8
1 2 3 4 5 6 7 8
1 2 3 4 5 6 7 8
1 2 3 4 5 6 7*
[391]
November
1 2 3 4 5 6 7 8
1 2 3 4 5 6 7 8
1 2 3 4 5 6 7 8
1 2 3 4 5 6 **
[392]
December
1 2 3 4 5 6 7 8
1 2 3 4 5 6 7 8
1 2 3 4 5 6 7 8
1 2 3 4 5 6 7*
*option not used in this screen
DGP-848
- 13 -
Programming Guide
Programmable Outputs
The control panel deactivates an activated PGM in one of two ways (also see sections [502] and [503]):
Section [502]: Option OFF = Follow Activation Event:
If the first digit of the PGM Activation Event is set at 1, 2, 3, 4, or 7, the PGM will remain activated until the PGM Activation
Event has ended. It will ignore the PGM Deactivation Event. If the first digit of the PGM Activation Event is set at 8, 9, A, B, C,
D, E, or F, the PGM will remain activated until the PGM Deactivation Event occurs.
Section [502]: Option ON = Follow PGM Delay Timer:
After activating the PGM, the control panel will start the PGM delay timer and the PGM will deactivate only when the PGM
delay timer has elapsed regardless of the PGM Deactivation Event.
Section
Event Group Event Group
(First Digit) (Second Digit)
PGM
[400]
PGM1 Activation Event
[401]
PGM1 Deactivation Event
[402]
PGM2 Activation Event
[403]
PGM2 Deactivation Event
[404]
PGM3 Activation Event
[405]
PGM3 Deactivation Event
[406]
PGM4 Activation Event
[407]
PGM4 Deactivation Event
[408]
PGM5 Activation Event
[409]
PGM5 Deactivation Event
First Digit
Second
Digit
0 = PGM Disabled
___
___
___
___
1
2
3
4
5
6
7
8
1
2
3
4
5
6
7
8
___
___
___
___
1
2
3
4
5
6
7
8
1
2
3
4
5
6
7
8
___
___
___
___
1
2
3
4
5
6
7
8
1
2
3
4
5
6
7
8
___
___
___
___
1
2
3
4
5
6
7
8
1
2
3
4
5
6
7
8
___
___
___
___
1
2
3
4
5
6
7
8
1
2
3
4
5
6
7
8
Feature Select Programming †
1
2
3
4
5
6
7
8
N/A
N/A
N/A
N/A
N/A
N/A
N/A
N/A
N/A
Note 1*
Any Arming
Method
Force
Arm
Stay
Arm
Instant
Arm
Strobe
Silent
Alarm
Audible
Alarm
(until alarm is
cancelled or
bell is cut off)
(until alarm is
cancelled or
bell is cut off)
Zone
Bypassed
Master or
Installer
(armed or not)
Programming
Zone Low
Battery
Fire Loop
1 = Status 1
Note 1*
2 = Status 2
3 = Status 3
Event Selection
(on/off)†
Note 1*
Ready
Status
Intellizone
Exit Delay
Fire Delay
Entry Delay
Auto Arm
Delay
Trouble
N/A
(until alarm is
cancelled)
Alarm
Memory
Any Tamper
Fire Alarm
(until alarm is
cancelled or
bell is cut off)
Keypad
Lockout
Zone
Supervision
NOTE 1*:
0 = Occurs in all partitions enabled in the system (see section [500]).
1 = Partition 1 3 = Partition 3
2 = Partition 2 4 = Partition 4
8 = Occurs in at least one partition enabled in the system.
† : If you select a group and set all options to OFF, all users/zones/selections of that group will be enabled (result is “ANY” of
that group). For example, if you select A0 and set all 8 options to OFF, the PGM will activate/deactivate whenever a user
between 1 and 8 arms the system.
DGP-848
- 14 -
Programming Guide
First Digit
Second
Digit
0
1
2
4 = Status 4
Feature Select Programming
4
5
6
1
2
3
Chime
Partition 1
N/A
Chime
Partition 2
N/A
Chime
Partition 3
N/A
System
Trouble
AC Fail
TLM
Module
Trouble
Aux. Limit
Fail to
Com2
Module
TLM
5
Module
Tamper
Dialer
Trouble
Battery fail
Fail to
Com1
Module
ROM Error
6
Missing
Keypad
Missing Any
Module
N/A
00:00
02:00
04:00
06:00
08:00
10:00
12:00
14:00
16:00
18:00
20:00
22:00
00:15
02:15
04:15
06:15
08:15
10:15
12:15
14:15
16:15
18:15
20:15
22:15
00:30
02:30
04:30
06:30
08:30
10:30
12:30
14:30
16:30
18:30
20:30
22:30
3
4
Chime
Partition 4
N/A
Siren
Partition 1
Smoke
Reset
N/A
Siren
Partition 2
Ground
Start
N/A
Combus
Trouble
Bell Limit
No Bell
ROM Error
Fail to
Fail to
Fail to
Com3
Com4
Com PC
Module Fail Printer Fault Module AC
Fail
to Com
Phone#
Global ComN/A
N/A
00:45
02:45
04:45
06:45
08:45
10:45
12:45
14:45
16:45
18:45
20:45
22:45
01:00
03:00
05:00
07:00
09:00
11:00
13:00
15:00
17:00
19:00
21:00
23:00
7
8
Siren
Partition 3
Kissoff
Siren
Partition 4
N/A
N/A
Timer Loss
N/A
N/A
N/A
N/A
Module
Module Aux.
Battery Fail
fail
bus Failure
Combus
Overload
Module Combus Com Fail
01:15
03:15
05:15
07:15
09:15
11:15
13:15
15:15
17:15
19:15
21:15
23:15
01:30
03:30
05:30
07:30
09:30
11:30
13:30
15:30
17:30
19:30
21:30
23:30
01:45
03:45
05:45
07:45
09:45
11:45
13:45
15:45
17:45
19:45
21:45
23:45
7 = At the
Selected Time
0
1
2
3
4
5
6
7
8
9
A
B
8 = Utility Keys†
0
1
9 = Access
Granted
0
1
2
3
Door 01
Door 09
Door 17
Door 25
Door 02
Door 10
Door 18
Door 26
Door 03
Door 11
Door 19
Door 27
Door 04
Door 12
Door 20
Door 28
Door 05
Door 13
Door 21
Door 29
Door 06
Door 14
Door 22
Door 30
Door 07
Door 15
Door 23
Door 31
Door 08
Door 16
Door 24
Door 32
9 = User Code
Entered
8
9
A
B
C
D
E
F
Code # 01
Code # 09
Code # 17
Code # 25
Code # 33
Code # 41
Code # 49
Code # 57
Code # 02
Code # 10
Code # 18
Code # 26
Code # 34
Code # 42
Code # 50
Code # 58
Code # 03
Code # 11
Code # 19
Code # 27
Code # 35
Code # 43
Code # 51
Code # 59
Code # 04
Code # 12
Code # 20
Code # 28
Code # 36
Code # 44
Code # 52
Code # 60
Code # 05
Code # 13
Code # 21
Code # 29
Code # 37
Code # 45
Code # 53
Code # 61
Code # 06
Code # 14
Code # 22
Code # 30
Code # 38
Code # 46
Code # 54
Code # 62
Code # 07
Code # 15
Code # 23
Code # 31
Code # 39
Code # 47
Code # 55
Code # 63
Code # 08
Code # 16
Code # 24
Code # 32
Code # 40
Code # 48
Code # 56
Code # 64
A = Arming
0
1
2
3
4
5
6
7
Code # 01
Code # 09
Code # 17
Code # 25
Code # 33
Code # 41
Code # 49
Code # 57
Code # 02
Code # 10
Code # 18
Code # 26
Code # 34
Code # 42
Code # 50
Code # 58
Code # 03
Code # 11
Code # 19
Code # 27
Code # 35
Code # 43
Code # 51
Code # 59
Code # 04
Code # 12
Code # 20
Code # 28
Code # 36
Code # 44
Code # 52
Code # 60
Code # 05
Code # 13
Code # 21
Code # 29
Code # 37
Code # 45
Code # 53
Code # 61
Code # 06
Code # 14
Code # 22
Code # 30
Code # 38
Code # 46
Code # 54
Code # 62
Code # 07
Code # 15
Code # 23
Code # 31
Code # 39
Code # 47
Code # 55
Code # 63
Code # 08
Code # 16
Code # 24
Code # 32
Code # 40
Code # 48
Code # 56
Code # 64
A = Disarming
8
9
A
B
C
D
E
F
Code # 01
Code # 09
Code # 17
Code # 25
Code # 33
Code # 41
Code # 49
Code # 57
Code # 02
Code # 10
Code # 18
Code # 26
Code # 34
Code # 42
Code # 50
Code # 58
Code # 03
Code # 11
Code # 19
Code # 27
Code # 35
Code # 43
Code # 51
Code # 59
Code # 04
Code # 12
Code # 20
Code # 28
Code # 36
Code # 44
Code # 52
Code # 60
Code # 05
Code # 13
Code # 21
Code # 29
Code # 37
Code # 45
Code # 53
Code # 61
Code # 06
Code # 14
Code # 22
Code # 30
Code # 38
Code # 46
Code # 54
Code # 62
Code # 07
Code # 15
Code # 23
Code # 31
Code # 39
Code # 47
Code # 55
Code # 63
Code # 08
Code # 16
Code # 24
Code # 32
Code # 40
Code # 48
Code # 56
Code # 64
Utility Key 1 Utility Key 2 Utility Key 3 Utility Key 4 Utility Key 5 Utility Key 6 Utility Key 7 Utility Key 8
Utility Key 9 Utility Key 10 Utility Key 11 Utility Key 12 Utility Key 13 Utility Key 14 Utility Key 15 Utility Key 16
† See Utility Key Event Generation Table on page 17.
DGP-848
- 15 -
Programming Guide
Feature Select Programming
4
5
6
First Digit
Second
Digit
1
2
3
7
8
B = Zone is OK
0
1
2
3
4
5
Zone # 01
Zone # 09
Zone # 17
Zone # 25
Zone # 33
Zone # 41
Zone # 02
Zone # 10
Zone # 18
Zone # 26
Zone # 34
Zone # 42
Zone # 03
Zone # 11
Zone # 19
Zone # 27
Zone # 35
Zone # 43
Zone # 04
Zone # 12
Zone # 20
Zone # 28
Zone # 36
Zone # 44
Zone # 05
Zone # 13
Zone # 21
Zone # 29
Zone # 37
Zone # 45
Zone # 06
Zone # 14
Zone # 22
Zone # 30
Zone # 38
Zone # 46
Zone # 07
Zone # 15
Zone # 23
Zone # 31
Zone # 39
Zone # 47
Zone # 08
Zone # 16
Zone # 24
Zone # 32
Zone # 40
Zone # 48
B = Zone is Open
8
9
A
B
C
D
Zone # 01
Zone # 09
Zone # 17
Zone # 25
Zone # 33
Zone # 41
Zone # 02
Zone # 10
Zone # 18
Zone # 26
Zone # 34
Zone # 42
Zone # 03
Zone # 11
Zone # 19
Zone # 27
Zone # 35
Zone # 43
Zone # 04
Zone # 12
Zone # 20
Zone # 28
Zone # 36
Zone # 44
Zone # 05
Zone # 13
Zone # 21
Zone # 29
Zone # 37
Zone # 45
Zone # 06
Zone # 14
Zone # 22
Zone # 30
Zone # 38
Zone # 46
Zone # 07
Zone # 15
Zone # 23
Zone # 31
Zone # 39
Zone # 47
Zone # 08
Zone # 16
Zone # 24
Zone # 32
Zone # 40
Zone # 48
C = Auto Zone
Shutdown
0
1
2
3
4
5
Zone # 01
Zone # 09
Zone # 17
Zone # 25
Zone # 33
Zone # 41
Zone # 02
Zone # 10
Zone # 18
Zone # 26
Zone # 34
Zone # 42
Zone # 03
Zone # 11
Zone # 19
Zone # 27
Zone # 35
Zone # 43
Zone # 04
Zone # 12
Zone # 20
Zone # 28
Zone # 36
Zone # 44
Zone # 05
Zone # 13
Zone # 21
Zone # 29
Zone # 37
Zone # 45
Zone # 06
Zone # 14
Zone # 22
Zone # 30
Zone # 38
Zone # 46
Zone # 07
Zone # 15
Zone # 23
Zone # 31
Zone # 39
Zone # 47
Zone # 08
Zone # 16
Zone # 24
Zone # 32
Zone # 40
Zone # 48
C = Zone Bypass
(when system
is armed)
8
9
A
B
C
D
Zone # 01
Zone # 09
Zone # 17
Zone # 25
Zone # 33
Zone # 41
Zone # 02
Zone # 10
Zone # 18
Zone # 26
Zone # 34
Zone # 42
Zone # 03
Zone # 11
Zone # 19
Zone # 27
Zone # 35
Zone # 43
Zone # 04
Zone # 12
Zone # 20
Zone # 28
Zone # 36
Zone # 44
Zone # 05
Zone # 13
Zone # 21
Zone # 29
Zone # 37
Zone # 45
Zone # 06
Zone # 14
Zone # 22
Zone # 30
Zone # 38
Zone # 46
Zone # 07
Zone # 15
Zone # 23
Zone # 31
Zone # 39
Zone # 47
Zone # 08
Zone # 16
Zone # 24
Zone # 32
Zone # 40
Zone # 48
D = Zone Fault
(Tamper / Fire
Loop)
0
1
2
3
4
5
Zone # 01
Zone # 09
Zone # 17
Zone # 25
Zone # 33
Zone # 41
Zone # 02
Zone # 10
Zone # 18
Zone # 26
Zone # 34
Zone # 42
Zone # 03
Zone # 11
Zone # 19
Zone # 27
Zone # 35
Zone # 43
Zone # 04
Zone # 12
Zone # 20
Zone # 28
Zone # 36
Zone # 44
Zone # 05
Zone # 13
Zone # 21
Zone # 29
Zone # 37
Zone # 45
Zone # 06
Zone # 14
Zone # 22
Zone # 30
Zone # 38
Zone # 46
Zone # 07
Zone # 15
Zone # 23
Zone # 31
Zone # 39
Zone # 47
Zone # 08
Zone # 16
Zone # 24
Zone # 32
Zone # 40
Zone # 48
D = RF Zone Fault
(Low battery
Supervision)
8
9
A
B
C
D
Zone # 01
Zone # 09
Zone # 17
Zone # 25
Zone # 33
Zone # 41
Zone # 02
Zone # 10
Zone # 18
Zone # 26
Zone # 34
Zone # 42
Zone # 03
Zone # 11
Zone # 19
Zone # 27
Zone # 35
Zone # 43
Zone # 04
Zone # 12
Zone # 20
Zone # 28
Zone # 36
Zone # 44
Zone # 05
Zone # 13
Zone # 21
Zone # 29
Zone # 37
Zone # 45
Zone # 06
Zone # 14
Zone # 22
Zone # 30
Zone # 38
Zone # 46
Zone # 07
Zone # 15
Zone # 23
Zone # 31
Zone # 39
Zone # 47
Zone # 08
Zone # 16
Zone # 24
Zone # 32
Zone # 40
Zone # 48
E = Fire /Burglar
Alarms
0
1
2
3
4
5
Zone # 01
Zone # 09
Zone # 17
Zone # 25
Zone # 33
Zone # 41
Zone # 02
Zone # 10
Zone # 18
Zone # 26
Zone # 34
Zone # 42
Zone # 03
Zone # 11
Zone # 19
Zone # 27
Zone # 35
Zone # 43
Zone # 04
Zone # 12
Zone # 20
Zone # 28
Zone # 36
Zone # 44
Zone # 05
Zone # 13
Zone # 21
Zone # 29
Zone # 37
Zone # 45
Zone # 06
Zone # 14
Zone # 22
Zone # 30
Zone # 38
Zone # 46
Zone # 07
Zone # 15
Zone # 23
Zone # 31
Zone # 39
Zone # 47
Zone # 08
Zone # 16
Zone # 24
Zone # 32
Zone # 40
Zone # 48
E = Fire/Burglar
Restore
8
9
A
B
C
D
Zone # 01
Zone # 09
Zone # 17
Zone # 25
Zone # 33
Zone # 41
Zone # 02
Zone # 10
Zone # 18
Zone # 26
Zone # 34
Zone # 42
Zone # 03
Zone # 11
Zone # 19
Zone # 27
Zone # 35
Zone # 43
Zone # 04
Zone # 12
Zone # 20
Zone # 28
Zone # 36
Zone # 44
Zone # 05
Zone # 13
Zone # 21
Zone # 29
Zone # 37
Zone # 45
Zone # 06
Zone # 14
Zone # 22
Zone # 30
Zone # 38
Zone # 46
Zone # 07
Zone # 15
Zone # 23
Zone # 31
Zone # 39
Zone # 47
Zone # 08
Zone # 16
Zone # 24
Zone # 32
Zone # 40
Zone # 48
0
Combus
Fault
Auxiliary
Output Fail
Combus
Fault
Restore
Auxiliary Fail
Tamper
ROM Error
TLM
Printer Fault
AC Fail
Battery Fail
N/A
N/A
N/A
Fail to
Comm.
N/A
N/A
N/A
N/A
Tamper
Restore
ROM Error
Restore
TLM
Restore
Printer Fault
Restore
AC Fail
Restore
Battery Fail
Restore
N/A
N/A
N/A
Fail to
Comm.
Restore
N/A
N/A
N/A
N/A
1
F = Module
Troubles
8
9
DGP-848
- 16 -
Programming Guide
Event Name
Utility Key 1
Utility Key 2
Utility Key 3
Utility Key 4
Utility Key 5
Utility Key 6
Utility Key 7
Utility Key 8
Utility Key 9
Utility Key 10
Utility Key 11
Utility Key 12
Utility Key 13
Utility Key 14
Utility Key 15
Utility Key 16
Table 1: Utility Key Event Generation Table
Using Keyswitch
Using Keyswitch
Using Keypad
Definition 3
Definition 4
Buttons
Keyswitch 001 opens
Keyswitch 002 opens
Keyswitch 003 opens
Keyswitch 004 opens
Keyswitch 005 opens
Keyswitch 006 opens
Keyswitch 007 opens
Keyswitch 008 opens
-
Keyswitch 001 opens
Keyswitch 001 closes
Keyswitch 002 opens
Keyswitch 002 closes
Keyswitch 003 opens
Keyswitch 003 closes
Keyswitch 004 opens
Keyswitch 004 closes
Keyswitch 005 opens
Keyswitch 005 closes
Keyswitch 006 opens
Keyswitch 006 closes
Keyswitch 007 opens
Keyswitch 007 closes
Keyswitch 008 opens
Keyswitch 008 closes
[1] + [2]
[4] + [5]
[7] + [8]
[CLEAR] + [0] or [*] + [0]
[2] + [3]
[5] + [6]
[8] + [9]
[0] + [ENTER] or [0] + [#]
-
Using Remote
Control
Utility Key 1†
Utility Key 2†
Utility Key 3†
Utility Key 4†
Utility Key 5†
-
† You must program a remote control button with a Utility Key option; see MG-RCV3 Reference and Installation
Manual for more details.
Other Settings
Section #
Decimal Value (00 to 15)
Description
Default
[440]
___/___
00 to 04 (00 = all enabled partitions)
CONTROL PANEL PARTITION ASSIGNMENT
00
[441]
___/___
x4 sec.
ANSWERING MACHINE OVERRIDE DELAY
32 sec.
[442]
___/___
x1 Ring
NUMBER OF RINGS
8 rings
Zone Labels
For instructions on how to enter letters and special characters when using an LCD or Grafica keypad, refer to the LCD
keypad’s Installation Manual or Grafica’s User Manual. A complete Grafica user manual is available on our website at
paradox.com.
Section
Zone #
Zone Label
Section
Zone #
Zone Label
[451]
Zone 1
__/__/__/__/__/__/__/__/__/__/__/__/__/__/__/__
[475]
Zone 25
__/__/__/__/__/__/__/__/__/__/__/__/__/__/__/__
[452]
Zone 2
__/__/__/__/__/__/__/__/__/__/__/__/__/__/__/__
[476]
Zone 26
__/__/__/__/__/__/__/__/__/__/__/__/__/__/__/__
[453]
Zone 3
__/__/__/__/__/__/__/__/__/__/__/__/__/__/__/__
[477]
Zone 27
__/__/__/__/__/__/__/__/__/__/__/__/__/__/__/__
[454]
Zone 4
__/__/__/__/__/__/__/__/__/__/__/__/__/__/__/__
[478]
Zone 28
__/__/__/__/__/__/__/__/__/__/__/__/__/__/__/__
[455]
Zone 5
__/__/__/__/__/__/__/__/__/__/__/__/__/__/__/__
[479]
Zone 29
__/__/__/__/__/__/__/__/__/__/__/__/__/__/__/__
[456]
Zone 6
__/__/__/__/__/__/__/__/__/__/__/__/__/__/__/__
[480]
Zone 30
__/__/__/__/__/__/__/__/__/__/__/__/__/__/__/__
[457]
Zone 7
__/__/__/__/__/__/__/__/__/__/__/__/__/__/__/__
[481]
Zone 31
__/__/__/__/__/__/__/__/__/__/__/__/__/__/__/__
[458]
Zone 8
__/__/__/__/__/__/__/__/__/__/__/__/__/__/__/__
[482]
Zone 32
__/__/__/__/__/__/__/__/__/__/__/__/__/__/__/__
[459]
Zone 9
__/__/__/__/__/__/__/__/__/__/__/__/__/__/__/__
[483]
Zone 33
__/__/__/__/__/__/__/__/__/__/__/__/__/__/__/__
[460]
Zone 10
__/__/__/__/__/__/__/__/__/__/__/__/__/__/__/__
[484]
Zone 34
__/__/__/__/__/__/__/__/__/__/__/__/__/__/__/__
[461]
Zone 11
__/__/__/__/__/__/__/__/__/__/__/__/__/__/__/__
[485]
Zone 35
__/__/__/__/__/__/__/__/__/__/__/__/__/__/__/__
[462]
Zone 12
__/__/__/__/__/__/__/__/__/__/__/__/__/__/__/__
[486]
Zone 36
__/__/__/__/__/__/__/__/__/__/__/__/__/__/__/__
[463]
Zone 13
__/__/__/__/__/__/__/__/__/__/__/__/__/__/__/__
[487]
Zone 37
__/__/__/__/__/__/__/__/__/__/__/__/__/__/__/__
[464]
Zone 14
__/__/__/__/__/__/__/__/__/__/__/__/__/__/__/__
[488]
Zone 38
__/__/__/__/__/__/__/__/__/__/__/__/__/__/__/__
DGP-848
- 17 -
Programming Guide
[465]
Zone 15
__/__/__/__/__/__/__/__/__/__/__/__/__/__/__/__
[489]
Zone 39
__/__/__/__/__/__/__/__/__/__/__/__/__/__/__/__
[466]
Zone 16
__/__/__/__/__/__/__/__/__/__/__/__/__/__/__/__
[490]
Zone 40
__/__/__/__/__/__/__/__/__/__/__/__/__/__/__/__
[467]
Zone 17
__/__/__/__/__/__/__/__/__/__/__/__/__/__/__/__
[491]
Zone 41
__/__/__/__/__/__/__/__/__/__/__/__/__/__/__/__
[468]
Zone 18
__/__/__/__/__/__/__/__/__/__/__/__/__/__/__/__
[492]
Zone 42
__/__/__/__/__/__/__/__/__/__/__/__/__/__/__/__
[469]
Zone 19
__/__/__/__/__/__/__/__/__/__/__/__/__/__/__/__
[493]
Zone 43
__/__/__/__/__/__/__/__/__/__/__/__/__/__/__/__
[470]
Zone 20
__/__/__/__/__/__/__/__/__/__/__/__/__/__/__/__
[494]
Zone 44
__/__/__/__/__/__/__/__/__/__/__/__/__/__/__/__
[471]
Zone 21
__/__/__/__/__/__/__/__/__/__/__/__/__/__/__/__
[495]
Zone 45
__/__/__/__/__/__/__/__/__/__/__/__/__/__/__/__
[472]
Zone 22
__/__/__/__/__/__/__/__/__/__/__/__/__/__/__/__
[496]
Zone 46
__/__/__/__/__/__/__/__/__/__/__/__/__/__/__/__
[473]
Zone 23
__/__/__/__/__/__/__/__/__/__/__/__/__/__/__/__
[497]
Zone 47
__/__/__/__/__/__/__/__/__/__/__/__/__/__/__/__
[474]
Zone 24
__/__/__/__/__/__/__/__/__/__/__/__/__/__/__/__
[498]
Zone 48
__/__/__/__/__/__/__/__/__/__/__/__/__/__/__/__
System Options
Bold = Default setting
Section [500]: System Options
Option
[1]
Partition 1
[2]
Partition 2
[3]
Partition 3
ON
N Disabled
N Enabled
N Disabled
N Disabled
N Disabled
[4]
Partition 4
[5]
Bell/Siren Output in Partition 1
[6]
Bell/Siren Output in Partition 2
[7]
Bell/Siren Output in Partition 3
[8]
Bell/Siren Output in Partition 4
Section
OFF
N Disabled
N Disabled
N Disabled
N Enabled
N Enabled
N Enabled
N Enabled
N Enabled
N Enabled
N Disabled
N Enabled
OFF
ON
N see table
N see table
N see table
N see table
[501]: System Options
Option
Wireless Transmitter Supervision Options
[1]&[2]
[1]
[2]
OFF
OFF
Disabled (default)
ON
OFF
When disarmed: GENERATES TROUBLE ONLY
When armed: Follows Zone Alarm Types (page 5)
(armed or disarmed)
OFF
ON
GENERATES TROUBLE ONLY
ON
ON
When disarmed: GENERATES AUDIBLE ALARM
When armed: Follows Zone Alarm Types (page 5)
[3]
Generate Supervision Failure if detected on a
Bypassed Wireless Zone
N Yes
N No
[4]
Restrict Arming on Wireless Transmitter
Supervision Failure
N Disabled
N Enabled
DGP-848
- 18 -
Programming Guide
Section
[501]: System Options
Zone & Module Tamper Recognition Options
[5]&[6]*
[5]
[6]
OFF
OFF
Disabled (default)
ON
OFF
When disarmed: GENERATES TROUBLE ONLY
When armed: Follows Zone Alarm Types (page 5)
(armed or disarmed)
OFF
ON
GENERATES TROUBLE ONLY
ON
ON
When disarmed: GENERATES AUDIBLE ALARM
When armed: Follows Zone Alarm Types (page 5)
N see table
N see table
*see Hardware Connections on page 43
[7]
Generate Tamper if detected on Bypassed Zone N Yes
[8]
Restrict Arming on Tamper Trouble
N Disabled
N see table
N see table
N No
N Enabled
Bold = Default setting
Section [502]: PGM & Other Options
Option
[1]
[2]
PGM 2 Deactivation Type
PGM 3 Deactivation Type
[4]
PGM 4 Deactivation Type
[5]
PGM 5 Deactivation Type
ON
N Follows Event
N Follows Timer
N Follows Event
N Follows Timer
N Follows Event
PGM 1 Deactivation Type
[3]
OFF
N Follows Event
N Follows Event
[6]
Auto adjust panel clock for Daylight Savings
[7]
PGM 1 = 2-wire smoke detector input (255)
[8]
No bell cut-off during fire alarm
N Disabled
N Disabled
N Follows Timer
N Follows Timer
N Follows Timer
N Enabled
N Enabled
N Disabled
N Enabled
OFF
ON
N Seconds
N Minutes
Section [503]: PGM & Other Options
Option
[1]
PGM 1 Timer (see section [250])
[2]
PGM 2 Timer (see section [251])
[3]
PGM 3 Timer (see section [252])
N Seconds
N Seconds
N Seconds
[4]
PGM 4 Timer (see section [253])
[5]
PGM 5 Timer (see section [254])
[6]
Battery charge current *
[7]
AC failure does not appear in Trouble Display
[8]
N Seconds
N 350mA
Restrict arming on battery/AC failure
N Disabled
N Disabled
N Minutes
N Minutes
N Minutes
N Minutes
N 850mA
N Enabled
N Enabled
* A 40VA transformer is required when selecting the 850mA battery charge current. Using a 20VA
transformer with a battery charge current of 850mA may damage the system.
Section [504]: Keypad & Other Options
Option
OFF
[1]
Multiple Actions in User Menu
[2]
User Code length
[3]
User Code length
[4]
Power Save Mode
N Disabled
ON
N Enabled
N Fixed (see option [3] below) N Flexible (1 to 6 digits)
N 4-digits (if option [2] = off)
N Disabled
[5]
Bypass not displayed while system is armed
[6]
Trouble Latch
[7]
EOL resistor on hardwire inputs
[8]
ATZ (Zone Doubling)
N Disabled
N Disabled
N Disabled
N Disabled
DGP-848
- 19 -
Programming Guide
N 6-digits (if option [2] = off)
N Enabled
N Enabled
N Enabled
N Enabled
N Enabled
Partition 1: Options
Bold = Default setting
Section [505]: Partition 1 Options
Option
OFF
ON
N Disabled
N Enabled
[1]
Switch to Stay Arming (if no delay zone opened) N Disabled
[2]
Partition 1 arms & disarms with Partition 2
[3]
Partition 1 arms & disarms with Partition 3
[4]
Partition 1 arms & disarms with Partition 4
[5]
Timed Auto-Arming
[6]
“No Movement” Auto-Arming
[7]
Arming method for auto arming
[8]
Exit Delay termination
N Disabled
N Disabled
N Disabled
N Disabled
N Force Arming
N Enabled
N Enabled
N Enabled
N Enabled
N Enabled
N Stay Arming
N Disabled
N Enabled
OFF
ON
Section [506]: Partition 1 Options
Option
[1]
N Disabled
Panic 1 (keys [1] and [3])
[2]
Panic 2 (keys [4] and [6])
[3]
Panic 3 (keys [7] and [9])
[4]
Panic 1 alarm type
[5]
Panic 2 alarm type
N Disabled
N Disabled
N Report Only
N Report Only
N Report Only
[6]
Panic 3 alarm type
[7]
Report Disarming Options
[8]
Always Force Arm When Regular Arming
N Enabled
N Enabled
N Enabled
N Audible Alarm
N Audible Alarm
N Fire Alarm
N Always report disarming
N Report disarming only after alarm
OFF
ON
N Disabled
N Enabled
N Disabled
N Enabled
Section [507]: Partition 1 Options
Option
[1]
Bell Squawk upon Disarming
[2]
Bell Squawk upon Arming
[3]
Bell Squawk upon Auto-Arming
N Disabled
N Disabled
N Disabled
[4]
Bell Squawk during Exit Delay
[5]
Bell Squawk during Entry Delay
[6]
Bell Squawk upon Remote Arming/Disarming
[7]
Ring Back: bell squawk if disarmed after alarm
[8]
N Disabled
N Disabled
N Disabled
Ring Back: keypad beeps if disarmed after alarm N Disabled
N Enabled
N Enabled
N Enabled
N Enabled
N Enabled
N Enabled
N Enabled
Section [508]*: Partition 1 Options
Option
[1]
OFF
N Disabled
One-Touch Regular Arming
N Disabled
[2]
One-Touch Stay Arming
[3]
One-Touch Instant Arming
[4]
One-Touch Force Arming
[5]
One-Touch Stay or Instant Disarming
N Disabled
N Disabled
[6]
One-Touch Bypass Programming
[7]
One-Touch Event Display
N Disabled
N Disabled
N Disabled
ON
N Enabled
N Enabled
N Enabled
N Enabled
N Enabled
N Enabled
N Enabled
[8]
No Exit Delay when arming with remote control N Disabled
N Enabled
* If the keypad is assigned to more than one partition, the feature must be enabled in all the keypad’s partitions.
DGP-848
- 20 -
Programming Guide
Partition 2: Options
Bold = Default setting
Section [509]: Partition 2 Options
Option
OFF
Partition 2 arms & disarms with Partition 1
N Disabled
[2]
Switch to Stay Arming (if no delay zone opened) N Disabled
[3]
Partition 2 arms & disarms with Partition 3
N Disabled
[1]
[4]
Partition 2 arms & disarms with Partition 4
[5]
Timed Auto-Arming
[6]
“No Movement” Auto-Arming
[7]
Arming method for auto arming
[8]
Exit Delay termination
N Disabled
N Disabled
N Disabled
N Force Arming
ON
N Enabled
N Enabled
N Enabled
N Enabled
N Enabled
N Enabled
N Stay Arming
N Disabled
N Enabled
OFF
ON
Section [510]: Partition 2 Options
Option
[1]
N Disabled
Panic 1 (keys [1] and [3])
[2]
Panic 2 (keys [4] and [6])
[3]
Panic 3 (keys [7] and [9])
[4]
Panic 1 alarm type
[5]
Panic 2 alarm type
N Disabled
N Disabled
N Report Only
N Report Only
N Report Only
[6]
Panic 3 alarm type
[7]
Report Disarming Options
[8]
Always Force Arm When Regular Arming
N Enabled
N Enabled
N Enabled
N Audible Alarm
N Audible Alarm
N Fire Alarm
N Always report disarming
N Report disarming only after alarm
OFF
ON
N Disabled
N Enabled
N Disabled
N Enabled
Section [511]: Partition 2 Options
Option
[1]
Bell Squawk upon Disarming
[2]
Bell Squawk upon Arming
[3]
Bell Squawk upon Auto-Arming
N Disabled
N Disabled
N Disabled
[4]
Bell Squawk during Exit Delay
[5]
Bell Squawk during Entry Delay
[6]
Bell Squawk upon Remote Arming/Disarming
[7]
Ring Back: bell squawk if disarmed after alarm
[8]
N Disabled
N Disabled
N Disabled
Ring Back: keypad beeps if disarmed after alarm N Disabled
N Enabled
N Enabled
N Enabled
N Enabled
N Enabled
N Enabled
N Enabled
Section [512]*: Partition 2 Options
Option
[1]
OFF
N Disabled
One-Touch Regular Arming
N Disabled
[2]
One-Touch Stay Arming
[3]
One-Touch Instant Arming
[4]
One-Touch Force Arming
[5]
One-Touch Stay or Instant Disarming
N Disabled
N Disabled
[6]
One-Touch Bypass Programming
[7]
One-Touch Event Display
N Disabled
N Disabled
N Disabled
ON
N Enabled
N Enabled
N Enabled
N Enabled
N Enabled
N Enabled
N Enabled
[8]
No Exit Delay when arming with remote control N Disabled
N Enabled
* If the keypad is assigned to more than one partition, the feature must be enabled in all the keypad’s partitions.
DGP-848
- 21 -
Programming Guide
Partition 3: Options
Bold = Default setting
Section [513]: Partition 3 Options
Option
[1]
Partition 3 arms & disarms with Partition 1
[2]
Partition 3 arms & disarms with Partition 2
[3]
OFF
ON
N Disabled
N Enabled
N Disabled
Switch to Stay Arming (if no delay zone opened) N Disabled
[4]
Partition 3 arms & disarms with Partition 4
[5]
Timed Auto-Arming
[6]
“No Movement” Auto-Arming
[7]
Arming method for auto arming
[8]
Exit Delay termination
N Disabled
N Disabled
N Disabled
N Force Arming
N Enabled
N Enabled
N Enabled
N Enabled
N Enabled
N Stay Arming
N Disabled
N Enabled
OFF
ON
Section [514]: Partition 3 Options
Option
[1]
N Disabled
Panic 1 (keys [1] and [3])
[2]
Panic 2 (keys [4] and [6])
[3]
Panic 3 (keys [7] and [9])
[4]
Panic 1 alarm type
[5]
Panic 2 alarm type
N Disabled
N Disabled
N Report Only
N Report Only
N Report Only
[6]
Panic 3 alarm type
[7]
Report Disarming Options
[8]
Always Force Arm When Regular Arming
N Enabled
N Enabled
N Enabled
N Audible Alarm
N Audible Alarm
N Fire Alarm
N Always report disarming
N Report disarming only after alarm
OFF
ON
N Disabled
N Enabled
N Disabled
N Enabled
Section [515]: Partition 3 Options
Option
[1]
Bell Squawk upon Disarming
[2]
Bell Squawk upon Arming
[3]
Bell Squawk upon Auto-Arming
N Disabled
N Disabled
N Disabled
[4]
Bell Squawk during Exit Delay
[5]
Bell Squawk during Entry Delay
[6]
Bell Squawk upon Remote Arming/Disarming
[7]
Ring Back: bell squawk if disarmed after alarm
[8]
N Disabled
N Disabled
N Disabled
Ring Back: keypad beeps if disarmed after alarm N Disabled
N Enabled
N Enabled
N Enabled
N Enabled
N Enabled
N Enabled
N Enabled
Section [516]*: Partition 3 Options
Option
[1]
OFF
N Disabled
One-Touch Regular Arming
N Disabled
[2]
One-Touch Stay Arming
[3]
One-Touch Instant Arming
[4]
One-Touch Force Arming
[5]
One-Touch Stay or Instant Disarming
N Disabled
N Disabled
[6]
One-Touch Bypass Programming
[7]
One-Touch Event Display
N Disabled
N Disabled
N Disabled
ON
N Enabled
N Enabled
N Enabled
N Enabled
N Enabled
N Enabled
N Enabled
[8]
No Exit Delay when arming with remote control N Disabled
N Enabled
* If the keypad is assigned to more than one partition, the feature must be enabled in all the keypad’s partitions.
DGP-848
- 22 -
Programming Guide
Partition 4: Options
Bold = Default setting
Section [517]: Partition 4 Options
Option
OFF
ON
N Disabled
N Enabled
N Disabled
[1]
Partition 4 arms & disarms with Partition 1
[2]
Partition 4 arms & disarms with Partition 2
[3]
Partition 4 arms & disarms with Partition 3
N Disabled
[4]
Switch to Stay Arming (if no delay zone opened) N Disabled
[5]
Timed Auto-Arming
N Disabled
[6]
“No Movement” Auto-Arming
[7]
Arming method for auto arming
[8]
Exit Delay termination
N Disabled
N Force Arming
N Enabled
N Enabled
N Enabled
N Enabled
N Enabled
N Stay Arming
N Disabled
N Enabled
OFF
ON
Section [518]: Partition 4 Options
Option
[1]
N Disabled
Panic 1 (keys [1] and [3])
[2]
Panic 2 (keys [4] and [6])
[3]
Panic 3 (keys [7] and [9])
[4]
Panic 1 alarm type
[5]
Panic 2 alarm type
N Disabled
N Disabled
N Report Only
N Report Only
N Report Only
[6]
Panic 3 alarm type
[7]
Report Disarming Options
[8]
Always Force Arm When Regular Arming
N Enabled
N Enabled
N Enabled
N Audible Alarm
N Audible Alarm
N Fire Alarm
N Always report disarming
N Report disarming only after alarm
OFF
ON
N Disabled
N Enabled
N Disabled
N Enabled
Section [519]: Partition 4 Options
Option
[1]
Bell Squawk upon Disarming
[2]
Bell Squawk upon Arming
[3]
Bell Squawk upon Auto-Arming
N Disabled
N Disabled
N Disabled
[4]
Bell Squawk during Exit Delay
[5]
Bell Squawk during Entry Delay
[6]
Bell Squawk upon Remote Arming/Disarming
[7]
Ring Back: bell squawk if disarmed after alarm
[8]
N Disabled
N Disabled
N Disabled
Ring Back: keypad beeps if disarmed after alarm N Disabled
N Enabled
N Enabled
N Enabled
N Enabled
N Enabled
N Enabled
N Enabled
Section [520]*: Partition 4 Options
Option
[1]
OFF
N Disabled
One-Touch Regular Arming
N Disabled
[2]
One-Touch Stay Arming
[3]
One-Touch Instant Arming
[4]
One-Touch Force Arming
[5]
One-Touch Stay or Instant Disarming
N Disabled
N Disabled
[6]
One-Touch Bypass Programming
[7]
One-Touch Event Display
N Disabled
N Disabled
N Disabled
ON
N Enabled
N Enabled
N Enabled
N Enabled
N Enabled
N Enabled
N Enabled
[8]
No Exit Delay when arming with remote control N Disabled
N Enabled
* If the keypad is assigned to more than one partition, the feature must be enabled in all the keypad’s partitions.
DGP-848
- 23 -
Programming Guide
Dialer Options
Bold = Default setting
Section [521]: Dialer Options
Option
OFF
ON
N see table
N see table
N see table
N see table
Telephone Line Monitoring (TLM) Options
[1]&[2]
[1]
[2]
OFF
OFF
Disabled (default)
OFF
ON
When armed: GENERATES AUDIBLE ALARM
ON
OFF
When armed: GENERATES TROUBLE ONLY
ON
ON
TLM silent alarm: BECOMES AUDIBLE ALARM
[3]
Dialer (reporting to monitoring station)
[4]
Dialing Method
[5]
Pulse Ratio
[6]
Busy Tone Detection
N 1:2 (Europe)
N Disabled
[7]
Switch to pulse dialing on 5th attempt
[8]
Bell/Siren upon Communication Failure if
system is armed
Section
N Disabled
N Pulse
N Disabled
N Enabled
N Tone (DTMF)
N 1:1.5 (North America)
N Enabled
N Enabled
N Disabled
N Enabled
OFF
ON
N Disabled
N Enabled
[522]: Dialer Options
Option
N Disabled
[1]
Call Back
[2]
Automatic Event Buffer Transmission
[3]
Hourly Test Transmission
[4]
Shabbat Feature
[5]
Clear Bell Limit Trouble*
[6]
Alternate Dial
[7]
Dial Tone Delay
N Disabled
N Disabled
N On Restore
N Disabled
N Force dial if no dial tone
[8]
Report zone restore options
* For UL installations, option [5] must be set to ON.
DGP-848
N On bell cut-off
- 24 -
Programming Guide
N Enabled
N Enabled
N Enabled
N Manually
N Enabled
N Hang-up if no dial tone
N On zone closure
Partition 1: Event Call Direction
Bold = Default setting
Section
[523]: ARMING AND DISARMING REPORT CODES (PARTITION 1)
Option
[1]
Call Telephone Number 1 (see section [561])
[2]
Call Telephone Number 2 (see section [562])
[3]
Call Telephone Number 3 (see section [563])
[4]
Call Telephone Number 4 (see section [564])
[5]
Backup on Telephone Number 1
[6]
Backup on Telephone Number 2
[7]
Backup on Telephone Number 3
[8]
Backup on Telephone Number 4
Section
ON
N Disabled
N Enabled
N Disabled
N Disabled
N Disabled
N Disabled
N Disabled
N Disabled
N Disabled
N Enabled
N Enabled
N Enabled
N Enabled
N Enabled
N Enabled
N Enabled
[524]: ALARM AND ALARM RESTORE REPORT CODES (PARTITION 1)
Option
[1]
Call Telephone Number 1 (see section [561])
[2]
Call Telephone Number 2 (see section [562])
[3]
Call Telephone Number 3 (see section [563])
[4]
Call Telephone Number 4 (see section [564])
[5]
Backup on Telephone Number 1
[6]
Backup on Telephone Number 2
[7]
Backup on Telephone Number 3
[8]
Backup on Telephone Number 4
Section
OFF
OFF
ON
N Disabled
N Enabled
N Disabled
N Disabled
N Disabled
N Disabled
N Disabled
N Disabled
N Disabled
N Enabled
N Enabled
N Enabled
N Enabled
N Enabled
N Enabled
N Enabled
[525]: TAMPER AND TAMPER RESTORE REPORT CODES (PARTITION 1)
Option
[1]
Call Telephone Number 1 (see section [561])
[2]
Call Telephone Number 2 (see section [562])
[3]
Call Telephone Number 3 (see section [563])
[4]
Call Telephone Number 4 (see section [564])
[5]
Backup on Telephone Number 1
[6]
Backup on Telephone Number 2
[7]
Backup on Telephone Number 3
[8]
Backup on Telephone Number 4
OFF
ON
N Disabled
N Enabled
N Disabled
N Disabled
N Disabled
N Disabled
N Disabled
N Disabled
N Disabled
DGP-848
- 25 -
Programming Guide
N Enabled
N Enabled
N Enabled
N Enabled
N Enabled
N Enabled
N Enabled
Partition 2: Event Call Direction
Bold = Default setting
Section
[526]: ARMING AND DISARMING REPORT CODES (PARTITION 2)
Option
[1]
Call Telephone Number 1 (see section [561])
[2]
Call Telephone Number 2 (see section [562])
[3]
Call Telephone Number 3 (see section [563])
[4]
Call Telephone Number 4 (see section [564])
[5]
Backup on Telephone Number 1
[6]
Backup on Telephone Number 2
[7]
Backup on Telephone Number 3
[8]
Backup on Telephone Number 4
Section
ON
N Disabled
N Enabled
N Disabled
N Disabled
N Disabled
N Disabled
N Disabled
N Disabled
N Disabled
N Enabled
N Enabled
N Enabled
N Enabled
N Enabled
N Enabled
N Enabled
[527]: ALARM AND ALARM RESTORE REPORT CODES (PARTITION 2)
Option
[1]
Call Telephone Number 1 (see section [561])
[2]
Call Telephone Number 2 (see section [562])
[3]
Call Telephone Number 3 (see section [563])
[4]
Call Telephone Number 4 (see section [564])
[5]
Backup on Telephone Number 1
[6]
Backup on Telephone Number 2
[7]
Backup on Telephone Number 3
[8]
Backup on Telephone Number 4
Section
OFF
OFF
ON
N Disabled
N Enabled
N Disabled
N Disabled
N Disabled
N Disabled
N Disabled
N Disabled
N Disabled
N Enabled
N Enabled
N Enabled
N Enabled
N Enabled
N Enabled
N Enabled
[528]: TAMPER AND TAMPER RESTORE REPORT CODES (PARTITION 2)
Option
[1]
Call Telephone Number 1 (see section [561])
[2]
Call Telephone Number 2 (see section [562])
[3]
Call Telephone Number 3 (see section [563])
[4]
Call Telephone Number 4 (see section [564])
[5]
Backup on Telephone Number 1
[6]
Backup on Telephone Number 2
[7]
Backup on Telephone Number 3
[8]
Backup on Telephone Number 4
OFF
ON
N Disabled
N Enabled
N Disabled
N Disabled
N Disabled
N Disabled
N Disabled
N Disabled
N Disabled
DGP-848
- 26 -
Programming Guide
N Enabled
N Enabled
N Enabled
N Enabled
N Enabled
N Enabled
N Enabled
Partition 3: Event Call Direction
Bold = Default setting
Section
[529]: ARMING AND DISARMING REPORT CODES (PARTITION 3)
Option
[1]
Call Telephone Number 1 (see section [561])
[2]
Call Telephone Number 2 (see section [562])
[3]
Call Telephone Number 3 (see section [563])
[4]
Call Telephone Number 4 (see section [564])
[5]
Backup on Telephone Number 1
[6]
Backup on Telephone Number 2
[7]
Backup on Telephone Number 3
[8]
Backup on Telephone Number 4
Section
ON
N Disabled
N Enabled
N Disabled
N Disabled
N Disabled
N Disabled
N Disabled
N Disabled
N Disabled
N Enabled
N Enabled
N Enabled
N Enabled
N Enabled
N Enabled
N Enabled
[530]: ALARM AND ALARM RESTORE REPORT CODES (PARTITION 3)
Option
[1]
Call Telephone Number 1 (see section [561])
[2]
Call Telephone Number 2 (see section [562])
[3]
Call Telephone Number 3 (see section [563])
[4]
Call Telephone Number 4 (see section [564])
[5]
Backup on Telephone Number 1
[6]
Backup on Telephone Number 2
[7]
Backup on Telephone Number 3
[8]
Backup on Telephone Number 4
Section
OFF
OFF
ON
N Disabled
N Enabled
N Disabled
N Disabled
N Disabled
N Disabled
N Disabled
N Disabled
N Disabled
N Enabled
N Enabled
N Enabled
N Enabled
N Enabled
N Enabled
N Enabled
[531]: TAMPER AND TAMPER RESTORE REPORT CODES (PARTITION 3)
Option
[1]
Call Telephone Number 1 (see section [561])
[2]
Call Telephone Number 2 (see section [562])
[3]
Call Telephone Number 3 (see section [563])
[4]
Call Telephone Number 4 (see section [564])
[5]
Backup on Telephone Number 1
[6]
Backup on Telephone Number 2
[7]
Backup on Telephone Number 3
[8]
Backup on Telephone Number 4
OFF
ON
N Disabled
N Enabled
N Disabled
N Disabled
N Disabled
N Disabled
N Disabled
N Disabled
N Disabled
DGP-848
- 27 -
Programming Guide
N Enabled
N Enabled
N Enabled
N Enabled
N Enabled
N Enabled
N Enabled
Partition 4: Event Call Direction
Bold = Default setting
Section
[532]: ARMING AND DISARMING REPORT CODES (PARTITION 4)
Option
[1]
Call Telephone Number 1 (see section [561])
[2]
Call Telephone Number 2 (see section [562])
[3]
Call Telephone Number 3 (see section [563])
[4]
Call Telephone Number 4 (see section [564])
[5]
Backup on Telephone Number 1
[6]
Backup on Telephone Number 2
[7]
Backup on Telephone Number 3
[8]
Backup on Telephone Number 4
Section
ON
N Disabled
N Enabled
N Disabled
N Disabled
N Disabled
N Disabled
N Disabled
N Disabled
N Disabled
N Enabled
N Enabled
N Enabled
N Enabled
N Enabled
N Enabled
N Enabled
[533]: ALARM AND ALARM RESTORE REPORT CODES (PARTITION 4)
Option
[1]
Call Telephone Number 1 (see section [561])
[2]
Call Telephone Number 2 (see section [562])
[3]
Call Telephone Number 3 (see section [563])
[4]
Call Telephone Number 4 (see section [564])
[5]
Backup on Telephone Number 1
[6]
Backup on Telephone Number 2
[7]
Backup on Telephone Number 3
[8]
Backup on Telephone Number 4
Section
OFF
OFF
ON
N Disabled
N Enabled
N Disabled
N Disabled
N Disabled
N Disabled
N Disabled
N Disabled
N Disabled
N Enabled
N Enabled
N Enabled
N Enabled
N Enabled
N Enabled
N Enabled
[534]: TAMPER AND TAMPER RESTORE REPORT CODES (PARTITION 4)
Option
[1]
Call Telephone Number 1 (see section [561])
[2]
Call Telephone Number 2 (see section [562])
[3]
Call Telephone Number 3 (see section [563])
[4]
Call Telephone Number 4 (see section [564])
[5]
Backup on Telephone Number 1
[6]
Backup on Telephone Number 2
[7]
Backup on Telephone Number 3
[8]
Backup on Telephone Number 4
OFF
ON
N Disabled
N Enabled
N Disabled
N Disabled
N Disabled
N Disabled
N Disabled
N Disabled
N Disabled
DGP-848
- 28 -
Programming Guide
N Enabled
N Enabled
N Enabled
N Enabled
N Enabled
N Enabled
N Enabled
System Event Call Direction
Bold = Default setting
Section
[535]: SYSTEM TROUBLES AND TROUBLE RESTORES
Option
[1]
Call Telephone Number 1 (see section [561])
[2]
Call Telephone Number 2 (see section [562])
[3]
Call Telephone Number 3 (see section [563])
[4]
Call Telephone Number 4 (see section [564])
[5]
Backup on Telephone Number 1
[6]
Backup on Telephone Number 2
[7]
Backup on Telephone Number 3
[8]
Backup on Telephone Number 4
Section
OFF
ON
N Disabled
N Enabled
N Disabled
N Disabled
N Disabled
N Disabled
N Disabled
N Disabled
N Enabled
N Enabled
N Enabled
N Enabled
N Enabled
N Enabled
N Disabled
N Enabled
OFF
ON
N Disabled
N Enabled
[536]: SPECIAL REPORTING
Option
[1]
Call Telephone Number 1 (see section [561])
[2]
Call Telephone Number 2 (see section [562])
[3]
Call Telephone Number 3 (see section [563])
[4]
Call Telephone Number 4 (see section [564])
[5]
Backup on Telephone Number 1
[6]
Backup on Telephone Number 2
[7]
Backup on Telephone Number 3
[8]
Backup on Telephone Number 4
N Disabled
N Disabled
N Disabled
N Disabled
N Disabled
N Disabled
N Disabled
N Enabled
N Enabled
N Enabled
N Enabled
N Enabled
N Enabled
N Enabled
Global Access Control Features
Section
[537]: ACCESS CONTROL
Option
OFF
ON
N Disabled
N Enabled
N Disabled
[1]
Access Control Feature
[2]
Log “Request for Exit” in Event Buffer*
[3]
Log “Door Left Open Restore” in Event Buffer
[4]
Log “Door Forced Restore” in Event Buffer
[5]
Burglar Alarm on Forced Door
[6]
Skip Exit Delay when Arming with Card
[7]
Burglar Alarm on Door Left Open
[8]
Access to Doors During Clock Loss and Clock
Resetting
N Disabled
N Disabled
N Disabled
N Disabled
N Disabled
N Granted to all users
N Enabled
N Enabled
N Enabled
N Enabled
N Enabled
N Enabled
N Granted Only to Masters
*Since “Request for Exit” events can occur often, the Event Buffer may fill up quickly.
DGP-848
- 29 -
Programming Guide
Communication Settings
Section #
[550]
Description
___
___
___
___
REPORTING FORMATS FOR TELEPHONE NUMBERS
1 TO 4
USE THE SAME FORMAT FOR EACH NUMBER.
ONLY THE PAGER FORMAT CAN BE USED
WITH OTHER REPORTING FORMATS.
For more information refer to Automatic
Report Code Programming on page 35.
Section #
Hexa Value (0-FFFF)
If less than 4 digits, press [ENTER]
Description
[551]
___/___/___/___
PARTITION
1: ACCOUNT NUMBER
[552]
___/___/___/___
PARTITION
2: ACCOUNT NUMBER
[553]
___/___/___/___
PARTITION
3: ACCOUNT NUMBER
[554]
___/___/___/___
PARTITION
4: ACCOUNT NUMBER
Only SIA formats support the “0” digit in its account numbers. For account numbers that use another reporting format, you
must replace the “0” with an “A”. To enter an “A”, press the [STAY] key on LCD keypads or the [#] key on Grafica keypads.
When using the SIA Format, the control panel will only use Partition Account Number 1 programmed in section [551], but
the report code will include the partition number.
[555]
___/___/___/___
PANEL IDENTIFIER (FOR
[556]
___/___/___/___
PC PASSWORD (FOR
[560]
__/__/__/__/__/__/__/__/__/__/__/__/__/__/__/__/__/__/__/__/__/__/__/__/__/__/__/__/__/__/__/__
PC TELEPHONE NUMBER FOR WINLOAD SOFTWARE (press [ENTER] if less than 32 digits)
[561]
__/__/__/__/__/__/__/__/__/__/__/__/__/__/__/__/__/__/__/__/__/__/__/__/__/__/__/__/__/__/__/__
MONITORING STATION/PAGER TELEPHONE NUMBER 1 (press [ENTER] if less than 32 digits)
[562]
__/__/__/__/__/__/__/__/__/__/__/__/__/__/__/__/__/__/__/__/__/__/__/__/__/__/__/__/__/__/__/__
MONITORING STATION/PAGER TELEPHONE NUMBER 2 (press [ENTER] if less than 32 digits)
[563]
__/__/__/__/__/__/__/__/__/__/__/__/__/__/__/__/__/__/__/__/__/__/__/__/__/__/__/__/__/__/__/__
MONITORING STATION/PAGER TELEPHONE NUMBER 3 (press [ENTER] if less than 32 digits)
[564]
__/__/__/__/__/__/__/__/__/__/__/__/__/__/__/__/__/__/__/__/__/__/__/__/__/__/__/__/__/__/__/__
MONITORING STATION/PAGER TELEPHONE NUMBER
WINLOAD SOFTWARE)
WINLOAD SOFTWARE)
4 (press [ENTER] if less than 32 digits)
For North American installations using either SIA or Contact ID reporting formats, enter *70 and then either P (4-second
pause) or W (wait for second dial tone) before the phone number in sections [560] to [564] to disable call-waiting.
Table 2: Special Telephone Number Keys
Function
*
#
Switch to Tone Dialing (T)
Wait for second dial tone (W)
4-second pause (P)
LCD
[STAY]
Grafica
Function
Clear
[#]
Delete
[FORCE]
[ARM] (press key until desired Delete from cursor to the end
[DISARM] letter/symbol appears) Insert space
[BYP]
DGP-848
- 30 -
Programming Guide
LCD
[CLEAR]
Grafica
Left action key (Clear)
[TRBL]
[ACC]
[MEM]
—
—
—
Report Codes
Each section from [600] to [718] contains up to four reportable events as defined on the following pages.
Ademco slow, Silent Knight fast, SESCOA, Ademco express or Pager formats:
Key-in desired 1 or 2-digit hexa values from 0 to FF.
Ademco format:
Use sections [790] to [795] to program a set of default Ademco report codes from the Automatic Report Code List on page
36. Then to program the remaining report codes or to change some of the defaults, enter the individual sections and key-in
the desired 2-digit hexa values found in the Contact ID Report Code List on page 38.
SIA format:
Use sections [790] to [795] to program a set of default SIA report codes from the Automatic Report Code List on page 36.
Codes that have not been set to default can be set to default manually by entering FF in the appropriate section. To disable
reporting of an event, enter 00 in the appropriate section.
Arming Report Codes
[600]: __ /__ Access code 1
__ /__ Access code 2
__ /__ Access code 3
__ /__ Access code 4
[608]: __ /__ Access code 33
__ /__ Access code 34
__ /__ Access code 35
__ /__ Access code 36
[616]: __ /__ Access code 65
__ /__ Access code 66
__ /__ Access code 67
__ /__ Access code 68
[601]: __ /__ Access code 5
__ /__ Access code 6
__ /__ Access code 7
__ /__ Access code 8
[609]: __ /__ Access code 37
__ /__ Access code 38
__ /__ Access code 39
__ /__ Access code 40
[617]: __ /__ Access code 69
__ /__ Access code 70
__ /__ Access code 71
__ /__ Access code 72
[602]: __ /__ Access code 9
__ /__ Access code 10
__ /__ Access code 11
__ /__ Access code 12
[610]: __ /__ Access code 41
__ /__ Access code 42
__ /__ Access code 43
__ /__ Access code 44
[618]: __ /__ Access code 73
__ /__ Access code 74
__ /__ Access code 75
__ /__ Access code 76
[603]: __ /__ Access code 13
__ /__ Access code 14
__ /__ Access code 15
__ /__ Access code 16
[611]: __ /__ Access code 45
__ /__ Access code 46
__ /__ Access code 47
__ /__ Access code 48
[619]: __ /__ Access code 77
__ /__ Access code 78
__ /__ Access code 79
__ /__ Access code 80
[604]: __ /__ Access code 17
__ /__ Access code 18
__ /__ Access code 19
__ /__ Access code 20
[612]: __ /__ Access code 49
__ /__ Access code 50
__ /__ Access code 51
__ /__ Access code 52
[620]: __ /__ Access code 81
__ /__ Access code 82
__ /__ Access code 83
__ /__ Access code 84
[605]: __ /__ Access code 21
__ /__ Access code 22
__ /__ Access code 23
__ /__ Access code 24
[613]: __ /__ Access code 53
__ /__ Access code 54
__ /__ Access code 55
__ /__ Access code 56
[621]: __ /__ Access code 85
__ /__ Access code 86
__ /__ Access code 87
__ /__ Access code 88
[606]: __ /__ Access code 25
__ /__ Access code 26
__ /__ Access code 27
__ /__ Access code 28
[614]: __ /__ Access code 57
__ /__ Access code 58
__ /__ Access code 59
__ /__ Access code 60
[622]: __ /__ Access code 89
__ /__ Access code 90
__ /__ Access code 91
__ /__ Access code 92
[607]: __ /__ Access code 29
__ /__ Access code 30
__ /__ Access code 31
__ /__ Access code 32
[615]: __ /__ Access code 61
__ /__ Access code 62
__ /__ Access code 63
__ /__ Access code 64
[623]: __ /__ Access code 93
__ /__ Access code 94
__ /__ Access code 95
__ /__ Access code 96
DGP-848
- 31 -
Programming Guide
Arming Report Codes (con’t)
[624]: __ /__ Keyswitch 1
__ /__ Keyswitch 2
__ /__ Keyswitch 3
__ /__ Keyswitch 4
[625]: __ /__ Keyswitch 5
__ /__ Keyswitch 6
__ /__ Keyswitch 7
__ /__ Keyswitch 8
SPECIAL ARMING CODES
[626]: __ /__ Auto-Arming
__ /__ PC/Remote Arming
__ /__ Late to close
__ /__ No Movement
[627]: __ /__ Partial Arming
__ /__ Quick Arming
__ /__ Closing Delinquency
__ /__ N/A
Disarming Report Codes
[628]: __ /__ Access code 1
__ /__ Access code 2
__ /__ Access code 3
__ /__ Access code 4
[636]: __ /__ Access code 33
__ /__ Access code 34
__ /__ Access code 35
__ /__ Access code 36
[644]: __ /__ Access code 65
__ /__ Access code 66
__ /__ Access code 67
__ /__ Access code 68
[629]: __ /__ Access code 5
__ /__ Access code 6
__ /__ Access code 7
__ /__ Access code 8
[637]: __ /__ Access code 37
__ /__ Access code 38
__ /__ Access code 39
__ /__ Access code 40
[645]: __ /__ Access code 69
__ /__ Access code 70
__ /__ Access code 71
__ /__ Access code 72
[630]: __ /__ Access code 9
__ /__ Access code 10
__ /__ Access code 11
__ /__ Access code 12
[638]: __ /__ Access code 41
__ /__ Access code 42
__ /__ Access code 43
__ /__ Access code 44
[646]: __ /__ Access code 73
__ /__ Access code 74
__ /__ Access code 75
__ /__ Access code 76
[631]: __ /__ Access code 13
__ /__ Access code 14
__ /__ Access code 15
__ /__ Access code 16
[639]: __ /__ Access code 45
__ /__ Access code 46
__ /__ Access code 47
__ /__ Access code 48
[647]: __ /__ Access code 77
__ /__ Access code 78
__ /__ Access code 79
__ /__ Access code 80
[632]: __ /__ Access code 17
__ /__ Access code 18
__ /__ Access code 19
__ /__ Access code 20
[640]: __ /__ Access code 49
__ /__ Access code 50
__ /__ Access code 51
__ /__ Access code 52
[648]: __ /__ Access code 81
__ /__ Access code 82
__ /__ Access code 83
__ /__ Access code 84
[633]: __ /__ Access code 21
__ /__ Access code 22
__ /__ Access code 23
__ /__ Access code 24
[641]: __ /__ Access code 53
__ /__ Access code 54
__ /__ Access code 55
__ /__ Access code 56
[649]: __ /__ Access code 85
__ /__ Access code 86
__ /__ Access code 87
__ /__ Access code 88
[634]: __ /__ Access code 25
__ /__ Access code 26
__ /__ Access code 27
__ /__ Access code 28
[642]: __ /__ Access code 57
__ /__ Access code 58
__ /__ Access code 59
__ /__ Access code 60
[650]: __ /__ Access code 89
__ /__ Access code 90
__ /__ Access code 91
__ /__ Access code 92
[635]: __ /__ Access code 29
__ /__ Access code 30
__ /__ Access code 31
__ /__ Access code 32
[643]: __ /__ Access code 61
__ /__ Access code 62
__ /__ Access code 63
__ /__ Access code 64
[651]: __ /__ Access code 93
__ /__ Access code 94
__ /__ Access code 95
__ /__ Access code 96
DGP-848
- 32 -
Programming Guide
Disarming Report Codes (con’t)
[653]: __ /__ Keyswitch 5
__ /__ Keyswitch 6
__ /__ Keyswitch 7
__ /__ Keyswitch 8
SPECIAL DISARMING CODES
[654]: __ /__ Cancel Auto-arm
__ /__ Quick Disarm
__ /__ PC/Remote Disarm
__ /__ Cancel Alarm
[655]: __ /__ Zone 1
__ /__ Zone 2
__ /__ Zone 3
__ /__ Zone 4
[659]: __ /__ Zone 17
__ /__ Zone 18
__ /__ Zone 19
__ /__ Zone 20
[663]: __ /__ Zone 33
__ /__ Zone 34
__ /__ Zone 35
__ /__ Zone 36
[656]: __ /__ Zone 5
__ /__ Zone 6
__ /__ Zone 7
__ /__ Zone 8
[660]: __ /__ Zone 21
__ /__ Zone 22
__ /__ Zone 23
__ /__ Zone 24
[664]: __ /__ Zone 37
__ /__ Zone 38
__ /__ Zone 39
__ /__ Zone 40
[657]: __ /__ Zone 9
__ /__ Zone 10
__ /__ Zone 11
__ /__ Zone 12
[661]: __ /__ Zone 25
__ /__ Zone 26
__ /__ Zone 27
__ /__ Zone 28
[665]: __ /__ Zone 41
__ /__ Zone 42
__ /__ Zone 43
__ /__ Zone 44
[658]: __ /__ Zone 13
__ /__ Zone 14
__ /__ Zone 15
__ /__ Zone 16
[662]: __ /__ Zone 29
__ /__ Zone 30
__ /__ Zone 31
__ /__ Zone 32
[666]: __ /__ Zone 45
__ /__ Zone 46
__ /__ Zone 47
__ /__ Zone 48
[667]: __ /__ Zone 1
__ /__ Zone 2
__ /__ Zone 3
__ /__ Zone 4
[671]: __ /__ Zone 17
__ /__ Zone 18
__ /__ Zone 19
__ /__ Zone 20
[675]: __ /__ Zone 33
__ /__ Zone 34
__ /__ Zone 35
__ /__ Zone 36
[668]: __ /__ Zone 5
__ /__ Zone 6
__ /__ Zone 7
__ /__ Zone 8
[672]: __ /__ Zone 21
__ /__ Zone 22
__ /__ Zone 23
__ /__ Zone 24
[676]: __ /__ Zone 37
__ /__ Zone 38
__ /__ Zone 39
__ /__ Zone 40
[669]: __ /__ Zone 9
__ /__ Zone 10
__ /__ Zone 11
__ /__ Zone 12
[673]: __ /__ Zone 25
__ /__ Zone 26
__ /__ Zone 27
__ /__ Zone 28
[677]: __ /__ Zone 41
__ /__ Zone 42
__ /__ Zone 43
__ /__ Zone 44
[670]: __ /__ Zone 13
__ /__ Zone 14
__ /__ Zone 15
__ /__ Zone 16
[674]: __ /__ Zone 29
__ /__ Zone 30
__ /__ Zone 31
__ /__ Zone 32
[678]: __ /__ Zone 45
__ /__ Zone 46
__ /__ Zone 47
__ /__ Zone 48
[652]: __ /__ Keyswitch 1
__ /__ Keyswitch 2
__ /__ Keyswitch 3
__ /__ Keyswitch 4
Alarm Report Codes
Alarm Restore Report Codes
Special Alarm Report Codes
[679]: __ /__ Emergency Panic
__ /__ Auxiliary Panic
__ /__ Fire Panic
__ /__ Recent Closing
[680]: __ /__ N/A
__ /__ Auto Zone Shutdown
__ /__ N/A
__ /__ Duress
DGP-848
- 33 -
Programming Guide
Zone Tamper Report Codes
[681]: __ /__ Zone 1
__ /__ Zone 2
__ /__ Zone 3
__ /__ Zone 4
[685]: __ /__ Zone 17
__ /__ Zone 18
__ /__ Zone 19
__ /__ Zone 20
[689]: __ /__ Zone 33
__ /__ Zone 34
__ /__ Zone 35
__ /__ Zone 36
[682]: __ /__ Zone 5
__ /__ Zone 6
__ /__ Zone 7
__ /__ Zone 8
[686]: __ /__ Zone 21
__ /__ Zone 22
__ /__ Zone 23
__ /__ Zone 24
[690]: __ /__ Zone 37
__ /__ Zone 38
__ /__ Zone 39
__ /__ Zone 40
[683]: __ /__ Zone 9
__ /__ Zone 10
__ /__ Zone 11
__ /__ Zone 12
[687]: __ /__ Zone 25
__ /__ Zone 26
__ /__ Zone 27
__ /__ Zone 28
[691]: __ /__ Zone 41
__ /__ Zone 42
__ /__ Zone 43
__ /__ Zone 44
[684]: __ /__ Zone 13
__ /__ Zone 14
__ /__ Zone 15
__ /__ Zone 16
[688]: __ /__ Zone 29
__ /__ Zone 30
__ /__ Zone 31
__ /__ Zone 32
[692]: __ /__ Zone 45
__ /__ Zone 46
__ /__ Zone 47
__ /__ Zone 48
[693]: __ /__ Zone 1
__ /__ Zone 2
__ /__ Zone 3
__ /__ Zone 4
[697]: __ /__ Zone 17
__ /__ Zone 18
__ /__ Zone 19
__ /__ Zone 20
[701]: __ /__ Zone 33
__ /__ Zone 34
__ /__ Zone 35
__ /__ Zone 36
[694]: __ /__ Zone 5
__ /__ Zone 6
__ /__ Zone 7
__ /__ Zone 8
[698]: __ /__ Zone 21
__ /__ Zone 22
__ /__ Zone 23
__ /__ Zone 24
[702]: __ /__ Zone 37
__ /__ Zone 38
__ /__ Zone 39
__ /__ Zone 40
[695]: __ /__ Zone 9
__ /__ Zone 10
__ /__ Zone 11
__ /__ Zone 12
[699]: __ /__ Zone 25
__ /__ Zone 26
__ /__ Zone 27
__ /__ Zone 28
[703]: __ /__ Zone 41
__ /__ Zone 42
__ /__ Zone 43
__ /__ Zone 44
[696]: __ /__ Zone 13
__ /__ Zone 14
__ /__ Zone 15
__ /__ Zone 16
[700]: __ /__ Zone 29
__ /__ Zone 30
__ /__ Zone 31
__ /__ Zone 32
[704]: __ /__ Zone 45
__ /__ Zone 46
__ /__ Zone 47
__ /__ Zone 48
Zone Tamper Restore Report Codes
Special Tamper Report Codes
[705]: __ /__ Keypad Lock Out
__ /__ N/A
__ /__ N/A
__ /__ N/A
DGP-848
- 34 -
Programming Guide
System Trouble Report Codes
[706]: __ /__ N/A
__ /__ AC Failure
__ /__ Battery Failure
(disconnect or low)
__ /__ Auxiliary Supply
[708]: __ /__ Combus Fault
__ /__ Module tamper
__ /__ Module ROM check
error
__ /__ Module TLM Fail
[710]: __ /__ Module auxiliary failure
__ /__ Low battery wireless tx.
__ /__ Wireless transmitter
supervision trouble
__ /__ N/A
[707]: __ /__ Bell Output (disconnect
or overload)
__ /__ Timer Loss
__ /__ Fire Loop Trbl.
__ /__ N/A
[709]: __ /__ Module fail to com.
__ /__ Printer fault
__ /__ Module AC failure
__ /__ Module battery failure
[711]: __ /__ Tel# 1 fail to com.
__ /__ Tel# 2 fail to com.
__ /__ Tel# 3 fail to com.
__ /__ Tel# 4 fail to com.
System Trouble Restore Report Codes
[712]: __ /__ TLM restore
__ /__ AC restore
__ /__ Battery failure restore
(disconnect or low)
__ /__ Aux. supply restore
[714]: __ /__ Combus fault restore
__ /__ Module tamper restore
__ /__ Module ROM check
error restore
__ /__ Module TLM restore
[713]: __ /__ Bell output (disconnect
or overload) restore
__ /__ Timer programmed
__ /__ Fire loop restore
__ /__ N/A
[715]: __ /__ N/A
__ /__ Printer fault restore
__ /__ Module AC restore
__ /__ Module battery restore
[716]: __ /__ Module aux. restore
__ /__ Wireless transmitter
battery restore
__ /__ Wireless transmitter
supervision restore
__ /__ N/A
Special Report Codes
[717]: __ /__ Cold start (sys. shutdown)
__ /__ Warm start (sys. reset)
__ /__ Test report
__ /__ N/A
[718]: __ /__ N/A
__ /__ PC access finished
__ /__ Installer in
__ /__ Installer out
Automatic Report Code Programming
When using Contact ID or SIA Reporting formats (section [550] page 30), default report codes can be programmed
automatically. After automatic defaults are set, they can be changed and the remaining report codes can be set manually.
Section #
Description
Sets all the report codes in the following sections to the
default values from the “Automatic Report Codes List”:
[790]
ALL CODES
[600] to [718]
[791]
ARMING
[792]
ALARM
[793]
TAMPER
[794]
TROUBLE & TROUBLE RESTORE CODES
[706] to [716]
[795]
SPECIAL CODES
[717] to [718]
& DISARMING CODES
[600] to [654]
& ALARM RESTORE CODES
[655] to [680]
& TAMPER RESTORE CODES
DGP-848
[681] to [705]
- 35 -
Programming Guide
Automatic Report Code List
Arming with Master Code (##)
Arming with User Code (##)
Arming with Keyswitch (##)
Auto Arming
Arm with PC software
Late To Close
No Movement
Partial arming
Quick arming
Closing Delinquency
Default Contact ID Report Code
when using sections [790] to [795]
3 4A1 - Close by user
3 4A1 - Close by user
3 4A9 - Keyswitch Close
3 4A3 - Automatic Close
3 4A7 - Remote arm/disarm
3 4A4 - Late to Close
3 4A4 - Late to Close
1 574 - Group bypass
3 408 - Quick arm
1 654 - System Inactivity
Default SIA Report Code
when using sections [790] to [795]
CL - Closing Report
CL - Closing Report
CS - Closing Keyswitch
CA - Automatic Closing
CL - Closing Report
OT - Late to Close
NA - No Activity
CG - Close Area
CL - Closing Report
CD - System Inactivity
Disarm with Master Code (##)
Disarm with User Code (##)
Disarm with Keyswitch (##)
Disarm after alarm* with Master Code (##)
Disarm after alarm* with User Code (##)
Disarm after alarm* with Keyswitch (##)
Cancel alarm** with Master Code (##)
Cancel alarm** with User Code (##)
Cancel alarm** with Keyswitch (##)
1 4A1 - Open by user
1 4A1 - Open by user
1 4A9 - Keyswitch Open
1 4A1 - Open by user
1 4A1 - Open by user
1 4A1 - Keyswitch Open
1 4A6 - Open by User
1 4A6 - Open by User
1 4A6 - Keyswitch Open
OP - Opening Report
OP - Opening Report
OS - Opening Keyswitch
OP - Opening Report
OP - Opening Report
OS - Opening Keyswitch
OR - Disarm from Alarm
OR - Disarm from Alarm
OS - Opening Keyswitch
Auto Arming Cancellation
Disarm with PC software
Disarm after an alarm with PC software
Quick disarm
1 4A5 - Deferred Open/Close
1 4A7 - Remote arm/disarm
1 4A7 - Remote arm/disarm
1 408 - Quick disarm
CE - Closing Extend
OP - Opening Report
OR - Disarm From Alarm
OP - Opening Report
Zone Bypassed (##)
Zone alarm (##)
Fire alarm (##)
Zone alarm restore (##)
Fire alarm restore (##)
1 57A - Zone bypass
1 13A - Burglary Alarm
1 11A - Fire alarm
3 13A - Burglary Alarm Restore
3 11A - Fire alarm Restore
UB - Untyped Zone Bypass
BA - Burglary Alarm
FA - Fire Alarm
BH - Burglary Alarm Restore
FH - Fire Alarm Restore
Panic 1 - Emergency
Panic 2 - Medical
Panic 3 - Fire
1 12A - Panic alarm
1 1AA - Medical alarm
1 115 - Pull Station
PA - Panic Alarm
MA - Medical Alarm
FA - Fire Alarm
Recent closing
Global zone shutdown
Duress alarm
Zone shutdown (##)
3 4AA - Open/Close
1 574 - Group bypass
1 121 - Duress
1 57A - Zone bypass
CR - Recent Closing
CG - Close Area
HA - Hold-up Alarm
UB - Untyped Zone Bypass
Zone tampered (##)
Zone tamper restore (##)
Keypad Lockout
1 144 - Sensor tamper
3 144 - Sensor tamper restore
1 421 - Access denied
TA - Tamper Alarm
TR - Tamper Restoral
JA - User Code Tamper
System Event
* An armed system is or was in alarm and was disarmed by a user.
** A disarmed system is or was in alarm (e.g. 24Hr zone) and was disarmed by a user.
DGP-848
- 36 -
Programming Guide
AC Failure
Battery Failure
Auxiliary supply trouble
Bell output current limit
Bell absent
Clock lost
Fire loop trouble
Default Contact ID Report Code
when using sections [790] to [795]
1 3A1 - AC loss
1 3A9 - Battery test failure
1 3AA - System trouble
1 321 - Bell 1
1 321 - Bell 1
1 626 - Time/Date inaccurate
1 373 - Fire trouble
Default SIA Report Code
when using sections [790] to [795]
AT - AC Trouble
YT - System Battery Trouble
YP - Power Supply Trouble
YA - Bell Fault
YA - Bell Fault
JT - Time Changed
FT - Fire Trouble
TLM trouble restore
AC Failure restore
Battery Failure restore
Auxiliary supply trouble restore
Bell output current limit restore
Bell absent restore
Clock programmed
Fire loop trouble restore
3 351 - Telco 1 fault restore
3 3A1 - AC loss restore
3 3A9 - Battery test restore
3 3AA - System trouble restore
3 321 - Bell 1 restore
3 321 - Bell 1 restore
3 625 - Time/Date Reset
3 373 - Fire trouble restore
LR - Phone Line restoral
AR - AC Restoral
YR - System Battery Restoral
YQ - Power Supply restored
YH - Bell Restored
YH - Bell Restored
JT - Time Changed
FJ - Fire Trouble Restore
Combus fault
Module tamper
Module ROM_RAM_error
Module TLM trouble
Module fail to communicate to monitoring
station.
Printer fault
Module AC Failure
Module battery failure
Module Auxiliary supply trouble
1 333 - Expansion module failure
1 145 - Expansion module tamper
1 3A4 - Rom checksum bad
1 352 - Telco 2 fault
ET - Expansion Trouble
TA - Tamper Alarm
YF - Parameter Checksum Fail
LT - Phone Line trouble
1 354 - Fail to communicate
YC - Communication Fails
1 336 - Local printer failure
1 3A1 - AC loss
1 3A9 - Battery test failure
1 3AA - System trouble
VT - Printer Trouble
AT - AC Trouble
YT - System Battery Trouble
YP - Power Supply Trouble
Bus fault restore
Module tamper restore
Module ROM_RAM_error restore
Module TLM restore
Printer fault restore
Module AC restore
Module battery restore
Module Auxiliary supply restore
3 333 - Expansion module failure restore
3 145 - Expansion module tamper restore
3 3A4 - Rom checksum bad restore
3 352 - Telco 2 fault restore
3 336 - Local printer failure restore
3 3A1 - AC loss restore
3 3A9 - Battery test failure restore
3 3AA - System trouble restore
ER - Expansion Restoral
TR - Tamper Restoral
YG - Parameter Changed
LR - Phone Line Restoral
VR - Printer Restore
AR - AC Restoral
YR - System Battery Restoral
YQ - Power Supply Restored
Fail to communicate with monitoring station
Module RF low battery
Module RF battery restore
Module RF supervision trouble
Module RF supervision restore
1 354 - Fail to communicate
1 384 - RF transmitter low battery
3 384 - RF transmitter battery restore
1 381 - Loss of supervision - RF
3 381 - Supervision restore - RF
YC - Communication Fails
XT - Transmitter Battery Trouble
XR - Transmitter Battery Restoral
US - Untype Zone Supervision
UR - Untyped Zone Restoral
Cold Start
Warm Start
Test Report engaged
PC software communication finished
Installer on site
Installer programming finished
1 3A8 - System shutdown
1 3A5 - System reset
1 6A2 - Periodic test report
1 412 - Successful - download access
1 627 - Program mode Entry
1 628 - Program mode Exit
RR - Power Up
YW - Watchdog Reset
TX - Test Report
RS - Remote Program Success
LB - Local Program
LS - Local Program Success
System Event
DGP-848
- 37 -
Programming Guide
Contact ID Report Code List
If using the Ademco Contact ID format, key in the 2-digit hexadecimal value (PROG. VALUE) to program the desired report
codes into sections [600] to [718].
CID#
Reporting Code
MEDICAL ALARMS - 100
100
Medical Alarm
101
Pendant Transmitter
102
Fail to Report In
FIRE ALARMS - 110
110
Fire Alarm
111
Smoke
112
Combustion
113
Water Flow
114
Heat
115
Pull Station
116
Duct
117
Flame
118
Near Alarm
PANIC ALARMS - 120
120
Panic Alarm
121
Duress
122
Silent
123
Audible
BURGLAR ALARMS - 130
130
Burglary
131
Perimeter
132
Interior
133
24-Hour
134
Entry/Exit
135
Day/Night
136
Outdoor
137
Tamper
138
Near Alarm
GENERAL ALARMS - 140
140
General Alarm
141
Polling Loop Open
142
Polling Loop Short
143
Expansion Module Failure
144
Sensor Tamper
145
Expansion Module Tamper
24-HOUR NON-BURGLARY - 150 & 160
150
24-Hour Non-Burglary
151
Gas Detected
152
Refrigeration
153
Loss of Heat
154
Water Leakage
155
Foil Break
156
Day Trouble
157
Low Bottled Gas Level
158
High Temp
159
Low Temp
161
Loss of Air Flow
FIRE SUPERVISORY - 200 & 210
200
Fire Supervisory
201
Low Water Pressure
202
Low CO2
203
Gate Valve Sensor
Prog.
Value
01
02
03
04
05
06
07
08
09
0A
0B
0C
0D
0E
0F
10
11
12
13
14
15
16
17
18
19
1A
1B
1C
1D
1E
1F
20
21
22
23
24
25
26
27
28
29
2A
2B
2C
2D
2E
CID#
Reporting Code
Prog.
Value
204
Low Water Level
2F
205
Pump Activated
30
206
Pump Failure
31
SYSTEM TROUBLES - 300 & 310
300
System Trouble
32
301
AC Loss
33
302
Low System Battery
34
303
RAM Checksum Bad
35
304
ROM Checksum Bad
36
305
System Reset
37
306
Panel Program Changed
38
307
Self-Test Failure
39
308
System Shutdown
3A
309
Battery Test Failure
3B
310
Ground Fault
3C
SOUNDER/RELAY TROUBLES - 320
320
Sounder Relay
3D
321
Bell 1
3E
322
Bell 2
3F
323
Alarm Relay
40
324
Trouble Relay
41
325
Reversing
42
SYSTEM PERIPHERAL TROUBLES - 330 & 340
330
System Peripheral
43
331
Polling Loop Open
44
332
Polling Loop Short
45
333
Exp. Module Failure
46
334
Repeater Failure
47
335
Local Printer Paper Out
48
336
Local Printer Failure
49
COMMUNICATION TROUBLES - 350 & 360
350
Communication
4A
351
Telco Fault 1
4B
352
Telco Fault 2
4C
353
Long Range Radio
4D
354
Fail to Communicate
4E
355
Loss of Radio Supervision
4F
356
Loss of Central Polling
50
PROTECTION LOOP TROUBLES - 370
370
Protection Loop
51
371
Protection Loop Open
52
372
Protection Loop short
53
373
Fire Trouble
54
SENSOR TROUBLES - 380
380
Sensor Trouble
55
381
Loss of Super. -RF
56
382
Loss of Super. - RPM
57
383
Sensor Tamper
58
384
RF xmtr. Low Battery
59
OPEN/CLOSE - 400
400
Open/Close
5A
401
O/C by User
5B
402
Group O/C
5C
DGP-848
- 38 -
Programming Guide
CID#
Reporting Code
Prog.
Value
403
Automatic O/C
404
Late to O/C
405
Deferred
406
Cancel
407
Remote Arm/Disarm
408
Quick Arm
409
Keyswitch O/C
REMOTE ACCESS - 410
411
Callback Request Made
412
Success - Download Access
413
Unsuccessful Access
414
System Shutdown
415
Dialer Shutdown
ACCESS CONTROL - 420
421
Access Denied
422
Access Report By User
SOUNDER RELAY DISABLES - 520
520
Sounder/Relay Disabled
521
Bell 1 Disable
522
Bell 2 Disable
523
Alarm Relay Disable
524
Trouble Relay Disable
525
Reversing Relay Disable
COMMUNICATION DISABLES - 550 & 560
551
Dialer Disabled
552
Radio xmitter Disabled
BYPASSES - 570
570
Zone Bypass
571
Fire Bypass
572
24-Hour Zone Bypass
573
Burg. Bypass
574
Group Bypass
TEST/MISC. - 600
601
Manual Trigger Test
602
Periodic Test Report
603
Periodic RF Xmission
604
Fire Test
605
Status Report to Follow
606
Listen-in to Follow
607
Walk Test Mode
621
Event Log Reset
622
Event Log 50% Full
623
Event Log 90% Full
624
Event Log Overflow
625
Time/Date Reset
626
Time/Date Inaccurate
627
Program Mode Entry
628
Program Mode Exit
631
Exception Schedule Change
5D
5E
5F
60
61
62
63
64
65
66
67
68
69
6A
6B
6C
6D
6E
6F
70
71
72
73
74
75
76
77
78
79
7A
7B
7C
7D
7E
7F
80
81
82
83
84
85
86
87
Other Settings and Modes
Section #
[800]
Data
Description
Default
___/___/___/___/___/___
INSTALLER CODE
000000
[801] to [896]
The instructions that follow detail how to program access codes when using an LCD keypad. For instructions
on how to program users when using a Grafica keypad, refer to Grafica’s User Manual. A complete Grafica
user manual is available on our website at paradox.com. Program User Code Options, Partition Assignment
and Access Control features for users 001 to 096. Refer to the appropriate keypad User’s Manual for
instructions on how certain users can also program these values.
To program user labels, refer to the LCD Keypad System Manager’s Manual.
Press and hold
the [0] key
Where sections [801] to [896]
represent User #s 01 to 96.
User Options (Bold = default setting)
[1]
[2]
Master Feature
off
off
Disabled
on
off
Master - user can program user access codes only
on
on
Full Master - user can program user access codes, options
and assignments
Enter the
Installer Code
Enter the
[SECTION]
User Code Options
Feature Select
Programming
[3] Duress
[4] Bypass
[5] Arm only
Set desired
options
Press the [S] key
User Partition
Assignment
Feature Select
Programming
Set desired
options
[6] Stay & Instant
[7] Force
[8] off = access keypad’s partitions only
on = access any partition assigned to user
*Note: all users can regular arm the system
User Code Partition Assignment †
[1] User Code Has Access to Partition 1
[2] User Code Has Access to Partition 2
[3] User Code Has Access to Partition 3
[4] User Code Has Access to Partition 4
† The default setting depends on the programming user’s assigned partitions. For
example, when a user (with master feature) that is assigned to partitions 1 and 2
programs a user code, partitions 1 and 2 will be the default setting for the new user.
Press the [S] key
Access Level and Schedule Assignment
First brackets
Access Level = enter level from 00 (default) to 15 (00 = access to all doors)
Access Level and
Schedule Assignment
Enter digits
Access Control User
Options
Feature Select
Programming
Second brackets
Schedule = enter level from 00 (default) to 15 (00 = access granted at all times)
Set desired
options
Access Control User Options (default: all options Off)
[1] Access Card is activated
[2] Can disarm with Access Card
[3] Access Card with Extended Unlocked Period
[4]
on
on
on
on
Press the [S] key
Enter
Access Card
[5]
off
on
off
off
[6]
off
off
on
off
[7]
off
off
off
on
Feature
Can Regular Arm with Access Card
Can Stay Arm with Access Card
Can Instant Arm with Access Card
Can Force Arm with Access Card
[8] Can open armed Access Control Doors
Press the [ENTER] or [S] key to
save and advance to next section
DGP-848
Access Card Assignment
Enter Access Card’s serial number or present Card to the reader
- 39 -
Programming Guide
Section #
[900]
Description
Display Serial Number of Control Panel and All Modules Connected to the Combus:
After entering section [900], the keypad will display the 8-digit serial number of the control panel:
For LCD Keypads: Use the [S] and [T] keys to scroll through the serial number of each module on the combus.
For Grafica keypads: Press the center action key (Next) to scroll through the serial number of each module on
the combus.
[950]
Reset System Master Code:
To reset the System Master Code to 123456 and reset the options to default, put the “reset” jumper to on and
enter section [950]. You do not have to remove power from the control panel.
[951]
Module Reset:
Reset a module’s programmed contents to default by entering its serial number.
[952]
Locate/Unlocate Module:
Locate a specific module (e.g. detector, zone expander, etc.) connected to the combus by entering the
module's serial number. The green “LOCATE” LED on the module will begin to flash until the serial number is reentered or the appropriate “tamper” or “unlocate” switch on the module is pressed.
[953]
Module Programming Mode:
Enter the serial number of the module you wish to program.
[954]
Module Broadcast:
Copy the contents of all programming sections from one module to one or more modules of the same type.
Enter the serial number of the source module, followed by the serial numbers of the modules you wish to
program. To begin transferring data, press [ACC] on LCD keypads or the center action key (Start) on Grafica
keypads.
PLEASE NOTE: The Module Broadcast feature will only work when a module is broadcasting its data to a
module or to modules of the same type and model number. For example, an APR-PRT1 (Printer Module)
cannot broadcast to an APR3-PRT1. Likewise, a DGP module cannot broadcast to a DGP2 module.
[955]
Remove Modules:
After entering the section, the control panel will scan all modules connected to the combus. If any missing
modules are detected (i.e. detector removed from the combus), the control panel will erase the module's serial
number, removing the module from the control panel's memory.
Paradox Memory Key
[961]
Download from the Memory Key to control panel except sections [001] to [056].
[962]
Download from the Memory Key to control panel including sections [001] to [056].
[965]
Copy the control panel sections to the Memory Key except sections [001] to [056].
[966]
Copy the control panel sections to the Memory Key including sections [001] to [056].
Download Memory Key to Control Panel
1. Remove AC and battery power from the control panel you want to program.
2. Insert the Memory Key onto the control panel’s connector labelled “DIGIPLEX KEY”.
3. Re-apply AC and battery power.
4. To download the contents of the Memory Key except sections [001] to [048] (device serial
numbers) and [049] to [056] (Keyswitch serial numbers), enter installer programming mode, then enter section [961].
To download the contents of the Memory Key including sections [001] to [048] and [049] to [056], enter installer
programming mode, then enter section [962].
5. When the keypad emits a confirmation beep, wait 10 seconds and remove the Memory Key.
Copy Control Panel to Memory Key
1. Remove AC and battery power from the control panel you want to copy.
2. Insert Memory Key onto the control panel’s connector labelled “DIGIPLEX KEY”. Ensure the write
protect jumper is on.
3. Re-apply AC and battery power.
4. To copy the contents to the Memory Key except sections [001] to [048] (device serial numbers)
DGP-848
- 40 -
Programming Guide
and [049] to [056] (Keyswitch serial numbers), enter installer programming mode, then enter section [965].
To copy the contents to the Memory Key including sections [001] to [048] and [049] to [056], enter section [966].
5. After the confirmation beep, wait 10 seconds and remove the Memory Key. Remove the Memory Key’s jumper if you do
not wish to accidentally overwrite its contents.
Software Reset
Performing a software reset will set certain parameters to default values. To do so:
1. Make sure the RESET jumper on the control panel is on.
2. Enter Programming Mode (see page 1).
3. Enter the 3-digit [SECTION] corresponding to the software reset you wish to perform:
Section #
[970]
[974]
[975]
[976]
Description
Entering this section will reset all programmable sections from [001] to [896] (except sections [451] to [498],
[555], [556], [560], [790] to [795], and [800]) to default values. The Zone Labels, Panel ID, PC Password, PC
Telephone Number, Installer Code, System Master Code, Event Buffer, and Automatic Report Codes will not
be reset.
Entering this section resets the following Access Control sections: [301] to [332], [340] to [355], [361] to [375],
[381] to [392], and [537].
Entering this section will reset all Zone and Keyswitch programming sections from [001] to [056], and [101] to
[156] to default values.
Entering this section will reset the following sections to default values: [200] to [261], [270] to [274], [400] to
[409], and [440] to [442].
[977]
Entering this section will reset sections from [500] to [522] to default values.
[978]
Entering this section will reset the following communication sections to default values: [521] to [536], [550] to
[554], [561] to [564], and [600] to [718].
[979]
Entering this section will reset all user code sections from [801] to [896] to default values.
Section #
[990]
Data
Description
Default
___/___/___ (147=lock, 000=unlock)
LOCK INSTALLER CODE
000
Installer Function Keys
To access the installer functions, press and hold the [0] key, enter the [INSTALLER CODE], and then:
For LCD keypads: press the key indicated in the list below that corresponds to the function you wish to activate.
For Grafica keypads: press the center action key (Options), highlight the desired function and then press the center action
key (Ok).
[STAY]
[FORCE]
[ARM]
[DISARM]
[MEM]
Test Report: Sends the “Test Report” report code programmed in section [717] to the monitoring station.
Call WinLoad Software: Will dial the PC telephone number programmed in section [560] in order to initiate
communication with a computer using the WinLoad Upload/Download software.
Answer WinLoad Software: Will force the control panel to answer a call made by the monitoring station that is
using the WinLoad upload/download software.
Cancel Communication: Cancels all communication with the WinLoad Software or with the monitoring station
until the next reportable event.
Installer Test Mode: The installer test mode will allow you to perform walk tests where the bell or siren will
squawk to indicate opened zones. Press [MEM] again to exit. Partitions can not be armed if the Installer Test
Mode is enabled.
[TRBL]
Start Module Scan: The keypad will display the serial number of each module on the bus.
[ACC]
For LCD Keypads (DGP2-641BL/RB) only
Combus Voltmeter: Verify if the combus is supplying sufficient power. A reading of 12.3V indicates that the
voltage is too low. The voltage may drop during the control panel battery test.
DGP-848
- 41 -
Programming Guide
Power Consumption
Table 3: Power Consumption Table
Description
QTY.
mA used by each
Total mA
Grafica Graphic LCD Keypads (DNE-K07):
_______
X
130mA =
__________ mA
LCD Keypads (DGP2-641BL):
_______
X
110mA =
__________ mA
LCD Keypads with Built-in Reader (DGP2-641RB):
_______
X
120mA =
__________ mA
Icon LCD Keypads (DGP2-640):
_______
X
95mA =
__________ mA
LED Keypads (DGP2-648):
_______
X
110mA =
__________ mA
Motion Detector Modules (DG85, DGP2-50/60/70):
_______
X
30mA =
__________ mA
Door Contact Modules (DGP2-ZC1):
_______
X
15mA =
__________ mA
1-Zone Expansion Modules (DGP2-ZX1):
_______
X
30mA =
__________ mA
4-Zone Expansion Modules (APR3-ZX4):
_______
X
30mA =
__________ mA
8-Zone Expansion Modules (APR3-ZX8):
_______
X
30mA =
__________ mA
Magellan Wireless Expansion Modules (MG-RCV3):
_______
X
35mA =
__________ mA
4-PGM Expansion Modules (APR3-PGM4):
_______
X
150mA =
__________ mA
Printer Modules (APR3-PRT1):
_______
X
25mA =
__________ mA
DVACS Modules (DGP2-DVAC):
_______
X
40mA =
__________ mA
Annunciator Modules (DGP2-ANC1):
_______
X
20mA =
__________ mA
InTouch Voice-Assisted Arm/Disarm Modules (APR3-ADM2):
_______
X
105mA =
__________ mA
Hub and Bus Isolator (APR3-HUB2):
_______
X
50mA =
__________ mA
_______
X
120mA =
__________ mA
Access Control Module (DGP-ACM11):
Note: The DGP-ACM11 consumes 130mA from its own power supply or 120mA
when connected on the combus for power.
Other devices such as hardwired motion detectors
__________ mA
Maximum available power = 700mA
GRAND TOTAL
__________ mA
1. Using Table 3, calculate the total amount of power required by each device, module, and accessory in the system. Please
take into account devices connected to the control panel’s PGM outputs. Since the BELL output has its own power supply,
do not include the sirens connected to it in the calculation.
2. If the Grand Total is less than 700mA, go to step 3. If the value is greater, you will require an external power supply (see
External Power Supply on page 45) to provide the additional power needed. Proceed with step 3.
3. Due to the degradation of a power signal over long distances, EACH length or run of wire in the system can support only
a specific amount of power. Using Table 4, determine how much power each length of wire can support. Please note that
the total amount of power can never surpass 700mA
.
Table 4: Power Limitations For Each Run of Wire
Gauge: 18AWG Surface: 0.823mm2
Length of each Available Power
run of wire
(mA)
30m(100ft.)
61m(200ft.)
91m(300ft.)
122m(400ft.)
152m(500ft.)
183m(600ft.)
213m(700ft.)
244m(800ft.)
274m(900ft.)
305m(1000ft.)
457m(1500ft.)
610m(2000ft.)
762m(2500ft.)
914m(3000ft.)
700
700
700
700
690
575
493
431
383
345
230
172
138
115
Gauge: 22AWG Surface: 0.326mm2
Length of each Available Power
run of wire
(mA)
30m(100ft.)
61m(200ft.)
91m(300ft.)
122m(400ft.)
152m(500ft.)
183m(600ft.)
213m(700ft.)
244m(800ft.)
274m(900ft.)
305m(1000ft.)
DGP-848
- 42 -
Gauge: 24AWG Surface: 0.205mm2
Length of each Available Power
run of wire
(mA)
700
682
454
341
273
227
195
170
151
136
Programming Guide
30m(100ft.)
61m(200ft.)
91m(300ft.)
122m(400ft.)
152m(500ft.)
183m(600ft.)
700
429
286
214
171
143
Hardware Connections
SINGLE ZONE INPUTS
ATZ - Double Zone Inputs
DGP-848
- 43 -
Programming Guide
Connections
Option [7] in section [502] must be enabled
PGM1 becomes control panel input #255
When using ESL smoke detectors with the
CleanMe™ feature, do not connect more
than 20 detectors in parallel.
SINGLE FIRE ZONE CONNECTIONS ONLY
If the ATZ feature is enabled, do not use the
extra input (i.e. in the above example, input
009 cannot be used as a zone).
*Note: It is recommended that all 2-wire and
4-wire smoke detectors be connected in a
daisy chain configuration.
Telephone Line Connections
DGP-848
- 44 -
Programming Guide
External Power Supply
Devices connected to a power supply do not draw power from the control panel’s auxiliary output.
152m (500ft) from control panel
152m (500ft) from control panel’s AUX. output
Therefore this run = max. 273mA
610m (2000ft) from control panel
152m (500ft) from power supply
Therefore this run = max. 273mA
Do not use the same transformer for the control panel and the external power supplies. Modules should never
be installed more than 914m (3000 ft) from the control panel.
Connecting the Combus in Noisy Environments
When installing the combus wires in proximity to high electrical interference such as neon lights, motors, high-voltage wiring,
transformers, or if connecting the combus across separate buildings, you must use shielded cables. Connect the shielded
cable as follows:
Within the Same Building: Strip the outer jacket at one end of the shielded cable to expose the shield and connect the
shield to the control panel ground (not the dialer ground), while leaving the shield at the other end of the cable open (floating).
Across Separate Buildings: Strip the outer jacket at one end of the shielded cable to expose the shield. In the same
building that houses the control panel, connect the exposed shield to a cold water pipe or any other earth ground available,
while leaving the shield at the other end of the cable open (floating). The same configuration applies for any subsequent
building.
DGP-848
- 45 -
Programming Guide
DGP2-641BL/RB Programming
DGP2-641BL V1.1
DGP2-641RB V2.0
The keypad’s serial number can be found on the keypad’s PC board. The keypad’s serial number can also be viewed by pressing and holding the [0] key,
entering the [INSTALLER CODE] and then entering section [000].
U = Default setting
SECTION [001] : Keypad Partition Assignment
Option
[1]
SECTION [002]: Assigning Doors to Partitions †
OFF
Partition 1
[2]
Partition 2
[3]
Partition 3
[4]
Partition 4
[5]
Partition 5 (DGP-NE96 only)
[6]
Partition 6 (DGP-NE96 only)
[7]
Partition 7 (DGP-NE96 only)
[8]
Partition 8 (DGP-NE96 only)
N Disabled
N Disabled
N Disabled
N Disabled
N Disabled
N Disabled
N Disabled
N Disabled
ON
Option
Door Assigned to Partition1
OFF
U Enabled
[2]
Door Assigned to Partition 2
U Enabled
[3]
Door Assigned to Partition 3
U Enabled
[4]
Door Assigned to Partition 4
U Enabled
[5]
Door Assigned to Partition 5 (DGP-NE96 only) U Disabled
U Enabled
[6]
Door Assigned to Partition 6(DGP-NE96 only) U Disabled
U Enabled
[7]
Door Assigned to Partition 7 (DGP-NE96 only) U Disabled
U Enabled
[8]
Door Assigned to Partition 8 (DGP-NE96 only) U Disabled
ON
Display code entry
U Disabled
[2]
Display exit delay
U Disabled
[3]
Display entry delay
U Disabled
[4]
Confidential Mode
(not for UL installations)
U Disabled
[5]
To exit Confidential Mode
[6]
Future Use
Future Use
[8]
Time display option
U Enabled
U Disabled NEnabled
U Disabled NEnabled
U Disabled NEnabled
NEnabled
NEnabled
NEnabled
NEnabled
SECTION [004]: General Options 2
[1]
[7]
ON
N Disabled
[1]
SECTION [003]: General Options 1
Option
OFF
U Enabled
N Enabled
N Enabled
N Enabled
N Enabled
U Enter code N Press Button
N N/A
N N/A
N N/A
Option
OFF
U Disabled
ON
N Enabled
[1]
Muting
[2]
Exit Delay Beep
[3]
Door Left Open Pre-Alarm †
N Disabled
[4]
Chime on Zone Closure
U Disabled
N Enabled
[5]
Door Left Open Alarm Feedback †
N Silent
U Audible
[6]
Door Left Open Alarm Follows †
U Alarm
N Disabled
U Enabled
U Enabled
N Beep Timer
restore
N N/A
U yy/mm/dd N dd/mm/yy
[7]
Door Forced Alarm †
N Silent
[8]
Door Forced Alarm †
U Alarm
U Audible
N Beep Timer
restore
SECTION [005] : Beep on Trouble
Option
[1]
SECTION [006]: PGM and Tamper Options
OFF
System & Clock Trouble Beep
ON
U Disabled
N Enabled
Option
OFF
U N.O.
PGM State‡
PGM Deactivation Mode‡
U Deactivation N PGM Timer
[2]
Communicator Trouble Beep
U Disabled
N Enabled
[3]
Module & Combus Trouble Beep
U Disabled
N Enabled
[3]
PGM Base Time‡
U 1 second
[4]
All Zone Trouble Beep
U Disabled
[4]
PGM Override‡
U Disabled
[5]
Keypad Tamper
U Disabled
[7]
Time Format
[8]
Future Use
N N/A
N Enabled
N N/A
U 24Hr clock N 12Hr clock
N N/A
N N/A
Event
[6] to [8] Future Use
† Section/option is only available with DGP2-641RB
‡ Section/option is only available with DGP2-641BL
DGP-848
- 46 -
N N.C.
[1]
[2]
[5] to [6] Future Use
ON
Programming Guide
N N/A
N 1 minute
N Enabled
N Enabled
N N/A
SECTION [006]: General Options 3 †
Option
OFF
ON
[1]
Card Activates Door Unlocked Schedule
N Disabled.
[2]
Door Left Open Alarm
U Disabled
[3]
Door Forced Open Alarm
U Disabled
[4]
PIN Entry on Keypad
U Enabled *
[5]
Keypad Tamper
U Disabled
[6]
Relock Door
U Disabled
[7]
Future Use
N N/A
[8]
Unlock on REX
U Disabled
Section
† Section/option is only available with DGP2-641RB.
U Enabled
N Enabled
* This option cannot be turned ON and will
always remain OFF.
N Enabled
N Enabled
N Enabled
N N/A
N Enabled
Data
Description
Default
[007]
__/__/__ (005 to 255 seconds)
Confidential Mode Timer
120
[008]
__/__/__ (000 to 255; see option [3] in section [006])
PGM Timer ‡
005
[008]
__/__/__ (000 to 255 seconds)
Door Unlocked Period †
005
[009]
__/__/__ (000 to 255 seconds added to section [008])
Door Unlocked Period Extension †
015
[010]
__/__/__ (000 to 255 seconds)
Door Left Open Interval †
060
[011]
__/__/__ (000 to 25 seconds)
Door Left Open Pre-Alarm Timer †
015
[012]
__/__/__ (000 to 25 seconds)
Beep Timer for Door Left Open Alarm †
005
[013]
__/__/__ (000 to 25 seconds)
Beep Timer for Door Forced Open Alarm †
005
† Section/option is only available with DGP2-641RB.
‡ Section/option is only available with DGP2-641BL
Section [017]
Door Unlocked Schedule †
Start Time
End Time
Days (turn ON or OFF)
S
M T
W T
F
S
H
Schedule A:
___ ___ : ___ ___
___ ___ : ___ ___
1
2
3
4
5
6
7
8
Schedule B:
___ ___ : ___ ___
___ ___ : ___ ___
1
2
3
4
5
6
7
8
† Section/option is only available with DGP2-641RB.
Section [510]: Download from Memory Key (PMC-4) to DGP2-641RB.
Section [520]: Upload from DGP2-641RB to Memory Key (PMC-4).
Event Group
Feature Group
Section
Section
Start #
Section
End #
Section
PGM Activation
[009]‡
__/__/__
[010]‡
__/__/__
[011]‡
__/__/__
[012]‡
__/__/__
PGM Deactivation
[013]‡
__/__/__
[014]‡
__/__/__
[015]‡
__/__/__
[016]‡
__/__/__
‡ Section/option is only available with DGP2-641BL.
Only Event Groups 000 to 055 and 070 can be used to program the module’s PGM.
Message Programming
Each section from [101] to [148], [200] to [204] and [301] to [396] contains one message with a maximum of 16 characters. The sections contain the
following messages:
Sections [101] to [148] = “Zone 01” to “Zone 48” respectively
Section [200] = “Paradox Security”
Sections [201] to [204] = “First Area”, “Second Area”, “Third Area”, and “Fourth Area”
Sections [301] to [396] = “Code 01” to “Code 96” respectively
After entering the section corresponding to the desired message, the message can be re-programmed to suit your installation needs as detailed in
Table 4. For example, section [101] “Zone 01” can be changed to “FRONT DOOR”.
DGP-848
- 47 -
Programming Guide
Table 4: Message Programming Special Function Keys
Key
[STAY]
[FORCE]
[ARM]
Function
Details
Insert Space
Press the [STAY] key to insert a blank space at the current cursor’s position.
Delete
Press the [FORCE] key to delete the character or blank space found at the current cursor’s position.
Delete Until the End
Press the [ARM] key to delete all characters and spaces to the right of the cursor and at the cursor’s position.
[DISARM] Numeric/Alphanumeric
Press the [DISARM] key to toggle the numeric keys to alphanumeric keys and vice versa. Numeric: Keys [0] to [9]
represent numbers 0 to 9. Alphanumeric: refer to Table 5 below.
[BYP]
Lower/Upper Case
Press the [BYP] key to toggle from lower to upper case and vice versa.
[MEM]
Special Characters
After pressing the [MEM] key, the cursor will turn into a flashing black square. Using Table 6 below, enter the 3-digit
number for the desired character.
Table 5: Alphanumeric Keys
Key
Press Key Once
Press Key Twice
Press Key Three Times
[1]
A
B
C
[2]
D
E
F
[3]
G
H
I
[4]
J
K
L
[5]
M
N
O
[6]
P
Q
R
[7]
S
T
U
[8]
V
W
X
[9]
Y
Z
Table 6: Special Characters
DGP-848
- 48 -
Programming Guide
Using the Memory Key
[510]
Download all from the Memory Key (LCD keypad sections [001] to [396] and all labels and messages) to the LCD keypad.
[520]
Copy the LCD keypad sections [001] to [396] and all labels and messages to the Memory Key.
Download Contents of the Memory Key to the LCD Keypad
1) Insert the Memory Key onto the keypad’s connector labelled “KEY”.
2) To download the contents of the Memory Key, enter the keypad’s programming mode and enter section [510].
3) Once the keypad emits a confirmation beep, wait for a second confirmation beep and then remove the Memory Key.
Copy Contents of the LCD Keypad to the Memory Key
1) Insert Memory Key onto the keypad’s connector labelled “KEY”. Ensure that the write protect jumper is on (refer to
<Italics>Memory Key (PMC-4) below).
2) To copy the contents to the Memory Key, enter the keypad’s programming mode and enter section [520].
3) Once the keypad emits a confirmation beep, wait for a second confirmation beep and then remove the Memory Key.
Remove the Memory Key’s jumper if you do not wish to accidentally overwrite its contents.
Memory Key (PMC-4)
The memory key will only function with a keypad that has the DGP2 or DNE prefix in the model number. Only the PMC-4 memory key will
function with DGP2 and DNE keypads.
Combus Voltmeter
To verify if the combus is supplying sufficient power, press and hold the [0] key, enter the [INSTALLER CODE] and press the [ACC] button. A reading of 10.5V or
lower indicates that the voltage is too low. The voltage may drop during the control panel battery test.
DGP-848
- 49 -
Programming Guide
PCB Layout
Four pin connector can be
used for quick installation of
a Digiplex keypad or module.
Charging and battery test LED
(every 64 seconds)
“STATUS” LED:Short flash
Long flash
Constant
OFF
= Panel OK
= TLM Fault
= Dialer on-line
= Panel error/off-line
Reset jumper
Warning:
Disconnect the
battery before
replacing the fuse.
Warning:
Disconnect
telephone line
before servicing
Optional
connector can be
used to recharge
another battery
in the system.
PGM1: 100mA
PGM2: 50mA
PGM3: 50mA (opt.)
PGM4: 50mA (opt.)
PGM5
(optional 5A
relay)
BELL OUTPUT will
shut down if current
exceeds 3A.
*A 1k9 resistor is required if the Bell is not
equipped with an internal resistor. Connect
the resistor between the Bell’s negative (-)
and positive (+) wires. Position the resistor
as close as possible to the Bell. A resistor
is not required for sirens.
For the hardwire
connections, refer to
"Hardware Connections"
on page 43.
AWG#14 single
conductor solid
copper wire
To metallic
enclosure
COMBUS
Connection for Self-Contained Bell/Siren
Ground
clamp
Cold
water pipe
grounding
To provide maximum lightning
protection we strongly
recommend having separate
earth connections for the dialer
and zone ground terminals.
The sum of the current
drawn from the BELL and
AUX must be limited to 2.0A.
Exceeding this limit will
overload the panel power
supply and lead to complete
system shutdown.
(40VA transformer strongly recomended)
AUX POWER
Refer to transformer requirements below for Auxiliary Power Output.
Also, refer to Calculating Power Requirements (on page 42). To
connect additional wiring to auxiliary power, use the red (+) and black
(-) keypad connectors. Auxiliary power will shut down if current
exceeds 1.1A.
When installing the combus wires in a noisy
environment, or when connecting the combus
across separate buildings, you must use a shielded
cable. Refer to Connecting the Combus in Noisy
Environments on page 45.
Transformer Requirements:
minimum 16VAC 20VA *
*The approved battery for UL installations is Universal transformer
model # UB1640W 16.5VAC 40VA.
Auxiliary Supply can provide:
typical: 600mA
max.: 700mA
Usable Battery Charge Currents:
350mA
Before adding any module to the control
panel make sure you shutdown the panel
by removing AC power and the battery.
* A 40V transformer is required when selecting the 850mA
battery charge current. Using a 20VA transformer with a
battery charge current of 850mA may damage the system.
This equipment must be installed and maintained by
qualified service personnel only.
Warning: Improper connection may
result in damage to the system.
Warning: During power up, the panel will
perform a module scan that lasts
between 30 and 120 seconds.
The combus supports a maximum of 95 modules.
Although external power supplies can be used to
provide power to modules connected far from the
control panel, the final modules on the combus
should not be more than 914m (3000ft) away.
If multiple runs of wire are being used, the total
distance of all the runs combined cannot exceed
1000m (3000ft). For example, if ten runs of wire
each measuring 304m (1000ft) were connected, the
total distance would be 3048m (10 000 ft) and
therefore exceeds the system’s capacity.
For UL and C-UL warnings, refer to the Warnings section in the Digiplex Reference and Installation Manual.
DGP-848
- 50 -
Programming Guide
Warranty
Paradox Security Systems Ltd. (“Seller”) warrants its products to be free from defects in materials and workmanship under
normal use for a period of one year. Except as specifically stated herein, all express or implied warranties whatsoever,
statutory or otherwise, including without limitation, any implied warranty of merchantability and fitness for a particular
purpose, are expressly excluded. Because Seller does not install or connect the products and because the products may be
used in conjunction with products not manufactured by Seller, Seller cannot guarantee the performance of the security
system and shall not be responsible for circumstances resulting from the product’s inability to operate. Seller obligation and
liability under this warranty is expressly limited to repairing or replacing, at Seller's option, any product not meeting the
specifications. Returns must include proof of purchase and be within the warranty period. In no event shall the Seller be liable
to the buyer or any other person for any loss or damages whether direct or indirect or consequential or incidental, including
without limitation, any damages for lost profits stolen goods, or claims by any other party, caused by defective goods or
otherwise arising from the improper, incorrect or otherwise faulty installation or use of the merchandise sold.
Notwithstanding the preceding paragraph, the Seller’s maximum liability will be strictly limited to the purchase price of the
defective product. Your use of this product signifies your acceptance of this warranty.
BEWARE: Dealers, installers and/or others selling the product are not authorized to modify this warranty or make additional
warranties that are binding on the Seller.
© 2003-2006 Paradox Security Systems Ltd. All rights reserved. Specifications may change without prior notice. One or more
of the following US patents may apply: 6215399, 6111256, 5751803, 5721542, 5287111, 5119069, 5077549, 5920259 and
5886632. Canadian and international patents may also apply.
Digiplex, Grafica, InTouch, Magellan, and WinLoad are trademarks or registered trademarks of Paradox Security Systems
Ltd. or its affiliates in Canada, the United States and/or other countries.
DGP-848
- 51 -
Programming Guide
Trouble Display
To view the Trouble Display on LCD or LED keypads:
1. Press the [TRBL] key.
2. For LEDs: Press the Numerical Symbol corresponding to the Group heading to view the specific trouble.
For LCDs: Press the number representing the trouble and use the [S] and [T] keys to view the specific trouble.
To view the Trouble Display on Grafica Keypads:
1. Enter your [ACCESS CODE].
2. Using the scroll keys, highlight Trouble and then press the center action key (Ok). The trouble(s) will appear by Trouble
Group.
3. If more than one Trouble Group appears, highlight the desired group before pressing the center action key (View) to view
the specific trouble.
TROUBLE GROUP [1]: SYSTEM
TROUBLE GROUP [2]: COMMUNICATOR
[1] AC Failure
[2] Battery Trouble
[3] Aux. Current Limit
[1] TLM
[2] Fail to Com. 1
[3] Fail to Com. 2
[4] Bell Current Limit
[5] Bell Absent
[6] ROM Check Error
TROUBLE GROUP [3]: MODULE TROUBLE
[1] Module Tamper
[2] Module ROM Check Error
[3] Module TLM Trouble
[4] Module Fail to Com.
[5] Printer Trouble
[6] Module AC Failure
[7] Module Battery Failure
[8] Module Supply Output
[4] Fail to Com. 3
[5] Fail to Com. 4
[6] Fail to Com. PC
TROUBLE GROUP [4]: COMBUS TROUBLES
[1] Missing Keypad
[2] Missing Module
[6] General Failure
[7] Combus Overload
[8] Combus Com. Error
TROUBLE GROUP [5]: ZONE TAMPER
TROUBLE GROUP [6]: ZONE LOW BATTERY
Press the [5] button to display the tampered zone or zones.
Press the [6] button to display the zone(s) assigned to
wireless devices with low batteries.
TROUBLE GROUP [7]: ZONE FAULT
TROUBLE GROUP [8]: CLOCK LOSS
Press the [7] button to display the zone(s) experiencing a
communication, a fire loop or CleanMeTM trouble.
Press the [8] button to re-program the time.
For technical support in Canada or the U.S., call 1-800-791-1919, Monday to Friday from 8:00 a.m. to 8:00 p.m. EST. For
technical support outside Canada and the U.S., call 00-1-450-491-7444, Monday to Friday from 8:00 a.m. to 8:00 p.m. EST.
Please feel free to visit our website at paradox.com.
Printed in Canada - 02/2007
DGP848-EP10