1
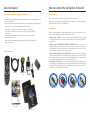
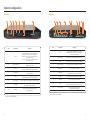
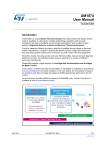
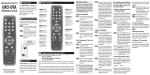
Consolidated Communications
USER’S MANUAL
Amulet 505
Set-Top Box
Welcome to
Consolidated
Communications (CCI)
Thank you for choosing TV service from Consolidated Communications. With
local, national and music channels, plus Premium High-Definition Channels,
Video on Demand, Digital Video Recorder (DVR) and HBO, Showtime, Cinemax
and Starz, our TV service provides you with leading-edge television technology.
Although you’ll find answers to many of your most common questions in this
guide, our friendly Technical Support staff is available 24 hours a day, 7 days a
week for more assistance. Simply dial 800.480.0080.
Now see TV the way it was meant to be!
1
Let’s Get Started
How to Connect the Set-Top Box to Your TV
Get to know your Amulet 505 Set-Top Box Media Hub
Basic Connections
Your Amulet 505 Set-Top Box Media Hub supports all of CCI’s TV services including Pay Per View,
Video on Demand and HD.
These are the required connections for your set-top box to operate properly.
This device must be handled much in the same way as a computer to reduce potential for damage.
•
Position it in an open space to allow airflow around the set-top box
•
Do not place the set-top box in an enclosed entertainment unit or cabinet
•
Do not place the set-top box on a soft surface such as a rug, sofa, bed or other
similar surface
•
The set-top box should not be next to an external heat source that could raise
the temperature of the unit
•
Connection into a surge protector along with your other audio/video equipment is
highly recommended
Connect the power supply via the Power Adaptor. Next connect an Ethernet cable (included) from
your set-top box to a DSL modem or network router.
TV Connections
Choose one of the following connection configurations to connect your set-top box with your TV.
Keep in mind that Component and HDMI connectors are for HDTV.
• Cabling Option 1: HDMI. Connect one end of the supplied HDMI cable from the HDMI
connection on the back of the set-top box. Connect the other end of the cable to the HDMI “IN”
port on your TV.
• Cabling Option 2: COMPONENT FOR VIDEO CONNECTION. Connect one end of the
Component cable (red, green, blue) to the component video connection on the back of the settop box. Connect the other end of the cable to the component input connection on your TV. Use
the red and white composite cable to connect your audio.
Included Accessories
• Cabling Option 3: RCA/COMPOSITE AUDIO/VIDEO. Connect one end of the supplied RCA
Audio (red and white) and the Video (yellow) cable to the Audio/Video “OUT” ports on the back
of the set-top box. Connect the other end of the RCA Composite Audio (red and white) and
Video (yellow) to the RCA Composite “IN” ports on the back of the TV.
• Cabling Option 4: COAX. Connect one end of the COAX cable to the RF TV/COAX “OUT” port
on the back of the set-top box. Connect the other end of the COAX cable to the COAX “IN” port
on the back of the TV. Note: COAX cable carries both an audio stream and a video stream. The
TV must be set to either channel 3 or channel 4.
Batteries
HDMI Cables
RGB (Component)
Cables
Power Adapter
Remote Control
Amulet 505 Set-Top Box
User’s Manual
Entone Manuals
2
3
Let’s Get Started
How to Connect the Set-Top Box to Your TV
Get to know your Amulet 505 Set-Top Box Media Hub
Basic Connections
Your Amulet 505 Set-Top Box Media Hub supports all of CCI’s TV services including Pay Per View,
Video on Demand and HD.
These are the required connections for your set-top box to operate properly.
This device must be handled much in the same way as a computer to reduce potential for damage.
• Position it in an open space to allow airflow around the set-top box
Connect the power supply via the Power Adaptor. Next connect an Ethernet cable (included) from
your set-top box to a DSL modem or network router.
TV Connections
• Do not place the set-top box in an enclosed entertainment unit or cabinet
• Do not place the set-top box on a soft surface such as a rug, sofa, bed or other
similar surface
Choose one of the following connection configurations to connect your set-top box with your TV.
Keep in mind that Component and HDMI connectors are for HDTV.
• The set-top box should not be next to an external heat source that could raise
the temperature of the unit
• Connection into a surge protector along with your other audio/video equipment is
highly recommended
• Cabling Option 1: HDMI. Connect one end of the supplied HDMI cable from the HDMI
connection on the back of the set-top box. Connect the other end of the cable to the HDMI “IN”
port on your TV.
• Cabling Option 2: COMPONENT FOR VIDEO CONNECTION. Connect one end of the
Component cable (red, green, blue) to the component video connection on the back of the settop box. Connect the other end of the cable to the component input connection on your TV. Use
the red and white composite cable to connect your audio.
Included Accessories
• Cabling Option 3: RCA/COMPOSITE AUDIO/VIDEO. Connect one end of the supplied RCA
Audio (red and white) and the Video (yellow) cable to the Audio/Video “OUT” ports on the back
of the set-top box. Connect the other end of the RCA Composite Audio (red and white) and
Video (yellow) to the RCA Composite “IN” ports on the back of the TV.
• Cabling Option 4: COAX. Connect one end of the COAX cable to the RF TV/COAX “OUT” port
on the back of the set-top box. Connect the other end of the COAX cable to the COAX “IN” port
on the back of the TV. Note: COAX cable carries both an audio stream and a video stream. The
TV must be set to either channel 3 or channel 4.
Batteries
HDMI Cables
RGB (Component)
Cables
Power Adapter
Remote Control
Amulet 505 Set-Top Box
User’s Manual
Entone Manuals
2
3
System Configuration
Front Panel
1
Back Panel
2
3
4
5
6 7
8
1
2
3
4
5 6
7
8
9 10
Item
Description
Function
1
TV Out
For connecting to an RF TV for loop-through.
(For Amulet 505, it should NOT be connected to
in-house cable network).
2
Composite Video
For connecting to a standard-definition TV (SDTV).
3
Audio
For connecting stereo audio output (Left/Right)
4
Component Video
For connecting to a high-definition TV (HDTV).
To connect USB devices such as USB flash drive
and external USB hard drive (max 500mA load).
5*
IR Blaster Port
For connecting to an IR Blaster.
Link Indicator
Blue dot indicates that Ethernet or Wi-Fi network
connection is active.
6
Digital Audio
For connecting to an entertainment system
that supports 5.1 Surround Sound audio.
5
Clock
Displays current time set by your service provider.
May not display time while unit is booting up.
7
HDMI
For connecting to a high-definition TV (HDTV).
6
Record Indicator
Blue dot indicates current program is currently recording.
8
Ethernet
For connecting to a wired network.
7
HD Indicator
Blue dot indicates current program is playing
in HD (720p of higher) resolution.
9*
USB
For connecting USB devices such as USB flash drives
and external USB hard drives (max 500mA load).
8
USM Port
For inserting a Universal Storage Module
(USM) hard drive.
10
DC Power Jack
For connecting to a power source
(100-240V, Output 12V/3A).
Item
Description
Function
Power
Solid blue indicates the unit is on.
Solid red indicates the unit is in standby mode.
Flashing blue indicates the unit s booting up.
Press button once to put unit in standby mode,
press again to resume.
To reboot the device, press and hold button for
at least five seconds.
2*
SD Card Reader
To read or transfer content from a compatible
SD flash memory card.
3*
USB Port
4
1
* Some functions are not available.
* Some functions are not available.
4
5
Troubleshooting
Our friendly Technical Support staff is available 24 hours a day, 7 days a week.
Simply dial 800.480.0080.
No Sound on TV
• Verify that the TV does not have Mute on.
• Check to make sure all cables are firmly connected.
TV Has A Snowy Screen
• Check to make sure all cables are firmly connected.
• If the TV still has no sound, power cycle the set-top box by disconnecting the power cord for
20-30 seconds, then reconnect and allow the system to fully load.
• Verify that the TV is set to the correct TV input mode. We prefer you use your original TV
remote control. Each TV is different, but typically this is how to set your TV to the proper
INPUT mode. Using your original TV remote control:
• If you still experience problems, please call Technical Support at 800.480.0080.
• If the Power button on the front of the set-top box is not lit, verify that the DC Power Supply is
connected properly to the set-top box (see number 10 on page 2) and that the power cord is
connected to the electrical outlet.
1. Press the MENU button.
2. Toggle through the menu selections until you locate the TV input selection. Typically
the TV input selection contains one or more options (Video 1, Video 2, Input 1, Input
2, CATV, Y/PR/PB, S-video, etc.). Toggle through the Input options until programming
is viewable.
TV is not Working
• If you still experience problems, please call Technical Support at 800.480.0080.
• If the TV picture is still snowy, power cycle the set-top box by unplugging the power source from
the back of the set-top box and then plugging the power source back into the set-top box.
• If you still experience problems, please call Technical Support at 800.480.0080.
TV Has A Black Screen
• Check to make sure all cables are firmly connected.
• Try to change channels by pressing the Channel Up or Channel Down buttons.
• Press the GUIDE button.
• If the set-top box is connected to the TV via COAX cable, check the TV to verify it is set to
channel 3.
• If the TV still has a black screen, power cycle the set-top box by disconnecting the power
cord for 20-30 seconds, then reconnect and allow the system to fully load.
• If you still experience problems, please call Technical Support at 800.480.0080.
TV Has A Blue Screen
• Many times, this problem is due to the TV being changed to a video input for a VCR/DVD
player or video game.
• Verify that the TV is set to the correct TV input mode. We prefer you use your original TV
remote control. Each TV is different, but typically this is how to set your TV to the proper
INPUT mode. Using your original TV remote control:
1. Press the MENU button.
2. Toggle through the menu selections until you locate the TV input selection.
Typically the TV input selection contains one or more options (Video 1, Video
2, Input 1, Input 2, CATV, Y/PR/PB, S-video, etc.). Toggle through the Input
options until programming is viewable.
• If the TV still has a blue screen, power cycle the set-top box by disconnecting the power
cord for 20-30 seconds, then reconnect and allow the system to fully load.
• If you still experience problems, please call Technical Support at 800.480.0080.
6
7
Frequently Asked Questions
Questions about your Amulet 505 Set-Top Box Media Hub
How do I start a recording from the on-screen guide?
Go to the program, then press the RECORD button.
Can I record a program while watching another program on a different channel?
Yes.
When I try to record a program, I see a message “the recording is not enabled for this
channel.” What do I do?
First, power cycle the set-top box. To do this:
1. Unplug the power supply from the set-top box
(refer to the diagram on page 2)
2. After 20-30 seconds, reconnect the power supply and allow the
system to fully load.
If this does not work, please call Technical Support at 800.480.0080.
8
9
Technical Support: 800.480.0080
102-01448 Amulet 505 Guide_Aug2014_H
10
I consolidated.com