1
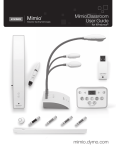
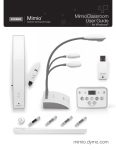
Chapter 3
MimioTeach
Using MimioTeach with a projector, you can deliver lessons and presentations directly from
your whiteboard. Using MimioStudio Interactive mode, you control the movement of the
cursor on your screen with the MimioTeach stylus, much like you would with a mouse at
your computer.
What's Included
The MimioTeach package contains the following items:
1
MimioTeach bar
5
Mounting plates
2
USB power adapter
6
MimioStudio DVD
3
MimioHub
7
MimioTeach stylus
4
USB cable
If you are missing any of the items above, contact Customer Support.
About MimioTeach
You can use the MimioTeach bar and stylus in MimioStudio Interactive mode to deliver
lessons and presentations.
29
MimioTeach
You can also use the MimioTeach bar with MimioCapture to capture notes from your
whiteboard into MimioStudio Notebook. For more information about using MimioTeach
with MimioCapture, see MimioCapture.
The following figure shows the major components of the MimioTeach.
1
Start Tools (button A)
5
USB/Power connector
2
Hover/Right-click (button B)
6
Launch
3
MimioHub dock
7
Calibrate
4
Power/Status light
Status Lights
The status light visually shows the status of the MimioTeach bar.
30
Off
Not receiving power; USB/power cable is not connected or MimioTeach is turned off.
Solid Green
MimioTeach is connected and receiving power; MimioStudio software is running.
Flashing Green
MimioTeach is connected or connecting, and receiving power; MimioStudio software is
not running.
Solid Amber
MimioTeach cannot find an available MimioHub.
Flashing Amber
MimioTeach is searching for an available MimioHub.
About MimioStudio Tools
With the various presentation tools found in MimioStudio Tools you can focus your
audience on a specific area of the screen by displaying only certain parts of the screen. You
can also annotate the screen with the drawing tools available in MimioStudio Tools using
the Screen Annotation feature.
For more information about MimioStudio Tools, see Marking Up the Display Using Screen
Annotations.
The following table describes the major components of MimioStudio Tools.
31
MimioTeach
Selection tool
Zoom
Pen
Brush
Text
Highlighter
Line
Arrow End
Arrow Start
Arrow Both
Rectangle
Ellipse
Triangle
Right Triangle
Five Pointed Star
Hexagon
Pentagon
Shape Recognition
Eraser
Insert file
Screen clipping
Color picker
More colors
Object Fill
Outline and Fill color
Thickness slider
Color palette
Solid Line
Dash Line
Dotted Line
Transparency
Gallery
Applications (see below)
Right-click
Interactive
Mouse
Screen Annotation
From the Applications tool, you can access the following:
Reveal
Spotlight
Text Tools
Quick Vote
Recorder
View
Calculator
Magnify
Web Browser
Getting Started
Review the following topics to install and start using your MimioTeach.
32
Getting Started
n
Setting Up the MimioTeach Stylus
n
Setting Up the MimioTeach Bar
n
Setting Up Interactive Mode
Setting Up the MimioTeach Stylus
The MimioTeach stylus is powered by a rechargeable lithium-ion battery. The battery
recharges whenever the stylus is docked on the MimioTeach bar.
To set up the MimioTeach stylus
1. Turn the top of the stylus counter-clockwise to separate the top from the body of the
stylus.
2. Remove the plastic strip from the stylus.
3. Replace the top onto the body of the stylus and turn clockwise to attach.
Setting Up the MimioTeach Bar
The MimioTeach bar comes pre-linked to the included MimioHub. You can also use this
MimioHub to connect other MimioClassroom devices to your computer, such as
MimioVote.
When not in use, the MimioHub can be stored in the MimioHub dock on the back of
the MimioTeach bar.
MimioTeach is powered using the included USB cable and power adapter.
33
MimioTeach
Optionally, MimioTeach can be powered using three AAA batteries. For information
about using batteries to power the MimioTeach bar, see Inserting the Batteries.
To set up the MimioTeach bar
1. Plug the USB cable into the USB port on the power adapter.
2. Plug the other end of the USB cable into the USB port on the MimioTeach bar.
3. Plug the power adapter into a power outlet.
4. Place the MimioTeach bar along the left edge of the whiteboard as shown.
34
Getting Started
The MimioTeach bar attaches securely to any magnetic whiteboard. See Mounting
MimioTeach to a Non-Magnetic Whiteboard for information about mounting the bar to
a non-magnetic whiteboard.
5. Plug the MimioHub into an available USB port on your computer.
If you do not want to connect the MimioTeach bar to your computer wirelessly, you
can link the bar to your computer using the included USB cable without the power
adapter. The bar will be powered by USB through your computer.
Setting Up Interactive Mode
Using MimioStudio Interactive mode, you can deliver lessons and presentations directly
from your whiteboard.
To use Interactive mode you need a projector, a MimioTeach-enabled whiteboard, and a
MimioTeach stylus. Combined, these devices make for a powerful tool for delivering lessons
and presentations.
Projecting Your Desktop
If you are presenting from a MimioStudio Notebook or another application, such as a
PowerPoint presentation, you can open the application before or after Interactive mode is
enabled and calibrated.
To set up for Interactive mode
1. Project your desktop image onto your whiteboard.
Refer to your projector’s documentation for instructions on how to project your desktop
image.
2. Adjust the projected image to have a 2-inch to 3-inch buffer between the edge of your
projection and your MimioTeach.
35
MimioTeach
3. Click the MimioTeach Mouse anywhere on the whiteboard.
Interactive mode starts and the calibration screen appears.
To exit Interactive mode
Do one of the following:
l
Press the Interactive button,
l
Start MimioStudio Tools, click Interactive , and then click Exit.
Start MimioStudio Settings, select Interactive, and then click Disable.
l
, twice on the MimioTeach bar.
See Customizing MimioStudio for information on how to access MimioStudio
Settings.
Calibrating Interactive Mode
Each time Interactive mode is enabled, you are prompted to calibrate using the MimioTeach
stylus.
When using a permanently installed whiteboard and projector, you do not need to
recalibrate Interactive mode after the first session. See Adjusting the Interactive Settings.
To calibrate Interactive mode
1. If the calibration screen does not appear when you start Interactive mode, do one of the
following:
l
Start MimioStudio Tools, click the Interactive button,
Recalibrate.
l
Press the Interactive button, , on your MimioTeach bar.
Start MimioStudio Settings, select Interactive, and then click Calibrate.
l
, and then click
2. Press the MimioTeach stylus down on the whiteboard at the center of each of the nine
calibration targets.
Make sure to hold the stylus perpendicular to the writing surface as you click.
The calibration target disappears and the next calibration target appears.
When the calibration screen disappears, Interactive mode is enabled.
Using MimioTeach
You can use the MimioTeach bar and stylus in MimioStudio Interactive mode to deliver
lessons and presentations. In MimioStudio Interactive mode, you control the movement of
the cursor on your screen with the MimioTeach stylus, much like you would with a mouse
at your computer.
You can also use the various presentation tools found in MimioStudio Tools to focus your
audience on a specific area of the screen by displaying only certain parts of the screen. And,
you can annotate the screen with the drawing tools available in MimioStudio Tools using
the Screen Annotation feature.
Using the MimioTeach Stylus
In Interactive mode, the MimioTeach stylus can be used to control your desktop and interact
with applications on your computer from your whiteboard.
36
Using MimioTeach
The following table describes how to use the MimioTeach stylus to control your desktop
from the whiteboard.
To execute
Do this
Left mouse click
Click in the projected area at the desired location with the tip of the stylus.
Double left mouse click
Quickly click twice in the projected area at the desired location with the tip of
the stylus.
Right mouse click
Hover
Press the B button on the stylus, and then click in the projected area at the
desired location with the tip of the stylus.
1. Hold the stylus at the desired location, staying as close to the whiteboard
as possible without touching it.
2. Press the B button on the stylus.
3. Move the stylus to the desired location.
4. Release the B button on the stylus.
To change the functions of the MimioTeach stylus buttons, see Adjusting the Interactive
Settings.
Focusing Attention Using the Reveal and Spotlight Tools
The Reveal tool and the Spotlight tool help you to focus your audience on a specific area of
the screen by keeping parts of the screen hidden.
Using the Reveal Tool
The Reveal tool creates a shade that you can raise, lower, move left, and move right over
the screen image, as if you are moving a shade up, down, or across the screen. You can then
expose bullet points or other information progressively.
37
MimioTeach
To use the Reveal tool
Do one of the following:
l
From MimioStudio Tools, click the Applications button,
Reveal.
l
(Interactive mode only) Press the Launch button,
then click
Reveal in the Launch window.
, and then choose
, on the MimioTeach bar, and
To adjust the revealed area
Click inside the shaded area and drag down, up, left, or right to reveal more or less of
the displayed area.
To adjust the transparency of the Reveal tool
1. Click , and then point to Transparent.
2. From the Transparent list, choose a percentage.
A transparency of 0% means that the shaded area will be completely opaque.
Using the Spotlight Tool
The Spotlight tool masks the entire screen except for a small area, the spotlight. You can
then focus audience attention on a specific area of the screen. The spotlight area can be
reshaped, resized, and moved around the screen.
To use the Spotlight tool
1. Do one of the following:
l
From MimioStudio Tools, click the Applications button,
Spotlight.
, and then choose
(Interactive mode only) Press the Launch button, , on the MimioTeach bar, and
then click
Spotlight in the Launch window.
2. Click the shaded area outside of the spotlight border and drag the spotlight to
the desired location.
l
To adjust the shape of the spotlight
1. Click , and then point to Shape.
2. From the Shape list, choose a shape for the spotlight.
To resize the spotlight
38
Using MimioTeach
1. Click , and then point to Size.
2. From the Size list, choose a spotlight size.
You can also resize the spotlight by dragging the colored border of the spotlight until
the spotlight is the desired size.
To adjust the spotlight transparency
1. Click , and then point to Transparent.
2. From the Transparent list, choose a transparency percentage.
A transparency of 0% means that the shaded area will be completely opaque.
Marking Up the Display Using Screen Annotations
Screen Annotation mode allows you to annotate applications, web pages, and images. When
in Annotation mode, a green border with a faded edge appears around your desktop.
When you exit from Screen Annotation mode, all annotations are cleared from the
whiteboard and automatically archived in the Screen Annotations folder in MimioStudio
Gallery.
Enabling Screen Annotation Mode
To enable Screen Annotation mode
1. Do one of the following
l
From MimioStudio Tools, click the Screen Annotation button,
current desktop image.
, to freeze your
(Interactive mode Only) Press the Launch button, , on the MimioTeach bar, and
then click
Screen Annotation in the Launch window.
A green border with a faded edge appears around your desktop.
l
2. Annotate the screen using MimioStudio Tools.
All object, drawing, and manipulation features in MimioStudio Tools are available in
Screen Annotation mode.
To exit Screen Annotation mode
Do one of the following:
l
From MimioStudio Tools, click the Mouse button,
l
(Interactive mode only) Press the Launch button, , on the MimioTeach bar, and
then click
Screen Annotation in the Launch window.
, to “unfreeze” the screen.
To disable the Annotation mode border
1. Right-click in the notification area of the taskbar and choose
Settings.
2. Select
Notebook from the MimioStudio Settings dialog box.
3. Under General, clear the Enable fullscreen border (Screen Annotation only) check
box.
4. Click OK to save the settings.
Annotating the Screen Using MimioStudio Tools
MimioStudio Tools are used to annotate the screen. All object, drawing, and manipulation
features in MimioStudio Tools are available in Screen Annotation mode.
39
MimioTeach
Once you select a drawing tool, that tool remains selected until you select a different
drawing tool or the selection tool.
See Manipulating Objects for a complete description of manipulating objects.
All of the functions and features of the MimioStudio drawing tools that are available in
MimioStudio Notebook are available in Screen Annotation mode.
To use the freehand pen
1. Click the Pen button, .
2. (Optional) To adjust the line width, drag the Thickness slider.
3. (Optional) To adjust the line color, do one of the following:
l
Select a color from the Color Palette.
l
Click
, and then select a color from the Color dialog box.
Click
, and then select a color from the desktop.
4. (Optional) To adjust the transparency of the line, click the Transparency button,
and then choose a transparency percentage.
l
,
5. Place the cursor where you want the ink stroke to start on the page.
6. Drag the cursor to draw ink strokes.
To use the freehand brush
1. Click the Brush button,
.
2. (Optional) To adjust the line width, drag the Thickness slider.
3. (Optional) To adjust the line color, do one of the following:
l
Select a color from the Color Palette.
l
Click
, and then select a color from the Color dialog box.
Click
, and then select a color from the desktop.
4. (Optional) To adjust the transparency of the line, click the Transparency button,
and then choose a transparency percentage.
l
5. Place the cursor where you want the brush stroke to start on the page.
6. Drag the cursor to draw brush strokes.
To highlight a portion of the display
1. Click the Highlighter button, .
2. (Optional) To adjust the highlighter width, drag the Thickness slider.
3. (Optional) To change the color, do one of the following:
l
Select a color from the Color Palette.
l
Click
, and then select a color from the Color dialog box.
l Click
, and then select a color from the desktop.
4. Place the cursor where you want the highlight stroke to start on the page.
5. Drag the cursor over the area you want to highlight.
To erase ink and highlighting
1. Click the Eraser button, .
2. (Optional) To adjust the eraser width, drag the Thickness slider.
3. Drag the cursor over the ink or highlighter strokes you want to erase.
40
,
Using MimioTeach
To add a line or shape
1. Click the line type or shape you want to add.
2. (Optional) To adjust the line or outline width, drag the Thickness slider.
3. (Optional) To change the line or outline color, select the Outline Color box, and then
do one of the following:
l
Select a color from the Color Palette.
l
Click
, and then select a color from the Color dialog box.
l Click
, and then select a color from the desktop.
4. (Optional) To adjust the fill color, select the Fill Color box, and then do one of the
following:
l
Select a color from the Color Palette.
l
Click
, and then select a color from the Color dialog box.
l
Click
, and then select a color from the desktop.
5. To change the line or outline style, click
l
Solid Line
l
Dash Line
and choose one of the following:
Dotted Line
6. (Optional) To adjust the transparency of the line or shape, click the Transparency
button, , and then choose a transparency percentage.
7. Place the cursor where you want the line or shape to start on the page.
l
8. Drag the cursor to draw the line or shape.
To add formatted text
1. Click the Text button, .
2. Place the cursor where you want the text to start on the page.
For a fixed width text box, place the cursor where you want the text box to start on the
page and then drag to the desired width.
3. Select a font style, size, color, and an alignment option for the text.
4. Enter text in the text box.
To draw a shape
1. Click the Shape Recognition button,
.
2. (Optional) To adjust the outline width, drag the Thickness slider.
3. (Optional) To change the outline color, select the Outline Color box, and then do one
of the following:
l
Select a color from the Color Palette.
l
Click
, and then select a color from the Color dialog box.
l Click
, and then select a color from the desktop.
4. (Optional) To adjust the fill color, select the Fill Color box, and then do one of the
following:
41
MimioTeach
l
Select a color from the Color Palette.
l
Click
, and then select a color from the Color dialog box.
l
Click
, and then select a color from the desktop.
5. To change the line or outline style, click
l
Solid Line
l
Dash Line
and choose one of the following:
Dotted Line
6. (Optional) To adjust the transparency of the shape, click the Transparency button,
and then choose a transparency percentage.
l
,
7. Place the cursor where you want the shape to start on the page.
8. Drag the cursor to draw the shape.
The Shape Recognition tool can be used to draw circles, ellipses, triangles, rectangles,
squares, and lines.
Clearing All Annotations from the Display
When you exit Screen Annotation mode, all annotations are cleared from the display and all
annotations are automatically preserved as a snapshot of the display. See Working with
Saved Annotation Snapshots for information about reviewing and using the snapshots.
Inserting Text Into an Application Using MimioStudio Text Tools
You can enter text into any text-entry box or page using the MimioStudio Text Tools. The
Text Tool has three modes for entering text:
n
On-Screen Keyboard allows you to enter text through an on-screen keyboard
application.
n
Write Anywhere allows you to enter text by writing anywhere on the screen. Your
handwriting is automatically converted into text and entered into the current
application.
Write Anywhere is only available on Windows XP 32-bit.
n
Writing Pad allows you to enter text through a small on-screen writing pad. Your
handwriting is automatically converted into text and input into the current application.
In addition, Write Anywhere and Writing Pad also support gesture recognition, which
allows handwritten shortcuts to be automatically recognized as commonly used keys.
To access MimioStudio Text Tools
1. From MimioStudio Tools, click the Applications button,
Tools.
2. Right-click the Text Tools icon
taskbar.
,
, or
Text
in the notification area of the Windows
3. Choose the Text Tool that you want to use.
42
, and then choose
l
Keyboard to enable the On-Screen Keyboard.
l
Write Anywhere to enable Write Anywhere.
l
Writing Pad to enable Writing Pad.
Using MimioTeach
To disable MimioStudio Text Tools
Do one of the following:
l
Click the Text Tools icon
,
, or
in the notification area of the taskbar.
l
From MimioStudio Tools, click the Applications button,
Text Tools.
, and then choose
Using the On-Screen Keyboard
You can enter text into any application using the On-Screen Keyboard.
To use the On-Screen Keyboard
1. Start the On-Screen Keyboard.
2. Click in the text-entry box or on the page where you want to enter the text.
3. Using your mouse or MimioTeach stylus, press the virtual keys on the on-screen
keyboard.
The text is entered into the text-entry box or on the page that you selected.
Using Write Anywhere
With Write Anywhere you can enter text into any text-entry box or page, by writing
anywhere on the screen with the MimioTeach stylus while in Interactive mode. You can
also use Write Anywhere with your mouse or other input device from your computer.
Write Anywhere is only available on Windows XP 32-bit.
To use Write Anywhere
1. Start Write Anywhere.
The Write Anywhere on-screen buttons appear.
2. Click in the text-entry box or on the page where you want to enter the text.
3. Using your mouse or MimioTeach stylus, write anywhere on the screen.
Your handwriting is automatically converted to text and entered into the text-entry box
or on the page that you selected.
4. Use the on-screen buttons for commonly used keys.
Button
Description
Backspace
Enter
Tab
Space
Write Anywhere also supports gesture recognition for commonly used keys. See Using
Gesture Recognition.
43
MimioTeach
Using Writing Pad
With Writing Pad you can enter text through a small on-screen writing pad using the
MimioTeach stylus while in Interactive mode. You can also use Writing Pad with your
mouse or other input device from your computer.
To use Writing Pad
1. Start Writing Pad.
The on-screen writing pad appears.
2. Click in the text-entry box or on the page where you want to enter the text.
3. Using your mouse or MimioTeach stylus, write within the yellow space of the onscreen writing pad.
Your handwriting is automatically converted to text and entered into the textentry box or on the page that you selected.
4. Use the on-screen buttons for commonly used keys.
Button
Description
Backspace
Enter
Tab
Space
Writing Pad also supports gesture recognition for commonly used keys. See Using Gesture
Recognition.
Using Gesture Recognition
With gesture recognition, handwritten shortcuts are automatically recognized as commonly
used keys. Both Write Anywhere and Writing Pad support gesture recognition.
The following table describes how to use gestures to perform common functions.
44
Caring for MimioTeach
To press
Do this
Backspace
Draw a line from right to left.
Enter
Draw a connected line from top to bottom
and then from right to left.
Draw a connected line from bottom to top
Tab
and then from left to right.
Draw a connected line from top to bottom
Space bar
and then from left to right.
Using the Web Browser, Calculator, and Magnify Tools
MimioStudio Tools includes shortcuts for accessing a Web browser, a calculator, and a
magnifier.
To use the tools
1. Start MimioStudio Tools.
2. Click the Applications button,
following tools:
l
Calculator
l
Magnify
l
Web Browser
, choose More Tools, and then choose one of the
Recording Desktop Actions and Audio in Interactive Mode
Using MimioStudio Recorder, you can record your interactions into an AVI movie file, with
or without audio. See Using MimioStudio Recorder for more information on how to use
MimioStudio Recorder.
Caring for MimioTeach
Review the following topics for information about cleaning, inserting the batteries, and
permanently mounting your MimioTeach.
n
Cleaning MimioTeach
n
Inserting the Batteries
n
Mounting MimioTeach to a Non-Magnetic Whiteboard
45
MimioTeach
Cleaning MimioTeach
MimioTeach is designed to give you long and trouble-free service while requiring very little
maintenance.
You can easily clean your MimioTeach using the following items:
n
Lint-free cloth.
n
Isopropyl alcohol, diluted dishwashing detergent, or diluted glass cleaner.
If you use glass cleaner, make sure it does not contain ammonia.
To clean the MimioTeach bar and stylus
1. Disconnect the USB cable from the MimioTeach bar.
2. Use the lint-free cloth to wipe the exterior of the MimioTeach bar and stylus.
3. Remove dirt and smudges with one of the cleaning solutions mentioned above.
Avoid using liquids on any exposed charging contacts. Do not allow liquid into
any openings on the equipment.
4. Reconnect the USB cable.
Inserting the Batteries
MimioTeach is powered using the included USB cable and power adapter. Optionally,
MimioTeach can be powered using three AAA batteries.
To insert the batteries
1. Press down and slide off the battery compartment cover.
2. Insert three AAA batteries into the battery compartment.
3. Replace the battery compartment cover.
Remove the batteries if the MimioTeach bar will not be used for a long period of time.
Mounting MimioTeach to a Non-Magnetic Whiteboard
The MimioTeach bar attaches securely to any magnetic whiteboard. If you do not have a
magnetic whiteboard, you can mount the MimioTeach bar to your whiteboard using the
included metal plates.
If you are installing both MimioTeach and MimioCapture, you must mount
MimioCapture before mounting MimioTeach. This will ensure proper placement of the
MimioTeach bar. See Mounting MimioCapture to a Non-Magnetic Whiteboard for
information on mounting MimioCapture.
To mount MimioTeach to a non-magnetic whiteboard
1. Place the metal plates against the back of the MimioTeach bar as shown.
Make sure that the recess on each plate is inserted into the recess on the back of the
MimioTeach bar.
46
Caring for MimioTeach
2. Remove the paper backing from the adhesive strips to expose the adhesive.
3. Press the MimioTeach bar firmly along the left edge of the whiteboard as shown.
47
This page intentionally left blank for double-sided printing.
48