1
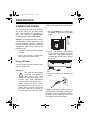
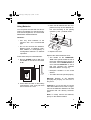
12-795.fm Page 1 Friday, July 16, 1999 7:11 AM
Cat. No. 12-795
OWNER’S MANUAL
Please read before using this equipment.
Multi-Band AC/DC Portable Radio
12-795.fm Page 2 Friday, July 16, 1999 7:11 AM
FEATURES
Your RadioShack Multi-Band AC/DC
Portable Radio is designed to provide
high-quality sound while you listen to up
to 10 different radio bands. The portable
design lets you use it almost anywhere.
Its features include:
We recommend you record your radio’s
serial number here. The number is inside the radio’s battery compartment.
Serial Number __________________
WARNING:
Multiple Power Options — let you
power the radio with standard AC power
using the supplied cord, batteries (not
supplied), or your car’s cigarette-lighter
socket (using an optional DC adapter).
MIC Jack — lets you connect a micro-
phone with a 1/8-inch plug (not supplied)
to the radio and hear sound from the microphone through the radio’s speaker
(like a public address system).
To reduce the risk of fire or
shock hazard, do not expose this product to rain
or moisture.
CAUTION
RISK OF ELECTRIC SHOCK.
DO NOT OPEN.
CAUTION: TO REDUCE THE RISK OF
ELECTRIC SHOCK, DO NOT REMOVE
COVER OR BACK. NO USER-SERVICEABLE PARTS INSIDE. REFER SERVICING
TO QUALIFIED PERSONNEL.
This symbol is intended to alert
you to the presence of uninsulated dangerous voltage within
the product’s enclosure that might
be of sufficient magnitude to constitute a risk of electric shock. Do
not open the product’s case.
AFC (Automatic Frequency Control)
— provides drift-free FM reception and
reduced sound distortion.
Carry Strap — easily attaches to the radio so you can carry it with you almost
anywhere.
Direction Finder — directional antenna
lets you fine-tune the radio to improve
AM reception.
!
This symbol is intended to inform
you that important operating and
maintenance instructions are
included in the literature accompanying this product.
Caution: The directional antenna
(DIRECTION FINDER) on top of the radio
is not a handle. To avoid damaging the
antenna, do not lift or carry the radio using the antenna. (Use the provided carry
strap instead.)
© 1999 Tandy Corporation.
All Rights Reserved.
RadioShack is a registered trademark used by Tandy Corporation.
2
!
12-795.fm Page 3 Friday, July 16, 1999 7:11 AM
CONTENTS
Preparation ...........................................................................................................
Connecting Power ...........................................................................................
Using AC Power .......................................................................................
Using Batteries .........................................................................................
Using Vehicle Battery Power ....................................................................
Connecting the Wire Antenna .........................................................................
Attaching the Carry Strap ................................................................................
4
4
4
5
6
7
7
Operation .............................................................................................................. 8
Understanding the Bands ................................................................................ 8
AM Broadcast ........................................................................................... 8
Citizen Band ............................................................................................. 8
Short Wave 1/2 ......................................................................................... 8
FM Broadcast ........................................................................................... 9
TV Sound 1 ............................................................................................... 9
TV Sound 2 ............................................................................................... 9
VHF Marine ............................................................................................... 9
Air Craft ..................................................................................................... 9
Weather Band ........................................................................................... 9
Basic Radio Operation .................................................................................. 10
Reading the Tuning/Battery Meter ................................................................ 11
Using the P.A. (Public Address) Function ...................................................... 11
Using the Earphone ....................................................................................... 12
Listening Safely ...................................................................................... 12
Traffic Safety ........................................................................................... 12
Care ............................................................................................................... 13
The FCC Wants You to Know ........................................................................ 13
Specifications .................................................................................................... 15
3
12-795.fm Page 4 Friday, July 16, 1999 7:11 AM
PREPARATION
CONNECTING POWER
You can power the radio from standard
AC power using the supplied power
cord, with batteries (not supplied), or
from your vehicle’s cigarette-lighter
socket (using an optional DC adapter).
Follow these steps to connect AC power.
1. Be sure POWER is set to OFF, then
set AC/DC on the back of the radio
to AC.
Caution: Connecting the radio to AC or
vehicle battery power disconnects any
internal batteries. However, batteries
can leak chemicals that can corrode and
damage the radio. Always remove the
batteries if you:
• will not be using the radio for a week
or more
• plan to use only AC or vehicle battery power for a week or more
2. Open the battery compartment
cover, pull out the power cord, then
replace the cover while routing the
cord through the slot on the side of
the cover.
Using AC Power
You can power the radio using the supplied AC power cord.
Cautions:
You must use the supplied
AC power cord. Using any
other power cord could
damage the radio or the power cord.
Contact your local RadioShack
store for power cord replacement.
!
• Always connect the power cord to
the radio before you connect it to AC
power. When you finish, disconnect
the power cord from AC power before you disconnect it from the radio.
4
Cord
Slot
3. Plug the cord into a standard AC
outlet.
Caution: Your radio’s power cord has a
polarized plug (one blade is wider than
the other). If you have difficulty inserting
the plug into the outlet, do not force it!
Turn the plug over and try again.
12-795.fm Page 5 Friday, July 16, 1999 7:11 AM
Using Batteries
You can power the radio with four D batteries (not supplied). For the best performance and longest life, we recommend
RadioShack alkaline batteries.
3. Place four D batteries into the compartment on top of the attached ribbon and according to the polarity
symbols (+ and –) marked inside.
Cautions:
• Use only fresh batteries of the
required size and recommended
type.
• Do not mix old and new batteries,
different types of batteries (standard, alkaline, or rechargeable), or
rechargeable batteries of different
capacities.
Ribbon
4. Replace the cover.
Replace the radio’s batteries when:
Follow these steps to install batteries.
1. Be sure POWER is set to OFF, then
set AC/DC on the back of the radio
to DC.
• The needle on the TUNING/BATTERY meter points toward the left of
the green shaded (lower) portion of
the meter, when POWER ON/OFF is
set to ON and RADIO/P.A. is set to
P.A. (see “Reading the TUNING/
BATTERY Meter” on Page 11).
• Reception weakens or the sound
distorts.
• The radio does not operate properly.
Warning: Dispose of old batteries
promptly and properly. Do not burn or
bury them.
2. Press down the tabs on the battery
compartment cover and pull them
out to remove the cover.
Cautions: If you do not plan to use the
radio with batteries for a week or longer,
remove the batteries. Batteries can leak
chemicals that can destroy electronic
parts.
Note: To easily remove the batteries,
pull up on the attached ribbon.
5
12-795.fm Page 6 Friday, July 16, 1999 7:11 AM
Using Vehicle Battery Power
You can power the radio from a vehicle’s 12V power source (such as cigarette-lighter socket) using a 9V, 500 mA
DC adapter (not supplied) available at
your local RadioShack store.
2. Set the adapter’s voltage switch to
9V.
3. Insert the adapter’s 5.5 mm outer
diameter/2.1 mm inner diameter
barrel plug into the DC 9V jack on
the back of the radio.
Cautions:
You must use a power
source that supplies 9V DC
and delivers at least 500
mA. Its center tip must be set to
negative and its plug must fit the radio's DC 9V jack. Using an adapter
that does not meet these specifications could damage the radio or the
adapter.
!
• Always connect the DC adapter to
the radio before you connect it to the
power source. When you finish, disconnect the adapter from the power
source before you disconnect it from
the radio.
4. Plug the other end of the adapter
into the vehicle’s cigarette-lighter
socket.
Cigarette
Lighter
Socket
Follow these steps to connect DC power.
1. Be sure POWER is set to OFF, and
set AC/DC on the back of the radio
to DC.
6
Note: If the radio does not operate when
you connect a DC adapter, unplug the
adapter from the cigarette-lighter socket
and clean any ashes or debris from the
socket.
12-795.fm Page 7 Friday, July 16, 1999 7:11 AM
CONNECTING THE WIRE
ANTENNA
ATTACHING THE CARRY
STRAP
Besides the DIRECTION FINDER antenna and the built-in telescoping antenna,
the radio comes with a separate wire antenna (about 10 feet long) for reception
when you listen to the shortwave bands
(SW or SW2). To connect the antenna,
simply insert the antenna’s plug into
ANT on the front of the radio.
The radio comes with a carry strap that
you can easily attach and use to carry
the radio with you almost anywhere you
go. Follow these steps to attach each
end of the supplied strap to the hanger
bars on the radio.
For the best reception when using the
wire antenna, fully extend the antenna
and run it outside through a window (if
possible).
Note: If you lose or damage the supplied wire antenna, you can replace it
with a shortwave antenna kit available at
your local RadioShack store.
1. Insert one end of the strap into the
hanger bar on one side of the radio.
2. Loop the strap end around the bar
and pull up on the strap.
3. Insert the strap end into the lower
part of the buckle.
4. Pull the strap end through the top of
the buckle far enough to stop the
strap from slipping.
To shorten the strap for hand carrying, slide the two buckles together.
To lengthen the strap for shoulder
carrying, slide the two buckles apart.
7
12-795.fm Page 8 Friday, July 16, 1999 7:11 AM
OPERATION
UNDERSTANDING THE BANDS
This radio lets you select from 10 different
radio frequency bands. A scale showing
the frequency range and tuning position
for each band appears to the right of that
band’s name on the radio’s multi-band display.
This section briefly describes the frequency range of each band and the types of
communication you can hear when you
listen to that band.
Notes:
• CB reception is limited by range.
Some conditions, such as electrical interference, natural obstructions (such as hills), humidity, or
atmospheric conditions, could further limit reception.
• For the best CB reception, be
sure to fully extend the radio’s
telescoping antenna.
AM Broadcast
Short Wave 1/2
Frequency Range: 530–1710 kHz
Frequency Range:
Communications: AM radio stations
• SHORT WAVE 1: 4–6 MHz
• SHORT WAVE 2: 7–12 MHz
Citizen Band
Frequency Range: 26.965–27.405 MHz
Communications: Traffic and road condition announcements, and Channel 19 —
the HELP channel, home-to-home, truckto-truck, dispatchers.
8
Communications:
around the world.
Broadcasts
from
12-795.fm Page 9 Friday, July 16, 1999 7:11 AM
Notes:
• Reception varies according to the
seasons of the year, the current
weather conditions, change in atmosphere and the frequency you
selected.
• The best time for listening to shortwave broadcasts is in the evening.
VHF Marine
Frequency Range: 145–175 MHz
Communications: Public service and
marine band frequencies (such as police, fire department, taxi, truck and other private mobile transmissions).
Air Craft
FM Broadcast
Frequency Range: 108–135 MHz
Frequency Range: 88–108 MHz
Communications: FM radio stations.
Communications: Aircraft communications such as aircraft-to-aircraft or between air traffic control and aircraft.
TV Sound 1
Frequency Range: Channels 2–6
Weather Band
Frequencies:
Communications: Audio portion of television broadcasts.
TV Sound 2
Frequency Range: Channels 7–13
Communications: Audio portion of television broadcasts.
162.400
162.425
162.450
162.475
162.500
162.525
162.550
Communications: Weather information
broadcasts.
Note: You can generally expect to receive at least one of these channels in
your area.
9
12-795.fm Page 10 Friday, July 16, 1999 7:11 AM
BASIC RADIO OPERATION
TUNING/BATTERYMeter
DIRECTION FINDER
Frequency
Scale
POWER
RADIO/P.A.
AFC
TUNING
FINE TUNING
VOLUME
TONE
Band
Selector
MIC
ANT
EAR
Follow these steps to turn the radio on/
off, select a radio band and station/frequency, and adjust the sound.
1. Turn VOLUME toward MIN until it
stops.
2. Set RADIO/P.A. to RADIO. (To use
the P.A. setting, see “Using the P.A.
(Public Address) Function” on Page
11.
3. Turn the band selector to the
band(s) you want to listen to.
4. If you selected any band other than
AM, SW1 or SW2, fully extend the
telescoping antenna on top of the
radio.
If you selected SW1 or SW2, connect
the supplied wire antenna to ANT on
the front of the radio. (See “Connecting the Wire Antenna” on Page
7.)
10
Telescoping Antenna
Note: The radio uses the attached
directional antenna (DIRECTION
FINDER) for AM band reception. The
position of the radio’s telescoping
antenna does not affect AM band
reception.
5. For reduced sound distortion and
drift-free FM reception, set AFC
(Automatic Frequency Control) to
ON.
6. Set POWER to ON to turn on the
radio.
7. Adjust VOLUME toward MAX to
increase the volume, or toward MIN
to decrease it.
8. Adjust TONE to get the sound you
like.
12-795.fm Page 11 Friday, July 16, 1999 7:11 AM
9. To select a different station/frequency, rotate TUNING (the outside
knob) on the front of the radio. The
yellow bar on the multi-band scale
moves to indicate the current tuning
position. The needle on the TUNING/
BATTERY meter moves toward 10 as
the signal strength increases or
toward 0 as it decreases (see
“Reading the TUNING/BATTERY
Meter).
Notes:
• If you selected the AM band, turn
DIRECTION FINDER (the directional AM antenna) on top of the
radio to fine tune the selected AM
station.
• If you selected the SW1 or SW2
band, rotate FINE TUNING (the
knob inside TUNING) to fine tune
the selected SW frequency.
10. To turn off the radio when you finish,
set POWER to OFF.
READING THE TUNING/
BATTERY METER
With POWER set to ON and RADIO/P.A.
set to RADIO, the position of the needle
on the top portion of the meter shows
the current signal strength on a scale of
0 (weakest signal) to 10 (strongest signal).
With POWER set to ON and RADIO/P.A.
set to P.A., the position of the needle on
the lower (green-shaded) portion of the
meter shows the current battery
strength. The needle points toward the
right when the battery strength is strong,
and moves to the left as the battery
strength weakens.
USING THE P.A. (PUBLIC
ADDRESS) FUNCTION
Follow these steps to connect a microphone with 1/8-inch (3.5-mm) plug (not
supplied) to the radio and set the radio
so you can hear sound from the microphone through the radio’s speaker.
Note: Your local RadioShack store carries a wide selection of microphones.
The radio’s TUNING/BATTERY meter indicates the current signal strength and
the current battery strength (if you installed batteries).
1. Turn VOLUME toward MIN until it
stops.
11
12-795.fm Page 12 Friday, July 16, 1999 7:11 AM
2. Set RADIO/P.A. to P.A.
3. Plug the microphone into MIC on the
front of the radio.
4. Be sure POWER is set to ON, then
speak into the microphone in a normal voice.
5. As you begin speaking, adjust VOLUME to a comfortable listening level.
Note: To prevent feedback or highpitched sounds, keep the microphone
pointed away from the radio and stand
at least 3 feet away from (behind or beside) the radio.
3. Put the earphone in your ear and
adjust VOLUME to a comfortable listening level.
Listening Safely
To protect your hearing, follow these
guidelines when you use an earphone.
• Set the volume to the lowest setting
before you begin listening. After you
begin listening, adjust the volume to
a comfortable level.
• Do not listen at extremely high volume levels. Extended high-volume
listening can lead to permanent
hearing loss.
USING THE EARPHONE
Follow these steps to attach the supplied earphone so you can listen to the
radio without disturbing others. Connecting the earphone disconnects the
speaker.
• Once you set the volume, do not
increase it. Over time, your ears
adapt to the volume level, so a volume level that does not cause discomfort might still damage your
hearing.
Traffic Safety
Do not wear an earphone while operating a motor vehicle or riding a bicycle.
This can create a traffic hazard and
could be illegal in some areas.
1. Turn VOLUME toward MIN until it
stops.
2. Insert the earphone’s 1/8-inch (3.5mm) plug into the EAR jack on the
front of the radio.
12
Even though some earphones let you
hear some outside sounds when listening at normal volume levels, they still
can present a traffic hazard.
12-795.fm Page 13 Friday, July 16, 1999 7:11 AM
CARE AND MAINTENANCE
Your RadioShack Multi-Band AC/DC Portable Radio is an example of superior design and craftsmanship. The following suggestions will help you care for your radio
so you can enjoy it for years.
Keep the radio dry. If it gets wet, wipe it dry immediately. Liquids might
contain minerals that can corrode the electronic circuits.
Use and store the radio only in normal temperature environments. Temperature extremes can shorten the life of electronic devices, damage
batteries, and distort or melt plastic parts.
Keep the radio away from dust and dirt, which can cause premature
wear of parts.
Handle the radio gently and carefully. Dropping it can damage circuit
boards and cases and can cause the radio to work improperly.
Use only fresh batteries of the required size and recommended type.
Batteries can leak chemicals that damage your radio’s electronic parts.
Wipe the radio with a damp cloth occasionally to keep it looking new.
Do not use harsh chemicals, cleaning solvents, or strong detergents to
clean the radio.
Modifying or tampering with the radio’s internal components can cause a malfunction and might invalidate its warranty and void your FCC authorization to operate it.
If your radio is not performing as it should, take it to your local RadioShack store for
assistance. [If the trouble is affecting the telephone lines, the phone company can
ask you to disconnect your radio until you have resolved the problem.
13
12-795.fm Page 14 Friday, July 16, 1999 7:11 AM
FCC DECLARATION OF
CONFORMITY
This device complies with Part 15 of the
FCC Rules. Operation is subject to the
following two conditions: (1) this device
may not cause harmful interference, and
(2) this device must accept any interference received, including interference
that may cause undesired operation.
Product:
Model:
Responsible Party:
Phone:
Multi-Band AC/DC Portable Radio
12-795
RadioShack
100 Throckmorton
Fort Worth, TX 76102
817-415-3200
THE FCC WANTS YOU TO
KNOW
This equipment has been tested and
found to comply with the limits for a
Class B digital device, pursuant to Part
15 of the FCC Rules. These limits are
designed to provide reasonable protection against harmful interference in a
residential installation. This equipment
generates, uses and can radiate radio
frequency energy and, if not installed
and used in accordance with the instructions, may cause harmful interference to
radio communications.
14
However, there is no guarantee that interference will not occur in a particular
installation. If this equipment does
cause harmful interference to radio or
television reception, which can be determined by turning the equipment off and
on, the user is encouraged to try to correct the interference by one or more of
the following measures:
• Reorient or relocate the receiving
antenna.
• Increase the separation between
the equipment and receiver.
• Connect the equipment into an outlet on a circuit different from that to
which the receiver is connected.
• Consult your local RadioShack store
or an experienced radio/TV technician for help.
• If you cannot eliminate the interference, the FCC requires that you
stop using your radio.
Changes or modifications not expressly
approved by RadioShack may cause interference and void the user’s authority
to operate the equipment.
12-795.fm Page 15 Friday, July 16, 1999 7:11 AM
SPECIFICATIONS
Bands
AM ...................................................................................................... 530–1710 kHz
CB (Channels 1–40) ................................................................... 26.965–27.405 MHz
SW1 ........................................................................................................ 4.0–6.0 MHz
SW2 ...................................................................................................... 7.0–12.0 MHz
FM ........................................................................................................... 88–108 MHz
AIR ........................................................................................................ 108–135 MHz
TV2 (Channels 7–13) ............................................................................ 176–218 MHz
VHF ....................................................................................................... 145–175 MHz
WX ................................................................................................ 162.4–162.55 MHz
TV1 (Channels 2–6) ........................................................................ 59.75–87.75 MHz
General
Power Output ................................................................................................. 900 mW
Power Requirements ............................................................... AC 120V, 60 Hz, 5 W;
6.0 Volts (Four D Batteries); 9V DC Center Negative
Dimensions (HWD) .............................................................. 101/4 × 145/8 × 53/8 Inches
(260 × 372 × 136 mm)
Weight ............................................................................................................ 5.53 lbs
(2.51 kg)
Antenna ................................................................. FM Telescoping, Direction Finder
Included Accessories ............................................ Wire Antenna (about 10 feet long)
Earphone, Carry Strap
Specifications are typical; individual units might vary. Specifications are subject to
change and improvement without notice.
15
12-795.fm Page 16 Friday, July 16, 1999 7:11 AM
Limited Ninety-Day Warranty
This product is warranted by RadioShack against manufacturing defects in material and workmanship under normal use for ninety (90) days from the date of purchase from RadioShack companyowned stores and authorized RadioShack franchisees and dealers. EXCEPT AS PROVIDED
HEREIN, RadioShack MAKES NO EXPRESS WARRANTIES AND ANY IMPLIED WARRANTIES,
INCLUDING THOSE OF MERCHANTABILITY AND FITNESS FOR A PARTICULAR PURPOSE,
ARE LIMITED IN DURATION TO THE DURATION OF THE WRITTEN LIMITED WARRANTIES
CONTAINED HEREIN. EXCEPT AS PROVIDED HEREIN, RadioShack SHALL HAVE NO LIABILITY OR RESPONSIBILITY TO CUSTOMER OR ANY OTHER PERSON OR ENTITY WITH RESPECT TO ANY LIABILITY, LOSS OR DAMAGE CAUSED DIRECTLY OR INDIRECTLY BY USE
OR PERFORMANCE OF THE PRODUCT OR ARISING OUT OF ANY BREACH OF THIS WARRANTY, INCLUDING, BUT NOT LIMITED TO, ANY DAMAGES RESULTING FROM INCONVENIENCE, LOSS OF TIME, DATA, PROPERTY, REVENUE, OR PROFIT OR ANY INDIRECT,
SPECIAL, INCIDENTAL, OR CONSEQUENTIAL DAMAGES, EVEN IF RadioShack HAS BEEN ADVISED OF THE POSSIBILITY OF SUCH DAMAGES.
Some states do not allow the limitations on how long an implied warranty lasts or the exclusion of incidental or consequential damages, so the above limitations or exclusions may not apply to you.
In the event of a product defect during the warranty period, take the product and the RadioShack
sales receipt as proof of purchase date to any RadioShack store. RadioShack will, at its option, unless otherwise provided by law: (a) correct the defect by product repair without charge for parts and
labor; (b) replace the product with one of the same or similar design; or (c) refund the purchase
price. All replaced parts and products, and products on which a refund is made, become the property of RadioShack. New or reconditioned parts and products may be used in the performance of
warranty service. Repaired or replaced parts and products are warranted for the remainder of the
original warranty period. You will be charged for repair or replacement of the product made after the
expiration of the warranty period.
This warranty does not cover: (a) damage or failure caused by or attributable to acts of God, abuse,
accident, misuse, improper or abnormal usage, failure to follow instructions, improper installation or
maintenance, alteration, lightning or other incidence of excess voltage or current; (b) any repairs
other than those provided by a RadioShack Authorized Service Facility; (c) consumables such as
fuses or batteries; (d) cosmetic damage; (e) transportation, shipping or insurance costs; or (f) costs
of product removal, installation, set-up service adjustment or reinstallation.
This warranty gives you specific legal rights, and you may also have other rights which vary from
state to state.
RadioShack Customer Relations, 200 Taylor Street, 6th Floor, Fort Worth, TX 76102
We Service What We Sell
04/99
RadioShack
A Division of Tandy Corporation
Fort Worth, Texas 76102
07A99
811-296091-031
Printed in China