1
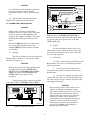
MOUNTING UNDER DASH
CAUTION
1/4" SPLIT
LOCKWASHER
1/4-20 HEX NUT
CAUTION
Damage to unit will occur if not properly
fused. Ensure that an in-line fuse (20A) and
fuseholder are installed in the red power
cable lead.
1/4-20 x 3/4" HEX
HD CAP SCREW
1/4-20 x 1/2"
HEX HD. CAP
SCREW WITH
LOCKWASHER
MUST BE USED
AS SHOWN
LONGER SCREW
WILL CAUSE
CIRCUITRY
DAMAGE.
3-1. UNPACKING.
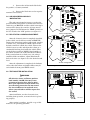
MOUNTING
BRACKET
1/4-20 x 1/2" HEX
HD. CAP SCREW
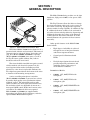
After unpacking the Model PA300 Series,
examine it for damage that may have occurred in
transit. If the equipment has been damaged, file a
claim immediately with the carrier stating the extent
of damage. Carefully check all envelopes shipping
labels and tags before removing or destroying them.
1/4" SPLIT
LOCKWASHER
Before proceeding with installation, ensure that
the following parts have been included in the carton.
1/4-20 x 1/2"
HEX HD. CAP
SCREW
KIT CONTENTS LIST
Qty.
Description
1/4" SPLIT
LOCKWASHER
Part No.
MICROPHONE
CABLE
NOTE:
ONLY ONE BRACKET IS SUPPLIED
290A4452-02
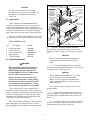
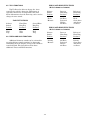
Figure 3-1. Installation of PA300 Under Dash.
1
2
2
1
1
Cable Assembly
Lockwasher, 1/4
Screw, 1/4-20 x 1/2
Mtg. Bracket
Label, Warning
1461360
7074A015
7002A008-08
85361059
1612339
To install the unit under the dash, determine the
mounting location and proceed as follows (see figure
3-1).
CAUTION
The unit must be installed in an adequately
ventilated area. Never install near heater
ducts.
3-2. MOUNTING BRACKET.
WARNING
A. Use the mounting bracket as a template
and scribe two drill positioning marks at the selected
mounting location under the dash.
When installing equipment inside air
bag equipped vehicles, the installer
MUST ensure that the equipment is
installed ONLY in areas recommended
by the vehicle manufacturer.
CAUTION
Before drilling holes in ANY part of a vehicle,
be sure that both sides of the mounting
surface are clear of parts that could be damaged; such as brake lines, electrical wiring or
other vital parts.
Failure to observe this warning will
reduce the effectiveness of the air bag,
damage the air bag, or potentially damage or dislodge the equipment, causing
serious injury or death to you or others.
B. Drill two 1/4-inch diameter holes at the
position marks.
The electronic siren comes equipped with a
swinging bracket which enables it to be mounted in
variety of positions. Positioning the bracket above the
unit allows mounting to the underside of the dash.
Positioning the bracket below the unit will permit
mounting on any horizontal surface.
C. Secure the mounting bracket to the dash
with user-supplied 1/4-20 x 3/4 hex head screws, 1/4
split lockwashers and 1/4-20 hex nuts as shown in
figure 3-1.
D. Secure the electronic siren to the mounting
bracket with 1/4-20 x 1/2 hex head screws and 1/4
split lockwashers as shown in figure 3-1.
The unit should be mounted in a position that is
both comfortable and convenient to the operator.
Keep visibility and accessibility of controls in mind.
-4-