1
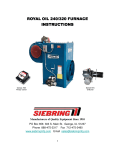
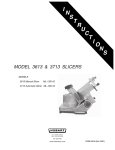
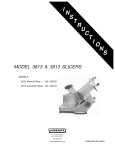
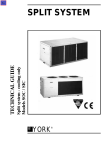
4-112.3
September, 2008
Oil Fired Unit Heaters
DESIGN FEATURES
Maximum Performance, Comfort, and Efficiency
Durable Attractive Casing Design
Modine model POR oil-fired unit heaters offer an efficient and
reliable means of heating, particularly in regions where supplies
of other fuels, such as natural gas, may be unavailable,
undependable, or interruptible. The units are direct driven
propeller fan type units designed for overhead suspension and
horizontal delivery of heated air. They are available in three
model sizes: 100,000, 145,000, and 185,000 Btu/hr outputs.
Time-tested and field-proven components are engineered
into the design of these compact units which produce comfort
heating at the lowest cost through their highly efficient
operation. Models are UL-listed and require fuel oil grade No. 1
or 2, as specified by ASTM (American Society for Testing and
Materials) D396-73 Standard Specifications for Fuel Oils or
Canadian Government Specification Board, 3-GP-28.
The casing is treated for protection against corrosion and
painted with an attractive, Modine Gray-Green, baked polyester
powdercoat paint finish.
The following are standard features and benefits of the model
POR unit (refer to Figure 2.1):
Advanced Burner and Burner Controls
Quiet, Efficient, and Safe Air Mover
The propeller fan is statically balanced and the motor resiliently
mounted to the finger-proof fan guard to minimize vibration and
noise. Additionally, the draw-formed casing venturi at the air
inlet is designed to reduce fan noise and power consumption.
The motor is a totally enclosed, permanent split capacitor
(PSC) type that provides excellent starting capabilities with low
amp draw on operation.
A fan and limit-control safety device performs three functions:
1) delays start of fan until the heat exchanger has warmed up
and prevents fan from stopping until the heat exchanger has
cooled, 2) protects the unit from overheating, and, 3) provides a
manual switch for constant fan operation.
The POR oil fired unit heater is equipped with the latest in
Effective Heat Throw
burner and burner control technology making the POR an
Heat throw and coverage are controlled by manual adjustment
industry leader in efficient fuel handling. Features include:
of standard horizontal and/or optional vertical louver blades.
• A pressure-atomizing, gun-type burner with a stainless steel,
Depending on the model, the heat throw will vary from 39 to 51
die-stamped flame retention head that produces a highly
feet, maximizing heated air distribution at floor level.
stable flame with 20-30% greater combustion efficiency over
non-flame retention type burners. The flame retention head
Figure 2.1 - Model POR Unit Features
matches the flame to the shape of the heat exchanger for
maximum heat transfer while ensuring a long life.
• A two-stage fuel unit for maintaining maximum fuel pressure
delivery, even in high lift applications.
Fan and Limit
• The fuel unit utilizes an energy efficient permanent split
Control
capacitor (PSC) motor with ball bearings for reduced energy
consumption, excellent starting characteristics, and reduced
maintenance.
Heat Exchanger
• The latest in oil burner controls with a solid state
Assembly
microprocessor based controller featuring:
(See Figure 3.1)
> Interrupted-duty ignition that disables the spark ignition
once the flame has been proven. This feature extends the
Casing with
life of the ignition system, reduces component noise, and
Durable Baked
saves energy over traditional controls that maintain a power
Polyester
Powdercoat Paint
consuming spark during the entire call for heat period.
> Limited recycle/limited reset feature to limit the accumulation
Horizontal
of unburned oil in the combustion area.
Louvers
> Communications port to enable communication with service
instruments or data acquisition equipment.
> Diagnostic LED to provide service personnel an easy
indication of cad cell resistance and operational status
(lockout, recycle, etc.).
Flue Connection
> 15 second valve-on delay provides a pre-purge mode that
allows for clean starts and reduced maintenance.
Propeller Fan
> A cad-cell safety system de-energizes the burner controls
with Finger-Proof
Fan Guard
if a flame is not produced in 30 seconds. Manual reset of
flame protection is required following this safety shut-down.
• Beckett electronic oil igniter module that provides superior
Efficient PSC
spark ignition (20kV peak) and a smaller and lighter package
Fan Motor
than older spark transformer designs.
• Beckett CleanCut burner pump with the following advantages:
> Cleaner operation by use of a solenoid valve that cuts oil flow
almost instantly when power is cut to the motor, eliminating
coasting stops that can cause soot formation on shut-down.
Oil Burner with
> Pre-purge type controls work hand-in-hand with the
Microprocessor
CleanCut pump to establish airflow and bring pump
Control
pressure up to full operating levels before light-off to ensure
smooth and clean ignition.
Junction Box
> More reliable with fewer moving parts, compared to
conventional pumps and fewer troublesome oil fittings to
cause problems.
2
4-112.3
DESIGN FEATURES AND PERFORMANCE DATA
Superior Heat Exchanger Life Expectancy
Efficient Combustion
Long life is due in part to the roll-formed design of the heat
exchanger. Stresses caused by thermal expansion and
contraction typically concentrate in areas of sharp angular
bends or adjacent to welds, all of which are minimized with
roll-forming to distribute thermal expansion stresses uniformly.
Made of corrosion-resistant, 14 gauge aluminized steel, the
heat exchanger contains a preformed, ceramic fiber fire pot
that is thermally efficient, lightweight, resilient, and resists
both mechanical and thermal shocks. It reaches operating
temperature quickly, contributing to the efficiency of operation.
Combustion products heat flow through the heat exchanger can
be traced by the arrows in the cross-sectional view in Figure 3.2.
Flue products rise to the top of the drum, then pass into the two
radiators of the heat exchanger where internal baffles cause
them to flow to the bottom of the radiators; then back up to
the flue collector and out of the stack. During this passage the
original temperature at the fire pot of 2200-2300° F, is reduced
to a stack discharge temperature of 470 to 570° F. The units
are designed to operate at a stack draft of minus 0.02” W.C.
Easy Installation
Figure 3.1
Model POR Heat Exchanger Features
All units are factory-assembled, wired, and fire tested prior
to shipment. Units are ready to connect to 115V/60Hz/1ph
supply voltage, a 24V thermostat, fuel lines, and vents. Units
are shipped for a single-unit two pipe oil supply system, but
can be simply modified for a single pipe oil supply system or a
multiple-unit installation supplied by a common fuel distribution
system. They can be suspended with four threaded rods (1/2”13NC tap) or with 3/4” pipe by use of an optional pipe hanger
kit accessory.
Flue Connection
Flue Collector
Heat Exchanger
Internal Baffles
(not shown)
Inspection Port
Reduced Maintenance, Easy to Service
Under average conditions Modine unit heaters typically
require inspection only once a year, more often if the air is
contaminated with fumes, dust, or spray.
The heat exchanger is equipped with a convenient inspection
port and the service door opening is ample in size to facilitate
the removal of the fire pot should replacement become
necessary. Two clean-out ports are also readily accessible for
periodic cleaning. Refer to Figure 3.1.
The motor is totally enclosed with permanently lubricated
bearings to minimize maintenance. The fan and limit control,
motors, and burner are externally mounted on the unit for easy
service access.
Service Door
Clean-out Ports
Ceramic Fiber Fire Pot
(not shown)
Application Suggestions
For recommendations on specifying, applications, and locating
unit heaters, refer to Modine Literature 75-203 “How to Specify
the Right Unit Heater”.
Figure 3.2 - Combustion Products Heat Flow
Performance Data
Model
Input
Btu/Hr
Input Output
GPH Btu/Hr
POR100 119,000 0.85 100,000
POR145 175,000 1.25 145,000
POR185 231,000 1.65 185,000
CFM Delivery Temp.
Max
Heat
@ 70°F
FPM
Rise °F Height* Throw
1890
2400
3200
460
580
740
49
56
54
12'
13.5'
12'
39'
50'
51'
*Deflector blades pitched 45° at the floor (heated air). Mounting height is measured from floor to bottom of unit.
Fan Motor Specifications
Model
HP
Voltage
Hz
Phase
Fan
Motor
Amps*
POR100
POR145
POR185
1/5
1/3
1/3
115
115
115
60
60
60
1
1
1
2.1
5.4
5.4
RPM
Type
Fan Dia.
1100
1100
1100
PSC
PSC
PSC
18"
18"
22"
*Total AMPS equals fan motor AMPS plus burner motor and ignition transformer load of 2.2 AMPS.
4-112.3
3
DIMENSIONS AND ACCESSORIES
Figure 4.1 - Model POR Dimensions
Table 4.1 - Dimensions (Inches)
Model
A
B
C
D
E
F
G
H
J
POR100
POR145
POR185
27-1/2
27-1/2
28-5/8
35-1/4
35-1/4
40-1/4
28-1/8
28-1/8
32-3/4
25
25
26-1/8
23-7/8
23-7/8
23-7/8
13-3/4
13-3/4
14-3/8
8-5/8
8-5/8
8-5/8
23-7/8
23-7/8
25
8
9-1/2
10
K
L
M
12
38-1/8
16
12
38-1/8
16
13-3/4 42-3/4 20-3/4
Y
Approx.
Shipping Wt. (lbs)
8
8
8
324
333
398
Accessories
Low-Voltage Thermostats – Single-stage, 24-volt.
Thermostat Guard – Protects from damage or tampering.
Booster Pump Relay – Used to control booster pump
operation in the oil supply system. Factory set to close contacts
at 50 PSIG with a maximum allowable pressure of 150 PSIG.
Supplied with a 1/8” MPT connector and screw terminals.
Oil Safety Valve – Protects the burner pump from excessive
line pressure. The maximum inlet pressure is 60 PSIG.
Vertical Louvers – Used in combination with standard
horizontal louvers for complete control of air delivery.
Draft Regulator – Barometric type with screw adjustments and
hinge-pin action. Designed for precise control of drafts.
Outside Combustion Air Kit – Kit converts the burner to
accept outside combustion air piping. Includes adapter,
gaskets, vacuum relief valve, outside intake air hood, and other
miscellaneous hardware.
Fuel Oil Filter – Protects oil burner from foreign particles.
As Modine Manufacturing Company has a continuous product improvement program, it reserves the right to change design specifications without notice.
Distributed By:
Commercial Products Group
Modine Manufacturing Company
1500 DeKoven Avenue
Racine, Wisconsin 53403-2552
Phone: 1.800.828.4328 (HEAT)
Fax: 1.800.204.6011
www.modine.com
4-112.3
© Modine Manufacturing Company 2008
Litho in USA
4-521.4
Part 5H70866A
December, 2001
FIRE POT REPLACEMENT INSTRUCTIONS
oil-fired unit heaters
Fire Pot Replacement
1.
Remove louvers by pushing each to the left against the
coil spring and pulling out opposite end.
2.
Remove access door by removing six (6) brass bolts at
top and bottom of access door. Loosen the brass retaining
nuts at the right and left edges and slide off the access
door.
3.
Remove all debris from heat exchanger drum to assure
proper positioning of new fire pot. Remove door gasket
and any remaining fragments from fire pot retaining clips.
4.
From inside the drum, locate and drill two (2) .218 dia.
holes 13" up from the bottom of the drum and
approximately 2" from the old clip toward the front of the
unit (one on each side).
5.
Install new fire pot with the open end toward the burner
tube (rear of unit). Fire pot must sit flat on bottom of
drum. Fasten new fire pot retaining clips with stainless
steel screws and nuts at previously drilled holes so clips
retain fire pot corners.
6.
Cut new door gaskets to proper length, add holes and
install around door opening with tape or a suitable paste.
Fasten access door at top and bottom with six (6) new
brass bolts and then tighten brass retaining nuts along
right and left edges. Tightening door in this sequence will
assure proper sealing.
7.
Reverse procedure in Step One to replace louvers.
CAUTION: To prevent unusual thermal stress and eventual
harm to the heat exchanger, do not operate unit
heater without fire pot or with a damaged fire pot
that does not enclose the flame.
Louvers
Retaining
Clip
Burner Tube
Access Door
and Gaskets
Fire Pot
Commercial HVAC&R Division • Modine Manufacturing Company • 604 Liberty Lane • West Kingston, RI 02892
Phone: 401.789.9388 • Fax: 401.792.9041 (Service & Parts) • www.modine.com
© Modine Manufacturing Company 2001
12/01 - Litho in USA
4-530
5H080577A
November, 2008
INSTALLATION INSTRUCTIONS
CAS-2B Field Control AIRBOOT™ outside combustion air kit
for model POR with Beckett Model AF burner
WARNING
Kit Components
GASKET
Fuel supply shall be shut-off and the electrical power
disconnected before proceeding with the installation.
Failure to do so could result in fire, explosion, electrical
shock, or the unit starting suddenly resulting in injury.
IMPORTANT
1. The use of this manual is specifically intended for a
qualified installation and service agency. All installation
and service of these kits must be performed by a qualified
installation and service agency.
2. These instructions must also be used in conjunction with
the Installation and Service manual originally shipped
with the appliance being converted, in addition to any
other accompanying component supplier literature.
3. This product is specifically designed for use with Beckett
Model AF burners for ducting outside combustion air
directly to the burner.
AIR
COUPLING
MOUNTING
SCREWS
GASKET
FLOW
RESTRICTOR
FIGURE 1
Model Application
The outside combustion air kit for Model POR units is
designed to provide a means of ducting combustion air to
Modine Model POR units that feature the Beckett AF burner
in applications where the supply of combustion air from the
conditioned space is inadequate. Examples include tight
buildings with inadequate makeup air or buildings with
negative pressure. The combustion air would come from
outside the space being conditioned.
SK9551
VACUUM
RELIEF
INTAKE
AIR
(1) AIRBOOT™.................................................31988
(1) Burner Housing Gasket Set.........................31989
(2) Mounting Screws 1/4-20 x 1-1/4....................4226
(1) Extended Coupling.......................................21775
(1) Flow Restrictor.............................................31990*
(1) 4" Vacuum Relief Valve (VRV)....................31991**
(1) 4" Intake Air Hood (IAH)..............................31992**
* Not used with Modine model POR units.
** These components MUST be installed in conjunction with
the CAS-2B Field Control AIRBOOT™ to meet U/L
requirements.
THIS MANUAL IS THE PROPERTY OF THE OWNER.
PLEASE BE SURE TO LEAVE IT WITH THE OWNER WHEN YOU LEAVE THE JOB.
Modine Manufacturing Company has a continuous product improvement program,
and therefore reserves the right to change design and specifications without notice.
INSTALLATION – CAS-2B Field Control AIRBOOT™ Outside Combustion Air Kit
Assembly/Installation
Step 2. Assembly/Installation of the VRV
The recommended procedure for assembly and installation
is described as follows:
Step 1 - AIRBOOT™ Installation
Purpose of the Vacuum Relief Valve (VRV)
The VRV is installed to provide a secondary opening for
combustion air supply in the duct system. This is especially
important in the event of damage or blockage to the Intake
Air Hood.
VRV Operation
The VRV gate operates on changes in vacuum pressure
generated between the intake and the oil burner. The VRV
gate will remain closed during normal burner operation.
During any abnormal operation created by blockage of the
Intake Air Hood, duct pipe, or significant changes in external
building pressures, an increased negative pressure on the
intake of the burner causes a reduction in burner air flow.
Under this condition, the VRV gate opens, stabilizing and
maintaining proper air flow to the burner. The VRV gate
closes again once the abnormal condition is corrected.
A.
Remove the fuel pump, air shutter, and air band from
the burner housing.
B. Remove the original shaft coupling (or inlet air shutoff if
applicable; the inlet air shutoff cannot be used with the
boot) and install the extended coupling, part #21775.
C. Install both sealing gaskets to burner housing, part
#31989. (Figure 1, Page 1).
D. Position the AIRBOOT™ over the burner housing on the
air intake side.
E. Align the holes in the AIRBOOT™ with the holes in the
housing. Guide the pump shaft into the extended
coupling and secure the fuel pump with the 1/4-20 x 11/4 mounting screws (do NOT over tighten pump bolts)
A.
NOTE: The AIRBOOT™ may be oriented either vertically or
horizontally as space allows (Figure 2). The round spacer
ring attached to the AIRBOOT™ can be detached by
removing the two (2) plastic fasteners, rotating the spacer
plate 90° (from vertical mounting), and reinstalling the plastic
fasteners. (Figure 3, Page 2)
Mount VRV tee assembly or 90° elbow into the
AIRBOOT™ intake. Fasten using three (3) sheet metal
screws on all joints (Figure 4).
OUTSIDE
WALL
INSTALLER
SUPPLIED
4” PIPE
INTAKE AIR
HOOD
ALTERNATE
VRV
LOCATION
FIGURE 2
Horizontal Orientation
SK9553
Vertical Orientation
FIGURE 4
VRV
LOCATION
AIRBOOT ™
SK9554
PLASTIC
FASTENERS
B.
Assemble VRV balance weight onto gate. Screw the
weight all the way in, and then attach lock nut and
knurled nut (Figure 5).
BALANCE
WEIGHT
SPACER
RING
VRV
ASSEMBLY
FIGURE 3
GATE
LOCK
NUT
SK9552
NOTE: If the fuel lines have been disconnected in order to
remove the fuel unit, or if this is a new installation, the fuel
unit may require bleeding before initial burner start-up (look
under Burner Start-Up and Adjustment for bleeding
procedures).
2
FIGURE 5
KNURLED
NUT
SK9556
C. Mount the VRV assembly into the tee and fasten with
screw and nut in collar tabs. To ensure proper
operation, check the gate for being plumb as well as
being level across the pivot point (Figure 6).
4-530
INSTALLATION – CAS-2B Field Control AIRBOOT™ Outside Combustion Air Kit
Step 7. Burner Start-Up and Adjustment
HORIZONTAL
Caution: DO NOT start the burner when excess oil has
accumulated in the chamber, when the furnace or boiler is
full of oil vapor, or when the combustion chamber is very hot.
LEVEL ACROSS
PIVOT POINTS
A.
DIAGONAL
After the installation is complete, set the initial
AIRBOOT™ air dial setting at 250° for POR100 and 145
or 260° for POR185, as summarized in Chart 1.
Chart 1 – Approximate Air Dial Settings (See Notes)
Setup Data
Model Size
100
145
185
Head
F4
F4
F12
Static Plate
3-3/8R 3-3/8R 2-3/4U
G.P.H.
0.85
1.25
1.65
VERTICAL
FIGURE 6
SK9555
Step 3. Intake Air Hood Location (Horizontal Ducting)
Mount Intake Air Hood 12 inches above finish grade. If
mounting on the side of a building prone to drifting snow,
mount 12 inches above the snow line.
Approx. AIRBOOT™
Air Dial Setting
250°
250°
260°
Notes:
1. Chart based on 20 linear ft. of 4” duct, two 90° elbows,
and an Air Intake Hood.
2. G.P.H. is the firing rate for that specific model size.
3. Air Dial Settings are INITIAL settings. Always use
combustion test instruments for final adjustment settings.
NOTE: For vertical or through-the-roof air ducting, use Field
Star-Kap™ terminal model SK-4.
Step 4. Installation of Intake Air Hood
Cut a 4-1/4" diameter hole through the side wall of the
building.
B. Slide the Inlet Air Hood through the hole and fasten to
wall with appropriate fasteners. Seal the edges of the
mounting plate with silicone sealant or equivalent.
C. Always mount with the Intake Air Hood opening pointing
down.
B.
Step 5. Installation of Air Supply Duct
D.
A.
C.
A.
Duct length calculation: Do not exceed a MAXIMUM of
34 total equivalent feet (20’ straight pipe + two 90°
elbows at an equivalent straight pipe length of 7' per
elbow). Multiply the number of elbows by 7 and subtract
it from the total run length. Maximum linear footage will
be less for flex duct. Consult flex duct manufacturer for
equivalent lengths.
B. Route the duct work from the VRV tee to the Intake Air
Hood using a minimum amount of elbows.
C. Secure and support the duct work for the design and
weight of the material used to prevent physical damage
and separation of joints.
E.
F.
G.
H.
I.
NOTE: For guidelines, refer to recognized national
building codes or any applicable local codes.
Perform the initial startup and adjustment procedure for
model POR oil fired unit heater per the unit heater
Installation & Service Manual. When the burner air
supply and draft are properly adjusted, the over-fire
(combustion chamber) draft will be -.02" W.C.
Allow at least ten minutes for warm-up, or longer if the
appliance is new, in order to burn-off the oil deposits on
the heat exchanger and other surfaces.
Perform a smoke test. Reduce or increase the
AIRBOOT™ air dial until a TRACE OF SMOKE is
obtained. This is a reference point only, DO NOT leave
the air dial setting here.
Measure the CO2 in the flue gas at the TRACE of smoke
level. Open the air dial and add reserve air until the
CO2 is lowered to 11.5% to 12.5%.
Perform a smoke test again. The smoke paper should
now be clean (zero smoke).
After all final adjustments are made, tighten the lock
screw on the AIRBOOT™ air dial.
Start and stop the unit several times to ensure there are
no significant rumbles or pulsations.
Recheck the draft, smoke, and flue gas levels to verify
nothing has changed.
Inspection Required During Servicing/Annual
Maintenance
D. To reduce uncontrolled air leakage into the duct, tape all
joints and seams using standard foil or duct tape.
E. For cold climate conditions. To prevent sweating on the
outside of the duct when operating in areas that have
temperatures -10°F or below, insulate the duct work at
least 10 feet from Intake Air Hood.
1.
2.
3.
4.
Step 6. Exhaust Termination Installation
For barometric damper and other exhaust system
requirements, refer to the latest revision of Installation &
Service Manual 4-522 (revision .4 or later).
5.
4-530
Check the Inlet Air Hood and air supply system for
accumulation of any foreign material. Give special
attention to the 1/4" mesh screen inside the Intake Air
Hood. Thoroughly clean all material from the system.
Note any damage to components and re-place with
exact system components.
Verify that the VRV is operating properly.
Using combustion test instruments, verify that the
operating smoke level is "zero smoke" following
procedure outlined in Step 7 section.
Securely tighten the lock screw on the AIRBOOT™ air
dial after final testing or servicing.
3
Commercial Products Group • Modine Manufacturing Company • 1500 DeKoven Avenue • Racine, Wisconsin, USA 53403-2552
Phone: 1.800.828.4328 (HEAT) • www.modine.com
© Modine Manufacturing Company 2008
4-530
11/08 Litho in USA