1
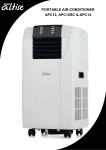
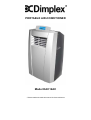
PORTABLE AIR-CONDITIONER
Model DAC12AC
☆Please read and retain this manual for future reference
Contents
Introduction............................................................................................................... 2
Important Safeguards ............................................................................................... 3
Energy Saving Tips .................................................................................................. 3
Features And Parts List ............................................................................................ 4
Installation ................................................................................................................ 5
Control Panel............................................................................................................ 6
Key Functions........................................................................................................... 6
Remote Control ........................................................................................................ 6
Operating Instructions .............................................................................................. 7
Water Drainage ........................................................................................................ 8
Maintenance ............................................................................................................. 8
Trouble Shooting ...................................................................................................... 9
Introduction
Thank you for choosing a Dimplex air conditioner. This manual contains information, regulations and
warnings which are of fundamental importance if the appliance is to be installed correctly and the
highest performance, in the safest possible conditions is to be obtained. We suggest that you read
the manual carefully before installing or starting up the appliance.
The air-conditioning unit is of the mono tube type, transferable (on wheels) with air/air operating
system for domestic use and has 3 settings:
•
Ventilate.
•
Cool.
•
Dehumidify.
The ventilation mode “moves” the air allowing for its recycling much like a fan.
The cooling mode, a refrigerated circuit (compressor), cools the room by transferring the heat from
the inside to the outside through the air exhaust hose. While cooling, the air-conditioning unit also
dehumidifies the room air.
2
Important Safeguards
•
Read all instructions.
•
Disconnect the power plug before dismantling, assembling or before cleaning.
•
Avoid touching mobile parts of the appliance.
•
Never insert fingers, pencils or any other objects though the guards whenever the power plug is
connected, especially while running.
•
The appliance is not intended for use by young children or infirm persons unless they have been
adequately supervised by a responsible person to ensure that they can use the unit safely.
•
Young children should be supervised to ensure that they do not play with the appliance.
•
Do not use the appliance for any other purpose than its intended use.
•
The appliance must not be used if the guards are not fastened according to instructions.
•
When the power cord is damaged, it must be replaced by the manufacturer or its service agent
or a similarly qualified person in order to avoid a hazard.
•
Do not use your appliance with an extension cord unless it has been checked and tested by a
qualified electrician or electrical supplier.
•
Return to Hagemeyer or authorised service agent.
•
The air conditioning unit must always be stored and transported upright, otherwise you
may cause irreparable damage to the compressor; in case of doubt we suggest to wait for
at least 24 hours before you start the air-conditioning unit.
•
Avoid restarting the air conditioning unit unless 4 minutes have passed since being turned off, or
the compressor may get damaged.
•
Never use the mains plug as a switch to start and turn off the air conditioning unit. Use the
provided ON/OFF switch located on the control panel.
•
Always place the portable air conditioner on a dry stable surface.
Energy Saving Tips
•
Do not cover or restrict the airflow from the Outlet or Inlet grills.
•
The minimum distance from furniture and wall should be 50cm.
•
Keep blinds and /or draperies, on any windows, closed during the sunniest part of the day.
•
Keep the filters clean. Under normal conditions, the filters should be cleaned approximately
every 30 days. Since the filters remove airborne particles, more frequent cleaning maybe
necessary, depending on the indoor air quality.
•
Set the fan speed switch to high cool and the thermostat to the coolest position for the initial
start-up, then set the Fan switch to Low cool and lower the thermostat to a comfortable setting.
3
Features And Parts List
Features:
•
No installation is required.
•
Easily moved with castors and handle grip holes.
•
Control panel with colourful LCD display.
•
Remote control.
•
Water-cooled mode can save running costs.
•
Low noise and strong breeze.
•
On/off timer function.
•
Three-minute restart delay to protect compressor.
Part Names:
1. Control panel
2. Air outlet grille
3. Remote control sensor
4. Adjustable air flow
5. Transport handle
6. Castors
7. Evaporator air inlet
8. Water draining hole (for continuous drainage)
9. Power cord
10. Water drainage hole (for emptying the water tank when full)
Accessories:
4
Installation
Before you use this unit please ensure it has been kept upright for at
least 2 hours.
1. The unit should be installed in a flat dry place. Leave at least 50cm space
around the unit (Fig. 1).
2. Fix the exhaust hose adapter to the exhaust terminal of the unit (Fig. 2).
3. Screw one end of the exhaust hose into the exhaust hose adapter and
screw the window exhaust adapter to the other end of the exhaust hose.
4. The window kit has been designed to fit most standard vertical (Fig. 3)
and horizontal (Fig. 4) windows. However it may be necessary for you to
modify some aspects of the installation procedures for certain types of windows. Once the
window kit is in place, simply snap the window exhaust adapter into the hole provided on the
window kit. You are now ready to use your portable air conditioner.
Fig. 2
5. Permanent installation (Fig. 5)
Fig. 3
Fig. 4
•
Fix the exhaust hose adapter to the exhaust terminal of the unit and screw in the exhaust
hose.
•
Make a round hole with the diameter more than 120mm, then input and fix the window kit
adaptor.
•
Fit the supplied round adapter on the air outlet duct then connect it with the Cover.
Fig. 5
Incorrect mounting (Fig. 6)
The bend of the exhaust pipe is very important. Take care to
prevent any sharp bow or bend in the exhaust. The exhaust air
must flow freely otherwise the air conditioner may malfunction.
NOTE: The length of the exhaust duct is between 500mm to
1500mm. We suggest using the minimum length of exhaust duct
for maximum performance.
This length has been designed according to the
specifications of the air conditioner. Do not use an extension
or exchange with a different hose as that may lead to
malfunction.
Do not use the unit in the bathroom or other humid environments.
5
Fig. 6
Fig. 1
Control Panel
Key Functions
1. ON/OFF: Press this button to turn the unit on or off.
2. MODE: Press this button to select from three modes: COOL, DRY and FAN
3. SPEED: Press this button to select high, medium or low fan speed
4. TIMER: Press this button to set timer-on, timer-off or no-timer.
5. UP & DOWN: Press these buttons to set the room temperature or time when in Time On/Off
mode.
6. LCD DISPLAY: Displays the different signals accordingly.
NOTE: To change from Fahrenheit to Celsius, press both UP and DOWN buttons at the same time.
Remote control
1. High fan speed button.
2. Medium fan speed button.
3. Low fan speed button.
4. Swing button.
5. Timer button.
6. Up button to set temperature and time.
7. Down button to set temperature and time.
8. Cool mode button.
9. Dry mode button.
10. Fan mode button.
11. Celsius to Fahrenheit exchange button.
12. Power (On/Off) button.
6
Operating Instructions
Cooling Mode
•
Press MODE (Cool on remote) button to choose cooling mode. The LCD will display
•
Press UP or DOWN buttons to set the desired temperature between 18-300C.
•
Press SPEED button (Low/Med/High on remote) to select the fan speed. The LCD will display
accordingly.
•
Press SWING button to make the fins swing for oscillation (available on the remote control only).
The LCD will display
Dry (Dehumidifying) Mode
•
Press MODE button (or DRY on remote) to choose Dry mode. The LCD will display
•
In dry mode the fan speed is preset and cannot be changed. The temperature cannot be set
either.
•
Press SWING button to make the fins swing for oscillation (available on the remote control only).
The LCD will display
•
Do not use the air outlet duct.
•
Dry mode cannot be used to cool the room.
.
Fan Mode
•
Press MODE button (Fan on remote) to choose Fan mode, The LCD will display
•
Press SPEED button (Low/Med/High on remote) to select the fan speed. The LCD will display
.
accordingly.
•
Press SWING button to make the fins swing for oscillation (available on the remote control only).
The LCD will display
•
The temperature cannot be set.
•
Do not use the air outlet duct.
Timer -On
•
When the unit is switched off, press TIMER button to set timer-on.
•
Press UP or DOWN buttons to adjust the time from 30 minutes to 24 hours.
•
The time-on light indicator will light up.
Timer -Off
•
When the unit is operating press the TIME button to set timer-off
•
Press UP or DOWN buttons to adjust the time from 30 minutes to 24 hours.
•
The time-off light indicator will light up.
NOTE: All functions, except the swing function, are available with the remote control and the control
panel. The swing function can only be operated by remote control.
7
Water Drainage
•
This product has a self-evaporative system. The condensing water will be recycled to cool the
condenser. This will improve the units cooling efficiency and save on energy consumption.
•
When the unit is in cool or fan modes there is usually no need to drain any water from the unit.
•
During dry (dehumidifying) mode, remove the drain plug from the back of the unit (Fig. 7) and
install a drain hose (Fig. 8) of 10mm inner diameter and place the open end of the hose into a
vessel such as a bucket.
Fig. 8
Fig. 7
•
If the internal water container becomes full, the LCD display will flash “P2” and the unit will stop
automatically.
•
Before you empty the unit you will need to turn the unit off and pull the plug out of the power
supply.
Important!
It is recommended that you do not move the unit around without firstly draining the internal tank. If
water is left in the unit then it may spill out onto the floor or carpet.
Maintenance
Cleaning
Turn off the unit and pull the plug out of the socket before cleaning.
1.Clean the surface
•
Clean the surface of the unit with a duster or a damp soft cloth.
•
Do not use chemical solvent like benzene, alcohol, gasoline and etc, or the surface may be
damaged or even deformed.
2. Clean the air filter
•
The air filter should be cleaned every two weeks
•
If the air filter is blocked with dust the efficiency of the unit will be
reduced.
•
To clean the air filters
1) Pull out the air filters (Fig.9).
2) Wash the air filter by immersing it gently in warm water (under
400C or 1040F) with neutral detergent.
3) Rinse the filter and dry it in a shaded place.
4) Push the air filter back into the original position.
8
Fig. 9
3. End of Season
1. Pull out the plug from the drain mouth and remove the water from the
drain pan (Fig. 10).
2. Keep the unit running in Fan mode for several hours to ensure the inside
of the unit is dry.
3. Switch off the unit and disconnect the plug from the power supply.
Fig. 10
4. Remove the exhaust duct and keep stored in a safe dry place.
5. Take the batteries out of the remote control and keep in a dry place.
6. Wrap the unit with the plastic bag, and keep it in a dry place.
Trouble Shooting
Before contacting a professional please read the following troubleshooting guide.
Issue
Reason
Solution
No power supply
Check it is plugged in properly, turn the
power-on and turn on the unit.
The LCD is flashing P2
Drain the water tank.
Timer function is active
Cancel timer function.
In direct sunlight
Draw the curtains
Windows/doors open, many
people or a heat source in the
room.
Close windows/doors, remove the heat
source if possible.
Dirty filter.
Clean or replace the air filter(s).
Air inlet or air outlet is blocked.
Remove the blockage.
Room temperature is lower than
then selected value.
Change temperature selection.
The unit is noisy.
The unit is not on flat surface.
Place the unit on an even, solid surface
(less vibrations).
The compressor does not
work
The overheat protection is
probably activated.
Wait 3 minutes until the temperature has
decreased, then turn the unit on again.
Is the voltage normal?
Turn off the unit if the voltage is
abnormal.
Is the exhaust tube attached
correctly or is it bent.
Set the exhaust tube correctly.
Have you added an extra exhaust
tube
Remove the extra tube.
The unit does not work
The unit does not seem
to perform
The unit starts and stops
frequently
Distance is too great.
The remote control does
not function
Remote control signal not
detected by the control panel.
The batteries are drained.
Turn unit off at power
outlet to reset.
Make sure the remote control is
correctly aimed at the control panel.
Replace the batteries.
CAUTION: Switch off the unit and unplug it immediately if anything abnormal occurs. Then
contact the Dimplex Customer Care Line.
9
Dimplex
24 Months Repair / Replacement Guarantee
Hagemeyer guarantees this product against defects caused by faulty workmanship and materials for 24 months
domestic use (12 months commercial use) from the date of purchase. During this guarantee period, Hagemeyer
will repair or replace any defective product. However, if the product includes a number of accessories, only the
defective product or accessory will be replaced.
Hagemeyer reserves the right to make minor repairs instead of replacing the product or accessory.
In the event of a product or accessory being replaced during the guarantee period, the guarantee on the
replacement will expire 24 months from the original purchase date. This guarantee excludes defects caused by
the product not being used in accordance with instructions, accidental damage, misuse or being tampered with
by unauthorised persons.
All costs of installation, removal, cartage, freight travelling expenses and insurance are to be paid by the
clamant. Should you experience any difficulties with your appliance you should firstly contact Dimplex Customer
Care for advice.
Please retain your receipt as proof of purchase. Every request for guarantee service must be accompanied by
proof of purchase.
For any information on your Dimplex product please call our Customer Care line 1300 739 033.
Be sure to attach your proof of purchase to this card and present with the appliance if replacement is required.
Product. __________________________________________________________________________________
Model.
Date of Purchase.
__________________________________________________________________________
___________________________________________________________________
Purchase from (name and address of retailer)
______________________________________________
_________________________________________________________________________________________
Please complete the above for your own records.
Dimplex products are distributed in Australia by
Hagemeyer Appliances, (A Division of Hagemeyer Brands Australia Pty Ltd)
ACN28 001 375 686
Locked Bag 4013, Kingsgrove NSW 2208
Phone: 1300739033
Fax: (02) 93708959
Email: [email protected]
Web: http://www.dimplex-australia.com
10