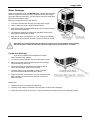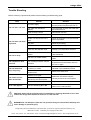
1
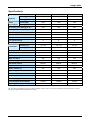
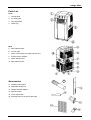
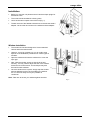
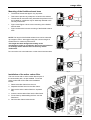
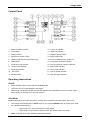
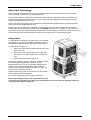
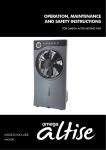
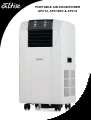
PORTABLE AIR-CONDITIONER
APC12, APC12RC & APC14
omega altise
Contents
Important Safeguards...................................................................................................................................... 2
Introduction...................................................................................................................................................... 3
Features Of Your New Portable Air-Conditioner .......................................................................................... 3
Energy Saving Tips ......................................................................................................................................... 3
Specifications .................................................................................................................................................. 4
Parts List .......................................................................................................................................................... 5
Accessories...................................................................................................................................................... 5
Installation........................................................................................................................................................ 6
Control Panel ................................................................................................................................................... 8
Operating Instructions .................................................................................................................................... 8
Aqua Chill Technology.................................................................................................................................. 11
Water Drainage .............................................................................................................................................. 12
Maintenance ................................................................................................................................................... 13
Trouble Shooting ........................................................................................................................................... 14
Important Safeguards
1. Read all instructions.
2. Disconnect the power plug before dismantling, assembling or before cleaning.
3. Avoid touching mobile parts of the appliance.
4. Never insert fingers, pencils or any other objects though the guards whenever the power plug is
connected, especially while running.
5. The appliance is not intended for use by young children or infirm persons unless they have been
adequately supervised by a responsible person to ensure that they can use the unit safely.
6. The appliance is not intended for use by persons (including children) with reduced physical, sensory or
mental capabilities, or lack of experience and knowledge, unless they have been given supervised or
instruction concerning use of the appliance by a responsible person for their safely.
7. Do not use the appliance for any other purpose than its intended use.
8. The appliance must not be used if the guards are not fastened according to instructions.
9. When the power cord is damaged, it must be replaced by the manufacturer or its service agent or a
similarly qualified person in order to avoid a hazard.
10. Do not use your appliance with an extension cord unless it has been checked and tested by a qualified
electrician or electrical supplier.
11. Return to MEA or authorised service agent.
12. The air conditioning unit must always be stored and transported upright, otherwise you may
cause irreparable damage to the compressor; in case of doubt we suggest to wait for at least 24
hours before you start the air-conditioning unit.
13. Avoid restarting the air conditioning unit unless 4 minutes have passed since being turned off, or the
compressor may get damaged.
14. Never use the mains plug as a switch to start and turn off the air conditioning unit. Use the provided
ON/OFF switch located on the control panel.
15. Always place the portable air conditioner on a dry stable surface.
2
omega altise
Introduction
Thank you for choosing an omega altise portable air conditioner. This manual contains information,
regulations and warnings which are of fundamental importance if the appliance is to be installed correctly
and the highest performance, in the safest possible conditions, is to be obtained. We suggest that you read
the manual carefully before installing or starting up the unit.
This portable air-conditioning unit is of the mono tube type, is conveniently transportable (on wheels) with an
air operating system for domestic use. This unit has the following settings for ease of use:
•
Ventilate (fan);
•
Cool; and
•
Heat (APC12RC only).
The ventilation mode “moves” the air allowing for the recycling of air much like a general fan.
The cooling mode uses a refrigerated circuit (compressor) to cool the room by transferring the heat from the
inside to the outside through the air exhaust hose and cooling the air that it returns to the room.
The heating mode uses a reversed refrigerated circuit (compressor) to warm the room by transferring the
cold from the inside to the outside through the air exhaust hose and warming the air that it returns to the
room.
Features of your new Portable Air-Conditioner
•
No costly installation required.
•
Easily moved with castors and handle.
•
Electronic control panel.
•
Remote control.
•
Low noise and strong breeze.
•
On/off timer function.
•
Three-minute restart delay to protect compressor.
Energy Saving Tips
1. Do not cover or restrict the airflow from the outlet or inlet grilles.
2. The minimum distance from furniture and walls should be 50cm.
3. Keep blinds and /or draperies, on any windows, closed during the sunniest part of the day.
4. Keep the filters clean. Under normal conditions, the filters should be cleaned approximately every 2
weeks (please see the maintenance section for further instructions). Since the filters remove airborne
particles, more frequent cleaning maybe necessary, depending on the indoor air quality and if you have
pets inside the home.
5. Set the fan speed switch to high cool and the thermostat to the coolest position for the initial start-up,
then set the Fan switch to Low cool and lower the thermostat to a comfortable setting.
6. Ensure all windows and doors to the room you are operating the unit in are closed.
3
omega altise
Specifications
Model
APC12
APC12RC
APC14
Cooling (BTU / kW)
12000 / 3.5
12000 / 3.5
14000 / 4.1
Heating (BTU / kW)
-
12000 / 3.5
-
Cooling (W)
1230
1230
1420
Heating (W)
-
1056
-
Air volume (max setting) (m /h)
440
440
440
Humidity removal capacity (L/day)
31.2
31.2
33.6
220-240 / 50
220-240 / 50
220-240 / 50
Compressor
Rotary
Rotary
Rotary
Refrigerant
R410A
R410A
R410A
2
2
2
1 – 24
1 – 24
1 – 24
18 – 32
18 – 32
18 – 32
-
18 – 32
-
Electronic / Remote
Electronic / Remote
Electronic / Remote
Pump over
Pump over
Pump over
Water injection port
Yes
Yes
Yes
Water full alarm
Yes
Yes
Yes
Water drainage
Yes
Yes
Yes
Directional louvres
Manual
Manual
Manual
Louvre auto swing
No
No
No
Yes
Yes
Yes
Approx. application area (m )
24
24
26
Noise level (dB(A))
65
65
65
365 x395 x745
365 x395 x745
365 x395 x745
29
29
30
1500ml
1500ml
1500ml
Yes
Yes
Yes
Capacity
Power
consumption
3
Power supply (V/Hz)
Fan speed settings
Timer (hr)
Thermostat
Cooling (OC)
O
Heating ( C)
Controls
Aqua Chill
Plastic window kit
2
Dimension (wxdxh mm)
Net weight (kg)
Lower Storage Tank Capacity
Self-diagnosis
NB: The above specifications are correct at time of printing. However, due to our policy of development and improvement, we reserve
the right to modify technical data without prior notice.
4
omega altise
Parts List
Front
1. Control panel
2. Air outlet grille
3. Carrying handle
4. Castors (4)
Back
5. Removable air filter
6. Air inlet grille
7. Power cord storage and water injection port
8. Exhaust outlet / adapter
9. Water drainage port
10. Removable air filter
11
Accessories
11. Flexible hose exhaust
12. Adjustable window kit
13. Window exhaust adapter
14. Remote control
15. Active carbon filter
16. Drainage tube for continuous drainage
5
omega altise
Installation
•
Before you use this unit please ensure it has been kept upright for
at least 24 hours.
•
The unit should be installed in a flat dry place.
•
Leave at least 50cm space around the unit (Fig. 1).
•
Thread one end of the flexible exhaust hose to the exhaust outlet /
adapter. On the other end screw on the window exhaust adapter.
Fig. 1
Window Installation
•
The window kit has been designed to fit most standard
vertical and horizontal windows.
•
However, it may be necessary for you to modify some
aspects of the installation procedures for certain types of
windows.
•
Open the window and insert the window kit to cover the
open gap.
•
Next, slide the window across so that the kit is held
securely. You may need to adjust the size of the window
kit and secure it with screws. This technique may also
be used for sash windows.
•
Once the window kit is in place, simply snap the window
exhaust adapter into the hole provided on the window
kit. You are now ready to use your portable air
conditioner.
Note: Take care to secure your window against intruders.
Fig. 2
6
omega altise
Mounting of the flexible exhaust hose
•
The bend of the exhaust pipe is very important.
•
Take care to prevent any sharp bow or bend in the exhaust.
•
The exhaust air must flow freely otherwise the performance of
the portable air conditioner may be adversely affected or the
unit may malfunction.
•
Figure 3 and Figure 4 show correct mounting of the flexible
exhaust hose.
•
9
Fig. 3
Figure 5 shows the incorrect mounting of the flexible exhaust
hose
9
NOTE: The length of the flexible exhaust hose can be extended
up to approx 150cm. We suggest using the minimum length of
exhaust duct for maximum performance.
This length has been designed according to the
specifications of the air conditioner. Do not use an extension
or exchange with a different hose as that may lead to
malfunction.
Fig. 4
Do not use the unit in the bathroom or other humid environments.
Fig. 5
Installation of the active carbon filter
This unit comes with an active carbon filter as part of
the accessories pack, not pre-installed. To use the
active carbon filter it will need to be installed as
follows:
1. Remove the filter frame from the unit.
2. Separate the filter fixer from the filter frame.
3. Remove the active carbon filter from its plastic
bag.
4. Insert the active carbon filter into the filter frame.
5. Fix the filter by reassembling the fixer onto the
filter frame.
6. Re-fit the filter frame inside the unit.
Fig. 6
7
omega altise
Control Panel
1. Speed (ventilation) button
12. ‘Power on’ indicator
2. Timer button
13. ‘Water full’ indicator
3. Display window
14. ON/OFF (power) button
4. Receiver for remote control
15. Sleep mode button
5. Heating mode indicator (APC12RC only)
16. TiO2 (UV)/ionizer button (optional)
6. Mode button
17. Compressor operation indicator
7. Automatic mode indicator
18. TiO2 (UV)/ionizer indicator (optional)
8. Cooling mode indicator
19. Sleep mode indicator
9. Fan mode indicator
20. Timer mode indicator
10. ‘UP’ button
21. Low fan speed indicator
11. ‘DOWN’ button
22. High fan speed indicator
Operating Instructions
On/Off
•
Press ON/OFF button, the unit will start in AUTO mode.
•
To turn the unit off, press ON/OFF button again.
•
Please note: The display window will show the ambient room temperature from 0oC to 50oC except
during setting on the timer-on or timer-off function.
Auto Mode
AUTO mode selects the mode, either fan or cooling, that is suitable to the temperature of the room.
•
The unit will automatically start in AUTO mode or you can press MODE button to choose Auto mode.
•
If the ambient temperature is:
•
o
Higher than 23oC, the unit will work in cooling mode.
o
Higher than 20oC but below or equal to 23oC, the unit will work in fan mode.
AUTO mode will choose the ventilation speed automatically.
8
omega altise
Fan Mode
The Fan or ventilation mode “moves” the air allowing for the recycling of air much like a general fan.
•
Press MODE button to choose FAN mode.
•
Press SPEED button to select the fan speed, either low or high.
•
The temperature cannot be set.
Cool Mode
The cooling mode uses a refrigerated circuit (compressor) to cool the room by transferring the heat from the
inside to the outside through the air exhaust hose and cooling the air that it returns to the room.
•
Press MODE button to choose COOL mode.
•
In COOL mode the temperature of this unit is pre-set to 240C.
•
Press UP or DOWN buttons or to set the desired temperature between 18-320C. As you set the
temperature the display window will show the temperature you set. Otherwise it will show the ambient
temperature of the room.
•
Press SPEED button or to select the fan speed, either low or high.
•
In COOL mode the unit will use Aqua Chill technology to improve the cooling efficiency of the unit. See
the Aqua Chill section for further details.
Please Note: The temperature adjustment setting is not a direct correlation to the ambient room
temperature. For example, adjusting the setting to 180C will not necessarily bring the ambient room
temperature down to 180C.
Heat Mode (APC12RC only)
The heating mode uses a reversed refrigerated circuit (compressor) to warm the room by transferring the
cold from the inside to the outside through the air exhaust hose and warming the air that it returns to the
room.
•
Press MODE button to choose HEAT mode.
•
In HEAT mode the temperature of this unit is pre-set to 200C.
•
Press UP or DOWN buttons or to set the desired temperature between 18-320C. As you set the
temperature the display window will show the temperature you set. Otherwise it will show the ambient
temperature of the room.
•
Press SPEED button or to select the fan speed, either low or high.
Timer – On
•
When the unit is switched off, press TIMER button to set timer-on.
•
Press UP or DOWN buttons to adjust the time from 1hr to 24hrs.
•
Time will vary 1hr accordingly for each press of either the UP or DOWN buttons.
•
At this stage also select the mode/settings that you wish the unit to turn on with.
•
When the set time is reached the unit will turn on automatically.
9
omega altise
Timer – Off
•
When the unit is operating press the TIMER button to set timer-off.
•
Press UP or DOWN buttons to adjust the time from 1hr to 24hrs.
•
Time will vary 1hr accordingly for each press of either the UP or DOWN buttons.
•
When the set time is reached the unit will turn off automatically.
NOTE: Timer-on and Timer-off modes cannot be set to function at the same time.
Sleep Mode
•
If you select the SLEEP mode while in cooling mode, the set temperature will increase 10C at the end of
the 1st hour and, another 10C at the end of the second hour and then maintain that temperature until
switch off or manually changed.
•
If you select the SLEEP mode while in heating mode, the set temperature will decrease 10C at the end of
the 1st hour and, another 10C at the end of the second hour and then maintain that temperature until
switch off or manually changed.
•
In SLEEP mode the fan speed will remain at low.
•
Cancel SLEEP mode by pressing the SLEEP button again.
•
The unit will turn off automatically after the SLEEP function has been running for 12 hours.
•
SLEEP mode is not available while in FAN mode
•
Time will vary 1hr accordingly for each press of either the UP or DOWN buttons.
•
When the set time is reached the unit will turn off automatically.
Airflow Regulation
•
The airflow can be manually adjusted via the roller situated at the front of the air vent.
Remote Control
•
All the above functions can also be performed with the supplied remote control.
•
This remote control requires one button cell (No. CR2025) to operate.
10
omega altise
Aqua Chill Technology
When operating in Cool Mode this unit uses a self-evaporative system that extracts water from humid
environments and collects it in an internal water tank.
Once sufficient water is collected it is recycled over the condenser, assisting to cool the condenser and
internal refrigerant gas faster than only air. Cooler condenser and refrigerant, means improved cooling
efficiency and performance of the unit.
Some of the water recycled over the compressor is evaporated and expelled from the machine as water
vapour through the flexible exhaust hose.
During very humid conditions the collection of water may be in excess of the evaporation rate and the
internal water tank may become full and cause the WATER FULL indicator to trigger. In this instance the
compressor will shut off automatically and a buzzer will sound. Pressing any button will stop the buzzer. You
will need to empty the water tank before the unit will work again (refer to the drainage section).
Adding Water
To utilise the full potential of the cool mode of your portable
air-conditioner, we recommend approx 1000mls of water be
added to the water injection port just prior to initial start up.
To add water (see Figure 7.):
1. Take out the filter frame located at the bottom of the
back of the unit.
2. Use a water cup to pour water into the water tray.
Do not pour more than 1000ml. Do not overfill the
unit.
3. Put back the filter frame into the unit.
Normally an adequate quantity of water is collected to keep
the recycling process operating. However, in high
temperatures (over 300C) or dry climates, adding water to
commence the Aqua Chill mode will greatly assist the
efficiency and operating temperature of the unit, but is not
critical to the functioning of the unit.
Please ensure that you do not over-fill the unit or the water
tank full indicator may be triggered.
Do not fill the water injection port while in fan mode.
Fig. 7
Please Note: Adding water is not a requirement for this
unit to function normally. If you choose not to add water to this unit it will not adversely affect the
warranty or its regular performance.
11
omega altise
Water Drainage
When the water tank is full, the WATER FULL indicator will illuminate
and the compressor will stop working. A buzzer will sound Pressing
any button will stop the buzzer. You will need to empty the water tank
before the unit will work again.
Before you empty the unit you will need to:
1. Turn the unit off and pull the plug out of the power supply.
2. Place a water tray or pan under the drainage port.
3. Remove the drain knob and rubber plug on the drainage port and
drain into the tray beneath.
4. Once drained, replace the rubber plug and drain knob into the
drainage port and tighten by hand.
5. Plug the unit back in and switch it on. The compressor will delay
restarting for three-minutes and then continue to work as normal.
Fig. 8
Important! It is recommended that you do not move the unit around without firstly draining
the internal tank. If water is left in the unit then it may spill out onto the floor or carpet.
Continuous Drainage
If you wish to operate the unit without the need to
empty the water tank, please:
1. Turn the unit off and pull the plug out of the power supply.
2. Remove the drain knob and rubber plug on the drainage
port and retain for future use.
3. Connect the drain tube supplied to the water outlet as
shown and locate the other end into a drain.
4. The drain tube may be extended by using a suitable
connector and an extension tube (OD: 18mm).
5. Plug the unit back in and switch it on. The compressor will
delay restarting for three-minutes and then continue to
work as normal.
Fig. 9
Please note:
1. The drain must be at or below the outlet level
2. Flashing comp/ ‘water full’ indicator will not function in this mode of drainage.
3. When the room humidity is over 85%, it may be necessary to utilise the continuous drainage method.
12
omega altise
Maintenance
Cleaning
Turn off the unit and pull the plug out of the socket before cleaning.
1. Clean the surface
•
Clean the surface of the unit with a duster or a damp soft cloth.
•
Do not use chemical solvent like benzene, alcohol, gasoline and etc, or the surface may be damaged.
2. Clean the air filter
•
The air filter should be cleaned every two weeks
•
If the air filter is blocked with dust the efficiency of the unit will be reduced.
•
To clean the air filters
1. Pull out the air filters as shown in Figure 11.
2. Wash the air filter by immersing it gently in warm water (under 400C or 1040F) with neutral detergent.
3. Rinse the filter and dry it in a shaded place.
4. Push the air filter back into the original position.
5. Alternatively suction the filters using a vacuum cleaner with the dusting brush attachment to remove
any build up of dust or debris on the filters.
3. End of Season
•
Pull out the plug from the drain outlet and remove any water from the internal bottom water tank. You
can remove the water entirely by slanting the unit backwards.
•
Run the unit in Fan mode for several hours to ensure the inside of the unit is dry.
•
Switch off the unit and disconnect the plug from the power supply.
•
Remove the flexible exhaust duct and adapters and keep stored in a safe dry place.
•
Take the batteries out of the remote control and keep in a dry place.
•
Wrap the unit with the plastic bag, and keep it in a dry place.
13
omega altise
Trouble Shooting
Before contacting a professional please read the following troubleshooting guide.
Issue
The unit does not work
The unit does not seem
to perform
The unit is noisy
The compressor does
not work
The unit starts and
stops frequently
Reason
Solution
No power supply
Check the unit is plugged in properly,
turn the power on and turn the unit on.
The ‘water full’ indicator is
flashing.
Turn the power off, drain the water tank
and restart the unit.
Timer function is active
Cancel timer function.
In direct sunlight
Draw the curtains
Windows/doors open, many
people or a heat source in the
room.
Close windows/doors; remove the heat
source if possible.
Dirty filter.
Clean the air filter(s).
Air inlet or air outlet is blocked.
Remove any blockage.
Ambient room temperature is
lower than the selected value.
Change your temperature selection.
The unit is not on a hard or flat
surface.
Place the unit on an even, solid surface
(less vibrations)
The unit is on a tiled surface
Mount the unit on a rubber or carpeted
base.
The overheat protection may be
activated.
Turn the unit off, wait 3 minutes until the
temperature has decreased, then turn
the unit on again.
The exhaust tube is attached
incorrectly or is bent.
Set the exhaust tube correctly as
indicated in the installation section.
You have added an extra flexible
exhaust hose
Remove the extra hose.
Distance is too great.
The remote control
does not function
Error code appears
Remote control signal not
detected by the control panel.
Make sure the remote control is
correctly aimed at the control panel.
The batteries are drained.
Replace the batteries.
The LED is flashing E1 or E2
Turn the unit off and call your Customer
Care Line on 1300 739 033.
CAUTION: Switch off the unit and unplug it immediately if anything abnormal occurs. Then
contact the omega altise Customer Care Line on 1300 739 033.
WARNING! Do not attempt to repair the unit yourself. Doing so could void the warranty and
cause damage or personal injury.
Omega Altise products are distributed in Australia by MEA, (A Division of Hagemeyer Brands Australia Pty Ltd)
ABN 28 001 375 686, Locked Bag 4013, Kingsgrove NSW 2208
Phone: 1300 739 033 Fax: 1800 838 899 Email: [email protected] Web: meaappliances.com.au
TTT
14