1
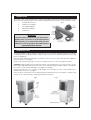
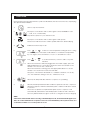
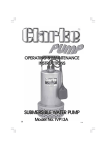
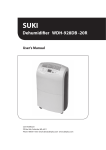
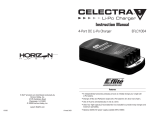
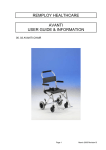
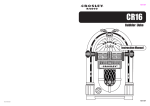
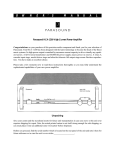
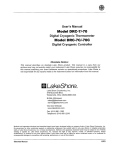
MOBILE
AIR CONDITIONING &
DEHUMIDIFYING UNIT
Model No. CA7500
OPERATING & MAINTENANCE
INSTRUCTIONS
1001
Thank you for purchasing this CLARKE 3 in 1 Air Conditioning Unit
Before operating the unit, please read this manual thoroughly and carefully follow all instructions.
This will ensure the unit is used correctly, so you can look forward to it giving you long and trouble
free service.
[email protected]
This CLARKE product is guaranteed against faulty manufacture for a period of 12 months from
the date of purchase. Please keep your receipt which will be required as proof of purchase.
This guarantee is invalid if the product is found to have been abused or tampered with in any
way, or not used for the purpose for which it was intended.
Faulty goods should be returned to their place of purchase, no product can be returned to us
without prior permission. This guarantee does not effect your statutory rights.
CONTENTS
Page
Specifications ............................................................................................ 2
Unpacking and Introduction ................................................................... 3
Elecrtrical Connections ............................................................................ 4
Installation .................................................................................................. 5
Health & Safety .......................................................................................... 5
Control Panel Description ........................................................................ 6
Control Functions ...................................................................................... 7
Operation ................................................................................................... 8
Maintenance ........................................................................................... 10
Trouble Shooting ...................................................................................... 11
SPECIFICATIONS
Motor Voltage: ................................................................................... 230V, 50Hz, 1 phase.
Fuse Rating ......................................................................................... 13Amps
Power Consumption:
Cooling ...................................................................... 860Watts
Dehumidifying .......................................................... 820 Watts
Fan only:(at highest speed) .................................... 40 Watts
Cooling Capacity: (at 30OC) ............................................................ 7,500 BTU
Moisture Removal: (at 70% RH) ........................................................ 1.5Litres/hr
Noise Level: (1Metre from machine in cooling mode) ................. 51.5dBA
Refrigerant: ........................................................................................ R22
Coolant Amt: ..................................................................................... 0.52kg
Water Receptacle Volume: ............................................................. 3.6Litres
Dimensions: (WxDxH) ......................................................................... 415x325x788mm
Weight: ................................................................................................ 34kg
Part No. ............................................................................................... 3230550
2
UNPACKING
Once the outer cover has been removed, in accordance with the information printed on the
carton, the following items are to be found in styrafoam trays mounted on top of the air-con unit.
1.
2 Metre Outlet Hose
2.
Outlet Hose Adapter
3.
Hose/Wall Adapter
4.
Flat Outlet Adapter
5.
Drain Hose
Fig.1
IMPORTANT
The unit has been transported to your dealer in the
upright position. If however, it has subsequently been
laid horizontally, eg. for transportation purposes, then
it MUST be stood in the upright position FOR AT LEAST 6
HOURS BEFORE SWITCHING ON.
INTRODUCTION
As a Dehumidifier or Fan, it may be used in any room or location, with little restriction. As an Airconditioner however, an air exhaust outlet is required to be close at hand (within 2 meters using
the hose supplied).
All controls are a pressure pad type, mounted on the front, top of the unit, and are explained
under ‘Functions’ on page 7.
Air flow may be directed, high or low, by moving the louvres, on the front grille, by hand.
CAUTION: Always grip the louvres with both hands, one at either side, to move them up or down.
This is particularly important when the unit is new, and the fitings are tight. Failure to adopt this
procedure could result in damage to the plastic mountings.
Air flow may also be set to sweep, left and right, electronically, from the control panel. this is
explained in ‘Functions’ on page 7.
The noise level of the unit is very low and unobtrusive, and a timer is incorporated so that the unit
can be set to switch itself ON or OFF at predetermined times.
Fig.3
Fig.2
3
ELECTRICAL CONNECTIONS
WARNING: THIS MACHINE MUST BE EARTHED.
This product is provided with a standard 13 amp, 230 volt (50Hz), BS 1363 plug, for connection to
a standard domestic, electrical supply. Should the plug need changing at any time, ensure that
a plug of identical specification is used.
IMPORTANT: The wires in the mains lead should be wired up in accordance with the following
colour code:
Green & Yellow
—-
Earth
Blue
—-
Neutral
Brown
—-
Live
•
Connect the GREEN & YELLOW coloured cord to plug terminal marked with a letter “E” or
Earth symbol “ ”.
•
Connect the BROWN coloured cord to plug terminal marked letter “L”
•
Connect the BLUE coloured cord to plug terminal marked letter “N”
Fuse Rating
The fuse rating for this appliance is 13 Amps
If this appliance is fitted with a plug which is moulded onto the electric cable (i.e. non-rewirable)
please note:
1.
The plug must be thrown away if it is cut from the electric cable. There is a danger of electric
shock if it is subsequently inserted into a socket outlet.
2.
Never use the plug without the fuse cover fitted.
3.
Should you wish to replace a detachable fuse carrier, ensure that the correct replacement
is used (as indicated by marking or colour code).
4.
Replacement fuse covers can be obtained from your local dealer or most electrical stockists.
5.
The fuse in the plug must be replaced with one of the same rating (13 amps) and this
4
INSTALLATION
REMEMBER - If the unit has been laid on its side for any reason, it MUST be stood in an upright
position for at least 6 hours before switching ON,
•
Always ensure that there is an air gap, between a wall and the rear of the unit, of at least
50cm, whatever the mode being used.
•
Always locate the unit on a level surface. If located on an incline, or an uneven surface, the
unit could vibrate excessively, resulting in possible component damage.
A. AIR CONDTIONER MODE
When used as an air-conditioner, the hose MUST be connected to the rear air outlet as shown in
fig.2, page 3, via the hose adapter shown in fig.1. The hose adapter simply slides over the runners
either side of the air outlet.
To attach the hose to the hose adapter, enter the leading edge of the wire, bared at the end of
the hose, into one of the grooves on the inside of the adapter. Screw the adapter on to the hose
until it becomes firm, and a good seal is made. The hose is attached to the wall adapter in the
same manner, and the wall adapter should be a good fit into the wall, or window opening.
NOTE: When installing for the first time, attach the hose to the window or wall adapter first, ensuring
the seal is good, then the other end to the outlet adapter, and finally attach the outlet adapter to
the air-con unit as described above.
A flat adapter is also provided, for connection to air ducting or other outlets as required.
IMPORTANT:
Always ensure that any ducting or hoses used, are of at least the same cross
sectional area as the supplied hose .
B.
DEHUMIDIFIER OR FAN MODE
When used in either dehumidifier or fan mode, the unit may be located wherever desired, but
ALWAYS remember to disconnect the hose from the rear of the unit whenever dehumidifier mode
is selected.
HEALTH & SAFETY
It is IMPORTANT that the following health and safety requirements are fully understood by all
those who use or come into contact with the unit.
•
DO NOT allow children to play with the unit or tamper with it in any way, eg., by poking
fingers or toys etc. into the front grille .
•
DO NOT place articles on top of the unit.
•
ALWAYS ensure the air outlet is completely free. DO NOT place clothes or other articles over
the outlet to dry, as any restriction to the air flow will seriously reduce the efficiency of the
unit and ultimately damage the working parts.
•
NEVER allow the air flow, in ANY MODE, to be directed on to a sleeping person. This could be
a serious health risk.
•
When unplugging the unit, do not yank the plug by the cable.
•
Always maintain the unit on a flat, level surface
5
CONTROL PANEL
The control panel is located on top of the unit, and all functions are operated by pressure pad
type controls as illustrated in fig.4.
Fig.4
In the centre of the panel is an LCD window, shown in fig.5, and in which is displayed the current
status of the unit.
i.e
•
selected mode
•
fan speed
•
temperature setting
•
air sweep indicator
Fig.5
6
FUNCTIONS
By pressing the pressure pads with the symbols as illustrated, the functions in the accompanying
description will be initiated.
1.
Start or stop the machine.
2.
Each press of the button will scroll through the three available modes
......Fan, Cool or Dehumidify.
Stop at the symbol for your desired mode.
3.
Each press of the button will scroll through the fan speeds.
Please note that this function is NOT operational when dehumidifying.
4.
Initiate the Fan Sweep mode.
5.
Press
or
to raise or lower temperature setting when in cooling
mode. One press of the button will advance or retard the temperature
by one degree, from a minimum of 16oC to to a maximum of 35oC.
6.
Press
to set time at which you wish to start or stop the
machine.
When the machine is OFF, but plugged into the mains supply, press the
appropriate button to set the time at which it switches itself ON. i.e the
number of hours from the current time.
When the machine is running, press the appropriate button to set the
number of hours at which it switches itself OFF.
One press of the button will advance or retard the number of hours by
one. The maximum setting is 18 hours - minimum is 1hour
7.
When lit, this lamp indicates that the compressor is operating.
8.
When lit, this lamp indicates that the water receptacle is full. The compressor
will have stopped so that the dehumidifyer/air conditioner will have ceased
to function.
When the receptacle is emptied and replaced, the compressor will
automatically start and the dehumidifyer/air conditioner will continue to
function. (Water will also be given off when cooling, but to a lesser degree)
or
NOTE:
If the unit is switched OFF when in Cooling or Dehumidifyer mode, and switched ON again soon
after, do not be alarmed if the compresor does not cut in immediately. This is quite normal, as it
could take 3 minutes or so for the system to re-set.
7
OPERATION
Ensure the unit is located in accordance with previous instructions, and plug it into the mains
supply. On doing so, the system will carry out a self test and you should hear a beep, indicating
that the mains power has been detected and the unit is functioning correctly.
If the unit is to be used for air conditioning (cooling), ensure the outlet hose is connected to the
air outlet. If it is to be used for dehumidifying, ensure the outlet hose is disconnected from the air
outlet.
A. AIR-CONDITIONING (Cooling)
As air is exhausted into the outside world, it follows that the air in the room being cooled must be
replenished. It is advisable therefore, that for maximum efficiency, an air vent, from within the
building, NOT from the outside world, be provided, and all doors and windows to the outside
world be firmly closed.
Additionally, in hot weather, blinds or curtains should be drawn to prevent direct sunlight from
entering the room.
To set the unit to cooling mode, proceed as follows:
1.
Once the unit is set up as previously described, and the unit plugged into the mains,
press the (ON/OFF) button and the unit will operate in its most recent setting.
2.
Press the mode button until the cooling mode is selected. The compressor will start
and the compressor indicator light will illuminate.
3.
Set the temperature you desire using the temperature button. Temperatures range
for cooling is from 18oC to 35oC.
4.
Set your fan speed.
5.
Set the sweep control, if desired.
6.
Set the time you wish the unit to stop, if desired.
You may now leave the unit which will function automatically until it is either switched OFF, using
the I/O button, the timer (if set) intervenes or the water container becomes too full.
B. DEHUMIDIFYING
The dehumidifyiing process involves the removal of water from the surrounding air. This water is
collected in a receptacle which is shown in fig. 3 on page 3. The dehumidifier will only operate
when the ambient temperature is between 16oC and 35oC.
When this receptacle is full, a sensor will detect the condition and automatically stop the
compressor, and hence the dehumidifier from operating. Replacing an empty receptacle will
automatically restart the dehumidifying process. Do not be alarmed however if the process does
not begin immediately as it may take a short time for the system to reset itself.
DO NOT remove the water receptacle whilst the unit is running. ALWAYS switch OFF beforehand
and wait for 3 minutes before withdrawal.
It should be noted also, that the dehumidifier will not operate if the water receptacle is not
correctly installed in its housing - ensure it is pushed home fully.
The volume of water collected at a relative humidity of 70% is 1½ litres per hour, and as the water
receptacle can hold 3.6 litres, it follows that the receptacle must be emptied every two hours or
so, should the unit be used continuously. This of course could be an annoyance, and completely
unsatisfactory if the unit is to be left unnattended for a long period of time.
8
For this reason, a second drain is provided which may be connected to either a larger container
or a permanent drain.
This continuous drain connector is shown in fig. 2 on page 3. Simply pull the connector out from the
side of the unit, and attach the hose, which is supplied for the purpose, or a hose of similar size,
which may then be led away to a large container or drain.
Always ensure the hose is not restricted or kinked in any way, otherwise water may build up and
leak on to a carpet etc.
It should be noted that this continuous drain connector must always be pushed firmly into place,
into its recess, other than when it specificaly used for draining, otherwise water will not enter the
water receptacle, but will leak from the open drain connector. Care should be taken to ensure
that children for example do not pull it out.
For maximum efficiency, you should ensure that all doors and windows are firmly closed.
To set the unit to Dehumidifier mode, proceed as follows:
1.
Once the unit is set up as previously described, and the unit plugged into the
mains, press the (ON/OFF) button and the unit will operate in its most recent setting.
2.
Press the mode button until the dehumidify mode is selected.The compressor will
start and the indicator light will illuminate.
3.
Set the sweep control, if desired.
4.
Set the time you wish the unit to stop, if desired.
You may now leave the unit which will function automatically until it is either switched OFF, using
the I/O button, the timer (if set) intervenes, or the water receptacle becomes full.
C. FAN
To set the unit to Fan mode, proceed as follows:
1.
Once the unit is set up as previously described, and the unit plugged into the
mains, press the (ON/OFF) button and the unit will operate in its most recent setting.
2.
Press the mode button until the fan mode is selected and set the fan speed.
3.
Set the sweep control, if desired.
4.
Set the time you wish the unit to stop, if desired.
D. TIMER ON
You may wish to start the unit some time in the future, when it is unnattended. i.e. if you intend to
be away from home or office for a period of time, but would like the air-con. to cool the room
before your arrival. This is provided for by setting the timer when the unit is switched OFF but
connected to the mains supply.
Firstly, however, it is necessary to switch the unit ON, by pressing the I/O button, and selecting the
mode you require on re-start, plus any other settings, and then switching the unit OFF.
These settings will be entered into memory, and will be used when the unit is next re-started.
With the unit OFF, set the number of hours, from the current time, at which you would like the unit
to re-start, by pressing the Timer button the appropriate number of times. The minimum period is
1 hour (from the current time), with a maximum period of 18 hours.
9
MAINTENANCE
For your protection, ALWAYS disconnect the unit from the mains supply whenever carrying out
maintenance or routine servicing.
1. CLEANING
•
Use only a soft damp cloth with a MILD, diluted cleansing agent. DO NOT use solvents or
other chemical agents as this will cause irreparable damage.
•
Dust may be removed from the front grille with the brush attachment of a vacuum cleaner.
•
To clean the water receptacle, wash in warm water with a mild detergent, dry and replace
correctly.
•
Periodically check the condition of the air filter located on the side of the unit, and which is
shown in fig. 2 on page 3. Pull open the door using the tab provided, and the filter will be
seen attached to the door, held by plastic hooks.
If necessary, carefully pull off the filter and wash it gently in warm water (40oC) with a neutral
detergent. Allow it to dry before replacing it again over the door hooks.
IMPORTANT: The filter should be replaced every two or three washes. See your CLARKE dealer.
•
Whilst the filter door is open, inspect the cooling fins of the evaporator. VERY CAREFULLY
remove any dust that may be present using the soft brush attachment of a vacuum cleaner,
taking great care not to press down on to the fins or damage them in any way. NEVER use a
hard brush or any object likely to damage the fins.
2. STORAGE
If you intend to store the unit for a considerable period of time, you should ensure the water
receptacle is empty and dry.
Additionally, within the water receptacle compartment, is a plastic hose, on the end of which is
a rubber bung. Remove the rubber bung to drain the water, within the hose, into a suitable
container, then replace the bung fully.
NOTE:
DO NOT remove the rubber bung at any other time, as water collected within the plastic hose is
used for cooling component parts.
Once this procedure is completed, run the unit in FAN mode ONLY for at least three hours, before
storing the unit, preferably wrapped in polythene.
10
TROUBLESHOOTING
PROBABLE CAUSE
PROBLEM
Press I/O button but unit
will not start
REMEDY
1. Not plugged in or switched ON
at mains
1. Plug IN/ switch ON
2. Water receptacle FULL
2. Drain receptacle and
ensure it is replaced
correctly
3. Water receptacle not
replaced correctly
3. Push receptacle home - fully
Cooling mode set, but
no cool air.
1. Room temperature lower than
16oC
1. Normal condition
Low air volume
Air filter blocked
Clean air filter
Unit noisy and it vibrates
Unit placed on an incline or
uneven surface
Check, and ensure unit is
placed horizontally, on an
even surface
REPLACEMENT PARTS
Replacement Filters are available from you CLARKE dealer,
please quote the following part number - 3230555
For Spare Parts and Service, please contact your nearest dealer,
or CLARKE International, on one of the following numbers.
PARTS & SERVICE TEL: 020 8988 7400
PARTS & SERVICE FAX: 020 8558 3622
or e-mail as follows:
PARTS: [email protected]
SERVICE: [email protected]
Please note that the details and specifications contained herein, are correct at the time of going to print. However, CLARKE International
11