1
l
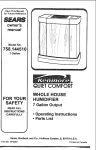
owner's
manual
Model No.
758.144532
13 Gallon
®
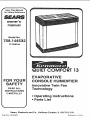
QUIET COMFORT 13
FOR YOUR
SAFETY
READ ALL
INSTRUCTIONS
CAREFULLY
EVAPORATIVE
CONSOLE HUMiDiFiER
innovative Twin Fan
Technology
• Operating instructions
e Parts List
Sears,
Part No, SP6082
Roebuck
and Co., Hoffman
Estates,
IL 60179
U.S.A.
Printed in U.S.A.
FULL ONE YEAR WARRANTY
ON HUMIDIFIER
If within one (i) year from the date of purchase, this humidifier fails c
a defect in material or workmanship, Sears will repair it, free of charge. If
within two (2) years from the date of purchase, the motor fails due to
defect in material or workmanship, Sears will repair it free of charge.
This warranty service is available by simply returning the humidifier to the
nearest Sears Service Center/Department throughout the United States.
This warranty applies only while this product is used in the United States.
This warranty gives you specific legal rights, and you may also have other
rights which vary from state to state.
Sears, Roebuck and Co., D1817 WA, Hoffman Estates, IL 60179
GENERAL SAFETY
Safety
Signal
4. Keep
Words
the humidifier
5, Do not put foreign
humidifier,
DANGER: means if the safety information
is not foilowed someone will be seriously
injured or killed.
WARNING: means if the safety information is not followed someone could be
seriously injured or killed.
CAUTION: means if the safety information is not followed someone might be
seriously injured.
I. To avoid fire or shock hazard, plug
humidifier directly into a 120V, A.C. electrfca_outlet. Do not use extension cords.
2. Keep the electric cord out of traffic
areas. To avoid fire hazard, never put
the electric cord under rugs, near heat
registers, radiators, stoves or heaters.
3. Always unplug the humidifier before
moving it, removing the housing section, before cleaning, or whenever the
humidifier is not in service.
NSTRUCTIONS
clean.
objects
inside the
6, Never use your humidifier while any part
is missing or damaged in any manner.
7. To avoid electrical hazard or damage
to humidifier,
do not tilt, jolt or tip
humidifier
while unit is running.
8, To avoid damage to humidifier,
unplug
humidifier,
when water reservoirs are
empty or when the humidifier
is not in
use.
9. To avoid accidental electrical shock,
do not touch the cord or controls with
wet hands.
10. Note the warning label
and on the humidifier.
shown
befow
electric shock, or injury always unplug
t before
ARNING:
reduce the
risk offire,
filling, Toservicing
or cleaning.
Table of Contents
Water
Warran_.y Information ....
2
General Safety Instructions ................... 2
To Save a Service Call .......................... 2
Know Your Humidifier ............................ 3
Humidifier Operations ............................ 4
Assembly ..............................................
4
Location instructions .....................
4-5
Electrical Hook_Up .............................
5
Fill ............................................
5_6
Operating Hum}differ Controls ............... 7
Using Your Humidifier
...........................
8
Operating Tips for Best Performance....
8
Replacement
and Care of Filters ...... 9-! 0
Cleaning of Humidifier
...................
! t -I 2
Trouble Shooting .................................
13
Repair
PaRs ...................................
14-15
To Save a Service Call
3_ is airflow
Check following if your humidifier will not
operate.
1. Is power cord attached to outlet?
2. Is there electrical power to Outlet?
::
4. Is humidity
control
control
5. is the cabinet
2
in operating
position?
set high enough?
setting
on a level surface?
I
Know Your Humidifier
Controls
...............
Operating Light
Fill Light
Bottles
Filter
Support
Assembly
\.
Filters
Control
Description
Gatlon OutpuV24 Hrs,
Capacity of Bottles
Sq, Ft, Coverage
Run Time
Fan Speeds
Filters
Fill Light
Water Level Indicator
Auto Humidistat
Controls
Operating Light
U.L, Listed
AHAM Certified
Volts
Hertz
Arnps
Watts
Panel Cover & Pivoting Lid
Removed for Clarity
758.144532
!13
12-3/8 Gailons Each
i30oo
48 Hours
Variable
4
Yes
Yes
Yes
Slide Adj,
Yes
Yes
Yes
120 A.C.
6O
2,88
165
Humidifier
Operations
i!(11111
Your new Sears humidifier
is designed
satisfy home humidity requirements
through the principle of evaporation
of
water into the air.
After water
the filters
,11
ii
i
,,
U!ll!!
J _..
to
Humidified Air is
Thee Released
Through the Top
is added to the tank Or bottles,
begin to soak
up the water
become totally saturated
30 minutes, Air is drawn
and
in approximately
in from the rear
Through the
Rear
\
of the humidifier,
then passes through the
filters by means of two circulation fans. As
air passes through the filters moisture is
absorbed
into the air and then released
through
the top of the humidifier.
This
moist air is released in the form of vapor.
No water droplets will enter the home, AN
evaporation
into the air takes place in the
humidifier,
which means that the residue
Use only
32-14900
EPA
Registered
Bacteriostat
available
from SEARS Retail store, Under
k\ f
CAUTION:
Keep your humidifier
clean. While humidifiers
do not
cause colds, some studies
suggest
left. by evaporating
water is not passed
into the home, but remains in the filter,
"CAUTION:
22
that dirty humidifiers
can cause coldlike symptoms
in some people, To
avoid this, we recommend
you clean
your humidifier
weekly with Humidifier Cleaner 32_14713 and use Bacteriostat 32-14900. These are available
no
circumstances
should you use water
treatment
products
designed
for
Rote belt or Ultrasonic
humidifiers.
at your
local Sears
store,
Assembly
Your
new Sears
Kenmore
humidifier
instructions
is
completely
assembled
for you to use,
Remove the packaging
material from
inside your humidifier
and foIIow the
Location
the packaging
r,qar_uai for
materiat
and d sea[d,
Instructions
cabinet
may not s_nse the water
fill tght writ be on _:md the unit wdl
energize
If this happens, the unit
qeeo to be leveled in order for the
hot use humidifier
if any parts are
l damaged
ARNING: orFor
your own safety, do
missing.
Step 1
Place humidifier
of this owner's
proper usage, The packaging
rna!erial is
located under the fan assembly
P,emove
on a fiat fevel surface
m
area of housewhere
most humidity Is
needed, or one which would likely result
in moist air being-circulated
throughout
the house SUCh aS near a cold air return
Placir_g the unit '_eve] is very important
the humidifier islocated
on carpeting,
if
NOTE: The !3 gallon htimidifier contains
water bottles, the weight of the bottles m
1_e front of the cabinet may sink the casters deeper in the carpet, This wilt keep
lhe water level forward i_ the cabinet. The
water level float (located
at the rear of the
and tile
not
wiil
humidi,.
tier to be energized,
NOTE: It may De necessaPy ta purchase
leveling coasters from your loca} hardware store. The coasters
shouid be positioned under zhe trent two casters of the
humidifier
Moist air (humidity) produced will disperse
rote the wnole house, but area closest to
unit will have the highest hu;rudity, tf the
unit is posit{cried
cbse to a window, condensat_on may form on the window pane
If this is not appropriate
the umt should be
repositloned
in another
location
Location
NOTE:
from
Instructions
Due to release
(continued)
of coo!, moist
air
hum idifier, it is best to direct air away
"_"
_
At Least
2" From Wa
from home thermostat
and hot a_r registers. it is best to position humidifier next to
an inside wal!. Hot air registers and cotd
air from outside walls can affect the d_i_
ciencies
of the controls.
Unit should
not
be placed where warm air from a isot air
register blows directly on unit.
Step 2
The humidifier
shou!d be positioned
witi_
the back (cord exit side), at least 2 inches
away from the wall, Air needs to enter
through
_ouvers in the rear paise! in order
for the humidifier
ciency.
to operate
Electrical
Hook-Up
Loczde nearest
the tecation
wall
120V AC
desired,
hazard,
waI! socket
preferably
Plug in the e!ectrical
WARNING:
at peak effb
To avoid
humidifier
fire or shock
should
Water Fill
unplug
be
Do
................................
To avoid
humidifier
cleaning,
i r'_,>,i
cord.
plugged
into a 120V A.C. outlet.
not use extension
cords.
WARNING:
it,
ors inside
shock,
before
always
filling,
Pivoting
Lid Removed
or servicing.
WARNING:
To avoid
fire or shock
hazard,
do not pour or spill water
into control
or motor area. Close the
control
cover,
ff controls
get wet, let
them dry completely
and have unit
checked
by authorized
service
personnel
before
plugging
in.
This humidiiier
is designed
to be used
with the two water booties that are tocaled
under the pivoting
{id
Open the pivoting lid of the hurnidifie_
Remove the water bottles. Jilt them
straight
up and out of the cabinet
"\b-."
for Clarity
Water Fill (cont nued)
i
Notice the Water bottles are designed as
right and left hand Units. PoSition them in
the correct location so the humidifier can
function properly, The water bottles
should rest in the front of the cabinet.
Each "E-Z-Fill Side-Cap" must be facing
the rear of the unit,
"_
Each water bottle
"E-Z-FIll
Side-Cap"
able.
Remove
is designed
with an
that is easily remov-
the "E-Z-Fill
the side of the water
counterclockwise.
bottle
Side-Cap"
"E-Z-Fill
Place the opening of the water bottle unde[
a water faucet (the bottle should fit under a
four-inch clearance faucet). Fill with recommended mixture of cold water and
Sears Bacteriostat #32-14900 onfy. Solid
debris could make the vatve leak.
Install the "E-Z-Fill Side-Cap" by twisting
clockwise, Hand tighten only,
Check for possible leaks by performing
the following:
1. Grasp bottle handle and hold the bottle
upright over a sink.
2. Press up on valve cap plunger for about
one second to let out a little water,
3, Release the plunger.
4, Listen for air bubbles, Look for leaks
around "E-Z-Fii! Side-Cap".
5, If you hear air bubbles or see leaks,
retighten "E-Z-Fill Side*Cap" and repeat
steps 1-4.
Wipe off excess water from the bottle.
Position:the: Water bottle back into the
uhitl Grasp the water bottle handle, and
iower into the cabinet until the bottle sits
on pads at bottom of Cabinet, The "E-ZFill Side.Cap '_must b e facing the rear of
the cabinet When positioned properfy,
the plunger wilt open and water will flow
into the CabineL The water level wi]l auto1/2"
The unit is now ready for operation.
Rearof
J
4,.,._ Hurnidifier
Side-Cap" Should Always
Face Rear
on
by twisting
rnaticAiiy _ernain at approximately
Until the bottles are empty,
_"-q
Turn Counterclockwise
to Remove Cap
_
Valve
Cap Plunger
Pivoting Lid Removed
)
f
,orclrL
Operating
Humidifier
The operating
controls
of your Kenmore
Qu!et Comfort
13 evaporative
vided for conditions
humidifier
cover,
culating
located
between
fans. Lift the control
ing your finger
in the round
the air cir-
cover by placcuteut
and
Fan
Your Kenmore
located
closest
ize yourself
the switch
of the contro!
rect naming
used in this
To Operate
Humidity
and reference
area for the cormanual.
and off as required
humidity selected.
ommended,
depending
will turn on
to maintain
level of
MEDIUM setting is rec-
but there
or high amount
are times
of humidity
when
low
may be pre-
ferred. For constant
operation
of humidifier, MAX allows for the maximum amount
of humidity
to be evaporated
into the air
continuously.
Operation
of the slide control
will get
or waits,
Power
When
Control
"FAN"
position
slide switch,
will come
shoutd
the #2 setting
wii! operate
than the single
amount
settings
Speed
Ieve! that
best suits you.
_®
F/ L L
QU]E':r COMFORT 13
"i!!
,il
MAX
SPEED
HUMIDITY
shut off.
Control
The higher the air flow speed,
water
is evaporated
air. Low speed
the more
and released
is the quietest
into the
and is pro-
in the
a_lows you, to deter-
mine the noise tevel and output
of
The unit is adjusted
from "OFF" to high to
Iow with a variable speed control.
output
Maximum
by the humidifier
light
on
and
#2 position with the speed control set at
high. This combination
of infinite number
i
left in it, the fill light wH_ come
greater
fan settings,
output is provided
Fill Light
the unit has a small
with
the humidifier
with both fans and provides
on. tt will stay on until the unit is
water
position
provides reduced output at a lower noise
level. The "FAN" slide switch positioned
in
off or unplugged.
When
in the #I
the humidifier
one fan only in any speed
no longer
on, the power
and the unit wil_ automatically
to operate
positioned
will operate
Light
the unit is turned
turned
setting
until condensation
SIide
to operate
of two fans and two control
Water damage
may result
starts to form on windows
Humidity
be lowered
forms.
fo the "1" position
one fan and the "2" position
both fans.
of fan/speed
stiffer when the humidity setting reaches
the home conditions.
This is normal,
IMPORTANT:
if condensation
to the front of the cabinet
settings to the customer are summed
up
in the name, "QUIET COMFORT
13", The
Control:
Adiust the amount of humidity
on your needs. The humidifier
13 humidi-
to be made for single
The slide switch
one or two fans to be used.
The benefits
the Controls
Quiet Comfort
fier allows a choice
or dua_ fan control.
a!lows
with the controls
rate,
Control
lifting. The cover will stay open, Now you
can clearly see the controt area. Familiar*
the diagram
that may not require
as high an evaporation
are locate d on the top center of the hum!ditier. The controls are found under the
smoked
Controls
FAN
PO WER
i
Step t
Be sure unit is full of water and plugged
in.
Step 2
Set the =an selection switch to "2". This
wilt allow both fans to operate if the humidistat senses humidity is needed_
Step 3
Set speed control to tow.
Step 4
Set Humidity Control to medium position.
NOTE: Humidifier shou]d operate with
humidity control on the recommended
MEDIUM setting f it does not the humidity
is at a retativefy high level To test the unit
under this condition, turn Humidity Control
all the way to MAX and unit should begin to
operate. After unit has been tested, set
Humidity Control to MEDIUM or desired
{evel.
Allow 24 hours for humidifier to adjust.
If humidity level in home is sufficient, the
humidifier will only operate with Humidity
Control set on maximum.
IMPORTANT: Water damage may result
if condensation starts to form on windows
or walls, Humidity Control setting should
be lowered until condensation no longer
forms.
i
Step 5
If humidifier stops running, the humidity
level is at the normal reeuirements for that
setting or [tis adjusting to the home conditions. The table below shows approximate
relative humidity percentages which correspond to the vanous settings of the
Hum idity Control.
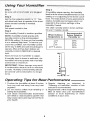
The slide humidify switch shows settings
for your t3 gallon model.
When Outdoor
Temperature is:
Recommended
Indoor Relative
Humidity is:
-10°F
0°F
10°F
20°F & above
20%
25%
30%
35%
M|N
--
O
a
o
o
t
0
0
ID
MAX
HUMIDITY
Operating
Tips for Best Performance
1. Position the humidifier at least 2 inches
from any watt and away from any heat
registers.
:
2. DO net restrict airflow from entering or
:
exfting _he humidifier:
:
3. Use Sears:recommended
bacteriostat
32-149:00 to retard bacteria growth that
may cause odors and may be harmful to
you_"health
4_ Regular cleaning
as instructed
in
"Cleaning of Humidifie_' section of this
manuatis recommended.
5. Replacement of the evaporative wicking
filter at least once per humidification
season or more depending on water
conditions in your area,
Replacement
WARNING:
and Care of Filters
To avoid shock
or
injury from moving parts, always
unplug humidifier
before removing or replacing any parts, i
CAUTION: To help retard bacteria
growth and keep maximum efficiency, the filters should be
replaced at least once a season, or
more often under hard water conditions, Use Sears recommended
replacement
filter.
All filters may be rinsed in clear water
only, Take care not to damage paper,
To replace the evaporative wicking filters
in your Kenmore Quiet Comfort 13 humidifier, follow the instructions betow.
1. Unplug humidifier, and proceed to
clean. Before removing the filters, we
recommend moving the humidifier to
an area where floor coverings are not
susceptible to water damage, i.e,
kitchen or bath areas.
2. Open the pivoting _id and remove
water bottles and set aside, Grasp the
fan assembly front center and rear
center. Lift off and set aside on a
clean flat surface, The filter assemblies are now accessible.
3. Lift filter housings out of cabinet and
place where you may work on them
comfortably, With a soft, absorbent
cloth remove any remaining water or
loose mineral deposits not trapped in
the filter from the humidifier cabinet,
4, To open filter housing for easy access
to filters:
a, Deflect the two spring tabs on top
of filter housing. Lift top cover off of
the filter housin£_ and set aside,
b, Removethe two filters and dispose
of properly, Clean internal parts of
humidifier per the "Cleaning of
Humidifier" section of your owner's
manual.
Spring
Tabs
Replacement
c. tnstali
and Care of Filters
new filters
in the filter hous-
(continued)
Fixed
Tabs
ing track with the glue beads of the
wicking pad to the inside of the filter
housing.
Spring
Tabs
d. Return the top cover of the filter
housing by installing the cover over
the fixed tabs on the rear of the
Filter
lower filter housing and pivoting the
cover down over the top of the filters. Snap
the cover
/
over the two
spring tabs.
e. Replace
cabinet,
Rear of
the filter housing in the
Note: There is a left and a
right filter housing.
There
is also a
Front
front and back orientation.
To position the filter housings correctly:
o Make sure
the
two indents
of
Humidifier
in the
cylinder
section of the top covers
are positioned
towards the center
of the cabinet.
Indents
° Be sure that the spring tabs of filter housings
are towards
front of
cabinet.
Towards
Top
Cove
\
• Align the lower portion of the filter
assembly over the six ribs located
at the bottom
rear of the humidi_
tier cabinet,
f.
Position fan assembly onto the cabinet, Make sure tile fan venturi
(_owest cylinder section below the
fan) is placed inside the filter housing.
g, Replace
h. Close
water
bottles,
the pivoting
lid on the fan
assembly,
Flat Portion
of Filter Housing
Towards Back of Cabinet
i, The unit is ready for use or to be
NOTE:
stored away for next season.
For correct operation
of the filter
housing
contained
assembly,
insicte
filters
the
must
flange
of
be
the
fully
top
cover
indents
Toward Center
of Cabinet
Step 4.e.
10
Center
Cleaning
of Humidifier
CAUTION:
To avoid injury, fire or
damage to humidifier,
use only
Step 2
To Remove
cleaners
specifically
recommended
for humidifiers.
Never use flammable, combustible
materials
a. L)ft pivoting
and set aside.
your humidifier,
b. Remove
To avoid scalds and damage to
humidifier,
never put hot water in
humidifier,
Locai water purity may
area to area and under cer-
To retard
bacteria
cause odors
growth
available
local
should be empty and the
net.
that may
to yo_tr
f
bacteriostat,
32-14900
cleaner 3244713,
at your
{see
Cabinet,
e Proceed to ';Bi-WeeMy Maintenance"
"End of Season Ma ntenance"
health, use only Sears replacement
filters. We also recommend using a
EPA approved
and humidifier
Paris !ist.)
from the cab-
wafer reservoir is ready for c!eaning,
The water reservoir consists
of the
lower areas of the humidifier
cabi-
in the res-
and be harmful
(See Repair
the water bottles
d The cabinet
tain conditions
water impurities and
airborne bacteria may promote
the
growth of microorganisms
ervoir of a humidifier.
the fan assem°
the motors and fans,
inet and remove the filter housings
'Repair Parts' Hst for identification).
c. Empty
CAUTION:
vary from
lid, remove
b_ywhich contains
or poisonous
to clean
Parts
or
Remove old tilters and dispose of prop,
edy, Continue to clean cabinet and
mternaJ parts as described on next
page.
Step 3
lnsta!i n_w filters
Sears store.
(p'4rchase
the correct
NOTE: If it is necessary to use approved
bactefiostat,
foiiow the d rections coTrecw
evaporative
wicking tilter' pads 32-t49!
t
ior your humidifier) into the iocation where
The barites
the old filters were positioned
of the
2-3/;€._ gallons
Step
13 g:dion
unit will ha!ti
of water each.
1
b_y on top of the cabinet
hunfidifier to the desired
[o make cleaning eas4er, the water reservo;r should be empty and eomp!etely
dried out
lowing
To accomplish
automatic
b. Unpk,'g hutTi difier
unplugged,
fan could start after
WARNING:
tf humidifier
is not
housing
is removed.
in step 2 beiow "To
d After removing the parts dryou_!he
bottom ef the humidifier cabi,qet
e Proceed to Bi-WeeklyMaintenancG
;End of Season Maintenance"
bottles with fresh cool
aIld set the controls
Humidifier Controls"
the humidifier
"OFF".
c Follow instructions
Remove Parts"
and return the
location for use
water and return them fo the cabinet Plug
the unit into a I20 vail A.C power outlet
to run until the
shutoff turns
Refill humidifier
tMs, use the foF
method:
a Allow the humidifier
tnstaH the
filter housings with lhe new filters into the
correct Iocation Pos}tion the fan asserm
or
11
per the "Operating
section of this manual
Cleaning of Humidifier (continued)
Bi-Weekly
2, Empty water reservoir after 20 minutes.
Rinse with water unti{ bleach smeI_ is
Maintenance
Removing Scale
1. Fill the water
.
gone.
reservoir
cup of undiluted
white
with one 8 oz.
vinegar.
brush.
Dampen
before
soft cloth with undiluted
when
disinfecting
2. Remove
the water
and outside
1. Fil! water
reservoir
Reservoir
storing.
cabinet
bleach
solution
stay 20 minutes,
every few
normally
in 1 gallon
minutes.
exposed
in
water.
witt not be used for at
or more.
away filters.
dry cempletel!
before
Do not store with water inside
or water bottles.
4. Store
in cool, dry location.
5. tnstall
new fi_ters in c_ean humidifier
before
with 1 teaspoon
chlorine
be cleaned
Maintenance
and threw
3, Let humidifier
sur-
with a soft cloth only.
Water
humidifier
least one week
with clean warm
scale and cleaning
4, Dust the fan assembly
Disinfecting
and Base
should
I. Follow bi-week/y maintenance
instructions at end of humidificat{on
season or
reservoir,
faces
bottles
manner.
with soft
white vinegar and wipe out the water
resepToir to remove scale.
so]ution
same
Allow unit to dry out comptetely.
End of Season
surfaces
3. Rinse thoroughly
water to remove
3. Water
Let solu-
tion stay 20 minutes.
2. Clean all interior
-----------
Let
swishing
Wet all surfaces
to water.
t2
next season
begins.
Troubleshooting
.................................................................
i................
:'f'roi]b]-e ......
]_
Probabfe
I w i _ )I 'u'
• Hw _d,'i_
Cause
Remedy
_ "_i i_, oo -db,_
• Ra}se hu'midistat
1 ° No power
....................................
, _._, w,
,/
sefting
120 volt power sou<e
4 ........................................................................................................................................
r,..,,
,_ s,_'LP,,off
Lpml will nol ,;Jr,/oul
..
• Check
i" Fk}a_ is not fi'mo
I ° V.Ja_e_ .s pr=.se_.i
,;_ s,_
, y,.,,
o From !!oa_ f_om obstruction
_'_ the
,, This is nou_n_
A srnali
amo_4nt
,_t
- High ......
,rs _ t} or _OW
temperature
fesu!ting
in
- Ai_ow unit to continue
lion
opera-
, sk)w evapo_abo
• Che,';k f,.:)__eak in w_der bottles
• Are gaskets
i
Cap_
,
)-_r
i,
for "E Z Fill Side-
",b,-_ !see lepair
e
......................................................................................................................................
, ................................................
,It)a}[is
i ° (_,hanqe to a fresh new htte(
! * Check or!er_t;:d}on of b:)tfie
notomptv_na
,
,
i-r" q%,,
,,,,,. ,r
i • ;"{!.'-'5_rvoir -:m _'.unqer
i
m
¢,,',, ._<:s_ r, o,.>_,O,, el
Reposi_}on
t ...........
so riga! reserveir
i c _bir, e!
cap Dlunqet is d.s,p e,.->t.J by
I
f)ost
in t ottom
of cab}net
[c-mpty
sulface (Float w_il not
sense wate_ at the rear of
pet padding rnay at!ow untt 1o
set lower in !he front than tile
the cab net
rea_ wi_h the additiona_ weight
of water bottles ]I! the ffonl of
the cab[r,'et Install coasters
under front casters,
FCAUTION:
Sears
|Use
Retail
of other
Use only
32-14900
EPA Regis_:ered
Bacteriostat
available
from
store.
water
treatment
products
{'nay damage
jUnder
no circumstances
should
you tJsewater
_for Rote beit or Ultrasonic
humidifiers.
13
the filter
treatment
elements.
products
designed
co
--'11
zOO,
,,.jm
o-lm
PT,
_n 3
=d
31
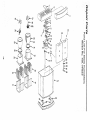
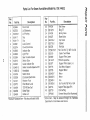
Parts List For Sears
Humidifiers
Model No. 758.144532
-8
-- eyI
Key
No.
Pan
22
819024'
Seal Valve
23
24
821421-1
819026
Ring "O"
Cap
Cap
Labei Control
25
819027
Stem Valve
26
822419-2
27
823710-2
Cap Valve
Cabinet
Cover
28
823726
STD601107
Description
_No.
t 823884
Part No.
Cover
Dust
Lid Stationary
Lid Pivoting
823724-1
824117
824117_t
825921
823974
823906
825858
o_
Electronics
_ndicator
i
11
823910
Light Pilot
Gear Variabte
Switch Slide
i
12
825920
Guide
i,i t3
10
i
14
I 824691-2
823904
13805-02
k ts I 823728
I7
824101
I8
823712
19
824690
20
16
21
824688
/ 823908
824689
29
30
Bar
822120
No,
Description
Spring
'
Valve
Rail Kick
* Scr. Pan Hd, Ty "AB" 10 x 3/4
Caster Twin Wheel
3t
823849
32
32-14911
Bar
33
823977
Speed
34
35
823715
823735
36
36a
822405-7
Retainer Float
Float Water Level
37
822406-1
Motor
Fan
38
816069-2
Scr Pan Hd "AB" #6 × 1-3/4
"E-Z-Fill Side-Cap"
39
823714
Bottle
Bottle
4O
825719
SP6082
indicator
Speed
Switch Variable
Humidistat
Switch
w/Off
Micro
Enclosure
Electronics
Right
Left
*Standard Hardware Item - May be purchased Iocally
822405-5
Support
Filter Lower
1 Filter Evaporative
Support Filter Upper
Seal Motor
Support
Motor
LH.
Support
Motor
Support Filter Upper R,H,
Cord w/Plug
Owners
Manua}
(Not Illustrated)
f Stock item - May be secured through
Department of most Sears retail stores.
the Ha'idWa'ie
For the repair or replacement parts you need
Gall 7 am - 7 pro, 7 days a week
I =800-366-PART
(1-800-366-7278)
For in-home major brand repair service
Call 24 hours a day, 7 days a week
1-800-4-REPABR
(1-B00-473-7247)
For the location of a
Sears Repair Service Center in your area
Call 24 hours a day, 7 days a week
1-8OO-488=
1222
For iafermation on purchasing a Sears
Maintenance Agreement or to inquire
about an existing Agreeme.t
Call 9 am- 5 prn, Monday-Saturday
t =800-827-6655
SEARS
A,merJ_a's Repair S#ecW_srs
The model number will be found on the Humidifier
label.
identification
When requesting service or ordering parts, always provide the
following
information:
, Product Type
° Part Number
Sears, Roebuck
Part No_ SP6082
• Model Number
° Part Description
and Co., Hoffman Estates,
Form No SP6082
IL 60179 U.S.A.
Printed in U,SA,
7/97