1
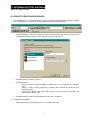
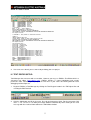
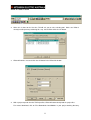
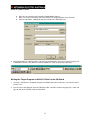
www.m16canz.com
MITSUBISHI M16C/62 MCU
STARTER KIT BOARD
(MSA0654-MEAUST)
INSTALLATION PROCEDURE
Version 2.0
06-Jun-02
Prepared by Alan Suyko
1
www.m16canz.com
I. SOFTWARE TOOL VERSIONS:
C Compiler:
Integrated Development Environment:
Debugger:
Monitor Program:
Flash programmer:
NC30WA Version 5.00 Release 1 or later
Tool Manager Version 3.11 or later
KD30 Version 3.00 Release 1 or later
Version 2.00 or later
Flash Start Version 1.0.0.7 or later
II. SOFTWARE TOOLS DOWNLOAD:
1. Uninstall all old M16C software tools in your PC that was installed from the M16C Starter Kit CD.
The software contents on the M16C CD were mainly for our university student program and are
no longer the latest versions.
2. Download the latest versions of NC30WA, TM, KD30, monitor program, start-up files and Flash
programmer as well as text editor (optional).
• NC30WA & TM: http://www.tool-spt.mesc.co.jp/trial/nc30ty_e.htm
•
KD30, Monitor Program, Flash Programmer, revised start-up files (ncrt0.a30, sect30.inc) for
Ver 2.00 monitor program: www.m16canz.com
•
Text editor: EditPlus (shareware) www.editplus.com
3. Install all the above software. Make sure to install NC30WA first before TM as TM will auto-detect
what compiler is installed in your system. NC30WA will ask you for a license ID, but without the
license ID the compiler will still be installed on a 4 months trial period.
4. For the sample projects (e.g. sample3), copy the C source file (sample3.c) and the header files
(leddata.h & sfr62.h) to a new directory. Make sure there are no spaces in the directory name
since Tool Manager does not recognize spaces in file names and paths.
5. Copy the revised versions of ncrt0.a30 and sect30.inc downloaded from our web site to this new
directory. Note that the interrupt vector addresses in the sect30.inc file has been modified based
on the interrupt routine functions used in the sample C program (e.g _TimerA0int, _TimerA1int).
NOTE: Make sure that the interrupt vector addresses in sect30.inc file are updated when using
the other sample programs requiring other interrupts such as ADC, UARTs, etc. All unused
interrupt vector addresses must be set to a ‘dummy_int’ label.
2
www.m16canz.com
III. PROJECT CREATION PROCEDURE:
1. Run Tool Manager 3.11 (TM Project Bar). Create a new project by clicking the New Project button
in the Project Bar. This will launch the Project Editor and Project Editor wizard.
•
PE Wizard Step 1: Select the Target chip (choose M16C Family) and specify a project name
and working directory (directory name and path must have no spaces).
•
PE Wizard Step 2: Choose C project.
•
PE Wizard Step 3:
- Choose compiler package NC30WA V.5.00 Release 1 by clicking on the pull-down
menu.
- Select a custom start-up program by specifying the ncrt0.a30 file located in your
working directory.
- Click the Next button. Your project will now be created using the specifications you
provided in the above steps.
•
PE Wizard Step 4: Click the Finish button to create your new project.
2. Go to TM Project Editor.
•
Expand the project tree by clicking on the (+) symbol beside ‘all’.
3
www.m16canz.com
•
Select the .x30 file and add the C source file (e.g. sample3.c) to your newly created project by
clicking the Add File button. Make sure the C source file is added under the .x30 file in the
project tree by first selecting the .x30 file prior to clicking the Add File button.
•
Save the newly created project.
3. Go back to TM Project Bar. Click on the Build or Rebuild button to build the new project. The
Builder window will be opened and will display the assembler, compiler and linker output data
while building the new project.
4
www.m16canz.com
4. If no errors were found, you are now ready to debug your new project.
IV. TEXT EDITOR SETUP:
Tool Manager does not come with a text editor. However you may use EditPlus Text Editor which is a
shareware text editor (www.editplus.com). EditPlus includes C syntax highlighting and accepts
parameters from Tool Manager to jump to the error lines in your source files during build for faster
debugging and development.
1. Register EditPlus in Tool Manager by clicking the Tool Register button in the TM Project Bar and
selecting the Edit Tool tab.
2. Click the Add button and fill in the name, file path and parameter fields. For the parameter field,
enter “-e %F –cursor %L” to allow you to open EditPlus automatically when clicking on the error
message with line number information on the TM Builder window.
5
www.m16canz.com
3. Verify if EditPlus is setup correctly by going to TM Project Editor window and double clicking your
C source file in the project file tree. EditPlus should automatically run and load your selected
source file.
V. KD30 DEBUGGER SETUP:
The KD30 debugger software installed in your PC talks to the monitor program written the M16C/62
Flash on the target board via serial cable in order to perform its debugging functions. The monitor
program provides KD30 with the debugging information it displays in its various windows. To write the
monitor program to the M16C/62 Flash on the SK board, the Flash Start programming software is
used.
M16C/62 Flash
with Monitor
Program
KD30
6
www.m16canz.com
Flash Start Setup
1. Register Flash Start in Tool Manager by clicking the Tool Register button.
2. Select the Application tab and fill in the Name and File Path fields.
3. Click the OK button. Flash Start will now be available from the TM Project Bar.
Monitor Program Installation
1. The Starter Kit board will normally be delivered without the monitor program installed. To install
the monitor program, set up the Starter Kit board by connecting the 9-pin serial cable to the SK
DB9 connector and to the PC RS-232 port.
2. Prior to connecting the DC power supply to the board (either 9V or 5V), make sure that the
CNVss jumper is fitted (located next to the 9V socket). This will allow the M16C MCU to startup in
“boot” mode where the CPU starts operating using the standard serial I/O control program in the
boot ROM area. This control program allows the Flash ROM to be programmed via the serial I/O
port.
7
www.m16canz.com
3. Connect the DC power supply (either 9V or 5V) to the board. The black DC socket is centerpositive and accepts DC voltage ranging from 8-12V. If a 5V regulated DC power supply is
available, use the DC screw-in terminal block. Set jumper JP8 accordingly such that LED D2 is lit
when power supply has been applied to the board.
4. Once the SK board has been powered up, run the Flash Start program.
5. Enter the path of the monitor program object file in the FilePath field and enter all “00” on the ID
field.
8
www.m16canz.com
6. From the main menu below, click on Setting to change the baud rate to a faster speed. If you are
using a 16MHz crystal on board the SK, you may try setting the baud rate up to 57600 bps.
If communication error is observed when using Flash Start, you may selecting a slower baud rate.
7. Click on the Erase button to erase the Flash ROM.
9
www.m16canz.com
8. Click the BPR button to perform Blank Check, Program and Read Check on the specified address
range (0FE000 to 0FFFFF) for the monitor program.
9. After the BPR operation is completed, exit the Flash Start program by clicking the Exit button.
10. Remove power on the SK board and remove the CNVss jumper.
11. Reapply power to the SK board. The SK board should now operate in normal mode. With the
monitor program now in place it should be able to communicate with KD30 Remote Debugger.
KD30 Debugging
1. Go to TM Project Bar and click the Debug button.
10
www.m16canz.com
2. When this is done for the first time, TM will ask you to select a debug tool. Make sure KD30 is
already installed prior to performing this step. Select KD30. Click the OK button.
3. KD30 will now be executed. Click the OK button in the KD30 Init window.
4. With a project opened from the TM Project Bar, KD30 will automatically load the project files.
For manual download, click on File->Download->Load Module in your project working directory.
11
www.m16canz.com
Once the project files are downloaded to KD30, you are now ready to perform your code
debugging and evaluation in KD30 using its many debugging features.
VI. STAND-ALONE MODE DEBUGGING
With the target program in the project now fully debugged under KD30, it is now time to create a
machine language file in Motorola S format to write the target program into the M16C/62 Flash on the
SK board. This will allow the target program to be debugged in stand-alone mode (i.e. without KD30 &
monitor program).
Currently the target program is still in absolute module file (.x30) format as created by the linker ln30.
To convert the absolute module file (.x30) to a machine language file in Motorola S format (.mot), the
lmc30 utility is used.
LMC30 Setup
1. Register LMC30 in TM by clicking the Tool Register button in TM Project Bar.
2. Select the Application tab in the Tools Information window and click the Add button.
3. In the Application Information window:
a. Enter ‘lmc30’ in the Name field.
12
www.m16canz.com
b. Enter the file path of lmc30 (normally C:\Mtool\BIN\lmc30.exe).
c. Enter ‘%X’ in the Parameters field. This will pass the target program name to lmc30.
d. Click the OK button. LMC30 will now be created in the TM Project Bar.
4. Run LMC30 from the TM Project Bar. This will now automatically create the machine language file
in Motorola S format (.mot) from the absolute module file (.x30) in your project directory.
Writing the Target Program to M16C/62 Flash in the SK Board
1. Set up the SK Board as in Monitor Program Installation procedure and make sure that the CNVss
jumper is on.
2. Run the Flash Start program from the TM Project Bar. Load the machine language file (*.mot) and
type all “00” on the ID field. Click the OK button.
13
www.m16canz.com
3. Click on the Erase button to erase the Monitor Program contained in the Flash ROM.
4. Click the BPR button to perform Blank Check, Program and Read Check on the specified address
range (e.g. 0C0000 to 0FFFFF for sample2.mot) for the target program.
5. When the BPR operation is completed, remove the power on the SK board and remove the
CNVss jumper. Reapply power and the target program should start executing immediately.
14