1
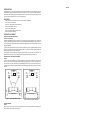
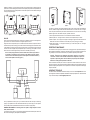
installed your speakers, you try both modes of operation to see which best suits your listening space and
preferences. As shown in the diagrams, the diffuse sound bi-pole/di-pole speakers can help to alleviate the
need for exact placement of surround speakers in a home theater system. Film sound tracks are designed
for this type of playback system.
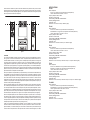
LEFT
FRONT
CENTER
CHANNEL
RIGHT
FRONT
LEFT
FRONT
RIGHT
FRONT
CENTER
CHANNEL
LEFT
FRONT
CENTER
CHANNEL
RIGHT
FRONT
Figure 10
LISTENING AREA
LISTENING AREA
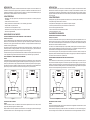
Figure 4
LISTENING AREA
Figure 5
Figure 6
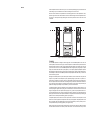
HOOK UP
Use a 16 gauge or heavier speaker wire for connecting to your amplifier or receiver. Cut wire lengths leaving an extra 12” to 24” at each end to allow for moving the speaker or receiver.
Using a wire cutter or a sharp knife, strip 1/2” of insulation off each end of the wire to expose the conductor.
Twist wire ends to prevent from fraying. Connect the conductors to the binding posts on the bottom or back
of the speaker by unscrewing the post enough to expose the hole in the terminal post. Slip the exposed
conductor in the hole and tighten the post. Repeat this step for connecting to your amplifier or receiver.
Refer to the owner’s manual supplied with your electronics to assist with proper hook up.
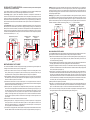
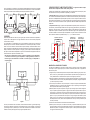
Note: To ensure proper performance, make sure that the wire from the red (+) terminal on
the speaker is connected to the red (+) terminal on your amplifier or receiver. Likewise,
make sure the wire from the black (-) terminal on the speaker is connected to the black (-)
terminal on the amplifier or receiver. (Figure 7)
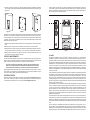
Figure 11
Figure 12
Pour obtenir un montage mural souple permettant de faire pivoter l’enceinte montée dans différentes
directions, installez le support mural d’enceinte Omnimount série 20 et montez sur celui-ci le support
fourni. Ceci permet à l’enceinte de pivoter tout en étant accrochée au mur et de conserver le verrouillage
rapide du support fourni. Pour utiliser cette option, procédez comme suit :
1) Fixez le support Omnimount série 20 au mur en utilisant les instructions du fabricant.
2) Montez la partie « A » du support fourni sur l’enceinte comme indiqué à l’étape 3 ci-dessus.
3) Montez la partie « B » du support sur la plaque de montage du support d’enceinte Omnimount en
utilisant deux vis et écrous à métaux de 1/4-20 de 3/8 pouce (10 mm) de long (non compris).
4) Faites glisser la partie « A » du support et l’enceinte qui y est fixée sur la partie « B » du support
comme décrit à l’étape 6.
ENTRETIEN ET MAINTENANCE
Ces enceintes ont été conçues pour fonctionner avec une large gamme de composants électroniques.
Dans la plupart des applications, 20 watts par canal suffisent pour obtenir une puissance adéquate. Pour
une grande pièce ou des niveaux sonores élevés, une puissance supérieure peut être requise.
Attention : N’utilisez pas un amplificateur de puissance supérieure à la puissance
nominale de l’enceinte. Si vous entendez une distorsion très importante, c’est que vous
dépassez la capacité du système. Une telle distorsion peut provoquer des dommages.
Réduisez le volume jusqu’à disparition de la distorsion.
Suivez les directives suivantes pour conserver leur aspect aux enceintes. Utilisez un chiffon doux et
humide pour nettoyer le coffret de l’enceinte. Évitez d’utiliser des détergents ou des liquides de nettoyage
puissants. Ne passez pas l’aspirateur sur les composants de l’enceinte car cela pourrait les endommager
de façon irréversible.
ASSISTANCE TECHNIQUE
BLACK RED
BLACK RED
BLACK RED
- +
- +
- +
- +
- +
BLACK RED
BLACK RED
Figure 7 - Connecting Speakers to Amplifier or Receiver
Once your speakers are hooked up, turn on your electronics and test to make sure they are functioning
properly. If your speakers sound “thin” with little bass and have a poor center image, one of the speaker
wires is probably hooked up backwards. Double check all connections for proper polarity.
BI-WIRING AND BI-AMPING: The following models are capable of being bi-amped or bi-wired:
TP160, TP260 and TP160S
If you decide to bi-wire or bi-amp, you remove the flat metal jumpers between terminal posts. Failure to do
this could result in damage to your amplifier and loudspeakers.
Pour obtenir d’autres informations d’assistance technique, visitez notre site dcmspeakers.com. Vous
pouvez également contacter nos spécialistes d’assistance technique par téléphone au 1-877-DCM-LOUD
ou par courrier électronique : [email protected].