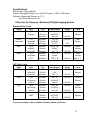
1
MetaMorph Imaging Handbook
Update 6/4/13
Startup
FIRST turn on mercury lamp (Fluorescence)
Computer and monitor
Qimaging Camera (on top)
Uniblitz Shutters-2
Halogen Lamp (Transmitted Light)
Computer
Login net id and netid password
Domain is Cornell
MetaMorph options
MetaMorph- normal use
Offline-computer only
Check out microscope
Light path to correct camera vs eyepieces
Mechanical shutter open
Zoom set to 1
Filter turret – check filters installed, change if necessary
DIC filters and ND filter out
Objectives: dry: 4x, 10x, 20x,
oil: 40x, 60x, 100x,
H2O: 40x w/ cover slip, 40x dipping
Iris diaphragm on 100X oil obj - open
Main Taskbar
If you lose the Main taskbar, go to
Journal –Taskbars-Load Taskbar
Look in C:\MM\Taskbars\Main.JTB
HELP
Use the F1 key to get help on any
active menu.
Choose Dialog for an explanation of
all entries.
MetaMorph help.pdf on website
Shutdown
Check Calendar before shutting down
Exit Metamorph
Leave Main Taskbar open
Transfer files
Logoff Windows
Turn off camera (on top)
Turn off shutters(2)
Turn off monitor
Turn off halogen lamp
Turn off mercury lamp last
Wipe oil off objective with lens paper
Cover microscope
*Note that Hg lamp must cool for 15
min before restarting
Shutters
Check shutters using shutter buttons in Main Taskbar
Make sure shutter is set to NC = Normally Closed on shutter control box
You may have to hit the Reset button on the shutter control box
General Procedure
Find your sample and focus
Send light to camera by pulling out lower camera knob on right all the way
In Taskbar:
Choose QImaging camera
Acquire window:
Choose Setting- select correct shutter
Select exposure time or try Autoexpose
Hit Show Live
Adj. focus, exposure time and/or 12 bit grey scale
Unclick Saturation warnings if not wanted (may have to click 2x)
Acquire (shutter will open and close)
Save As (from Main Taskbar)
1
Acquire (Main Taskbar)
Settings (lower left)
Select fluorescence or transmitted. This chooses the shutter as well as exposure
time, 12 bit adjustment, binning, gain, offset, etc.
You can save your settings with the same name or a new name.
Display Tab
Spread Triangles to ends, adjust as needed. Right triangle makes pixels whiter,
left makes background blacker. Middle is gamma, keep at 1
Special Tab
The Qimaging camera has a gain, offset and speed control.
Gain ranges from 1 to 30. If you have dim images, increasing the gain will give
you higher signal at the same exposure. Higher gains also have higher noise.
Start with gain of 1.
Offset controls your black level. Keep between 10-50 to avoid ‘too black’ pixels.
Digitizer has values at 2.5, 5.0, 5, 10, 20 MHz. This is the speed of the camera
readout. Higher speeds have more noise. For very low signals, a slower speed will give
you a higher signal-to-noise ratio. Generally use 10 or 20 MHz.
Acquiring an Image
Show Live—Shows a live image on the computer screen for focusing or X-Y
adjustment. Use this to focus and set exposure time.
Acquire button at top—uses whatever size image was last used.
Options:
Full Chip—1317 x 1035 pixels. Acquires the largest image field
Center Quadrant—658 x 517 pixels. Acquires the center 1/4 of the image field
Acquire Active Region—You must have an active region defined on an image
Troubleshooting
No light in microscope
-- lower knob should be pushed in to send light to eyepieces
-- toggle shutter ON from Main Taskbar
-- set shutter to NC on shutter control box
-- hit Reset button on shutter control box
-- check to see if the lamp is on
-- mechanical shutter must be open for fluorescence (in light path behind filter cubes)
Image on screen all black
--lower knob should be pulled out to send light to camera
--upper knob should be in to send light to Qimaging camera
--set shutter to NC on shutter control box
--hit Reset button on shutter control box
--check shutter listed at lower left of acquire window or in Acquire tab of same window
--try a longer exposure
Image too bright or is all white
--reduce exposure time, a lot
--Reduce gain (under special tab in acquire window)
--Send less light to camera by using the middle position on the lower knob (50% less)
and the middle position on the upper knob (together 75% less)
2
Image Processing
12 bit Images
Collecting images with 12 bits (4096 gray levels) is useful when you are doing
quantitative work, complex image processing, especially involving thresholding, or when
you have very low light levels or high background.
Adjusting 12-bit images
Use the triangles (under Display in the Acquire window) to adjust the white and black
levels. (This is just like Photoshop using Image-Adjustment-Levels.) The left triangle
chooses the level of grey that will be absolute white and the right triangle sets the grey
level below which everything will be black. You lose some of your grey levels but as you
start with 4096, this is generally OK. Do not adjust so far that you have less than 256
levels left. Use a longer exposure when this happens. When you convert to 8-bit, these
adjustments become permanent and you will have 256 grey levels.
You can also adjust the gamma but use this with care as it makes the relationship
between brightness and fluorophore concentration non-linear. Always use gamma=1 if
you want to make any brightness comparisons between images.
Scale Image (Main Taskbar) will adjust a previously acquired image. Choose image.
Select the 12-bit 4096 grey levels.
Image Quality
You should always avoid saturating pixels, as information is lost and can never be
retrieved. When you adjust your 12-bit images, do not make them too bright and also do
not make them too black. The area outside the triangles is lost when you convert to 8-bit
and can never be retrieved (unless you save the 12-bit images). Further adjustment of
the 8-bit image is possible with Photoshop.
Image Noise
If your images are grainy, try using a lower gain or a slower speed and increasing the
exposure time. You may also want to try 2x2 binning if resolution is not an issue. This
creates a larger pixel size but decreases your exposure time.
8-bit Images
To automatically acquire 8 bit images, click on Acquire 8 bit on the Main Taskbar.
To retain the ability to do 12 bit adjustments but only save 8 bit images use the copy to
8-bit option in the Main Taskbar. This converts and saves the image as 8-bit.
Convert all files to 8 bit
Or you can convert all images later using the copy DIR to 8-bit option. This will convert
all images in one folder automatically. The 12-bit images are overwritten. To keep the
12 bit images, make a copy first. (See also Image Color, below.)
Image Zoom
Use magnifying glass on each image and right and left mouse buttons to increase or
decrease zoom. Unclick to deactivate. This will be used on the next acquired image.
Scroll wheel on mouse also zooms, you may have to wake it up.
Image Cropping
Select square in Toolbar -- Draw region on image
3
Save Partial, to save just the defined region without re-acquiring
To use this region again, use acquire active region on image.
Overlay Images (Main Taskbar)
Collect images sequentially using different filters or transmitted light
Choose # images = 4 or more
Choose an image for each color (use black for transmitted light image)
Click on Show preview and move preview box around. You can adjust color balance,
or brightness if desired, or you can adjust your original images and see the changes live
in the preview window. If you do adjust the original images, consider whether you have
saved them, need to resave them, or don’t want to change them,
You can do a pixel shift here if the images do not line up properly but most likely
you bumped the scope and you should re-acquire the images. Note that a DIC image
may change the alignment.
Apply -- This creates a 24-bit RGB TIFF and does not need to be converted to 8-bit.
Saving Image Color
Overly images will always be in color. If you want green-black, red-black or blue-black
images, you can add color with the rainbow at the left side of each image. Note that this
color will be used for the next acquired image.
Duplicate as Displayed (Main Taskbar) will save the images in color. This converts to
a 24-bit RGB image (same as an overlay) so your 12-bit adjustments will be permanent.
Both images are on the screen and you can save both at this time.
Or
Leave the image in grey scale and use the Overlay feature (main taskbar). Put the
image in the color desired and apply. This also saves a 24 bit RGB image.
Scale Bar
Always save the image first
If you did not save the magnification with the image you must calibrate the image:
Measure Menu--Calibrate distance
Load calibration file (C:\MM\app\mmproc\data\distance.CAL
Choose correct objective and zoom and click on Apply
Can apply to all open images to calibrate many at once, or
Leave menu open and apply to each image if desired
For the Motic camera, load the file that matches the image size in pixels that you
used.
Create a scale bar as follows:
Display Menu -- Graphics -- Calibration Bar
Adjust length, thickness and label
When choosing color, remember that white = 4095 (12 bits) or 255 (8 bits)
Look for the bar in the lower right corner, you may have to scroll to find it
Stamp Calibration Bar to see what it will look like. If you want to change it, Undo
immediately. You may want to save with a different name. The bar is permanent.
4
Image Information
File-Open, highlight any file name, will give exposure time, bit depth, image size,
magnification, binning, gain, offset, speed, etc.
OR—
Open image
Edit menu –Image Info—gives above info and more.
Click on any file to see thumbnail image. Not with 12-bit images.
Saving and Naming Images
Images save in TIFF format. The .tif. is added automatically. Do not compress your
images. Opening and closing compressed images causes loss of information over time.
There are several ways to save an image.
---Use Save As in the Main Taskbar
This is the same as File-Save as
---The most recently acquired image can be saved with the button in the Acquire window
that says Save new01 or whatever number you are on. This button cannot be used for
previously acquired images. Name the image if desired.
---To save several images with the same base name, eg goodexpt01, goodexpt02, etc:
Check Save w/sequence. Click on Set Save and set the base name and folder.
Click on Save basename01 and it will save with this name.
Only the most recently acquired image can be saved with this method. You can skip
images, but you cannot go back.
To save as 8-bit images immediately, click on Copy to 8-bit in the Main Taskbar. This
works with any open image, not just the most recently acquired.
MIF Server
Copy your files to our fileshare ( Z: drive) and retrieve them soon via information
provided on the User Info handout.
Both the hard drive and the server have limited space. Please delete your files when
you have backed them up.
After 1 month, your files may be deleted.
5
Transmitted Light (Bright Field)
Introduction
You can collect a bright field image of the same region as the fluorescent image
to aid in localization of your fluorescence. The bright field image can be overlaid
(merged) with the fluorescent image(s), see Image Processing.
Note: Adjusting the microscope for an optimal bright field image is more complicated
than fluorescence. It is highly recommended that you ask for help the first few times.
Kohler Illumination
Technically, this must be done each time you switch objectives.
Focus on your specimen in the microscope.
Close the field stop diaphragm at base of microscope.
Adjust the height of the condenser until the aperture is sharply focused.
Center the aperture with the centering screws.
Open the field stop until the light just fills the field and the aperture is no longer visible.
Close the condenser diaphragm part way for desired contrast.
Focal Plane
The focal plane you choose for bright field or DIC may not be the same as for
fluorescence. You should check focus between acquisitions.
Remember to change shutter
Differential Interference Contrast (DIC) – Nomarski
DIC is a method of enhancing the contrast of a bright field image. It has optical
sectioning qualities and is very good for viewing surfaces. The effect looks similar to a
scanning EM image, with a black ‘shadow’ on one side and a white ‘shadow’ on the
other side. The ‘shadows’ are formed by differences in refractive index or by differences
in height.
Microscope Set Up for DIC
First follow procedures above for Kohler illumination.
The upper polarizer (often called the analyzer) found on the right side of the
microscope just below the zoom wheel must be pushed in.
The Wollaston Prism, just above the objectives, must be pushed in.
The polarizer below the stage must be in place and aligned 90 degrees to the analyzer.
It usually is in place.
The condenser must be set for the objective being used. There is a setting for each
objective except the 4x and 10x.
The condenser diaphragm should be fully open.
Wollaston Prism
The Wollaston Prism (just above the objective) has a screw, which can be adjusted for
desired contrast. The full range of the screw is such that the image is darkest in the
center and brighter near the ends. The difference between the two sides is the direction
the ‘shadows’ fall on. The optimum setting is usually somewhat off center on either side.
Note that the use of this prism may cause a pixel shift, which could be an issue when
overlaying with a fluorescence image.
6
Image Analysis -- Measure Menu
Updated for new software. This is a brief overview. There are lots of things not mentioned here.
Defining Regions
Define region(s) with box or other drawing tool from Region Toolbar.
User Traced Line to click-draw any shape
See Region Tool Properties (last icon on Region Toolbar) for other settings
To delete active region, hit del key.
You can shrink, save, move, transfer, label, and color regions.
See Region menu, Region Toolbar and Edit-Preferences-Regions
Region Statistics
Choose source image
Check to use entire image or active region.
Spatial Stats: area, height, width, perimeter, etc. in pixels or um
You must calibrate the image to get values in microns.
Intensity Stats: ave, st dev, integrated, min, max. etc.
Can use + / - threshold See Threshold, below
Intensity measurements are generally best with single color images
Region Measurements
This is used for more than one region
Choose + / - threshold, all regions, active region, or entire image
Configure to choose desired measurements. Includes morphometry and intensity levels
Intensity measurements are generally best with single color images
Threshold
Icon on left toolbar or under measure menu
Choose auto threshold for light objects and adjust orange bar in left toolbar
Set transparency of threshold to see objects underneath
The threshold menu will give you numbers (?)
Try zooming up to 200% to set
Color Threshold
Best for real color bright field images
Choose color range: HSI, HSL, RGB (Hue, Saturation, Intensity, Luminosity)
Set by example uses mouse clicks on image to choose colors, go slow as you can only
undo one click.
Cut / Join Objects
Use icons in OverlayToolbar at top
See Overlay Properties (last icon in overlay toolbar)
Center of cross is where line goes.
Do in 200% zoom
Integrated Morphometry Analysis
Must have a threshold. You can threshold the entire image
Calibrate the image to get values in microns, otherwise you can use pixels
Select Measurements
Choose desired parameters to measure
They are listed but you must check Display to see the data
You can set filters for one or more measurements (see below)
7
Hit Measure (at bottom) Objects measured will be green with white border.
Border is an option under Preferences
Object Data—display of data
Click on any data point to highlight object on image or vice versa
Double click to remove any data point/object
Data Log is in this view
Reset Current to delete measurements and start over.
Filters
Use a filter if you want to limit measurements to objects of a certain
size range or grey value range.
Do a measurement first, then look through your values to choose a size cutoff or
average object size or intensity level
Can also use histogram to set parameters
Histograms
Choose X-axis, Set # bins.
Click on arrow in lower left of graph to change axes scales, etc
Set filters for classifying by moving red lines. Click on Set Filters from Calipers
Log Data
Configure log
Choose parameters to log. Options are dependent on measurement mode
Choose log column headings.
Open log, choose DDE, Excel, row, column
Each time you measure, hit log data, and it will go into the Excel file.
You will need a separate log file for each measurement mode, data vs summary, etc
Measure Linescan--Shows the variation in intensity across any line drawn on image
Histogram--Show intensity levels of image.
Calipers—Measure distance and angle between objects
Manually Count Objects--Marks each object after clicking with mouse.
Morphometry--Measure objects-creates a new image of objects, use as a mask?
Apps Menu
These have specific functions but can be used for other samples
Only work with 12 bit (or greater) images
Can identify objects based on a local difference in intensity over background
Use the mouse cursor to see the grey value of any pixel (at bottom of image window).
Click on display result image to get a separate image of objects. The original image has
an overlay that can be toggled on/off with green square icon at left of image.
Try some setttings, make large changes, refine
Example: Count Nuclei -- set minimum and maximum size and grey level over
background
Process Menu
You may want to do some image processing to make your images easier to analyze.
Median filter smooths out rough edges and intensity variations (noise, speckle)
Dilate grows objects so you can join them
Erode shrinks objects so you can separate them
Many other options
8
Collecting a Z-Series
Set Up
Attach Z-motor color to coarse focus of microscope
Must start MM with the Z-motor icon
Use Show Live in the Acquire window to determine the best exposure for entire series
Use a bright plane in your specimen
Insert and tighten focus motor sleeve on right focus knob. Push in while tightening
screw. Make very snug.
All focusing must now be done with the small knob next to the joystick.
Select Focal Planes to Collect
Devices Menu – Focus
Focus (with small knob on joystick) to lowest focal plane you wish to collect.
Click on Set Origin to make this position = 0
Click on Set Bottom
Focus slightly lower
For highest accuracy:
Click on Set Home
Collect against gravity, bottom to top.
Focus to highest desired focal plane
This is in the negative direction.
Click on Set Top
Close shutter
Return to a lower position than the
desired starting position if you will
repeat with another filter.
Set # of planes or spacing
Acquire Menu -- Acquire Z-series
Note:
Image storage: set to stack
Moving the focus knob towards you will
Choose shutter
move the stage down.
Start at -- bottom
Move to -- Top
After -- Home
Choose number of planes desired - or - number of microns between planes
OK to start collecting
Calibration: 1um =10 steps
Viewing / Processing a Stack
Stack Menu
Select Planes
Remove Planes
Compress into one image (Projection)
Under 3-D reconstruction -- choose angle = 0
3-D Reconstructions
Movie—to watch
Make Movie—to make an AVI or Quicktime movie
Use 5 or 6 (/30) frames per second
No compression or try Cinepak at 100% or IndeoVideo at 100% or 50%
Building a Stack or Montage
File menu – Open Special -- Build Stack
Use Numbered Names or Quick
Click on first file
Click on last file
9
Timelapse Imaging – Basic
Choose in Main Taskbar
For transmitted light or fastest times, use none for shutter
Interval—shortest is ~400msec, accurately
Uncheck time reporting
Set time or number of frames
There is a maximum file size based on RAM of about 10 min at 0.5msec
To go faster or longer
Uncheck viewing
Use center quad
Use binning
Use 0 Interval, but times may be uneven (you can get the values)
Save as .stk
Timelapse Imaging -- Advanced
This method does not have a RAM limitation?
Can go faster?
Apps – Multidimensional Acquisition
Main, choose Timelapse only
Saving, pick basename and folder for saving
Wavelength
Set Gain to 1
Set exposure time (match the acquisition window)
Use 20MHz (fastest)
Timelapse
Interval
Set duration or number of frames
Summary, to review
Acquire here
This saves a .nd file which can be opened in Metamorph and is like a .stk
Also saves individual .tif for each time point and some sort of thumbnail image
for each time point
Stream—this seems to crash the software
You can also collect a Z-series at each time point with this method
Note that the Motic camera cannot collect faster than 1 sec intervals
Both
Use Stack menu to manipulate
To get time stamp:
Display – Graphics – Elapsed Time
Stamp onto first image
Save as stack? or
Stack – Movie
Save as .AVI
10
PhotoShop (ver 5.5 or 6.0 of 7.0) with Metamorph
Enhancing Contrast or Adjusting Colors
Image--Adjustment--Levels
choose RGB or individual color
use the histogram to adjust brightness, black level, and gamma
After adjusting, you should save with a new name. The contrast changes you make are
permanent and if you don’t like the printout, you will want to start with the original image,
not the adjusted one. Always save the original image.
12-bit files (This doesn't always work, for reasons unknown)
Image will open all black.
Image--Adjustment--Levels
Move right-hand triangle down to about 25, hit OK
This essentially converts to 8-bit
Image--Adjustment--Levels
Now you should see a broader histogram
Adjust brightness, black level and gamma as desired.
Save with a new name as explained above.
Or, go back to MetaMorph and convert to 8-bit
Coloring Images
To make a Red/Black or Green/Black image from greyscale.
Open image
Image--Mode—choose RGB Color
Image--Adjust--Levels
Choose colors not wanted
Drag left triangle under histogram all the way to the right to eliminate this color
Repeat with other color not wanted. You will be left with the desired color.
Adjust as above.
Save image (You can get rid of the color by changing Mode back to Grayscale)
Saturated pixels will turn white with this method. To avoid this, try the following method:
Image--Mode--RGB Color
Image--Adjust--Hue/Saturation
Check Colorize
Saturation at 100% is probably best
Adjust Hue to ~120 for green, red is the default
Lower Lightness to color white areas and darken background
Save image
Or use Duplicate as displayed in MetaMorph.
11
Specifications
Microscope: Olympus BX50
Camera: QImaging Retiga Exi cooled CCD camera 1392 x 1040 pixels
Software: Metamorph Premier ver 7.7.5
from Molecular Devices, Inc.
Filters for the Olympus / Metamorph Digital Imaging System
Standard Filter Turret
Name
Dyes
Type
Wavelengths
Range
Cat #
UV
DAPI
Hoechst
360 / 40
400 DCLP
460 / 50
470 / 40
500 DCLP
515 LP
ET560 / 40
585pxr
630 / 75
ET470 /40
495pxr
ET525 / 50
340-380
31000
Chroma
FITC
Alexa 488
also red
TRITC
mCherry
Texas Red
GFP
Alexa 488
FITC
Excitation
Dichroic
Emission
Excitation
Dichroic
Emission
Excitation
Dichroic
Emission
Excitation
Dichroic
Emission
Name
Dyes
Type
FR
Cy 5
FITC+
Green/Red
Red
435-485
450-490
515+
540-580
11001
Chroma
49008
Chroma
695-665
450-490
NEW 11'11
500-550
NEW 11'11
Wavelengths
Range
Cat #
Excitation
620 /60
590-650
41017
Alexa 633
Dichroic
600
Alexa 647
Emission
700 / 75
662-737
Cyan
Excitation
436 / 20
426-446
Fluorescent
Dichroic
455 DCLP
Protein
Emission
480 /40
460-500
Yellow
Excitation
500 / 20
490-510
Fluorescent
Dichroic
515 DCLP
Protein
Emission
535 / 30
520-550
Cyan-Yellow
Excitation
436 / 20
426-446
FRET
Dichroic
455 DCLP
Emission
535 / 30
GFP
49002
Chroma
GFP Filter Turret
CFP
YFP
C-Y
Chroma
31044v2
Chroma
41028
Chroma
31052
Chroma
520-550
If you move a filter cube to another location, please put it back
12
Scale Factors for Qimaging Retiga Camera with MetaMorph
Obj
Zoom
um/
pixel
pixels/
um
Mag on
screen
Obj
Zoom
um/
pixel
pixels/u
m
Mag on
screen
100x
1
0.10
9.8
2800x
20x
1
0.52
1.94
585x
100x
1.25
0.08
12.28
3500x
20x
1.25
0.41
2.43
730x
100x
1.6
0.06
15.76
4480x
20x
1.6
0.32
3.12
935x
100x
2
0.05
19.8
5600x
20x
2
0.26
3.9
1170x
60x
1
0.17
5.85
1680x
10x
1
1.03
0.97
280x
60x
1.25
0.14
7.32
2100x
10x
1.25
0.83
1.21
350x
60x
1.6
0.11
9.41
2688x
10x
1.6
0.64
1.56
450x
60x
2
0.09
11.76
3360x
10x
2
0.51
1.95
560x
40x
1
0.26
3.89
1120x
4x
1
2.56
0.39
110x
40x
1.25
0.20
4.88
1400x
4x
1.25
2.04
0.49
140x
40x
1.6
0.16
6.26
1800x
4x
1.6
1.61
0.62
180x
40x
2
0.13
7.85
2240x
4x
2
1.28
0.78
225x
Objectives on Olympus Microscope
Objective
Mag
Immersion
NA
Working
Distance
Uses
U PLAN APO
4x
Dry
0.16
13 mm
Fluor / DIC
U PLAN APO
10x
Dry
0.4
3.1 mm
Fluor / DIC
U PLAN APO
20x
Dry
0.7
0.65 mm
Fluor / DIC
U PLAN APO
40x
Oil
0.5-1.0
120 um
Fluor / DIC
PLAN APO
60x
Oil
1.4
100 um
Fluor / DIC
PLAN APO
100x
Oil
0.5-1.35
100 um
Fluor / DIC
U PLAN APO
40x
H2O
1.15
260 um
Fluor / DIC
U PLAN APO PH
40x
Oil
0.5-1.0
120 um
Fluor / Phase contrast
U PLAN APO PH
100x
Oil
0.5-1.35
100 um
Fluor / Phase contrast
13