1
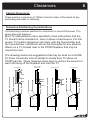
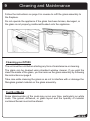
GAS FIREPLACE USER GUIDE
ST900
NORTH AMERICA
Ce manual est disponsible en Français sur demande
www.escea.net
630169_3_Manual_User_ST900_US_R-emotion
Any installation or service work carried out on this appliance must only
be done by a licenced or qualified service person.
The data plate for this appliance, containing technical information and
specifications, can be found to the right of the control tray, near the
base of the fireplace. To access this, the fascia must be removed.
Escea recommends the ST900 is inspected and serviced by a
licenced or qualified service person once every twelve (12) months.
DO NOT PLACE ARTICLES OR FURNISHINGS ON OR AGAINST THIS
APPLIANCE.
DO NOT OPERATE THE FIREPLACE IF THE GLASS HAS BEEN BROKEN,
DAMAGED OR IT IS NOT PROPERLY POSITIONED/HOOKED ONTO THE
FIREPLACE.
DO NOT
OPERATE THE FIREPLACE WITH THE FASCIA PANELS
REMOVED.
THIS APPLIANCE IS NOT INTENDED FOR USE BY YOUNG CHILDREN OR
INFIRM PERSONS UNLESS THEY HAVE BEEN ADEQUATELY
SUPERVISED BY A RESPONSIBLE PERSON TO ENSURE THAT THEY CAN
USE THE APPLIANCE SAFELY.
THIS APPLIANCE MUST BE INSTALLED IN ACCORDANCE WITH THE
MANUFACTURERS WRITTEN INSTRUCTIONS.
THE GLASS SURFACE ON THE FRONT OF THE FIREPLACE IS
CONSIDERED A WORKING SURFACE, AND AS SUCH IS HOT AND CARE
MUST BE TAKEN NOT TO TOUCH THIS SURFACE. IT IS RECOMMENDED A
SECONDARY GUARD IS FITTED IN PLACES WHERE THERE ARE YOUNG
CHILDREN OR AGED OR INFIRM PERSONS.
CURTAINS SHOULD NOT BE POSITIONED ABOVE THE FIREPLACE AND
ANY PROTRUDING LEDGES MUST NOT COME WITHIN THE MINIMUM
DISTANCES SPECIFIED IN SECTION 5.1 OF THE INSTALLATION MANUAL
SUPPLIED WITH THIS APPLIANCE.
YOUNG CHILDREN SHOULD BE CAREFULLY SUPERVISED WHEN THEY
ARE IN THE SAME ROOM AS THE APPLIANCE. TODDLERS, YOUNG
CHILDREN AND OTHERS MAY BE SUSCEPTIBLE TO ACCIDENTAL
CONTACT BURNS. A PHYSICAL BARRIER IS RECOMMENDED IF THERE
ARE AT RISK INDIVIDUALS IN THE HOUSE. TO RESTRICT ACCESS TO A
FIREPLACE OR STOVE, INSTALL AN ADJUSTABLE SAFETY GATE TO KEEP
TODDLERS, YOUNG CHILDREN AND OTHER AT RISK INDIVIDUAL OUT OF
THE ROOM AND AWAY FROM HOT SURFACES
International LTD
375b Green Valley Road
Griffin GA 30224
E-mail: [email protected]
Web: www.escea.net
Phone: 866 615 3096
Contents
> Basic Operation
Turning the ST900 on
Setting the Control Mode
Locking the Remote Control
Operation from the touch pad
1
2
5
5
> Clearances
6
> Cleaning and Maintenance
8
> Normal operating Sounds and Smells
10
> Warranty Information
11
The ST900 electronic control system is designed to work within the
temperature range of 0°C to 70°C, with a humidity level that is non
condensing. This is to ensure safe operation of the electronic and
gas control system.
If the fireplace is subjected to an environment with temperatures
very close to or exceeding these temperature limits (irrespective of if
the fireplace is on or off at the time) the fireplace may not start up
until the temperature returns back to within the operating range.
To remedy this the environmental temperature should be addressed
and the fireplace control system given time to adjust accordingly.
The fireplace should then function correctly.
1
Basic Operation
The ST900 remote control allows you to turn ON and OFF the fire, control the
flame height in the Manual mode, or control the room temperature in the
Thermostat mode. The remote has a maximum range of 10 meters, and
because the remote works by radio frequency, it does not need to be aimed at
the ST900 for it to operate.
Switching on the ST900
When first powered the remote starts at the OFF screen (it is possible that the
remote is locked in the OFF screen: to unlock it just press the button below
Unlock, and then OK).
Switching on: Once the remote is unlocked, press On (left button) and OK
(middle button). A beep from the control unit will be heard, and the ignition
process starts (the pilot will start sparking and gas will start flowing to the pilot,
which should then be lit within a few seconds).
If the pilot flame fails to ignite, you must turn OFF the ST900 from the remote
and start the process of turning it ON again.
Basic Operation
2
Switching off the ST900
To turn off the fire, push the OFF button, to shut down the gas flow to the fire
and switch it off. The OFF display will now appear in the display.
Setting the control mode for the fireplace:
There are three different modes for controlling the appliance:
> Manual
> Automatic
> Program
Automatic mode allows you to set a temperature, while in manual mode the
flame level may be set to HIGH, MEDIUM, LOW & PILOT. Program mode
offers automatic temperature control for specific times of the day.
In the initial screen when the remote is turned on, three options are available:
AUTO, MANUAL and MENU.
Auto and Manual are two of the three different modes for controlling the
appliance with the remote.
Manual mode:
If Manual is pressed, Pilot appears as the selected
setting. In the bottom row, ↓ and ↑ appear,
indicating that the flame level can by changed by
just pressing the left or middle button. There are four
possible flame positions: Pilot flame, Low flame,
Medium flame and High flame. Pressing Back (right
button), returns to the initial screen. Note that a
Safety temperature can be previously set in the
configuration menu. This specifies the maximum
the maximum permitted room temperature. This
temperature can never be set higher than 40ºC (104
ºF).
3
Basic Operation
Automatic mode:
If Auto is pressed in the initial screen, 25ºC (77 º F)
appears as the desired temperature in the selected
setting. In the bottom row, ↓ and ↑ appear,
indicating that we can change the desired
temperature value by just pressing the left or middle
button. In auto mode the appliance heats until this
temperature is reached. Limits are 0-37ºC (3299ºF).
Pressing Back (right button), returns to the initial
screen.
In this mode the main burner can be switched on and off.
Program mode:
By default the program mode is not enabled. To enable program mode, enter
configuration mode by pressing and holding the OFF button for 40 seconds,
selecting “Programming” and selecting “yes” (For more information on
configuration mode see the installation manual, section 19.9).
There are two types of program mode: a Daily mode and a Weekly mode. In
the daily mode, every day uses the same program. In the weekly mode, every
day has its own program, so it is possible have a different program for each
day of the week.
In this mode the main burner can be switched on and off (pilot still burning).
Day programming menu: (Menu → Adjust Menu → Change Program)
There are 8 menus like this. One for Daily, and the others for each separate
day (Monday, Tuesday, Wednesday, Thursday, Friday, Saturday and
Sunday).
(Continued next page)
Basic Operation
4
Program mode (continued)
The daily program screen consists of:
A: Selected (including “Daily”). The selected
day can be changed by pressing Change
(middle button).
B: Day schedule graphic. This bar displays
the program for the whole day by showing
the temperature setting for each hour of the
day. To access the day schedule graphic,
press ↓ (left button). To change the desired temperature, go to the hour you
want to change by pressing → (left button) and then press change (middle
button).
There are 3 temperature settings (bars):
Off
[Small bar] No temperature control (the appliance is in pilot
mode).
Night Temp
[Medium bar] The night temperature is set as the desired
temperature and the appliance will heat until this
temperature is reached. To adjust the night temperature
press “Menu → Adjust menu → Night” and set the desired
temperature.
Comfort Temp
[Large bar] The comfort temperature is set as the desired
temperature and the appliance will heat until this
temperature is reached. (High bar). To adjust the comfort
temperature pres Menu → Adjust menu → Comfort and set the
desired temperature.
Finally, to launch the program mode, in the main menu, set Program to On,
and select the desired Program Type (Daily or weekly). When activated, the
screen will show which of the above temperature settings is currently active,
Off, Night, or Comfort. The pilot must remain lit in order for the program to
remain running.
Changing the display from Celsius to Fahrenheit:
Go into Menu → Adjust menu → Unit. Press middle button and then left button
for changing units.
5
Basic Operation
To Lock / Unlock the remote control buttons:
Go into Menu → Lock. Press middle button and then left button for locking the
remote.
To unlock pres left button and then middle button.
Operation from the Touch Pad
The touch pad is intended to be used for service/diagnostic purposes and to
operate the fire in the event that the remote handset becomes lost or inoperative.
If you remove the fascia you will find an electronic touch pad in the lower centre of
the fire. The touch pad features the basic operations of the fire: On, off, and
manual adjustment of the flame height.
To turn on the ST900, push the ON/OFF button on the touch pad. The system will
emit a beep and begin the ignition process, which can take about 20 seconds.
Once the start up process is complete, the pilot flame is lit. The ST900 is now in
the 'Manual' mode and ready to be used.
While the pilot is lit, press the 'Flame Up' or 'Flame Down' button to alter the flame
height. The LED will flash once and the unit will beep to confirm the flame height
has been adjusted. The ST900 has 4 flame positions: Pilot only, Low, Medium,
and High flame height.
If the 'Flame Up' button is pressed while the unit is in the 'high' flame position,
nothing will happen. Similarly, if 'Flame Down' is pressed while the unit is in the
'pilot' flame position, nothing will happen.
To shut down the gas flow to the ST900, press the On/Off button and the LED will
begin to blink and the unit will emit a beep.
DO NOT DROP THE REMOTE.
Dropping the remote may result in a cracked LCD screen or malfunctioning components.
The warranty does not cover damage to the remote sustained by dropping, however
replacement remote controls are available.
6
Clearances
Cabinet Clearances
There must be a minimum of 100mm from the sides of the fascia to any
protruding side walls or cabinetry.
Television Positioning Considerations
It is becoming common practice for consumers to mount flat screen TV's
above their gas fireplace.
Most TV manufacturers have specified in their instructions that the
TV should not be installed on, near or above a heat source. For this
reason TV location decisions rest solely with the householder and
the manufacturer / distributor will not be held liable for any adverse
affects on a TV located near to the ST900 fireplace that may be
caused by heat.
The drawings below are suggestions that may be used as a GUIDE
for those consumers who do decide to locate their TV above an
ST900 gas fire. These drawings show ways to reduce the amount of
warm air rising off the fireplace and onto the TV.
Flush TV with
small mantle
Recessed TV
Mantle above fire
Protruding fire
2”
2”
2”
4”
2”
2”
2”
2”
4”
Mantle
Mantle
20”
20”
20”
20”
7
Clearances
The material that the wall and mantle are made from will also affect
the operating temperature of the TV so it is the customers
responsibility to satisfy themselves that their TV mounting and mantle
design will not exceed the listed maximum operating temperature of
their electronic goods.
Replacing Batteries
When batteries are replaced in either the battery box (inside the
fireplace) or in the handset, the unit will require 1 minute afterwards
to regain connection.
ST900 Mantle Clearances
If any part of the installation (mantle, wall
or cavity) is constructed from
COMBUSTIBLE materials, the diagram
below shows the maximum allowable size
for mantles or protruding surfaces
mounted above an ST900
If the entire installation (mantle, wall and
cavity) is constructed from NONCOMBUSTIBLE materials, then the
clearances to mantles or protruding
surfaces mounted above an ST900 may
be as shown by the shaded area in the
diagram below
Cleaning and Maintenance
8
Annual Servicing
Your ST900 Decorative Gas Fireplace requires that annual service checks be
carried out by a Registered Installer to ensure that it will continue to operate in
a safe manner.
Please ensure that you schedule annual service checks for your ST900 with
your local Registered Installer or service agent.
Removing the ST900 Fascia
Ensure the fascia is allowed to cool before handling.
The ST900 fascia attaches to the fire by four hooks. To remove the fascia,
simply lift it upwards 15-20mm, and pull towards you. Care should always be
taken when handling the fascia.
To replace the fascia, line up the four hooks with the matching receptacles on
the fire and push the fascia into place and let it drop down, the fascia should
now be securely in position
If you have a Velo fascia, the instructions above also apply (lift upwards then
outwards), however before removing the fascia the lower trim must be
removed
Removing the ST900 Glass Assembly
Ensure the ST900 is allowed to cool before continuing with the following
procedure.
Pull the four hooks shown below towards you and then away from the glass
to release the glass frame underneath the hook.
Lift the glass assembly towards you to clear the locating supports and
place it flat upon some newspaper or a sheet of cardboard to protect your
floor coverings.
9
Cleaning and Maintenance
Follow the instructions on page 8 in reverse to refit the glass assembly to
the fireplace.
Do not operate the appliance if the glass has been broken, damaged, or
the glass is not properly positioned/hooked onto the appliance.
Cleaning your ST900
The unit must be cold before starting any form of maintenance or cleaning.
The glass can be cleaned using standard window cleaner. If you wish the
clean the inside of the glass, you can remove the glass assembly by following
the instructions on page 8.
Take care while cleaning the glass so as not to interfere with or damage the
fibreglass gasket material on the glass assembly.
Fuel Bed Media
Some discolouration of the coals may occur over time, particularly on white
coals. The gravel, driftwood, or glass layout and the quantity of material
contained therein must not be altered.
Sounds and Smells
10
Note: Each time the fire is lit from cold the glass will fog up with condensation.
This is normal and the condensation will disappear within a few minutes once
the glass heats up.
Sounds
It is possible that you will hear some sounds from your gas appliance. This
is perfectly normal due to the fact that there various types of materials used
within your appliance. Listed below are some examples. These are all
normal operating sounds and should not be considered as defects in your
appliance.
Gas Control Valve:
As the gas control valves turn ON and OFF, a dull clicking sound may be
audible, this is normal operation of a valve. When the fire is switched off
after being run for a while, there may be popping and fluttering noises as
the residual gas in the burner burns away. These are normal and should be
no cause for concern.
Unit Body / Firebox:
Different types and thickness’ of steel will expand and contract at different
rates resulting in some “dull drumming” and “ticking” sounds being heard
throughout the cycling process.
Smells
The first few times the unit is operated, the unit may release an odour and
the flames may appear orange caused by the curing of the paint, the
burning off of the starch in the gas coals and the oils in the metal. This is a
temporary curing process which will disappear with use.
11
Warranty
WARRANTY TERMS & CONDITIONS:
LIMITED WARRANTY:
Provided that the Product is installed as per ESCEA's Installation Manual and the
step by step warranty procedure has been followed as per instructions issued by
ESCEA, (documented in the Dealer Manual), and the product is operated and
maintained in accordance with ESCEA operating and maintenance instructions,
then for the first period of twelve (12) months from the date of purchase ESCEA
will pay to the dealer who sold the appliance, a pre-determined sum to repair or
replace any part of the Product that is deemed by ESCEA to be faulty.
For the second period of twelve (12) months from the date of purchase ESCEA will
supply replacement parts only, without charge.
Parts and Labor for the first twelve (12) months:
a)
ESCEA, at its sole discretion and through its dealer, may modify, adjust,
repair, or replace the faulty products. The warranty period on parts and
labor shall be for twelve (12) months from the date of purchase.
b)
Pre-determined labor costs will only be reimbursed when ESCEA
specified procedure has been followed, and ESCEA has authorized
service work before it was carried out.
Parts Only for the second twelve (12) months:
a)
ESCEA, at its sole discretion, will provide replacement parts to its dealer
for the benefit of an end user. Faulty parts MUST be returned to
ESCEA. The parts only warranty period shall be for twelve (12) months
and will commence twelve (12) months after the acceptance date of the
Products by the ESCEA retailer.
General Terms and Exclusions:
1.
All repairs made within the Limited Warranty period shall be covered by
this Limited Warranty for a period of three (3) months from the date of
completion of the repair, or for the remainder of the overall Limited
Warranty period, whichever is the longer.
2.
If the buyer or any other party modifies any part of the product within the
Limited Warranty period without the prior written consent of ESCEA then
the Limited Warranty shall be void.
ESCEA may, at its sole discretion, decide that the Limited Warranty is
void in relation to any part of the product, which has been modified.
Warranty
3.
4.
5.
6.
12
ESCEA must be notified of all claims under this Limited Warranty as
soon as possible, but in any event not later than two (2) weeks of the
claimant becoming aware of the circumstance giving rise to the claims.
No ESCEA Distributor, retailer, employee or other third party is
authorized to make any modification, extension, or addition to this
Limited Warranty, whether verbal or written.
ESCEA reserves the right to discontinue products or make substitutions, in
such event, the buyer may receive a substitute product or a cash
refund at ESCEA'S sole discretion, if a replacement for the product
covered by this Limited Warranty is no longer available.
ESCEA is not responsible for damage arising from failure to follow
instructions for the product's installation, maintenance and permitted
and proper use. The Limited Warranty does not cover damage caused
by use with non-ESCEA products or damage caused by accident,
abuse, misuse, weather, fire, flood, earthquake or other external causes.
Products where an ESCEA serial number has been removed or defaced
or damage caused by incorrect fuel type or flueing are also not covered.
Cosmetic damage, including but not limited to paint blemishes,
scratches, non structural surface rust, water damage and normal fair
wear and tear are not covered as well. Gas Fireplaces require annual
service, problems caused by not having this service done such as (but
not limited to) dust and debris build up, flat batteries, insects present in
burners, incorrect gas pressure and worn thermocouples are also not
covered under this warrantee.
LIMITATION OF REMEDIES:
TO THE EXTENT PERMITTED BY LAW:
This limited warranty, and the remedies set forth above, are exclusive and in lieu of
all other warranties, remedies and conditions, whether verbal or written, statutory,
express or implied.
Escea specifically disclaims any and all statutory or implied warranties and
conditions, including, without limitation, warranties of merchantability, fitness for a
particular purpose and warranties against latent defects.
Except as provided herein, Escea is not responsible for direct, special, incidental or
consequential loss or damages resulting from any breach of warranty or condition,
or under any other legal theory, including but not limited to the loss of any of the
13
Warranty
following: use; revenue; actual or anticipated profits (including loss of profits on
contracts); use of money; anticipated savings; business; opportunity; goodwill;
reputation; any or indirect or consequential loss or damage howsoever caused
including the replacement or equipment and property.
Some states in Canada and in some States in the United States do not allow the
exclusion of incidental or consequential damages, so the above limitation may not
apply to buyer.