1
Using the TMA 1600-III
NOTE: If you purchased a standard ScanMaker 9800XL Plus without the TMA 1600-III, see only the section on
positioning reflective materials without the TMA 1600-III, on page 5.
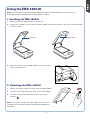
I. Installing the TMA 1600-III
1.
Make sure that the scanner power is turned off.
2.
Remove the scanner lid, then attach the TMA 1600-III by sliding the posts at the rear of the TMA 1600III into the holes.
TMA 1600-III
0
11
2
1
33
3
44
4
5
5
6
6
Scanner lid
00
1
11
2
22
3
4
4
5
55
6
6
3.
Plug the connector of the TMA 1600-III into the scanner’s
15-pin accessory port.
II. Unlocking the TMA 1600-III
1.
Remove the yellow “Step 3” sticker from the TMA 1600-III.
2.
Look for the locking knob at the base of the TMA 1600-III.
3.
Turn the locking knob counterclockwise to the unlock
position “ ”.
NOTE: If you need to transport your TMA 1600-III, you will have to
lock it back. For more details, please see the ScanMaker 9800XL Plus
User Guide.
3
33