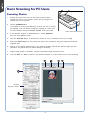
1
Basic Scanning for Mac Users
1.
Place the scan material.
•
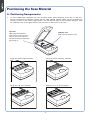
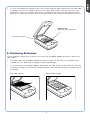
To scan a photo, place the photo on the upper glass bed, as detailed in the “Positioning Reflectives”
section in this guide.
•
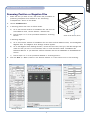
To scan film, use the film holder, as detailed in the “Positioning Transparencies” section in this
guide.
2.
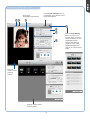
Launch ScanPotter as a stand-alone by clicking on the program icon, or by selecting it from the
application folder in your Mac OS X system.
3.
In the Scan Source options menu, depending on the scan material you are using, choose either Reflective
for photos, Negative Film for negatives, or Positive Film for transparencies and slides.
4.
Specify your scanning requirements in the Scanner Settings column.
a)
Select the appropriate image type (e.g., RGB Color) in the Color Type as your image output type.
- Select Color to scan the image in color.
- Select Grayscale to scan the image in grayscale.
- Select Black & White to scan the image in black-and-white.
b)
Select a desired resolution in the Resolution for your image output resolution.
c)
Select Automatic Detection or a desired dimension in the Scan Frame as your preview image size.
5.
Click the Preview button to perform a preliminary scan of the image in the Preview window.
6.
If necessary, resize the scan frame (floating dotted rectangle) around the image by dragging on the
square spots on the edge or on the corner of the scan frame to determine the final size of the actual
scan.
7.
If necessary, specify file settings for your output image files, using the options offered in the File Saving
Settings column.
8.
If necessary, click the Image Settings button to switch to a window in which you can select a preset
image effect to the image directly or adjust image quality manually by using the additional image
correction tools.
9.
Click the Scan button to start scanning.
NOTE: For details on scanning photos and film, see the ScanMaker 9800XL Plus User Guide in the Microtek Software CD/
DVD.
8