1
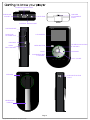
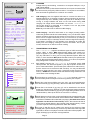
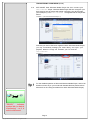
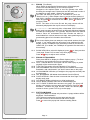
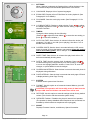
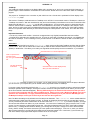
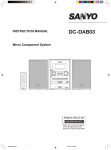
Doc. ID: EPMX72-UM-1_2
Page
1.
2.
3.
4.
4.
6.
7.
8.
9.
10.
11.
12.
13.
14.
15.
Safety Tips
Overview of controls
Using the controls
Charging the Internal Battery
Transferring your Media
Music Play
Movie Play
Audio Recorder
FM Radio
Photo Viewer
Text Viewer
System Settings
Using SD Cards
Appendix A (Introduction to Media Coder)
Appendix B (Introduction to TextMorph)
This User Manual is protected by copyright. No part of this document may copied or distributed by any means without prior
permission of BAYLIS Next Generation Ltd except for personal use in connection with the operation of the relevant product.
Other party trade names and software names may have been included within this document for reference and illustrative
purposes only. It is acknowledged that such names are used only in such context and that their Intellectual Property and
Copyright remain with the appropriate owner(s) and it is not intended nor implied that any connection exists between such
trade names and BAYLIS Next Generation or their associates.
Safety Tips.
DO NOT connect any accessories (apart from headphones) to this device other than those specifically
advised by BAYLIS for this device.
NEVER listen to headphones / earphones at high volume settings for prolonged periods. Permanent hearing
damage has been proven to occur to those who regularly listen to excessively loud music.
NEVER attempt to open, or otherwise service this product. If in doubt consult a qualified service engineer.
DO NOT listen to headphones / earphones whilst in charge of a motorised vehicle, or whilst participating in
activities that require your full attention. Always be aware of your surroundings.
DO NOT subject the device to shocks or falls. The internal LCD screen is made from glass and could be
damaged by being dropped or crushed.
DO NOT allow the unit to become excessively wet, or left in damp areas. The device is reasonably shower
proof if used outdoors but avoid letting it become soaked, and always dry it thoroughly afterwards with a soft
towel. Keep the player away from sand, dust, and water. Outer surfaces can easily be scratched - take care
of it as you would a camera for example.
DO NOT use this product for any other purpose that those specified within these instructions.
ALWAYS keep a backup copy of your media files and data that you store on this device! The memory area
of this device can very easily be erased, either by accidental operation, or malfunction. The manufacturer
cannot be held responsible for loss of data howsoever caused.
Page 1
Copyright BAYLIS Next Generation Ltd. England. © 2008
POWER & LOCK BUTTON
EARPHONE
SOCKET
LANYARD
ATTACHMENT
POINT
LIGHT LENS
MIC
INTERNAL MICROPHONE
BAYLIS
SYSTEM RESET
LCD SCREEN
SD
DOOR FOR
SD CARD SLOT
USB PORT
UP MENU NAVIGATION
& VOLUME +
MENU BUTTON
AUDIO
INPUT SOCKET
FORWARD
BACK
DOWN MENU NAV
& VOLUME r
SPEAKER
e
v
o
l
u
t
i
o
n
PLAY / PAUSE
BAYLIS
PUSH BUTTON FOR
LIGHT
GENERATOR
HANDLE
Page 2
Copyright BAYLIS Next Generation Ltd. England. © 2008
NOTE: Some buttons have two actions depending on the concept of
a brief press (short-press) or a press-and-hold (long-press).
Power Button
1.1
POWER BUTTON: Slide switch towards
and then release to turn
the device on. To turn OFF slide switch towards
and HOLD for 2
seconds. Slide to
to lock all the controls against accidental
operation (ie if carrying device in a pocket etc.)
1.2
MENU BUTTON: When the unit is working in a specific function (ie
Music Play for example) a short-press on the MENU button will
display a popup Options Menu that is relevant to that function.
Long-press MENU will return you to the previously shown menu or
Main Menu.
VOLUME CONTROLS: During "Now Playing", FM Radio, Movie
Play, Photo View, Ebook reading, Press / to change the volume
step-by-step. Long-press to smoothly increase / decrease the
volume.
Volume cannot be adjusted while any menu is displayed. You
can adjust volume when the following screens are displayed:
"Now Playing" / Ebook page display / a photo is viewed / a movie
is playng / FM Tuner is displayed.
WARNING! Do not listen at high volume for prolonged periods.
Permanent hearing damage is known to occur to those who
listen to high volume sounds for extended periods.
An automatic safety system always resets the volume to midpoint whenever an earphone jack is inserted.
Menu Button
Volume Keys
1.3
Play/Pause Key
1.4
PLAY / PAUSE KEY:
At the Main Menu, press PLAY to instantly begin play of the current
playlist or to pause current playback.
In Music or Movies mode this key will start or pause playback of the
current media.
In FM Radio mode this key will play or mute the radio.
In Recorder mode, press PLAY to commence recording. Press this
key again to pause recording.
In Photo mode this key will start / stop slide-show.
In Ebook mode this key will start / stop auto page-turning.
1.5
NAVIGATION KEYS:
Whilst a menu is displayed press / to move the menu highlight
(then press to choose the highlighted item, or
to return to a
previous menu).
Whilst the "Now Playing" screen or a Movie is displayed press / to
load the previous or next song or movie file. Long-press these keys
to Fast Forward or Rewind the current song or movie.
Press
/ to adjust the volume (see Volume Controls 1.3).
1.6
KEY-LOCK: (See diagram to the left)
Set to centre (normal) position:•
Enables all control keys.
•
Enables recharge by internal windup generator.
Navigation Keys
Key-Lock / Charging Switch
NORMAL
(Int. Charge)
LOCKED
(Phone Charge)
Set to
position:•
Locks all control keys to prevent accidental pressing. (At
system startup, do not engage KEY-LOCK until the device
has finished booting up)
•
Enables mobile phone charging by windup generator.
Page 3
Copyright BAYLIS Next Generation Ltd. England. © 2008
2.1
CHARGING
Charge either by hand winding, connection to a computer USB port, or by a
USB charge adapter.
When the unit is new (or after several months of non-use) we recommend that
the device be fully charged by USB connection. If a computer is not available,
then hand wind the generator for a minimum of 2 minutes.
2.2
USB Charging: Use the supplied USB cable to connect the device to a
suitable USB port on a computer (or laptop). Some computers can provide a
charge whilst they are in Standby, others may need to be actually on and
running. A charge indication will show on the LCD screen during USB
charging. Full charge will be reached after 3 to 5 hours. r e v o l u t i o n
cannot play whilst it is connected to a computer, but it can play whilst
connected to a USB charger adapter.
Note: Key-Lock switch has no effect for USB charging.
2.3
Hand Charging: Set KEY-LOCK switch to int. charge (normal) position.
Unfold the generator handle and rotate steadily in any one direction. Make
about 2 revolutions per second and continue for a minimum of 1 minute. The
device can be charged intermittently to suit your convenience. (ie winding it
for 1 minute each day for a few days will soon achieve a significant capacity).
If the battery is already full, the generator may disengage to protect the
battery from over-charging, causing the crank to feel loose. This is quite
normal, and there is no need to continue cranking.
3.1
TRANSFERRING YOUR MEDIA
The r e v o l u t i o n supports two different types of USB communication
modes:- “MSC” or “MTP”. MSC (Mass Storage Class) mode causes your
player to appear on your PC as a generic “Removable Disk”, and you can
copy any data files to or from your PC using Windows Explorer, MAC OS
Finder, or Linux interfaces. MTP (Media Transfer Protocol) is a special mode
used by Microsoft Windows Media Player version 10 or above, and permits
easy management of media to and from your device.
3.12
MSC MODE: Connect your r e v o l u t i o n to a computer via the USB
cable provided. The device will appear in your “My Computer” window as a
pair of “Removable Disks”. (The first of the pair is the device’s main memory,
and the second one is the device’s SD card slot). You may use Windows
Explorer to "drag-and-drop" your music / video files into the device’s internal
memory. NEVER disconnect the cable while data are being transferred - this
could cause a loss / damage of data.
Key-Lock / Charging Switch
NORMAL
(Int. Charge)
Charging a Mobile Phone
LOCKED
(Phone Charge)
Connect the supplied Phone
Charge wire between the
player’s USB port and your
phone’s charge port. (The
supplied wire fits 3mm Nokia
ports - use an adapter to suit
other phones as required).
Slide the player’s Power Switch
to the locked
position, then
crank the player’s generator
handle approx 2 revs / sec to
charge phone.
My Computer
Example layout of r e v o l u t i o
internal memory (folders / files)
n
Removable Disk (F:)
Mic Recordings (folder)
FM Recordings (folder)
Line-in Recordings (folder)
Music (folder)
The first time you connect your r e v o l u t i o n to a computer, there may
be some delay while the Player becomes recognised by the computer.
Any photo files.jpg (file)
Any movies files.avi (file)
Any text files.txt (file)
THE FOLDERS IN RED SHOULD NOT BE DELETED OR RENAMED
READY
"READY”
indicates
system idle (no data is
transferring) - so it is
safe to disconnect
Music files in the format of MP3, wma, wav, AAC, ogg can be transferred to
the device directly (by drag-and-drop). Place music files in the "Music" folder.
Photo files in the format of jpg, bmp, gif, can be transferred to the device
directly (by drag-and-drop). However, for best results large images should be
scaled down before transferring (by using an image editing software such as
“Windows Paint”). Place photo files in the root of the int. memory.
Movie files that conform to the correct specifications may be transferred to the
device directly. For the best results use the Media Coder software supplied
on the BAYLIS Utilities CD included with your player. (See Video Conversion
Appendix A at the back of this manual). NOTE: We recommend that all
movie files are stored directly in the root area of the Internal memory, unless
you have a specific need to organise them within disk Folders.
Any type of data file can be copied to the player for the purpose of data
storage (like a generic flash drive), however only media files of the supported
types will be shown in the player’s browse screens and will be playable - the
player will simply ignore all other unrecognised files.
Page 4
Copyright BAYLIS Next Generation Ltd. England. © 2008
TRANSFERRING YOUR MEDIA (Cont.)
3.13
MTP MODE: Start Windows Media Player first, then connect your
r e v o l u t i o n Player. Windows Media Player will then recognise your
device and a pop-up window will appear confirming your device setup
(see Example 1). Your r e v o l u t i o n will register itself as "Baylis EPMX72".
EXAMPLE 1. (Microsoft Windows Media Player 11)
Now that your device has been registered within Windows Media Player,
you may conveniently manage your music library, and “Sync” your
playlists, albums & songs etc. between your PC and the
r e v o l u t i o n .
EXAMPLE 2.
For the detailed operation of Microsoft Windows Media Player, and for full
details on how to Sync your media with Portable Devices please refer to
Microsoft’s on-line help (accessible from within Windows Media Player).
READY
"READY”
indicates
system idle (no data is
transferring) - so it is
safe to disconnect
Page 5
Copyright BAYLIS Next Generation Ltd. England. © 2008
4.1
MAIN MENU:The Main Menu provides access to all functions. Press
/
to
navigate through the Menu choices. Press to choose desired function.
If the Main Menu is not displayed, long-press the Menu Button.
5.1
MUSIC:
When MUSIC is selected, the Browse screen will be displayed. If you
have music files on an SD card, you DO NOT need to select "SD Card"
unless you wish to browse the card's file folder structure. All songs
(both Internal Memory & SD) can be accessed very conveniently via
"Play All" or any of the playlists such as artists / albums etc. Again,
simply use the Navigation Control to scroll and choose.
Whilst navigating the browse lists, playlist categories & folders are
shown simply by name, while actual tracks (songs) are shown as
"filename.xxx" (Where the last 3 letters indicate the file type, ie "mp3").
Main Menu
M
Music that you download from Music Retailers or converted from CD's
etc. contain meta data such as Artist name and Album art images.
r e v o l u t i o n uses this data to create its internal playlists. Such data
may not exist in music files that you have recorded or created yourself.
Microsoft Windows Media Player 10 (WMP10) or later contains utilities
for adding or changing these data. Refer to the online help within the
WMP interface for details. (Look for tagging).
Choose "Now Playing" to resume playing from a previously chosen list.
5.2
Music Browse
“NOW PLAYING” SCREEN:
Whilst the “Now Playing” screen is shown, press MENU to display a
sub-menu of options.
Playlists explained...
Now Playing Screen explanation
r e v o l u t i o n maintains groups of
songs called "Playlists".
"Now Playing" is a volatile Playlist that
changes every time a new list is
chosen. "Now Playing" is also known
as the "Queue". The Now Playing
screen shows the quantity of songs in
the current Queue.
For example, you could use the
Browse list to locate a new Album. If
you select the Album name, then
select Play All, the songs of that
Album will replace the existing
Queue. If however, you select the
Album name, then press MENU key
and then select "Add to Queue" the
existing Queue will not be replaced,
but the songs of that Album will be
added to the end of the existing
Queue.
Individual songs or entire Playlists
such as specific Albums or Artists can
be added to the Queue.
Individual songs only can be added to
the "Favourites" playlist. "Favourites"
is non-volatile and can be kept, edited
and played whenever you wish.
Clock
Window title
Battery status
Artist name
Song name
Album name
Song progress
Album Art
Play / Pause
Status indicator
Playlist track quantity
Play Mode indicator
Encoding rate
Time elapsed / Track length
EQ mode
The Play Mode indicator will show
for Repeat Play, or
Repeat One (repeats same song over and over), or
play. (See below for mode setting).
5.3
5.31
for
for Random
NOW PLAYING OPTIONS:
Press the Menu key to show the Options pop-up. Use the navigation
keys to scroll and select desired options:P l a y m o d e will show you a list of playing and repeat modes.
E q u a l i s e r will show you a choice of sound effect modes.
A d d t o F a v o u r i t e s will add the currently playing song to your
“favourites” playlist.
PLAYMODE: Options include; Random / Normal (default) / Repeat All
(repeats the current Playlist) / Repeat One (repeats only the current
song).
To play the entire contents of your player, simply choose "Play All" from
the music Browse list.
Page 6
Copyright BAYLIS Next Generation Ltd. England. © 2008
M
5.32
EQUALISER: Options include; Natural / Rock / Pop / Classical / Jazz /
Custom EQ.
As you move the highlight bar over the various EQ settings you can hear
the effects instantly. Press to accept the highlighted setting.
Custom EQ provides a 5-band equaliser interface that allows you to
increase or decrease the sound of 5 different frequency regions to tailor
the sound to your personal listening preference.
Now Playing - Options
5.33
Press
/ to move the sliders, and / to change frequency. Press
PLAY to save changes or press MENU key to cancel changes.
ADD TO FAVOURITES: Press to add current song to your Favourites
playlist.
5.4
EXIT NOW PLAYING
Long-press MENU to return to the music Browse list (you can continue
to browse your music collection etc whilst music is playing). Long-press
MENU again to reach the Main Menu.
You can continue to play music, even whilst reading Ebooks or browsing Photos.
However you can only interact with the playlist when the Now Playing screen is
displayed.
6.1
MOVIE PLAY:
When Movies are selected the Browse screen will be displayed.
Select from Internal Memory or SD Card as required.
Navigate to the required folder or movie file, (please note: while
browsing the storage area, Folders and media files are listed in order of
the dates they were added - Oldest first, newest last).
Movie files will always be shown as "Filename.xxx" (such as
"movie01.avi" etc.), whilst Folders show up as just a name. Highlight a
movie file and press to begin playback. Highlight a Folder name and
press to browse that Sub-folder, press to return to previous Folder.
6.11
During movie play, press MENU to end movie play.
Main Menu
Main Menu
If playback fails, or is slow, or the player's controls become
unresponsive, this will be due to a movie file that is not compatible.
Digital video is a relatively complex affair. Only movies that conform to
the required specifications will be playable. Refer to Appendix A at the
back of this manual for detailed information and to learn how to convert
videos into the required formats.
7.1
Record Menu
7.12
7.13
RECORDER:
Select RECORDER from the Main Menu. The Record Menu will be
displayed.
Select "Mic. Record Setting" to set the desired quality for recordings
made from the r e v o l u t i o n ' s internal microphone.
Select "Line-in Record Setting" to set the desired quality for recordings
made via the Line-in jack on the left side of the r e v o l u t i o n . (This
includes External Mic or Turntable recordings).
The higher the quality setting, the greater amount of memory space is
required for a recording of given duration.
TO MAKE A VOICE MEMO RECORDING, select "Start Mic. Record"
The Recorder screen will be displayed. (see Recorder Operation).
TO MAKE A LINE-IN RECORDING (ie to record from an analogue
equipment such as a tape deck or hi-fi), you must first make the
Page 7
Copyright BAYLIS Next Generation Ltd. England. © 2008
Line-In Jack
SD
3.5mm Stereo
Jack
7.14
Suggested connections
2 x RCA Phono Plugs
L
R
Line Out
Typical Hi-Fi equipment
appropriate connections.
Many hi-fi's will have "Line-out" sockets, typically two RCA audio sockets
(L Channel & R Channel). You will need to provide cables / adapters that
terminate in a single 3.5mm stereo Jack (see diagram). Such connectors
and leads are commonly available from most good Hi-Fi stores.
Once all connections have been properly made, select "Start Line-In
Record". The Recorder screen will be displayed. (see Recorder
Operation).
TO RECORD FROM AN EXTERNAL MICROPHONE, or from a
TURNTABLE RECORD DECK with phono level output, you must first
make the appropriate connections.
A microphone which has a 3.5mm jack plug may be connected directly
to the "Line-In" socket of the r e v o l u t i o n . It is common for hi-fi
turntables to have a pair of (RCA) phono plugs (L Channel & R
Channel). In this case you will need to provide appropriate adapters /
leads to connect between these RCA plugs and the "Line-In" socket of
the r e v o l u t i o n . Once all connections have been properly made,
select "Start Ext. Mic. Record". The Recorder screen will be displayed.
(see Recorder Operation).
NOTE: Ext. Mic. provides Mono recording only. For Stereo recording,
use "Line-in Recording".
Record Menu
7.2
7.21
RECORDER OPERATION:
When the Recorder screen is displayed r e v o l u t i o n is ready to
commence recording. If you are recording from externally connected
equipment, set that equipment to commence playing, then press PLAY
on the r e v o l u t i o n to begin recording. The icon in the centre of
the screen will blink a red light to indicate that recording is in progress. In
the case of Voice Memo recording, speak near to the top edge of the
player's body.
Recording can be paused at any point by pressing PLAY. The display
will show the elapsed time of recording and the estimated time available
according to memory space remaining.
TO FINISH RECORDING, press . If no recording has been started you
can abandon the Recorder screen by pressing MENU.
Recording File Name
Start / Pause Recording
Recording Source
M
Record / Pause Indicator
Recording Time Elapsed
End Recording
7.3
Estimated
Recording Time
Available
REPLAY A RECORDING:
After completing a recording you may replay it by selecting "Record List"
from the Record Menu. For your convenience, recordings are stored
automatically into special Folders:- "Mic. Record List" / "FM Record List"
/ "Line-In Record List".
These recordings may also be accessed via the MUSIC Main Menu (by
choosing "Internal Memory" from the Music Browse list.). These
recordings can also be added to your "Favourites" playlist - just like any
other song track.
7.4
RECORDING FM RADIO
To make a recording from FM Radio, please refer to the FM RADIO
chapter.
You can convert these recordings in to MP3 format with the use of the Media
Coder software supplied. (See Appendix A at the back of this manual)
Page 8
Copyright BAYLIS Next Generation Ltd. England. © 2008
M
8.1
FM RADIO
The earphones act as an aerial, so reception is usually better while
earphones are connected.
When FM Radio is selected the FM Tuner Screen will be displayed.
Press / to adjust volume. Press PLAY to Stop or Play the radio.
Signal Strength
Frequency
Main Menu
Play / Mute Indicator
Mono / Stereo
Indicator
Preset Channel No.
Tuning Scale
Mode
M
8.11
AUTO SCAN:The first time that FM Radio is used Auto Scan will
automatically start a search for receivable stations. Whilst scanning, the radio
will be muted. When scanning is complete all located stations will be stored
into Preset Channel numbers and the radio will then default to Preset Mode
(see PRESET MODE for operating instructions.)
8.2
FM RADIO OPTIONS MENU
Short-press the MENU key to display Options Menu. (The list of options may
vary according to the current operation mode).
Manual Mode: When the radio is in Manual Mode, short-press / to tune in
small increments, or long-press / to Fast Tune to the nearest receivable
station.
Preset Mode: When the radio is in Preset Mode, press / to change
stations.
Save Preset: When the radio is in Manual Mode, the currently tuned
frequency will be stored to a Preset Channel.
Delete Preset: When the radio is tuned to a Preset Channel, use this option to
remove this station from the Preset Channels List.
Auto Scan: Forces a new scan for receivable stations. All existing Preset
Channels will be deleted and a new list created.
Scan Sensitivity: Sets the sensitivity of Auto Scan's station Search. A low
setting will store only the strongest, clearest stations, while a high setting will
store even the weakest stations that may be subject to interference.
Start Recorder: Will display the Recorder screen so you can record the
currently tuned station. (See Recorder Operation). The FM recording quality
is not adjustable - it records at the best possible quality (subject to reception
conditions).
8.21
8.22
8.23
8.24
8.25
8.26
8.27
FM radio reception is highly directional and related to the proximity of the
station transmitter. If reception is poor, try moving to another location, or turn
the radio, or the earphones to another direction. Sometimes re-positioning by
just a metre or two can make a difference.
8.3
EXIT FM RADIO
To exit the FM Tuner screen long-press MENU. You can continue to listen to
the radio, even whilst reading Ebooks or browsing Photos. However you can
only interact with the tuning controls when the FM Tuner screen is displayed.
Page 9
Copyright BAYLIS Next Generation Ltd. England. © 2008
9.1
M
Main Menu
PHOTOS
When Photos are selected the Browse screen will be displayed.
Select from Internal Memory or SD Card as required.
Navigate to the required folder or photo file, (please note: while
browsing the storage area, Folders and photos files are listed in order
of the dates they were added - Oldest first, newest last).
Photo files will always be shown as "Filename.xxx" (such as
"Photo01.jpg" etc.), whilst Folders show up as just a name (without 3
digit suffix). Highlight a photo file and press to view. Highlight a
Folder name and press to browse that Sub-folder, press to return
to previous Folder.
NOTE: We recommend that all photo files are stored directly in the
root area of the Internal memory, unless you have a specific need to
organise them within disk Folders.
The Display Screen size is 220 x 176 pixels. Photos that are larger
than this size will be automatically re-scaled to best fit the screen.
Images that are very large will use up excessive memory space and
will be slower to display. It is better to use your favourite image editing
software to re-scale images first before transferring them to the
device. A good compromise is around 800 x 600 pixels.
Images larger that 1M Pixels may take some time to display / zoom /
pan. If an image causes too much delay, consider re-sizing it using a
photo editing software.
9.11
PHOTO VIEW: When a photo is displayed, press / to show
previous / next photo. Press PLAY to start / stop Slideshow.
Press / to adjust music volume whenever a photo is viewed in
Full Screen mode. (You cannot adjust volume during "Thumbnails",
"Zoom & Pan", or Slideshow modes.
M
9.2
9.21
9.22
9.23
View Options Menu
9.24
9.25
9.26
9.27
PHOTO VIEW OPTIONS MENU
Short-press MENU to display the View Options Menu popup. (The list
of options may vary according to the current operation mode).
PLAY / PAUSE MUSIC: This option can be used to play or pause
playback of the current music queue.
STOP FM: This option will mute FM radio (if it is playing).
ZOOM & PAN: Use this option to activate the Z/P function. A "Z" will
appear in the lower left corner of the photo. Then use the / keys
to zoom in / out. (Note: Zoom / Pan will only work with photos that are
larger than 220 x 176 pixels). If a photo has been zoomed "ZP" will
appear in the lower left corner of the photo. When "ZP" is displayed
long-press any navigation key to pan around the photo.
Press PLAY to exit from Zoom & Pan.
START SLIDESHOW: This option will begin slideshow where all your
photos will be shown in sequence.
SLIDE INTERVAL: Use this option to set the time that each photo is
displayed during a Slideshow.
THUMBNAILS: This option will display small images of your photos (4
photos per screen). Use the navigation keys to move the red outline
from photo to photo. When the desired photo is outlined in red, press
PLAY to view the photo in Full Screen mode.
LIST: This option will return you to the files / folders list.
Page 10
Copyright BAYLIS Next Generation Ltd. England. © 2008
10.1
M
Main Menu
EBOOK (Text Read)
When Ebook is selected the Browse screen will be displayed.
Select from Internal Memory or SD Card as required.
Navigate to the required folder or text file, (please note: while
browsing the storage area, Folders and text files are listed in order of
the dates they were added - Oldest first, newest last).
Text files will always be shown as "Filename.txt" (such as
"Story01.txt" etc.), whilst Folders show up as just a name (without 3
digit suffix). Highlight a text file and press to view. Highlight a Folder
name and press to browse that Sub-folder, press to return to
previous Folder.
NOTE: The name of the text file and the page counter will be
alternately displayed at the top left corner of the display.
r e v o l u t i o n can read only plain, unformatted "ASCII" text files.
Basic word processor programs such as Microsoft Windows Notepad
are ideal for creating such ".txt" type files. Microsoft Word can also be
used to "Save As" unformatted text files. Ebooks can also be
downloaded from various Internet web sites. www.gutenberg.org is a
good starting place for information about Ebooks.
The screen display does not attempt to wrap whole words at the right
margin. If you would prefer the document to be optimised for this
display, use the TextMorph utility software provided on the BAYLIS
Utilities CD. (For details, see TextMorph in Appendix B at the back of
this manual).
10.11 BOOK VIEW: When a book is displayed, press / to show previous
/ next page. Press PLAY to start / stop Auto page turning.
Press / keys to adjust music volume.
Ebook Options Menu
10.2
10.21
10.22
10.23
10.24
10.25
10.26
10.27
10.28
10.29
10.2
EBOOK OPTIONS MENU
Short-press MENU to display the Ebook Options popup. (The list of
options may vary according to the current operation mode).
PLAY / PAUSE MUSIC: This option can be used to play or pause
playback of the current music queue.
STOP FM: This option will mute FM radio (if it is playing).
ADD BOOKMARK: Each text file (Ebook) can maintain one unique
Bookmark. Add a bookmark if you wish to return later to this page.
GO BOOKMARK: Will take you straight to the page that currently has
the bookmark.
DEL BOOKMARK: Will delete the bookmark from this Ebook.
PAGE INTERVAL: Sets the time in seconds that Auto Page Turn will
display each page.
DAY MODE: Displays black text on white background.
NIGHT MODE: Displays white text on black background.
GO TO PAGE: Enables direct access to any page. The popup will
display a box with the current page number shown. Press / to
decrease / increase the page number. When the desired page
number is shown, press PLAY to go to that page.
EXIT FROM EBOOK
Long-press MENU to initiate exit procedure. A popup window will be
displayed: "Set Bookmark?"
YES: will save bookmark at current page and then exit.
NO: Will not save a new bookmark, and then it will exit
Press to cancel the popup and continue reading Ebook.
Page 11
Copyright BAYLIS Next Generation Ltd. England. © 2008
11.1
M
SETTINGS
When Settings is selected the Settings Menu will be displayed. Use
SETTINGS to adjust several default parameters of the device.
11.11 LANGUAGE: Displays a list of system languages.
11.12 EQUALISER: Display a list of EQ effects for music playback. (See
Paragraph 5.32 for details).
Main Menu
11.13 PLAYMODE: Sets the music play mode. (See Paragraph 5.31 for
details).
11.14 LCD BRIGHTNESS: Displays a slider window. Press / to adjust
the display brightness. Press to save the new setting, or press to
cancel the window.
11.2
Settings Menu
TIMERS
Change the timer settings for the following:(Press / to adjust the timer sliders, to save the new setting, or
press to cancel the window.)
11.21 AUTO SHUTOFF: Sets the time in minutes before the device will
shutdown if it is left on, but idle (ie not playing). Set this to "off" to
disable Auto Shutdown.
11.22 SCREEN SAVER: Sets the time in seconds before the LCD screen
power is turned off since the last key was pressed. Keep this setting
low to save battery power. Set to "Always" to disable the Screen
Saver.
11.23 SLEEP TIME: Sets the time in minutes that play back will run for
before automatically shutting down.
Timer Settings
11.24 DATE & TIME: Sets the system clock & calendar. Press
/
to
increment the figures (Long-press keys for fast scrolling). Press /
to move the highlight between sections, Press PLAY to save the
changes, or press MENU to cancel changes.
11.25 SLIDESHOW INTERVAL: Sets the time in seconds that each photo is
displayed during slideshow.
11.26 PAGE INTERVAL: Sets the time in seconds that each page of Ebook
is displayed during Auto Page Turning.
11.3
SYSTEM
Enables certain system-level functions.
11.31 FORMAT: Use this option to re-format the Internal Memory (and SD
card if present).
CAUTION! This operation will irreversibly erase all data from the
player & SD Card! All folders and media files will be lost!
11.32 RESTORE: Use this option to reset all settings to their factory default
values. (This function will also reset the system clock).
11.33 SPEAKER: Enables / Disables the player's internal loud speaker.
(The speaker is always disabled whilst earphones are connected, but
enabled by default whenever earphones are unplugged).
11.4
ABOUT
Displays Firmware Version, and Memory Space information.
Page 12
Copyright BAYLIS Next Generation Ltd. England. © 2008
12.1
USING SD CARDS
You can use SD Cards to store additional media files and other data.
r e v o l u t i o n is compatible with all standard SD cards (1Mb ~ 4Gb). It
is NOT compatible with "SDHC" type cards, so make sure you purchase
the correct type. Cards may be formatted as FAT / FAT16 / FAT32 file
storage formats. BAYLIS recommends the use of FAT32. CAUTION: Reformatting an SD card will erase ALL data that was stored on it.
12.11 INSERT SD: Slide open the SD slot door, then insert SD card with the
contacts face-up. Push the card in until it clicks into place. The player
may shutdown (If the system determines that a new index is required).
Re-start the player. Wait for the player to re-build its media indexes, and
then a yellow SD icon will appear next to the system clock display. Wait
until the SD icon turns green, to indicate that it is ready.
SD icon
SD
If the SD icon does not appear, or if the icon turns red, this indicates a
read error has occurred. Make sure that the SD card is not more than
90% full (the player requires some space to write index data on the card).
Make sure the SD contacts are clean (sometimes popping the card in
and out of the player a few times may help to clean contacts). Avoid
touching the contacts with your fingers. Make sure the “lock” tab on the
side of the SD card is in the unlocked position.
12.12 BROWSING: All media browse menus include an option to browse
"Internal Memory" or "SD Card" contents.
In addition, certain "special" browse functions will include data from both
Internal and SD card. For example, Music browsing "Artists / Albums /
Genre" etc. will automatically include data from both storage areas.
12.13 DIGITAL CAMERAS: Many cameras these days use SD cards to store
photos. If the photos are stored in "JPG" format, it is quite likely that
r e v o l u t i o n can display them if the SD is inserted. However, bear in
mind that large photos over 1M pixels may be slow to display.
Troubleshhoting Guide:
In the unlikely event that the Player system should become unstable, or response freezes, use a paper
clip or pin to carefully press the RESET button inside the small hole beside the SD card slot to reset the
system to default settings and shutdown. Then turn the device on again. (You will need to re-enter the
time & date after a system reset).
PLEASE NOTE: Due to the variations between computer systems and encoding methods used for digital
media files, BAYLIS do NOT guarantee that all media will play, or play perfectly, even if the media
conforms the specifications shown. In many cases such unplayable media can be made playable by
using the Media Coder utility software supplied in the Utilities CD.
Supported File Formats
Music
File Format
mp3, wav, wma*, AAC*,
ogg
Encoding
Up to 320 Kbps
Movies
Q. I can see a song file in the playlist, but it won’t play?
A. Check that the song is not restricted by it’s author. (This player will not play content that is DRM
protected).
Q. I copied a media file to the player with Drag-and-Drop, but now I cannot see this file listed by the
Player?
A. Only audio / video / photos / text files of the correct formats will be identified by the Player. Check
that the media in question is compatible with the Player’s specifications. (See left).
Q. I cannot hear any radio station whilst the Player is Auto-Scanning for signals?
A. The FM radio is muted during Auto-Scan. Let it finish scanning, and then you can listen to the stored
stations.
File Format
wmv*, avi, smv
Encoding
Up to 768 Kbps
Max 320 x 240 pix
Max 24 ~ 30 fps
Q. I tried to record a voice message with the recorder, but no sound was recorded?
A. Choose “Start Mic Record” to record from the built-in microphone. If you choose “Start Ext. Mic
Record” you must have your own external microphone connected to the Line-in jack socket.
File Format
jpg, bmp, gif
Encoding
Up to 1M pixels
Q. Some photos seem to cause the Player to “freeze” and not respond to the keys?
A. The Player will attempt to decode large images - but this takes time! For best performance, use
images of 800 x 600 pixels (SVGA).
A similar effect will occur with videos, if the frame size or data-rates are too high.
Photos
* Copyright protected files (DRM) cannot be played
back.
Movie files encoded by certain CODECS may not
be playable.
Some photo files may not be playable, depending
on their file formats & encoding.
Q. My videos play OK on my PC, but do not play on the r e v o l u t i o n ?
A. Use the Media Coder utility software supplied on the Utilities CD to convert videos to the correct
format for your player.
Q. I tried charging my phone with the generator, but the phone screen says "Error / Not Charging"
A. Make sure the KEY-LOCK switch is in the LOCK position. You may need to stop / start cranking a few
times before the phone will react correctly.
Page 13
Copyright BAYLIS Next Generation Ltd. England. © 2008
The Media Coder window
APPENDIX - A
The Media Coder window has the
following buttons along the top:
Add File, Add Dir, Add Track, Remove,
Clear, Play, Skip, Start, Revolution.
Media Coder
The Media Coder software supplied on the Baylis Utilities CD is provided “as is” and is not covered
by BAYLIS warranty, or product Support. These instructions are intended as a brief overview.
Please visit http://mediacoder.sourceforge.net/ for further information.
Add File: Displays file browse
dialogue. Use this to locate your media
files and add them into the Media
Coder window.
The purpose of Media Coder is the conversion of digital Audio and / or Video files into formats that
are optimised for use by the r e v o l u t i o n player.
(Note: not all media files will be convertible, but as a general rule, most media files that play
satisfactorily on your computer can be converted, unless they are Copy Protected by DRM).
Add Dir: Displays folder browse
dialogue. Use this to add all media files
contained in that folder into the Media
Coder window.
Media Coder is designed to run on the following PC platforms:Microsoft Windows XP (SP2) or Vista.
The PC specification should meet or exceed the recommended specifications as noted by
Microsoft for the O/S platform used.
In general terms, the conversion of Video data can be very slow and time-consuming. It is
recommended to use the best processors available to achieve faster video conversions.
Add Track: First, insert a CD or DVD
disc into your PC's CD drive (DVD disk
can only be read by optical drives that
are specifically "DVD" compatible).
Then use this button to display the Add
Track Dialogue. This dialogue lets you
set your CD drive and disk type, and
INSTALLING MEDIA CODER
Place the Baylis Utilities CD in your PC CD drive. The Baylis Installation window should
appear automatically. If it does not, then open “My Computer” window, and double-click on
the CD drive icon to commence the installation process.
Click on “Install Media Coder” and then follow on-screen instructions to complete the
installation.
HOW TO USE MEDIA CODER
Start up the Media Coder application. The Media Coder main window will be displayed.
Click here to add file(s)
to be converted
Click here to start
converting
Revolution
Settings
Click here to set the destination
of the converted file(s)
Audio Settings
Area
then it will display a list of "Tracks"
(Audio CD) or list of "Chapters" (Video
DVD). You can choose to add the
whole disk or select specific tracks.
Finally, click Add to add the chosen
tracks (or Chapters) to the Media
Coder window.
Video Settings
Area
Remove: Removes selected track
from the Media Coder window.
Clear: Clears all tracks from the Media
Coder window.
Play: Click on any track that is in the
Media Coder window to select it, then
click Play to play/stop playing the track.
1
Files that have been converted will be saved into the “output” folder. By default this is set
to the same folder as the original files, but you may specify any other folder if you wish.
Skip: Unsupported button.
Start: Starts transcoding the track(s) in
the Media Coder window. The button
changes to "Stop" whilst transcoding,
thus enabling the operation to be
aborted at will.
Revolution Settings: Click this button
to restore r e v o l u t i o n default output
video settings.
NOTE: Media Coder does not modify
your original files in any way. It simply
transcodes the data into a new file. If
the new file would have the same suffix
type (ie ".AVI") and is to be written in
the same folder as the original,
"_transcoded" is added to the new
filename to avoid overwriting the
original file.
Use the “Add Files” button to locate and add the media files that you wish to convert, or
use the “Add Track” button to convert a CD or DVD.
2
Click on the “Start” Button to commence conversion of the files in the list.
3
When conversion has completed, use Windows Explorer or Windows Media Player 11 to
transfer the converted files to the r e v o l u t i o n player.
AUDIO CONVERSION
Audio files created by the r e v o l u t i o n player's "RECORDER" functions are
recorded as "WAV" type files. To convert these (and any other audio file types), simply
"Add File" (as above - Step 1), then in the Audio Settings area, set desired bitrate / quality
and Algorithm Quality. Then click on the Start Button (as above - Step 2) to convert the
selected audio file into an MP3 type file.
When conversion has completed, use Windows Explorer or Windows Media Player 10 /
11 to transfer the converted files to the r e v o l u t i o n player.
Page 14
Copyright BAYLIS Next Generation Ltd. England. © 2008
APPENDIX - B
TextMorph
The TextMorph software supplied on the Baylis Utilities CD is provided “as is” and is not covered by BAYLIS warranty, or
product Support. These instructions are intended as a brief overview. Please refer to the online HELP within the TextMorph
program.
The purpose of TextMorph is the conversion of plain ASCII text into a format that is optimised for Ebook display in the
r e v o l u t i o n player.
This version of TextMorph, while referred to as TextMorph 2.2 is ACTUALLY a customized version of TextMorph 2.2 known as
"TextMorph 2.2 Custom 1" that was customized for easy and correct formatting of text files that can be read on the BAYLIS Eco
Media Player EP-MX72 (r e v o l u t i o n ) and EP-MX71 media players. You can note this version by clicking the Help tab
and then "About" inside of TextMorph. Besides a few visual differences, this version of TextMorph is also unique in a few
areas: the first 2 custom tools cannot be deleted (because they are shipped with this version), the "Add Trailing Carriage
Returns" tool operates a little differently in that it should normally not extend past the cut-off amount, and a few other minor
things.
Important Information:
- You can only convert ASCII text files. Unicode is not supported and only English formatted files have been verified.
- A text file has no information in it regarding font type. The font you see inside of TextMorph is merely for your VIEWING the
file inside of TextMorph. It has no bearing on how your files will look on the MX72/71 devices as that is controlled by the
device.
Instructions
To format an ASCII text file for use on the r e v o l u t i o n , simply open a text file inside TextMorph and then click the "MX72
Format" button. Next, click the "MX72 Save" button and you'll see the same filename selected for save, except it will have
"(MX72)" in the filename. This allows you to retain your original file and also quickly save the converted file. If you have the
Click this button to re-format displayed text
Click to open Browse
window to load
any "txt" type text
file.
The text will display
in this area
Click this button to save displayed text,
after you have formatted it.
connected via USB to your computer, you can simply save this converted file direct to the player. Otherwise
you can save it on your computer and you can transfer it to the player later outside of TextMorph.
r e v o l u t i o n
If you want to batch-format many text files for the r e v o l u t i o n at one time, you can easily do this by performing a Multiple
File Morph operation within TextMorph, choosing the text files, and then choosing the "MX72 Format" tool for your tool to use
(at the end of the list of tools that will appear). Warning: When doing this, the actual text files themselves that you select
to convert will be overwritten with the newly formatted version. While you can undo a Multiple File Morph (your last 10
operations are remembered), it is highly recommended that you first back up all of your text files BEFORE you start
the Multiple File Morph so that you ensure that you will still have the original files.
Note: The MX72 formatting tool by default is set to line-wrap at 32 characters. The r e v o l u t i o n uses a variable-width font
and therefore this number cannot be exactly accurate. In general, 32 characters should work fine for most text files, however
you may occasionally encounter words that are cut-off when read on the r e v o l u t i o n . If you have this problem, you might
want to lower this number even further, say to 30 characters. You can do this in TextMorph by going to Custom Tools -> Edit a
Custom Tool and choosing to edit the MX72 Format tool. Next click the Settings button next to the "Add Trailing Carriage
Returns" entry. A settings window will show allowing you to change the cut-off point. Change it from 32 to 30 and click OK.
Finally, click the "Modify Tool" button and answer yes to the question about modifying it. From now on, when you click the
"MX72 Format" button/tool, your files will be line-wrapped at 30 characters instead of 32. In the future, if you ever want to go
back to the default, simply repeat these steps but re-enter 32 for the cut-off point.
Page 15
Copyright BAYLIS Next Generation Ltd. England. © 2008