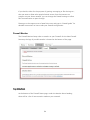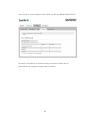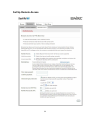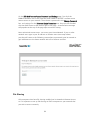
1
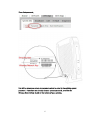
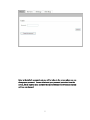
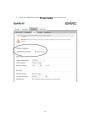
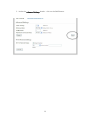
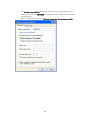
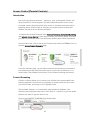
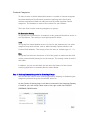
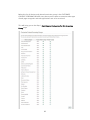
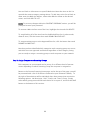
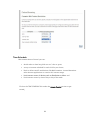
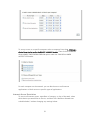
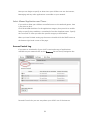
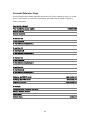
HomeNet Gateway User Guide Gateway User Guide – Table of Contents HomeNet Gateway User Guide Gateway User Guide – Table of Contents .......................................................................... 2 Introduction ..................................................................................................................... 3 What is the HomeNet Gateway (Gateway)? ............................................................... 3 How do I use it? .......................................................................................................... 4 Home Network ................................................................................................................ 9 Introduction ................................................................................................................. 9 Manage your Network ................................................................................................ 9 Wireless Networking .................................................................................................... 11 Introduction ............................................................................................................... 11 Wireless connection .................................................................................................. 11 Establishing a wireless connection ........................................................................... 15 Broadband Link ............................................................................................................ 22 Access Control (Parental Controls) .............................................................................. 23 Introduction ............................................................................................................... 23 Content Screening ..................................................................................................... 23 Time Schedule .......................................................................................................... 29 Access Control Log................................................................................................... 32 Firewall ......................................................................................................................... 33 Introduction ............................................................................................................... 33 Firewall Settings ....................................................................................................... 33 Firewall Monitor ....................................................................................................... 34 Remote Access .............................................................................................................. 37 Introduction ............................................................................................................... 37 Remote Access Summary ......................................................................................... 37 Set Up Remote Access .............................................................................................. 38 File Sharing ............................................................................................................... 39 Domain Name ........................................................................................................... 40 Your Gateway ............................................................................................................... 41 Personal Reference Page ............................................................................................... 42 Appendix 1 – About E-mail .......................................................................................... 43 PC based e-mail (e-mail programs) .......................................................................... 43 Web based e-mail (webmail) .................................................................................... 43 2 Introduction What is the HomeNet Gateway (Gateway)? The Gateway is an all-in one home networking solution that offers you control, security, and freedom. With the HomeNet Gateway you can: set up your home network (wired or wirelessly) to connect your computers and other devices together, add digital devices, configure and implement parental controls on internet content and access, protect your network with a firewall feature, and remote access into your home network via internet browsers from wherever you find yourself. 3 How do I use it? Once the installation of your HomeNet Gateway is complete, open your network browser and type in http://home or http://gateway.2wire.net This will lead you to your easy-to-use Gateway User Interface where you can view and manage all your settings and logs. 4 It is strongly recommended that you update the system password for your Homenet Gateway. The default password is the Wireless Network Key, found on the transparent sticker which is located on your Gateway. To update your system password, click the Settings Tab at the top of your Gateway user interface, 5 Then click password, You will be taken to a screen where you are asked to enter in the existing system password. If you have not already set your system password, it will be the Wireless Network Key, found on the bottom of your gateway, 6 Enter in the default password, and you will be taken to the screen where you can change your password. You are able to set your password protection from this screen, which requires your password be entered whenever any Homenet system settings are changed. 7 Be sure to click “Save” at the bottom of the page after entering your new password and password hint. 8 Home Network Introduction The Home Network feature connects your computers and other devices (eg. Playstation, Xbox, Palm Pilot, etc) together, so that they can share files, printers and the Internet. Manage your Network Under the Home tab, there is a heading that reads “Home Network Devices.” Under this heading, every device connected (both wired and wirelessly) to the Homenet Gateway will be listed. Clicking the “Device Details” link next to each device listed under this heading will bring you to a page outlining the MAC address of each connected device, as well as other details and settings. 9 If you click on the Settings tab, you will see a range of more complex options, diagnostics, and settings. You may want to refer to www.sasktel.com/support/internet/other/homenet and select HomeNet (2Wire help) for more instructions before modifying these settings. 10 Wireless Networking Introduction With the HomeNet Gateway you can set up a wireless network within your home so your desktop computer of laptop can access your network without cables. You can keep adding devices and computers to a wireless network – and experience a new level of freedom and convenience. Wireless connection By default the Gateway will come with wireless capability disabled. You will need to enable it before setting up any wireless connection. Enabling wireless capability 1. Using a computer with a wired connection go to your Gateway home page by typing http://home or http://gateway.2wire.net into the address line of your Internet browser. You will see your Gateway home interface. Click on the Wireless Icon 11 2. Check the ENABLE box under Wireless Interface. See image below. 12 3. Under the Advanced Settings header – click on the SAVE button. 13 4. You will receive a message reading CONFIGURATION SUCCESSFUL once your changes have been saved. You are now ready to establish a wireless connection. 14 Establishing a wireless connection Before you get started you will need to locate your serial number and wireless network key. These are located on the bottom of your Gateway. To establish a wireless connection with the Gateway you need either a wireless-enabled note book/laptop or a computer with a wireless network adaptor* installed. 1. Either plug your wireless adaptor into your computer’s USB port or put your wireless PC card into your laptop.** 2. Configure your wireless adaptor to work with the Gateway. The following instructions show you how to manually configure your wireless network in Windows XP.*** * You need to provide the wireless card or adaptor. ** If you experience difficulties installing your wireless card or adaptor contact the manufacturer for support. *** Please visit the support area of www.2Wire.com for wireless configuration instructions for other operating systems. 15 Press start and then select Control Panel. 16 Select Network and Internet connections. Right click on the Wireless Network Connection icon and choose Properties. 17 18 Click on the Wireless Networks tab. In the Available networks: window you should see the 2WIREXXX (eg. 2Wire079) icon, if so press the CONFIGURE button beside the window; if not, move down to the Preferred networks: area and click on the ADD button immediately below. Both actions will bring up the Wireless network properties screen. 19 The Network name (SSID): should be entered (if it is not already there by default) in the format 2WIREXXX (XXX being the last 3 digits of the Gateway serial number.) Next, uncheck the box next to The key is provided for me automatically. 20 Enter the 10-digit encryption key from the bottom of the Gateway into the Network key: field and again in the Confirm network key: field. Click the OK button. Click OK on the Wireless network properties screen. You’re finished! 3. To add another computer to your wireless network you will need to follow steps 1. and 2. each time. Important notice regarding Wireless Networking: When you enable wireless networking, by default, the wireless security is automatically set to WPA encryption. This ensures the gateway does not have an open wireless connection. We recommend you keep the gateway wireless security at WPA instead of the traditional WEP for greater wireless security, if your computer’s wireless card can support it. WPA (WiFi Protected Access) is the newest standard for WiFi security, which offers a measure of security that goes far beyond what WEP is capable of. WEP encryption has many shortcomings in terms of security that have been well documented, and as such, we recommend that you use WPA encryption as opposed to using WEP encryption if at all possible. 21 For detailed setup instructions, visit www.sasktel.com/support. Warning Incorrectly configuring the firewall or wireless network or file-sharing on your home network can leave your internet connection unsecured and your files 'open' for the world to see. The resulting vulnerabilities can result in compromised operating systems, file theft and various malicious actions such as open proxies, worms viruses etc. Broadband Link You can click on the Broadband icon connection to the Internet. 22 to see the status of your Access Control (Parental Controls) Introduction Your kids enjoy Internet activities - gaming, e-mail, chatting with friends, and doing research for school projects; but with unlimited Internet access comes increased concern about what kids have access to, and how much time they’re spending online. Parents need an easy way to maintain control of what their children see and do on the Internet and when. To resolve this Parental Controls offers Content Screening, Scheduled Screening, and Internet Access Control. These features mean you have the power to protect your kids from Internet threats and effectively monitor their online experiences. From the Home tab, click on the Access Controls link under the FIREWALL icon to view the Access Control Sumamry page. From this Summary page, you are able to view the various devices connected to your network (and the restrictions that may be in place for each device), or to access either Time Schedule restrictions or the Content Screening restrictions. Content Screening Content screening allows you to protect your children from questionable sites, identify categories, such as hate, pornography or violence that you don’t want your child to view, and create a list of approved sites. The HomeNet Gateway, via a continually updated website database, also identifies and categorizes new sites or lists them as “unrated” so you can decide whether you want to approve them or not. Click on the CONTENT SCREENING link shown below. 23 This will bring you to the Edit Content Screening Settings page where you can assign categories to Screening Groups and block and approve specific sites. 24 Content Categories To make it easier to block undesirable content, a number of content categories have been developed. Professional researchers working with a third-party maintain a database of Web site addresses that fall under specified content categories. This database is used to filter content for your children. There are three content screening categories or groups: No Restriction Setting This group has no restrictions. A computer in this group will be able to access or surf any website. This setting is most appropriate for adults. Teen This group has limited website access. For this list the administrator can select categories they wish to block such as, Adult/Sexually Explicit websites, and Criminal Skills websites. This setting is best for teens or children ages 10 – 18. Kids This group has the most restrictions of all of the groups to make sure that kids can be protected while having fun on the Internet. This setting is best for kids 9 and under. In addition, you can use the black list and white list features of the content screening application to manually block or above below. Step 1: Blocking Content Categories for Screening Groups You can edit the Teens or Kids screening groups by selecting or deselecting the categories you think the group should have access to. On the Content Screening page, each device connected to the Homenet Gateway is listed for you, with a drop-down menu to the right, under the CONTENT SCREENING GROUP header. 25 Below this list of devices and related restriction group is the CUSTOMIZE CONTENT SCREENING GROUPS area, where you are able to customize what type of web page categories and web applications are to be restricted. This will bring you to the Step1: Block Content Categories for this Screening Group page. 26 To block access to all Web sites that might be included in any category, just check the box next to that category. Once you have check all the categories you want blocked for that screening group (either Kids or Teens) click the SAVE button at the bottom of the section to go to Step 2. Step 2: Block and Approve Sites for this Screening Group After selecting the categories of content to be blocked, you can block or approve specific sites for all computers assigned to the screening group. Below the CUSTOMIZE CONTENT SCREENING GROUPS section of this page is the area where you are able to block or approve sites for a specific screening group. 27 You can block or allow access to specific Web sites. Note that sites on this list override the content category settings above. To add sites to the list to block or allow, enter the Web site address, select either Block or Allow as the desired action, and click ADD TO LIST. NOTE: To save any changes within the CONTENT SCREENING section, you will be prompted to enter your password. To remove a Web site from one of the lists, highlight the site and click DELETE. To stop blocking all of the sites listed in the Blocked Sites list (in other words, allow all sites), click the button that reads DISABLE BLOCKED LIST. To stop permitting access to the Approved Sites list, click the button that reads DISABLE ALLOWED LIST. Now that you have identified which categories each screening group can access, and which sites are approved and blocked regardless of their category listing, you are ready to assign a screening group to each computer on your network. Step 3: Assign Computers to Screening Groups Each computer on your network can be set up for a different level of Internet access depending on which Screening Group the computer is assigned to. Return to the Content Screening home page, and at the top of the page, you will be presented with a list of all devices connected to your Homenet Gateway. To the right of these devices will be individual drop-down menus that contain the following options: No Restriction, “Kid’s” Group, and “Teens” Group. Simply select which group you would like each device to be a part of, and click the SAVE button at the bottom of this section. 28 Time Schedule With Internet Access Control you can: decide when or how long kids can surf, chat or game, set up an Internet schedule for each child in your home, block or allow specific applications like Web browsing, Instant Messaging, other Internet applications or restrict ALL Internet usage, limit internet access of devices such as PlayStation or Xbox, and limit Internet access by time of day or day of the week. Click on the TIME SCHEDULE link under the Access Control section to get started. 29 You will come to the View Time Schedule Control Settings page which displays the restrictions applied to each computer on your network. The page also provides details about the restriction categories that have been assigned and displays a calendar that indicates the time intervals that each category is blocked or allowed. 30 To set up access on a specific computer select a computer from the 1. Click on a device from the list under the SELECT A DEVICE header. Then click on the BASED ON ALLOWED TIME SCHEDULE BELOW option under the CHOOSE ALLOWED ACCESS TYPE header. For each computer on the network, you can block access to all Internet applications or block access to specific types of applications. Internet Access Restriction To restrict all Internet access, regardless of category, or day of the week, select which device you would like to restrict, and then click “Based on allowed time schedule below,” without changing any settings below. 31 Now you can begin to specify at what times your children can use the Internet, Messaging and any other applications accessible on your network. Select Allowed Applications and Times… If you wish to allow your children controlled access to the web and games, here is the place to do it. Click the ALLOW checkbox for the application category that you wish to enable. Select a specific day, weekdays, or weekends from the dropdown menu. Specify the From and To times you want the specific category to be blocked. When you have finished setting up the access schedule click the SAVE button at the bottom right hand corner of the page. Access Control Log If you want to view details of your child’s restricted usage of applications available on your network click on the Summary link on the top navigation bar. Parental Controls let you rest easy about your child’s use of the Internet. 32 Firewall Introduction The HomeNet Gateway’s Firewall Monitor continuously assesses threats to the local network, while automatically keeping itself current with software updates. You can decide when and how to receive notification of attacks and view detailed logs through the Gateway's user interface. Firewall Settings The Firewall feature of the HomeNet Gateway is ready to go – you don’t need to configure any settings to get protection while on the Internet. Click on the Firewall icon on the top menu to get to the View Firewall Summary page. 33 If you decide, either for the purpose of gaming, messaging or file sharing etc., that you want to allow other people limited access from the Internet to a program on your home network, you can change the firewall settings to allow this communication to pass through. Please go to the support area of www.2wire.com and type in “firewall guide” for detailed instructions on how to edit your firewall configuration. Firewall Monitor The Firewall Monitor keeps tabs on attacks on your Firewall. On the View Firewall Summary the logs of possible attacks is located at the bottom of the page. Top Attackers At the bottom of the Firewall Status page, under the Attacks Alerts heading, there will be a list of recent attacks made on your network. 34 This page displays the following attack categories and the number of each type of attack that was blocked today and this week: Total attacks Blocked High risk A serious attempt by the attacker to disable your network. Medium risk These attacks represent a modest level of intent by the attacker to disable your network. Low risk attacks No serious threat to the network. Typically, these are probing attacks used by hackers to determine those networks on which a more serious attack will be conducted. 35 You are able to view the details of the attack, by clicking VIEW ATTACK DETAILS. For further information on Firewall settings and reports please refer to www.sasktel.com/support/internet/other/homenet/ 36 Remote Access Introduction The Remote Access feature gives you a fast, easy, and secure way to monitor and manage the Gateway remotely over the Internet. With remote access you can monitor your children’s’ Internet usage, change Parental Controls and firewall settings and view detailed logs just as if you were at your own computer at home. With Remote Access you also get: File sharing: Share files with friends and family. Place content, such as photos or digital music, in the appropriate public access folders. Anyone with an Internet connection and permissions can access approved files. Security: The Web Remote Access application allows access to be authenticated and encrypted between the remote Web browser and the gateway. Easy access: Includes an Internet address for easy access to the local network using a standard Web browser and Internet connection. Remote Access Summary Click on the Remote Access link on the top menu underneath the Firewall icon to get to the View Remote Access Summary page. 37 Set Up Remote Access 38 On the Edit Web Remote Access Password and Settings page, first click the ENABLE checkbox next to the field that reads “REMOTE ACCESS” to allow secure remote access to your network. Then choose a password in the Change Password box, and settings for the Enhanced Login Protection area. Once you are finished click the SAVE button at the bottom right of the page. A confirmation message will populate at the top of the page upon successful saving. Now, authorized remote users, can access your Home Network. If you or other network users type in your IP address or Domain name (see setup below) you/they will come to the following screen where a password must be entered to gain admittance to the home network with all its features and files. File Sharing Only computers that have file sharing enabled can be viewed via Remote Access; so it is important to set up file sharing on EACH computer on your network that you wish to access remotely. 39 You can enable file sharing on your computer by following your computer’s manufacturer instructions. For more information on manual configuration of file sharing you can also go to the support section of www.2wire.com and type in “file sharing guide.” Domain Name This service allows you and other specified remote users to type a simple WEB URL name to reach your gateway and your home network (e.g. http://myname.accessmyhome.net). Refer to the Domain Name section of the Remote Access page. Start by clicking the box that reads “ENABLE” next to Remote Access. If you would like there to be a shared folder that can be accessed via Remote Access, click the checkbox next to “Access Shared Files.” In order to set up a Doman Name to access your home network with, you will need to enter a password where it asks for one. You also have the option of enabling Enhanced login protection which will suspend your remote access temporarily if there are a certain number of failed or unsuccessful login attempts. To configure the Domain Name Remote Access, click “Edit Domain Name.” You will then be taken to the 2wire privacy policy which you must agree to in order to configure the Domain Name feature. A page will appear that will allow you to choose your custom domain name. 40 After choosing your custom domain name, all you will have to do to access your home network and shared files is type the custom domain name you have selected into a web browser, and you will be taken to the login page. For further information on Remote Access and how to remotely manage your network please refer to www.sasktel.com/support/internet/other/homenet/ Your Gateway We hope this User Guide allows you to start exploring the possibilities of the enhanced home networking experience that your HomeNet Gateway offers. With the HomeNet Gateway you are safe and secure whether on the Internet, sharing files or accessing the network from anywhere where there is a computer with a web browser. And this is only the beginning – the HomeNet Gateway will support many of the exciting new technologies that we expect to offer in the near future. For further details on your HomeNet Gateway and its services please refer to www.sasktel.com/support/internet/other/homenet/. 41 Personal Reference Page Use this page to write down important information for future reference. Keep it in a safe place. If you need to re-enter this information, remember that it should be typed in lower-case letters. Date Service Activated: Your local dial up access number: 13069957000 Dial-Up User ID: Dial-Up Password: E-mail User ID: E-mail Password: E-mail Address ( @sasktel.net ): E-mail User ID: E-mail Password: E-mail Address ( @sasktel.net ): E-mail User ID: E-mail Password: E-mail Address ( @sasktel.net ): E-mail User ID: E-mail Password: E-mail Address ( @sasktel.net ): Outgoing mail (SMTP) server: smtp.sasktel.net Incoming mail (POP) server: mail.sasktel.net News (NNTP) server: news.sasktel.net IP Address: Gateway Wireless Encryption Key (WEP): Wireless Network Number: Subnet Mask: Domain Name: sasktel.net 42 Appendix 1 – About E-mail With sasktel.net e-mail you may select between SaskTel’s web based e-mail (webmail) and/or PC based e-mail (e-mail programs such as Outlook Express). Each e-mail option has unique characteristics to meet the needs of different users. SaskTel recommends you setup an e-mail program on your primary computer to: download your e-mail, help manage your e-mail storage capacity, and to use webmail when you need to access e-mail away from your primary computer. The following material outlines the unique differences between the two e-mail options available with your sasktel.net service: PC based e-mail (e-mail programs) You can access your e-mail using a software program, which is included with some browsers (ex: Microsoft Outlook Express). These e-mail software packages are configured specifically for your computer (settings for individual browser programs are available at http://www.sasktel.com/support/internet/email/sasktelnet/emailsetup.html). Benefits of using an e-mail program Downloads messages from SaskTel server onto personal hard drive. Frees up space on the server so you never exceed your personal mail capacity. Don’t need to be on the Internet to view downloaded email. Web based e-mail (webmail) Webmail allows you to access your e-mail account on a Web page, using your Internet browser. This means you can read, send, and organize your e-mail on any electronic device with the capability of connecting to the Internet, anywhere in the world. Webmail is particular useful for those individuals who travel, use a 43 laptop, etc. or often need to access the Internet in places other than a permanent location. E-mail is stored on an e-mail server waiting for you to open it, and, unlike PC based e-mail, will remain on the e-mail server even after you view it (unless you delete the e-mail). Benefits of using webmail Don’t need to download email to hard drive. You can access and view your email from any location that has a computer with an Internet connection and a browser. Access your webmail at https://www.sasktel.net/messenger/framePage.html. 44 45