1
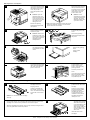
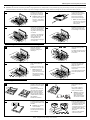
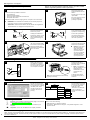
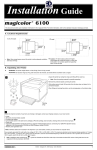
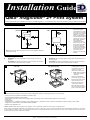
Installation Guide
QMS magicolor 2+ Print System
®
®
This document provides quick installation information for the QMS magicolor 2+. For further information, refer to the Operation manual (in hardcopy and CD-ROM).
A. Location Requirements
Caution: For best output
CXE, GXE
quality and longest
consumables life, install
the printer on a hard, flat,
level (within 1.5°) surface
capable of supporting
about 110 lbs (50 kg) for
the CXE, GXE models or
126 lbs (57.1 kg) for the
EXD model. A surface
can be tested for
levelness with a standard round pencil. If the
pencil rolls, the surface
is not level. Clear the
area of any obstruction
or items such as cables
that might prevent the
printer from sitting
directly on the flat, level
surface.
EXD
Note: Allow enough space around the printer to allow adequate ventilation
and easy servicing.
»
B. Unpacking the Printer
WARNING! The printer weighs about 66 lbs (30 kg). Don’t lift it by
yourself.
WARNING! The printer plus duplexer weighs about 93 lbs (42 kg). Don’t
lift it by yourself.
ACHTUNG! Der Drucker wiegt ca 30 kg; bitte versuchen Sie niemals,
das Gerät alleine anzuheben oder zu tragen.
1
CXE, GXE
ACHTUNG! Der Drucker und Duplexer wiegt ca 42 kg; bitte versuchen
Sie niemals, das Gerät alleine anzuheben oder zu tragen.
Unpack the printer by
unstrapping the outer box.
If necessary, unlock and
remove any plastic
fasteners. Lift off the box.
EXD (Duplex Model)
»
Note: Save the packing
material for possible
repacking.
Remove the protective
plastic covering the printer.
With another person’s help,
lift the printer from the
base tray, and place it in
its permanent location.
When lifting and carrying
the printer, use the carrying
grips on the bottom sides.
2
Check the shipment contents; if any items are missing or damaged, contact your shipping company or your local vendor:
•
•
•
•
•
•
Printer (the lower input feeder is standard on the EXD model)
250-sheet letter/A4 standard media cassette
Consumables starter kit (4 starter toner cartridges, OPC belt cartridge, fuser oil bottle/cleaning roller/oil removal syringe)
Power cord
2 media labels
QMS magicolor 2+ Installation Guide (this guide), QMS magicolor 2+ Operation manual, Connecting Your QMS Print System manual, and the QMS
magicolor 2+ Documentation and Software Utilities CD-ROMs
• Warranty and registration card
» Note: Interface cables aren’t included in the shipment. If you need cables, contact your local vendor or computer store.
Use a properly grounded AC outlet with a line voltage of 100 V, 120 V, or 220–240 V, ±10%, a maximum electrical current required during operation is 10 amps for
a 100 V system, 8.3 amps for 120 V, and 4.5 amps for 220–240 V, and a recommended frequency is 50–60 Hz ±2 Hz for a 100 V system, 60 Hz ±2 Hz for a 120 V
system, and 50 Hz ±2 Hz for a 220–240 V system.
1760262-001A
EDNord - Istedgade 37A - 9000 Aalborg - telefon 96333500
1
QMS magicolor 2+ Print System
If you have a duplex model,
remove any tape securing
the duplexer’s rear cover.
If not, skip to step 4.
3
Remove any tape securing
the top and front covers.
4
Squeeze the latch near the
upper-right corner of the
front cover to open the
printer’s front cover.
Open the duplexer’s rear
cover.
Remove the packing
materials and tape inside
the duplexer.
Remove any packing
material from the printer’s
waste toner pack.
5
Caution: Open the
duplexer’s rear cover
before opening the top
of the printer. Forced
opening of the printer’s
top cover first may
damage the unit.
Caution: This is
necessary as it makes
room for the OPC belt
cartridge. You could
damage the OPC belt
if you don’t do this.
» Note: The following illustrations show the printer
without the duplexer. However, the instructions
are the same for both models.
6
Pull the latch to release the
and open the printer’s top
cover.
" #$
%&& Caution: Remove the
waste toner pack once
and reinstall it to ensure
that it has not become
dislodged during
transportation.
Remove any packing
materials and tape inside
the printer.
!
7
Caution: Remove the
two shipping spacers
from between the fuser
rollers.
If you have a duplex model,
reach inside the duplexer’s
rear cover to access the
printer’s rear cover.
9
Open the media cassette(s)
and remove any packing
material.
8
Close the media
cassette(s).
Pull the handle on the
printer’s rear cover to
open it, and remove any
packing material.
10
Close the printer’s rear
cover.
If you have a duplex model,
keep the duplexer’s rear
cover open until you have
completed step E4.
C. Installing the Toner Cartridges
Remove the toner
cartridges from their
shipping cartons.
1
Remove the orange
protective cover from each
cartridge.
2
Holding a cartridge with
both hands, gently rock it
five or six times horizontally.
Align the toner cartridge
with the cartridge guides,
and gently push the
cartridge into the printer
until you begin to feel
resistance. Then pull the
cartridge back approximately 1/4 inch.
Pull the tab to remove the
tape.
Caution: Do not hold the toner cartridge
vertically.
Caution: Don’t push the toner cartridge in until you hear a click or force
it. If you hear a click, you’ve locked it into place incorrectly. Pull the toner
cartridge out so that it’s firmly seated but not locked into place.
3
While the cartridges may appear not to be fully inserted, closing the front
cover will guide them to their final position.
'( )'
2
EDNord - Istedgade 37A - 9000 Aalborg - telefon 96333500
Caution: Each toner
cartridge has a colored
label that corresponds
to a colored label to the
right of the cartridge
slots. Always install the
toner cartridge in the
slot with a label of the
same color.
Install the other toner
cartridges.
QMS magicolor 2+ Print System (continued)
D. Installing the OPC Belt Cartridge
Caution: The OPC belt is extremely sensitive to bright light and touch. Always leave it in its protective bag until you are ready to install it. Any exposure to light
should be limited to less than two minutes or permanent damage could result. Always handle the cartridge so you don’t touch the surface of the belt.
Rotate up the two green
lock levers to prepare the
opening for the cartridge.
1
Caution: Make sure the
printer’s front cover is
still open. This makes
room for the OPC belt
cartridge.
Holding the cartridge above
the printer, align the guide
pins on the cartridge with
the guide slots in the green
lock levers.
3
Pull out the two tensionrelease pins (one on each
side of the cartridge).
2
Remove the protective
sheet from the cartridge.
» Note: The white powder
lubricant on a new OPC
belt is normal; it won’t
affect quality.
Rotate the two green lock
levers to secure the OPC
belt cartridge in the printer.
4
The gear on the cartridge
goes to the right, and the
green surface of the
cartridge faces you.
Gently guide the cartridge
into the printer.
E. Installing the Fuser Oil Bottle and Cleaning Roller
1
3
Open the two green
cleaning roller lock
levers by rotating them
toward you.
2
Lower the oil bottle into
its slot.
4
The larger tab on the top of
the cleaning roller must be
on the left.
Close the two green lock
levers by rotating them
away from you.
The tab on the side of the
bottle must be on the right.
»
*' )
Install the cleaning roller
in its slot.
Close the printer’s top and
front covers.
Note: Because the
first oil bottle must
prime the printer, it has
less than the normal
12,000-page (1-sided)
life expectancy.
If you have a duplex model,
close the duplexer’s rear
cover.
F. Loading the Media Cassette
1
Take out the media
cassette. Adjust the media
guides to fit the size paper
you’re loading.
Push the media pressure
plate down to lock it in
position.
2
Fan a stack of approximately 250 sheets (½
ream). Load the paper.
Squeeze the retainers at
the ends of the left width
guide and/or the length
guide, move the guide to
the appropriate location
(media sizes are listed on
the cassette).
Caution: The paper
should fit easily between the guides.
Make sure the paper
corners are not bent.
Release the retainers.
3
A fill limit mark is provided
on the inside left side of the
cassette.
Place the media label(s) in
a convenient location as a
constant reminder to users
that cassettes must be
configured correctly to print
envelopes, glossy stock,
labels, transfer media, and
thick stock.
4
Caution: Do not overfill the cassette.
The paper should face up
with its top toward the rear
of the cassette.
14fdup.eps
&( )' EDNord - Istedgade 37A - 9000 Aalborg - telefon 96333500
Slide the media cassette
back into the printer.
3
QMS magicolor 2+ Print System
G. Installing the Lower Input Feeder
(Skip to “H. Connecting Interface and Power Cables” if you have an EXD
model or if you didn’t purchase a lower input feeder.)
1
Remove any tape and
packing material from the
feeder.
2
Check the lower input feeder kit contents:
•
•
•
•
Input feeder unit
Letter/A4 media cassette
Two small metal brackets with thumbscrews
Two plastic side covers
Set the printer on top of the
input feeder.
Be sure to align the printer
and input feeder as
precisely as possible.
Remove the feeder from the shipping carton, and place it on a flat surface.
WARNING! If consumables are installed, be sure to keep the printer
level when moving it to prevent accidental spills.
ACHTUNG! Achten Sie bitte darauf, das der Drucker mit eingebauten
Tonerkartuschen nur waagerecht transportiert wird.
3
Install the two metal
brackets underneath the
sides of the printer.
+
&
,(
*!
-.
,
/
Holding the bracket at a
slight angle, slide it up into
the hole underneath the
printer before setting it to
vertical.
Locate the cable at the left
rear of the optional feeder,
and connect it to the printer.
5
Make sure that the hole in
each metal bracket is lined
up with the corresponding
hole on the input feeder.
4
( /
Use the thumbscrews to
attach the two brackets to
the lower input feeder.
+
&
,(
Snap the plastic side
covers onto the appropriate
sides of the input feeder.
6
Switch the feeder cover
plates after the cables have
been connected.
Caution: If you move
the printer with the
lower input feeder
attached, lift the unit
by the four bottom
corners of the feeder,
not by the feeder's
cassette slot and not
by the printer itself.
H. Connecting Interface and Power Cables
Refer to the Connecting
Your QMS Print System
manual for instructions on
how to connect your printer
to a computer or network.
1
Plug the printer into a
grounded, surge-protected
electrical outlet.
2
»
0
'''
» Note: The printer requires a brief warmup
(typically 3 minutes).
Note: In compliance
with UL guidelines, “The
appliance inlet is
considered to be the
main disconnect
device.”
A startup page should
print when the printer is
turned on.
I. Configuring the Printer
See the Connecting Your
QMS Print System manual
for instructions on installing
the QMS printer driver.
1
2
Idle
Operator
Control
Administration
Use the on-line help to
configure the driver for
printing.
Registering the Printer
Installation
Operator
(Enter
password)
Use Operator
Off, On
Admin
(Enter
password)
Use Admin
Off, On
See the Reference manual
manual (on the magicolor
2+ Documentation CDROM) for further
instructions on advanced
printer configuration
through the control panel
menus.
Further Assistance
Internet—Visit the QMS Product Registration page on the Internet
at http://www.qms.com/support/prodreg/.
Mail—Fill out and send in the warranty card enclosed in your
shipment.
Refer to one of the following:
• QMS magicolor 2+ Operation manual.
• Appendix A, “QMS Customer Support,” in any QMS magicolor 2+ Print
System manual.
Telephone—In the US, call QMS toll-free at (887) 778-2687.
Trademarks and Copyright Notice
QMS, magicolor, and the QMS logo are registered trademarks of QMS, Inc. This document is Copyrighted © 1999 by QMS, Inc., One Magnum Pass, Mo bile, AL
36618. All Rights Reserved. This document may not be copied in whole or in part, nor transferred to any other media or language, without the express written
permission of QMS, Inc.
4
EDNord - Istedgade 37A - 9000 Aalborg - telefon 96333500