1
QMS magicolor 2+ Print System (continued)
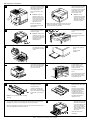
D. Installing the OPC Belt Cartridge
Caution: The OPC belt is extremely sensitive to bright light and touch. Always leave it in its protective bag until you are ready to install it. Any exposure to light
should be limited to less than two minutes or permanent damage could result. Always handle the cartridge so you don’t touch the surface of the belt.
Rotate up the two green
lock levers to prepare the
opening for the cartridge.
1
Caution: Make sure the
printer’s front cover is
still open. This makes
room for the OPC belt
cartridge.
Holding the cartridge above
the printer, align the guide
pins on the cartridge with
the guide slots in the green
lock levers.
3
Pull out the two tensionrelease pins (one on each
side of the cartridge).
2
Remove the protective
sheet from the cartridge.
» Note: The white powder
lubricant on a new OPC
belt is normal; it won’t
affect quality.
Rotate the two green lock
levers to secure the OPC
belt cartridge in the printer.
4
The gear on the cartridge
goes to the right, and the
green surface of the
cartridge faces you.
Gently guide the cartridge
into the printer.
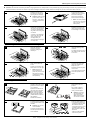
E. Installing the Fuser Oil Bottle and Cleaning Roller
1
3
Open the two green
cleaning roller lock
levers by rotating them
toward you.
2
Lower the oil bottle into
its slot.
4
The larger tab on the top of
the cleaning roller must be
on the left.
Close the two green lock
levers by rotating them
away from you.
The tab on the side of the
bottle must be on the right.
»
*' )
Install the cleaning roller
in its slot.
Close the printer’s top and
front covers.
Note: Because the
first oil bottle must
prime the printer, it has
less than the normal
12,000-page (1-sided)
life expectancy.
If you have a duplex model,
close the duplexer’s rear
cover.
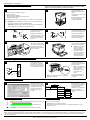
F. Loading the Media Cassette
1
Take out the media
cassette. Adjust the media
guides to fit the size paper
you’re loading.
Push the media pressure
plate down to lock it in
position.
2
Fan a stack of approximately 250 sheets (½
ream). Load the paper.
Squeeze the retainers at
the ends of the left width
guide and/or the length
guide, move the guide to
the appropriate location
(media sizes are listed on
the cassette).
Caution: The paper
should fit easily between the guides.
Make sure the paper
corners are not bent.
Release the retainers.
3
A fill limit mark is provided
on the inside left side of the
cassette.
Place the media label(s) in
a convenient location as a
constant reminder to users
that cassettes must be
configured correctly to print
envelopes, glossy stock,
labels, transfer media, and
thick stock.
4
Caution: Do not overfill the cassette.
The paper should face up
with its top toward the rear
of the cassette.
14fdup.eps
&( )' EDNord - Istedgade 37A - 9000 Aalborg - telefon 96333500
Slide the media cassette
back into the printer.
3