1
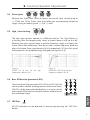
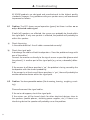
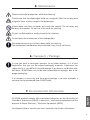
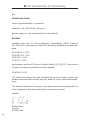
S6A Mk2
Operation manual
S6A Mk2
English
Introduction
Dear customer,
Congratulations on choosing an ADAM Audio S6A Mk2 main monitor!
ADAM loudspeakers are built for maximum quality reproduction and audio
perfection. With the S6A Mk2 you have selected one of the most ambitious
speaker systems available. This main monitor meets highest expectations in
sound quality and craftmansship.
This manual is intended to provide you with information about your new
ADAM. It contains important information regarding safety, setting up,
handling, and warranty. We request that you read these sections carefully
to ensure an easy set up and to prevent potential problems.
The S6A Mk2 is suitable for main monitoring. It is perfectly suited for large
control rooms, post-production suites, etc.—an ideal tool for situations where
a combination of no-compromise sound reproduction and high SPL regions
is required.
The S6A Mk2 is a four-way ported active system that uses a single ART
tweeter and two ART midrange drivers, ensuring full compatibility with the
latest expanded high frequency resolution media formats. It also employs two
7“ HexaCone©-midwoofers and two 12“ HexaCone©-subwoofers. Driven by 6
amplifiers with an overall power of 1000 watts (RMS), the S6A is powerful
enough for rooms of almost any size.
If you have any questions about this or any of our products, please don’t hesitate to contact us–we will be happy to assist you in any possible way.
For detailed information concerning the ADAM technologies and products,
complete reviews, and a list of worldwide ADAM users and studios, please
visit our website:
www.adam-audio.com
We hope very much that you really enjoy your new loudspeakers, and wish
you many delightful hours with them.
The ADAM Audio Team
2
1.
1.1
1.2
Quick Start.....................................4
Important Information. ...................4
Quick Start S6A Mk2......................4
2.
2.1
2.2
2.3
Speaker Placement.........................5
General Recommendations.............5
Stereo Setup. .................................5
Surround Setup...............................5
3.
3.1
3.2
3.3
3.4
3.5
3.6
3.7
Controls/Speaker Adjustement......6-7
The front (control) panel.................6
Input gain. ......................................6
X-Curve Filter..................................6
Driver gains. ...................................7
High/low shelving...........................7
Bass-EQ Section.............................7
LED Dim..........................................7
4.
Troubleshooting..............................8
5.
Maintenance...................................9
6.
Transportation / Package...............9
7.
Environmental Information..............9
8.
EU Declaration of Conformity.........10
9.
9.1
9.2
Limited Warranty............................11
Terms and Conditions.....................11
How to claim...................................11
10.
Safety Instructions..........................12
11.
Technical Data................................13
English
Table of contents
3
1. Quick Start
1.1 Important information for set up
Acclimation: After having unpacked your loudspeaker, please allow the system to acclimate to the temperature of the room. Please do not connect the
speaker for approximately an hour.
HQ Cabling: We recommend using high quality cables to guarantee optimal
performance.
Solid stand: It is important to ensure the speakers stand firmly on a solid
ground (if they are not wall-mounted)!
Package: We recommend not to damage the package and to retain it. The
original packaging is the best guarantee for safe transportation (see 7.).
Break-in time: Please note that the loudspeakers will need a few days to
achieve optimum sonic performance.
1.2 Quick start S6A Mk2
Before connecting the loudspeakers to your audio components and the
power source make sure that both the loudspeakers and your audio system
is switched off!
4
a)
Set all level controls fully counterclockwise.
b)
Connect the loudspeakers with your audio units: Use a XLR cable. The male
plug goes into the loudspeaker, the female plug into your audio component.
c)
Check if the specified voltage matches the voltage of the power supply
you use. If this is not the case do not connect the loudspeakers to a power
source! Please contact your local dealer or national distributor.
If the voltages match, connect the loudspeaker via the included power
cables to two AC sockets.
d)
Switch on your audio system. Switch on the main on/off switches on the
front panel of the loudspeakers.
e)
Turn on your source of music and adjust the volume carefully.
2. Speaker Placement
2.1 General recommendations/advises
Direct sound ways: There should be no obstacles in the way from the monitor
to your ears. You should be able to see the speakers completely.
Alignement: The loudspeakers should be aligned with the listener’s position.
Nearby objects: Please note that vibrating parts of nearby objects can mask
the sound.
Tweeter at the height of ears: The tweeters should be positioned approximately at the height of your ears. In case you need to position the speaker in a significant lower or higher position, the monitor should be angled accordingly.
2.2 Stereo set up
If the loudspeaker is going to be used for
stereo applications, the optimum listening
position should be located in the middle of a
stereo triangle. This means that your listening position will be located at the top of an
imaginary equilateral triangle and the two
loudspeakers should be placed at the other
two points of this triangle.
Figure 1: Stereo Triangle
2.3 Surround set up
Figure 2:
Surround set up
English
Speaker positioning for multi-channel stereo purposes is ideally based on
a circle with speakers placed at 0° (Center), 30° (Front Right), 110° (Rear
Right), 250° (Rear Left), 330° (Front Left), with the listener being the circle’s
center (Radius between 0.7-2.0 m). This ITU recommended configuration may
vary depending on the purpose of the control room (music or film). However,
it is recommended to create a symmetrical listening position with the front
side and surround speaker pointing to the listener’s ear.
5
3. Controls/Speaker Adjustment
3.1 The front (control) panel
On the front you will find a control panel that allows detailed fine-tuning of
your monitors to your particular room acoustics and personal listening preferences. The following tips are intended to assist you at using the controls in
the best manner.
Figure 3:
Control panel
Please note that using the controls may have a great impact on the overall
sound characteristics of your loudspeakers. We recommend using the controls with utmost care and only after several audio tests with familiar recordings.
3.2 Input gain
‘Input Gain’ regulates the overall input sensitivity of your loudspeaker within
a range of -10 to +10 dB, and controls the volume of your loudspeaker equally
in all frequency ranges.
3.3 X-Curve Filter
In large film score mixing rooms, it may be desirable to have a representation
of the sound in the theatres. To meet the ISO 2969 Standard, the Dolby™ Xcurve has to be applied. The X-curve engages a 3 dB per octave roll-off above
2 kHz. The S6A Mk2 and S7A Mk2 have a switch located below the input
selector that activates this filter, eliminating the need for external processing
during the film mix.
6
3. Controls/Speaker Adjustment
3.4 Driver gains
Whereas the ‘Input Gain’ raises or lowers the overall input sensitivity up to
+/-10 dB, the ‘Driver Gains’ work only within the corresponding frequency
range, raising or lowering from +/-2 to +/-6 dB.
3.5 High / low shelving
The other two controls operate in a different manner. The ‘High Shelve’ is
a shelving filter that progressively raises or lowers above 6 kHz up to 6 dB.
Whereas the gains raise or lower a specific frequency range as a whole, the
shelve filters work differently. They do not alter a whole frequency band but
alter in this band, from a certain point (6 kHz respectively 150 Hz in this case)
the frequencies are gradually being changed (see figure 4 & 5).
Figure 4
ROOM EQ >6 kHz for the high
frequencies above 6 kHz
Figure 5
ROOM EQ <150 Hz for the low
frequencies below 150 Hz
3.6 Bass EQ Section (parametric EQ)
3.7 LED Dim
All LED indicators can be dimmed if necessary by pressing the ‘LED Dim’button.
English
There are three fully parametric EQs (20 Hz to 200 Hz) that
can be used to combat standing waves in the control room.
The EQs can be bypassed individually or as a group so that
their overall effect can be analyzed in direct comparison to
the unaffected signal.
7
4. Troubleshooting
All ADAM products are designed and manufactured to the highest quality
standards. However, if any problems with your speaker occur, we recommend
to proceed as follows:
4.1 Problem: The LED shows normal operation (green) but there is either no or
only a distorted audio signal.
If both (all) speakers are affected, the reason can probably be found within
the signal path. If only one speaker is affected, the problem will probably be
within this speaker.
a)
Check the wiring
Is the cable defective? Are all cables connected correctly?
b)
Check the signal path
Interchange the cables of both loudspeakers. Does the problem change with
one of the cables?
Connect the monitor as directly to the signal source as possible (please mind
the volume!). Is another part of the signal path (e.g. mixer, subwoofer) defective?
If the answer to all these question is ‘no’, the problem is being caused by the
loudspeaker with the utmost probability.
If the answer to at least one of these questions is ‘yes’, there will probably be
another defective device within the signal path.
4.2 Problem: You hear parasitic noises (like humming, buzzing, soughing, cracking).
Please disconnect the signal cables.
If the noises disappear, check the signal path.
If the noises can still be heard, check for other electrical devices close to
the speakers (mobile phones, switching power supplies, etc.). If there is no
interfering device the speaker will probably cause the problem.
8
5. Maintenance
Please switch the loudspeaker off before cleaning!
Please note that the diaphragms build up a magnetic field. Do not play with
magnetic items at close range to the diaphragms.
Please make sure that no liquids get inside the cabinet. Do not spray any
fluids on the speaker. Do not use a wet cloth for cleaning.
Do not use flammable or acidly chemicals for cleaning.
Do not touch the membranes of the loudspeakers.
We recommend using a lint-free, damp cloth for cleaning.
The loudspeaker membranes may be dusted using a very soft brush.
6. Transport / Package
In case you have to send your speakers to any other location, it is of vital
importance that you use the original packaging materials. Experience has
shown that it is very difficult to avoid damage if you have to send them without these. ADAM Audio can not be held responsible for damages due to improper packaging.
If a transport is necessary and the original package is no more available, a
new one can be purchased from ADAM Audio.
All ADAM products comply with international directives on the Restriction of
Hazardous Substances (RoHS) in electrical / electronical equipment and the
disposal of Waste Electrical / Electronic Equipment (WEEE).
English
7. Environmental Information
For disposal, please consult your local authorities for further information.
9
8. EU Declaration of Conformity
We,
ADAM Audio GmbH
whose registered office is situated at
Lobeckstr. 36, 10969 Berlin, Germany
declare under our sole responsibility that the product:
S6A Mk2
complies with the EU Electro-Magnetic Compatibility (EMC) Directive
89/336/EEC, in pursuance of which the following standards have been applied:
EN 61000-6-1 : 2001
EN 61000-6-3 : 2001
EN 55020 : 2002
EN 55013 : 2001
and complies with the EU General Product Safety 2001/95/EC, in pursuance
of which the following standard has been applied:
EN 60065 : 2002.
This declaration attests that the manufacturing process quality control and
product documentation accord with the need to assure continued compliance.
The attention of the user is drawn to any spezial measures regarding the use
of this equipment that may be detailed in the owner’s manual.
Signed:
Roland Stenz
Director
ADAM Audio
10
9. Warranty
ADAM Audio GmbH provides a two year limited warranty for this product. If
anything goes wrong with this product due to manufacturing defects, ADAM
Audio and its national distributors will provide repair free of charge (exclusions may apply) and replacement parts.
9.1 Terms and Conditions
This guarantee complements any national/regional law obligations of dealers or national distributors and does not affect your statutory rights as a
customer.
This warranty is limited to the repair of the equipment.
Neither transportation, nor any other costs, nor any risk for removal, transportation and installation of products is covered by this warranty.
Products whose serial number have been altered, deleted, removed or made
illegible are excluded from this warranty.
The warranty will not be applicable in cases other than defects in materials
and/or workmanship at the time of purchase and will not be applicable:
a) for damages caused by incorrect installation, connection or packing,
b) for damages caused by any use other than correct use described in the user
manual,
c) for damages caused by faulty or unsuitable ancillary equipment,
d) if repairs or modifications have been executed by an unauthorized person,
e) for damages caused by accidents, lightning, water, fire heat, public disturbances or any other cause beyond the reasonable control of ADAM Audio.
9.2 How to claim repairs under warranty
If the equipment is being used outside the country of purchase, you should
contact your ADAM Audio national distributor in the country of residence.
You will be advised where the equipment can be serviced. Please visit our
website to get the contact details of your local distributor.
To validate your warranty, you will need a copy of your original sales invoice
with the date of purchase.
English
Should service be required, please follow the following procedure:
If the equipment is being used in the country of purchase, you should contact
your ADAM Audio dealer.
11
10. Safety Instructions
Please read the following safety instructions before setting up your
system. Keep the instructions for subsequent reference. Please heed
the warnings and follow the instructions.
Do not open the loudspeaker. There are no user-serviceable parts inside. In case of a problem,
please contact either your ADAM dealer or us. We are happy to help. Always refer servicing to
qualified personnel and never attempt to repair this product yourself.
This product, as well as all attached extension cords, must be terminated with an earth ground
three-conductor AC mains power cord like the one supplied with the product. To prevent shock
hazard, all three components must always be used.
Protect the cord from being walked on or pinched.
Never replace any fuse with a value or type other than those specified. Never bypass any fuse.
Always switch off your entire system before connecting or disconnecting any cables, or when
cleaning any components.
Please note that the diaphragms build up a magnetic field. Do not ply with magnetic items at
close range to the diaphragms.
Do not expose this product to rain or moisture, never wet the inside with any liquid and never
pour or spill liquids directly onto this unit. Please do not ut any objects filled with liquids (e.g.
vases, etc.) onto the speaker.
Always use fully checked cables. Defective cables can harm your speakers. They are a common
source for any kind of noise, hum, crackling etc.
Always keep electrical equipment out of the reach of children.
Always unplug sensitive electronic equipment during lightning storms.
The monitor should be installed near the socket outlet and disconnection of the device should
be easily accessible.
To completely disconnect from AC mains, disonnect the power supply from the AC receptacle.
Never use flammable or combustible chemicals for cleaning audio components.
Avoid touching the speaker membranes and do not block the woofer’s ventilation ports.
Never expose this product to extremely high or low temperatures. Never operate this product in
an explosive atmosphere.
High SPL’s may damage your hearing! Please do not get close to the loudspeakers when using
them at high volumes.
Assure free airflow behind the speakers to maintain sufficient cooling.
12
11. Technical Data
ADAM S6A Mk2 - active 4-ways bass reflex loudspeaker
Woofer/Subwoofer
2/2
Basket ø
7“/12“ HexaCone®
Voice coil ø
1.5“/2.5“
ART Tweeter
1
Diaphragm area
71 cm2
Equivalent diaphragm ø
9,5 cm
Speed transformation ratio
4:1
Diaphragm weight
0,17 g
ART Midrange
2
Diaphragm area
213 cm2
Equivalent diaphragm ø
16,5 cm
Speed transformation ratio
3.5:1
Diaphragm weight
0,7 g
Built-in amplifiers
6 (Class 1)
AC Voltage
100-120 V~, 50/60 Hz *3
220-240 V~, 50/60 Hz *3
Subwoofer channel (*1/*2)
2 x 500 W / 700 W
Woofer channel (*1/*2)
2 x 150 W / 200 W
Midrange channel (*1/*2)
150 W / 200 W
Tweeter channel (*1/*2)
150 W / 200 W
Frequency response (± 3 dB)
23 Hz - 35 kHz
Crossover frequencies
85 / 800 / 3100 Hz
THD >80 Hz at 90 dB in 1 m
≤ 0,5 %
Short time sine wave acoustic
output at 1 m, 100 Hz - 3 kHz
≥124 dB
Max. peak acoustic output per pair
with music
≥134 dB
Impedance
10 kΩ
Height x Width x Depth
720 x 940 x 490 mm
Weight
103 kg (227 pounds)
Warranty
2 years
Input
XLR (balanced)
Operating temperature
0° C bis 40° C (32° F bis 104° F)
Storage temperature
-30° C bis 70° C (-22° F bis 167° F)
Humidity
Max. 90% not condensing
*1 = long term IEC 265-8-Wrms/10 min // *2 = nominal IEC 265-8 = Peak Power 5 µsec
*3 = pay attention to the selected voltage on the rearside of the speaker
English
General Data
13
ADAM Audio GmbH
Ederstr. 16 | 12059 Berlin-Germany
phone: +49 30-863 00 97-0
fax: +49 30-863 00 97-7
email: [email protected]
ADAM Audio USA
31312 Via Colinas
Unit 108 | Westlake Village | CA, 91362
phone: +1 818-991 3800
fax: +1-818-991 3808
email: [email protected]
S6A Mk2 Manual
Version 09.2008 English
www.adam-audio.com