1
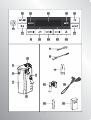
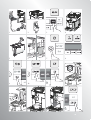
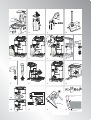
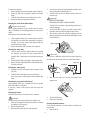
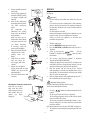
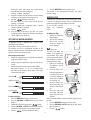
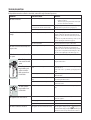
coffee is too thin and not creamy enough or that delivery is too
slow (a drop at a time), this can be corrected by adjusting the
grinding adjustment dial (fig. 12).
MAKING COFFEE
Selecting the coffee taste
The appliance is set by default to make coffee with a standard
taste.
You can also choose one of these tastes:
Extra-mild taste
Mild taste
Standard taste
Strong taste
Extra-strong taste
Please note!
The grinding adjustment dial must only be turned when the
coffee mill is in operation.
If the coffee is delivered too slowly
or not at all, turn one click clockwise
towards “7”.
For fuller bodied creamier coffee on the
other hand, turn one click anticlockwise
towards “1” (do not turn more than one
click at a time otherwise the coffee could be delivered a drop
at a time).
These adjustments will only be evident after at least 2 cups of
coffee have been delivered.
If this adjustment does not obtain the desired result, turn the
dial another click.
To change the taste, press the
button (fig. 9)
repeatedly until the required taste is displayed.
Selecting the quantity of coffee in the cup
The appliance is set by default to make a standard quantity of
coffee.
button
To select the quantity of coffee, press the
(fig. 10) until the message corresponding to the required
quantity of coffee is displayed:
Tips for a hotter coffee
For a hotter coffee, before delivery you are recommended to:
t QFSGPSNBSJOTFDZDMFCZTFMFDUJOHUIFi3JOTJOHwGVODUJPOJO
the settings menu (page 10)
t XBSN UIF DVQT XJUI IPU XBUFS VTJOH UIF IPU XBUFS
function);
t JODSFBTF UIF DPòFF UFNQFSBUVSF JO UIF TFUUJOHT NFOV
(page 10).
Coffee selected
Quantity in cup (ml)
MY COFFEE
Programmable:
from 20 to 180
ESPRESSO
40
STANDARD
60
LONG
90
Making coffee using coffee beans
EXTRA LONG
120
Important!
Do not use caramelised or candied coffee beans as they could
stick to the coffee mill and make it unusable.
Customising the “my coffee” quantity
The appliance is set by default to automatically deliver 30 ml
of “my coffee”.
To modify this quantity, proceed as follows:
1. Place a cup under the coffee spouts (fig. 14).
button (fig. 10) until “MY COFFEE”
2. Press the
is displayed.
button (fig. 11) pressed until the message
3. Keep the
“1 MY COFFEE Program quantity” is displayed and coffee
delivery begins. Release the button.
4. As soon as the coffee in the cup reaches the required level,
(fig. 11) again.
press the button
The quantity of coffee in the cup has now been programmed.
1. Place coffee beans in the coffee bean container (fig. 13).
2. Place under the coffee dispensing spouts, either:
- 1 cup if you want one coffee (fig. 14);
- 2 cups if you want 2 coffees.
3. Lower the spouts as near as possible to the cup. This makes
a creamier coffee (fig. 15).
4. Press the button corresponding to the number of coffees
or 2 cups
, figs. 11 and
required (1 cup
16).
5. Preparation begins. The amount of coffee selected is
displayed together with a progress bar which gradually
fills as preparation progresses.
Adjusting the coffee mill
The coffee mill is preset in the factory to make coffee correctly
and should not require adjusting initially.
However, if after making the first few coffees you find that the
t
12
Please note:
8IJMFUIFDPòFFNBLFSJTNBLJOHDPòFFEFMJWFSZDBOCF
interrupted at any moment by pressing one of the two