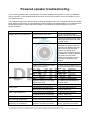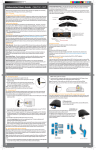
1
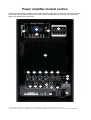
Flex series (12A / 15A)
Powered speaker with Bluetooth functionality
User manual
Any information and illustrations shown in this user manual are subject to change without further notice.
User manual version: 2.0 Creation date + author initials: 22-04-2013 RV Revision date + author initials: 25-02-2014 RV
Safety instructions
WARNING!
Always keep this device away from moisture and rain! Hazardous electrical shocks may occur!
WARNING!
Only connect this device to a matching power outlet. This device is intended to work on a
specified AC currency. Connecting this device to power outlets with other voltages may result in
permanent damage and possible hazardous situations, such as fire or electrical shocks!
WARNING!
Be careful with every operation of this device. Touching live wires inside and outside the unit
may cause hazardous electrical shocks!
This unit must be operated by, or under the supervision of an adult. This device is not suitable for children.
Every person involved with the installation, operation and maintenance of this device has to:
- Be qualified
- Follow the instructions of this manual
- Make sure there is no damage caused by transport. If the device seems damaged from the outside, do not
use it and contact your dealer for more information and consultation.
- To make sure the device maintains in perfect condition and for safe operation, it is necessary for the user to
follow the instructions and warning notes of this user manual.
- Damage caused by improper use or modifications to the device are not covered by warranty.
- This device does not have any user-serviceable parts inside. Servicing of this device needs to be done by
qualified technicians.
Important notes regarding safety and health:
- Always keep the power cord away from other cables. Handle the power cord and all connectors with
caution.
- Never remove any warning or informative labels from the unit
- The ground contact always needs to be connected. Do not cover or remove the ground contact.
- Never leave cables lying around
- Do not open the device and do not modify any hard- or software of this unit.
- Do not insert this object into air vents.
- Do not connect this device to a dimmerpack.
- Do not switch the system on and off frequently as this will reduce the lifespan of the device.
- Do not drive the inputs of the fixture with a signal larger than required to work at full performance.
- Only use this device indoor, avoid contact with water, moist or other liquids. Do not place items filled with
liquids on top of the unit.
- Avoid nearby flames or heat sources, do not place this device near flammable liquids, gas or flammable
items.
- Always disconnect the device when it is not in use for a longer period of time, when servicing is needed or
when the device needs cleaning.
Any information and illustrations shown in this user manual are subject to change without further notice.
User manual version: 2.0 Creation date + author initials: 22-04-2013 RV Revision date + author initials: 25-02-2014 RV
- Only handle the power cord by its connectors. Never pull the cable to remove a connector from its socket,
as this could lead to damage and electrical shocks.
- Always operate this device with a stable AC current.
- Always operate this device with the AC ground wire connected to the electrical system's ground.
- Never use other types of cables than specified in the manual, do not use defective or bad functioning
cables. Contact your dealer when the included or required cables do not work properly with this device.
- When the device has been exposed to large temperature differences (for example, transport from outdoor
to indoor), do not connect the device immediately. Do not activate the unit until it has reached room
temperature, as moist might build up inside the unit, which may cause short circuits and/or electrical shocks.
Guidelines and types of use:
- This device is intended to be used by professionals on stage, in theaters, clubs and other equal venues.
- This device is not suitable for children and always needs to be operated by an adult.
- Only use the device when the environment is suitable and will not cause any damage. Do not use the
product in moist or dusty environments, or where long-term damage may occur such as:
- indoor swimming pools where chlorine is used.
- Beaches, where sand and salt are present.
- Outdoor, without roof protection
- Indoor areas where intense heat sources are present or where the temperature exceeds levels
which are comfortable for humans.
- Only use the included power adapter and only connect the device to a suitable power outlet with the correct
output voltage. Connecting the device to a power outlet with the wrong type of voltage or using the product
with a wrong type of power supply may cause permanent damage to the device.
- Avoid shocks and collision during use and transport. Do not transport the device while in use. Avoid brute
force during the installation and operation of this device.
- Familiarize yourself with the functions of the device before use. Do not allow operation of the device by
unskilled or unqualified people.
- Use of the device in other ways than described in this user manual may cause damage and injury. Devine
does not take responsibility for any damage or injury caused by improper use.
Storage and transport:
- This device is intended for mobile use. When transported, use the original packaging of the product, or a
fitting flightcase, preferably filled with foam.
- This device is not intended for permanent use. Operation breaks will ensure that the lifespan of the device
remains unchanged.
- If the device is not used for a longer period of time, disconnect it from its power source and store it in its
original packaging, or in a fitting flightcase.
- Store the device indoor, dry and do not expose the device to extreme temperature differences.
Housing:
- Inspect the housing of the device frequently. Severe dents, cracks and missing screws should be avoided
at all costs. Do not use the device when the housing is not in optimal condition. Contact your dealer or a
skilled technician when in doubt about the state of the device
- Check the fixture and screws for corrosion. Corrosion should not be present on the fixture. Contact your
dealer or a skilled technician when corrosion is found on the fixture
- Every power or signal chassis/connector should be mounted tightly. Do not use the device when connectors
are loose.
- Do not use the power cord when the cores are visible. Contact your dealer for a replacement if needed.
- Avoid the buildup of dust and dirt. Clean the exterior of the fixture every month with a dry or damp cloth.
When using the device intensively, the cleaning frequency needs to be increased.
Fuses:
- The main fuse of this device is to be found on the rear of the device. In most cases, directly next to the
power inlet.
- Only replace a fuse for a new one with the same type and rating! Do not use a fuse with a higher or lower
rating.
- Do not bridge the fuse with electrical wires, aluminum foil, as the fuse is used for protection against
electrical shocks and short circuit.
- Always mount the fuse cover back to the fuse compartment.
Any information and illustrations shown in this user manual are subject to change without further notice.
User manual version: 2.0 Creation date + author initials: 22-04-2013 RV Revision date + author initials: 25-02-2014 RV
Guidelines for speakers
WARNING!
This loudspeaker is capable of producing a sound pressure level which can be harmful for
humans and animals when used incorrectly and/or without protection. Possible permanent
hearing loss may occur when humans or animals are exposed to high sound pressure levels for
a longer period of time.
- Avoid exposure to high sound pressure levels for a longer period of time. See the charts on this
page for more information about sound pressure levels and exposure to high levels.
Continuous dB
Permissible exposure time
85
8 hours
88
4 hours
91
2 hours
94
1 hour
97
30 minutes
100
15 minutes
103
7.5 minutes
106
3.75 minutes (<4 minutes)
109
1.875 minutes (<2 minutes)
112
0.9375 minutes (<1 minute)
115
0.46875 minutes (+/- 30
seconds)
- When installing this speaker on a speaker stand or distance pole, always tighten the screw knobs firmly.
- When using this speaker for the first time, set the gain settings on the amplifier (module) on a minimum
level. After this, raise the volume to a comfortable listening level (not at its maximum level). The speaker
needs to perform on a moderate level for several hours to perform on its full potential, when used for the first
time.
- When transporting the speaker on a cart, use caution during movement. Prevent the cart and speaker
combination from tipping over as this may cause serious injuries.
Any information and illustrations shown in this user manual are subject to change without further notice.
User manual version: 2.0 Creation date + author initials: 22-04-2013 RV Revision date + author initials: 25-02-2014 RV
Box contents
Box contents:
1x Flex series powered speaker (Flex 12A or Flex 15A)
1x power cable
1x wireless remote
2x monitor stand
Unit and accessory inspection
- Always use the supplied power cable to connect the unit to a power supply. If the cable appears broken or
has visible damage, do not use it.
- If the unit is not going to be used for a longer period of time, disconnect it from the power supply and store it
in a dust-free environment.
- Always check the unit for possible damage before use. If you suspect that something is wrong with the unit,
do not connect it to a power source! If you suspect that your unit is broken or damaged, contact your local
dealer or a certified technician to inspect the unit.
Any information and illustrations shown in this user manual are subject to change without further notice.
User manual version: 2.0 Creation date + author initials: 22-04-2013 RV Revision date + author initials: 25-02-2014 RV
Use of the speaker
This speaker is designed to perform in professional environments. Either speech, music, or any other type of
sound can be played trough this speaker.
The powered Flex-series are equipped with their own power amplifier, mounted on the rear of the speaker.
This module also houses the internal USB MP3-player, Bluetooth receiver, EQ and the several connectors +
volume controls. The built-in power amplifier is capable to produce enough power for the speaker alone. It is
not possible to attach a second passive speaker to the amplifier module of this speaker. It is however
possible to attach a second active speaker with the signal link-output.
The built-in MP3-player supports most USB-thumbdrives and SD cards. However, the results of some
models may vary as many manufacturers have their own standards. The display shows track information and
with the silver buttons you are able to browse through your files. The player has on-board controls for the
mode, play/pause, stop, repeat, previous and next features. It is also possible to use the included wireless
remote control to operate the MP3-player.
Make sure you connect the right audio sources to the right inputs. The mic input is suitable for most
microphones, but does not supply phantom power, if your microphone requires that. The line input is suitable
for RCA-sources (MP3-players, laptops, smartphones, tablets) and can also be used with an adapter cable
to a 3.5mm jack (not included). A XLR-connector is provided for professional audio sources, such as DJ or
PA mixers, electronic keyboards and so on. The line output is used to connect a second speaker, such as
another Flex series speaker. Connections are available in XLR and 6.35mm jack.
This speaker comes with two monitor stands, which makes horizontal positioning possible. This feature is
often used when the speaker needs to perform as a floor monitor for artists.
Mount the monitor stands as illustrated, further on this page.
This speaker is also equipped with a lockable 35mm stand adapter, which makes it possible to place the
speaker on a suitable height. This makes the distribution of high and mid-frequencies easier. See the image
above for details. The lockable screw-knob positions the speaker firmly on your speaker stand, thus
preventing any type of resonance.
Warranty is void when damage to this speaker is caused by improper use. When any damage to this speaker
occurs, please contact your local dealer for help.
Any information and illustrations shown in this user manual are subject to change without further notice.
User manual version: 2.0 Creation date + author initials: 22-04-2013 RV Revision date + author initials: 25-02-2014 RV
Power amplifier module section
The built-in power amplifier module, combined with the built-in MP3-player, connectors and volume controls,
has several options. A short explanation for each feature is described on the next page. The descriptions
apply to the Devine FLEX 12A as well.
5
1
3
2
4
6
7
8
9
10
11
12
13
14
18
15
16
17
19
21
20
22
Any information and illustrations shown in this user manual are subject to change without further notice.
User manual version: 2.0 Creation date + author initials: 22-04-2013 RV Revision date + author initials: 25-02-2014 RV
1. MP3-player display
2. SD card input
3. USB input
4. MP3-player control buttons
5. 5-band EQ
6. amplifier module heatsink
7. MP3-player volume level control
8. Microphone volume level control
9. Line level volume level control
10. Master level volume controls
11. Treble level control
12. Bass level control
13. Power LED indicator (green)
14. Clip LED indicator (red)
15. Microphone input (balanced XLR)
16. Microphone input (6.3 mm jack)
17. Line input (balanced XLR)
18. Line input (unbalanced stereo RCA)
19. Line output (6.3 mm jack)
20. Line output (balanced XLR)
21. ON/OFF switch
22. IEC power input with fuse holder
Practical information and tips for optimal use of your speaker system
For optimal performance and a long lifespan of your speaker, please pay attention to the following when
using your Devine speaker:
- This speaker is equipped with a CLIP limiter, which prevents damage to the speaker. This CLIP limiter will
activate at excessive volume levels and a red LED shows when the CLIP limiter is active. Prevent the
activation of the CLIP limiter system and the indicating LED. The CLIP limiter protects the system from
permanent damage, but is only effective at peak signals. Long term exposure causes distortion and power
overload, with possible permanent damage to your speaker system.
- When using an external mixer (such as a PA-mixer or DJ-mixer, make sure your master channel sends out
signals at 0dB maximum. This will provide optimal signal quality and with the volume control on the speaker
you are able to turn up the volume, just before the CLIP limiter LED will slightly flash. This way you are using
the speaker to its full potential with optimal sound quality.
- When using the internal equalizer system and adjusting the sound balance of your speaker, keep the
master volume on a medium, neutral level which is comfortable to your ears.
When you want to add extra bass, try to decrease the intensity of lower frequencies first. When you want to
add more high frequencies (for vocal and speech applications), try to decrease the low frequencies.
This way, the EQ system does not have to function as a pre-amplifier, thus providing optimal sound quality.
The EQ function features a 7-band system:
- The Treble and Bass knobs have a -12 to +12 range and operate in a 10 Hz and 100 Hz range.
- The 5-band EQ on the top right operates in frequencies 63 Hz, 500 Hz, 1 kHz, 3.2 kHz and 12 kHz. These
also feature a -12 to +12 range, but are used with a miniature slider instead of knobs.
The Treble and Bass knobs are used for main applications, but it is possible to adjust the sound
characteristics of the speaker in detail when using the 5-band EQ on the top right. The combination of these
two systems provide an excellent frequency coverage, which grants you optimal control over the
performance of this speaker.
The EQ function is used on the overall main signal and is therefore not bound to any specific input.
- Do not switch the power on and off frequently as this reduces the lifespan of the speaker and its internal
components. The speaker can be used for a whole day without any cooling-down time, if sufficient cooling is
provided.
Any information and illustrations shown in this user manual are subject to change without further notice.
User manual version: 2.0 Creation date + author initials: 22-04-2013 RV Revision date + author initials: 25-02-2014 RV
- The speaker is equipped with an internal fuse, located directly next to the IEC power input section. If this
fuse blows for any reason, only replace it with a fuse that has the same values as the original fuse. Do not
bridge the gap with any electrical wiring or whatsoever as this voids your warranty.
- Severe shocks and impact must be prevented as much as possible. Secure this speaker properly in place
during transport to prevent damage to the housing and the internal components of the speaker.
- The included wireless remote control is used to operate the built-in MP3-player. Controls to change the
MP3 player volume (digital), EQ settings, working mode and even a numeric keypad for direct access to
track numbers are featured.
- The Bluetooth functionality of the speaker runs through the internal MP3-player. To connect any mobile
Bluetooth device (such as a smartphone, tablet, netbook, MP3-player or computer), follow these steps:
- Turn on the speaker
- Hold the ‘MODE’ button of the MP3-player module until ‘Bluetooth’ appears on the display.
- Use your mobile device to search for the speaker (named ‘Bluetooth’). When found, connect your device.
- Use password ‘0000’ to connect your mobile device with the speaker.
- After these steps, sound played from your mobile device will be produced by the speaker. The maximum
distance is about 10 meters, when the signal is not disturbed by any objects that may cause interference.
- This speaker uses a large heatsink for cooling, instead of a regular fan. This prevents noise and possible
dust buildup inside the speaker and the amplifier module. It is important not to block the heatsink with any
objects, to provide sufficient cooling and airflow, for optimal disposal of heat generated by the amplifier
module. Blocking the heatsink, for example caused by positioning the speaker too close to a wall, may cause
overheating. This may result in permanent damage to your speaker, not covered by warranty.
- The speaker is provided with an internal mixer, making it possible to adjust the volume levels between
several audio inputs. The volume of the MP3-player, microphone input and line level input can be adjusted
from a variable 0 to 10 range. The main volume knob is used to determine the input level of the main signal.
- Pay attention to the volume settings, as power overload may cause permanent damage to the amplifier
module and speaker components. Use your eyes and ears to determine the optimal settings for your
application. When the red CLIP LED is active and/or when you hear any distortion, you need to take action
and decrease volume levels to prevent damage.
- The speaker is equipped with M10 mounting points and a pullback point, but is not intended to be installed
directly above your crowd as the internal construction is not designed for this application. When using the
M10 points to install the speaker, make sure that it is impossible for any person to be located directly
underneath the speaker or in any possible injury-zone if any failure occurs.
Consult local regulations regarding rigging applications. Devine can not be held responsible for any damage
or injury caused by improper installation of this speaker.
- Never use the transport handles to install the speaker in a hanging position, as these are only intended for
transport purposes. It is however possible to use the handles to secure the speaker, for example when
positioning a Flex 12A or 15A on top of a subwoofer stack. Use a proper strap and pay attention to the stress
on the handles, as excessive tension might cause permanent damage.
Any information and illustrations shown in this user manual are subject to change without further notice.
User manual version: 2.0 Creation date + author initials: 22-04-2013 RV Revision date + author initials: 25-02-2014 RV
Powered speaker troubleshooting
If you have any problems with active speakers, consult this troubleshooting section to solve any difficulties
with your product. If this troubleshooting section does not solve your problem, contact your dealer for more
information and help.
This troubleshooting section contains the most frequent problems and is not a complete collection of possible
faults, defects and solutions. The troubleshooting section applies for powered speakers. It is possible that not
all described problems, causes and solutions apply to your situation as product details may vary from
product to product.
Problem
Possible Cause
Solution
Speaker does not activate itself
ON/OFF switch set to OFF
Turn on the speaker with the
ON/OFF switch, to the ON position
Power not plugged in
Connect the included power cable
to the power inlet and a wall outlet
or power socket.
Fuse blown
Remove the fuse cover
underneath the power input and
check the fuse. Replace the fuse
with the same type and rating if
needed. Use caution when
removing the fuse holder, remove
the holder with a small screwdriver
and gently move the holder
towards you. Applying too much
force may cause broken fuse
holders!
No sound
Signal source level set to minimum Increase signal source level
Signal source level on the mixer
panel set to minimum
Increase volume of signal source
on the mixer panel with the volume
knobs
Master volume set to minimum
Increase master volume
Cable broken
Change cable
Lost Bluetooth contact
Move your Bluetooth device closer
Signal source level too high
Decrease signal source level
Signal source level on the mixer
panel set too high
Decrease signal source level on
the mixer panel
Master volume set too high
Decrease master volume level
Track without low frequencies
Try another reference track
Bass level set to minimal level
Increase Bass level
Track without high frequencies
Try another reference track
Treble level set to minimal level
Increase Treble level
Too much bass
Bass level set to high level
Decrease Bass level
Too much high frequencies
Treble level set to high level
Decrease Treble level
CLIP limiter indicator keeps on
flickering or is constantly lit
CLIP limiter circuit is active to
prevent overloading of internal
Decrease volume settings (signal
source, signal source on mixer
Distorted sound
Lack of bass
Lack of high frequencies
Any information and illustrations shown in this user manual are subject to change without further notice.
User manual version: 2.0 Creation date + author initials: 22-04-2013 RV Revision date + author initials: 25-02-2014 RV
components
panel or master volume)
Also try to set Treble and Bass to
normal levels.
Speaker can not be placed on a
speaker stand
Tightening knob is turned too tight
Loosen tightening knob
Stand not suitable
Measure stand top diameter, this
should be around 33-36 mm for
optimal placement. Use another
speaker stand if needed.
Buzzing noise coming from the
speaker
Ungrounded power connection
Connect the speaker to a
grounded outlet
Ungrounded signal source
Connect the signal source to a
grounded outlet
Interference from power cables
Avoid placing power and signal
cables in a parallel structure
Bad cables
Remove the cable or
increase/decrease the volume of
the speaker. If the noise is gone,
the problem is somewhere in your
signal chain.
Any information and illustrations shown in this user manual are subject to change without further notice.
User manual version: 2.0 Creation date + author initials: 22-04-2013 RV Revision date + author initials: 25-02-2014 RV
Technical specifications
Flex 12A
Type of speaker
Housing
Frequency range (-10 dB)
Frequency range (+/-3 dB)
Coverage pattern
Directivity Index (DI)
Directivity Factor (Q)
Crossover frequency
Amplifier power (LF + HF)
Amplifier power LF (continuous)
Amplifier power HF (continuous)
Distortion
Maximum SPL
Sensitivity
Signal indicators
Input gain (Input 1: Mic)
Input gain (Input 2: Line)
Main volume gain
Input impedance
LF driver
HF driver
Connector (Input 1: Mic)
Connector (Input 2: Line)
Connector (main link output)
XLR pin assignment
Enclosure
Handles
Stand mount
Mounting points
Grill
AC input
Dimensions
Flex 15A
Self-powered, active speaker
ABS polypropylene construction, two-way bass-reflex system
50 Hz – 20 kHz (flat EQ)
40 Hz – 20 kHz (Flat EQ)
55 Hz – 18 kHz (flat EQ)
45 Hz – 20 kHz (Flat EQ)
100 degrees horizontal, 45 degrees vertical
9 dB
9 dB
8
8
3 kHz
3 kHz
300 Watt RMS
375 Watt RMS
250 Watt
300 Watt
50 Watt
75 Watt
Less than 0.1%
Less than 0.1%
129 dB
129 dB
97 dB
98 dB
Red CLIP LED indicator, green Power/signal indicator
-infinity to +40 dB
-infinity to + 40 dB (max. 20 dB signal input)
-infinity to +4 dB (max. 20 dB signal input)
64 kOhm (balanced), 32 kOhm (unbalanced)
12 inch, Devine 265F-I 300mm
15 inch, Devine 265F-I 380mm
Differential Drive woofer with
Differential Drive woofer with
dual 2 inch voice coils
dual 2.5 inch voice coils
1.35 inch, Devine 3414H 34.4
1.35 inch, Devine 3414H 34.4
mm compression driver
mm compression driver
Balanced XLR / ¼ inch TRS
Balanced XLR / stereo RCA
Balanced male XLR (+20 dB peak) based on Mix volume
Pin 2: +, Pin 3: -, Pin 1: GND
Polypropylene impact co-polymer for main PA and monitor
applications
One on the side of the cabinet
36 mm pole socket with stabilizing tightening knob
4x M10 suspension points, 1x M10 pullback point
Black powder coated steel grill with acoustic transparent backing
screen
230V AC, 50/60 Hz
590 x 420 x 320 mm
685 x 465 x 415 mm
Any information and illustrations shown in this user manual are subject to change without further notice.
User manual version: 2.0 Creation date + author initials: 22-04-2013 RV Revision date + author initials: 25-02-2014 RV