1
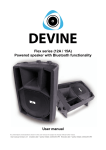
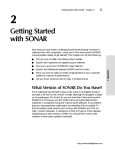
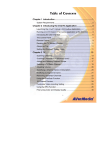
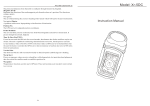
Chapter 1 PRACTICAL EXERCISE Setting Up Your DAW In Chapter 1, we discuss certain computer and hardware equipment recommended in order to set up your own digital audio workstation (DAW). This worksheet is intended to help you set up your DAW so that you’re ready and able to record basic audio and MIDI. Figure 1 shows a diagram of a general DAW setup. We recognize that that not every DAW setup is exactly the same, from different operating systems to preferred hardware and software. As a result, what is described here and what you see in your own computer’s setting screens may differ. This guide will therefore approach the setup procedures from the most general and conceptual standpoint possible. In each section you should be able to find the equivalent settings and take similar steps with your own computer and software. We may also at times refer you to the information and manuals provided by the manufacturer for specific instructions. Monitor Loudspeakers Audio/MIDI Interface MIDI Controller Keyboard Microphone External Hard Drive Computer (serving as audio mixer, editor, recorder, signal processor, & synthesizer) Monitor Headphones Figure 1 – General DAW Setup Setting Up Your DAW PRACTICAL EXERCISE Page 1 of 14 This material is based on work supported by the National Science Foundation under CCLI Grant DUE 0717743, Jennifer Burg PI, Jason Romney, Co-PI. Computer Setup The computer you use for your DAW should meet the computer system requirements with regard to RAM, hard drive, etc., discussed in Chapter 1. If you’re buying a new computer for this purpose, it may be helpful to gather together all of the system requirements discussed in the book as well as those specified by the audio hardware and software you will be using. Be sure to communicate these specifications to your sales representative and have them on hand when placing your order. If you are upgrading components on an existing computer, make sure the new components are compatible with your current system and any new audio hardware and software you may plan to get. Please safely and carefully follow the manufacturer instructions when installing the new components, or have the upgrade performed by a professional computer repair shop. Driver Installation Before you can use a piece of hardware with your computer – whether it is your audio interface, hard drive, MIDI keyboard, etc. – you may need to install a driver for it. The driver allows your computer to communicate with your new hardware and recognize what type of device it is. The driver for your hardware typically comes on an installation CD provided with the product. Follow the instructions provided by the manufacturer to complete the installation of your hardware. If you don’t have the driver, you can typically find it downloadable from the manufacturer’s website. Hard Drive Setup In Chapter 1, we talk about getting a large capacity hard drive to permanently store your audio data. The first thing you’ll want to do is format your hard drive. If you ordered a new desktop computer with an extra hard drive built in, the hard drive may already be formatted and ready to use, and even some external hard drives come preformatted as well. Either way, you will want to check the formatting to make sure it is appropriate for your needs, and if not follow these steps to format or reformat your new hard drive. Choosing Your Format There are several main format choices for your hard drive, depending on what operating system you primarily use. If your DAW setup is a Mac-based system, you’ll want to format your hard drive with the HFS+ (Mac OS Extended) file system for the best results. This format will work for drives of any capacity. If your DAW setup is Windows-based, you’ll want to format your hard drive with the NTFS file system. This format will work for drives of any capacity. A third format to be aware of is the FAT32 file system, which is supported by both Mac and Windows systems. However appealing this may seem, FAT32 has some major limitations, such as having a slower data speed and limited capacity. FAT32 drives have a maximum capacity of only 32 GB, and they can’t handle files larger than 4 GB. Audio data takes up a significant amount of space, and file sizes can easily exceed the 4 GB limit, particularly for multitrack Setting Up Your DAW PRACTICAL EXERCISE Page 2 of 14 This material is based on work supported by the National Science Foundation under CCLI Grant DUE 0717743, Jennifer Burg PI, Jason Romney, Co-PI. recording sessions. You’ll find FAT32 format commonly used with USB thumbdrives and smaller data storage devices where file size concerns are minimal and compatibility is key, but it would not be an ideal format choice for your audio storage hard drive. Cross Platform Accessibility Many sound practitioners find themselves going between Mac and Windows systems often, whether sharing audio files on collaborative projects, or utilizing both systems themselves in their own studio setup. This poses a challenge when Mac and Windows prefer different file format structures to store their data. It should be noted that a Mac system is able to read NFTS formatted drives, but not able to write to them. This means you could playback and transfer files on an NFTS drive with your Mac, but you could not record audio straight to the NFTS drive. Windows systems are natively unable to recognize Mac OS Extended formatted disks, either for reading or writing. There are, however, various software solutions that, when installed on your system, will provide you full read/write access to a Mac OS Extended formatted drive from your Windows system, and vice versa, with comparatively good speed and reliability. Before purchasing third party software to provide cross platform data accessibility, you may want to investigate with the manufacturers of your DAW applications and hardware to ensure that the software has been tested for reliability and compatibility with their products. Formatting Your Hard Drive Many hard drives are of the “plug and play” variety, meaning that once the hard drive is connected and turned on, your operating system will immediately recognize it. Alternatively, your hard drive may need to have a driver installed before your computer will recognize it. Please refer to the previous section “Driver Installation” for more information on setting up drivers. Once your computer recognizes your new hard drive, the first thing most operating systems will do is prompt you to format the new drive. If your computer does not ask you to do this, your drive may be preformatted. You should still read through this section and follow the steps to check the formatting or reformat your drive if necessary. If your computer does not automatically prompt you to format it, open your operating system’s file browser (i.e. “Finder” for Mac, “Explorer” for Windows) and locate your new hard drive. You will likely find it listed next to or near your main hard drives, with the hard drive’s default name similar to the product/model name given by the manufacturer. Open up the properties of the hard drive, typically by right clicking on it, and you should see an option to format your drive. If there is no option to format it, the hard drive properties should at least inform you what the drive is currently formatted as, so you will know if it needs reformatting. The option to format your hard drive may be otherwise accessed through your operating system’s setup disc or its built-in hard drive/disk utility application. Please refer to your operating system’s manual for specifics on where to access and format your hard disk drives. Usually, the actual process of formatting is relatively simple. In your hard drive setup utility, you should see your new hard drive listed. The utility may ask you for the desired file format (NFTS, Mac OS Extended, FAT32), the number of partitions, and the partition sizes. We won’t be going into partitioning your hard drive, but Setting Up Your DAW PRACTICAL EXERCISE Page 3 of 14 This material is based on work supported by the National Science Foundation under CCLI Grant DUE 0717743, Jennifer Burg PI, Jason Romney, Co-PI. you may want to investigate more information on this subject through other sources. Once you have selected these settings, you should be able to tell your computer to start formatting. Formatting your drive may take some amount of time, depending on the capacity and other factors, so be patient. Do not turn off or disconnect your hard drive during this process. Remember that formatting or reformatting your hard drive will erase all data currently on it. If this is a brand new hard drive, you may not have anything to worry about, but it’s a good idea to double check and backup any useful data on your hard drive before attempting this process, as you won’t be able to go back and recover it once it has begun. Audio/MIDI Interface Setup We discuss audio interfaces (or sound cards) in Chapter 1. Drivers Before you can use your audio interface, you may need to install a driver for it. Please refer to the previous section “Driver Installation” for more information on setting up drivers. Choosing Your Audio Device Once your audio interface has been installed, connected (USB, FireWire, etc.), and turned on, your computer should recognize it as a valid audio device. At this point you should be able to use it to handle your computer’s audio. Open your computer’s system settings. For example, on a Mac you would open the System Preferences application, or in Windows you would open the Control Panel, as shown in Figures 2 and 3. Please refer to your operating system’s manual for specifics on how to access your computer system settings. Figure 2 – System Preferences on a Mac Setting Up Your DAW Figure 3 – Control Panel on Windows XP PRACTICAL EXERCISE Page 4 of 14 This material is based on work supported by the National Science Foundation under CCLI Grant DUE 0717743, Jennifer Burg PI, Jason Romney, Co-PI. In your computer system settings screen, go Aside: Your “internal” or “built-in” sound to the subsection involving “sound” or “audio card is often an integrated chip included on your computer’s motherboard, and typically devices.” It is most likely designated by has only basic sound capabilities. This may these or similar terms. In your sound be suitable for listening to music or movies settings, there are likely further subsections, and other simple audio playback, but is not intended for the intensive, high quality involving system sound effects, volume audio and recording projects we’ll be levels, etc. In one of these subsections you engaging in. However, when you do not will find a list of audio devices. There may be need or have access to your DAW audio interface, you can easily switch back to your multiple places where you can select from internal audio hardware by following these the list of audio devices, possibly separated same steps. for input and output (or playback and recording), and your computer’s default audio device will likely be selected. The default audio device may be referred to as simply an “Internal” or “Built-in” device, or it may be the specific model name of the sound card built in to your computer. From these lists, you should see the name of your new DAW audio interface, and be able to select it to handle both input and output of audio for your system. Additional Audio Interface Software Some audio interfaces may come with their own proprietary audio setup or control software that also needs installation for your device to function properly. Follow the manufacturer’s instructions for installing and configuring this software. You may need to adjust your computer’s sound settings, as discussed, as well as the settings in your audio interface software in order to successfully use your new audio interface. Please refer your hardware’s user manual for more detailed information in these situations. Audio Device Settings Once you have selected your audio interface as your computer’s audio device, you should now be able to adjust the specific settings for it, such as volume, bit depth, sampling rate, etc. These device settings are typically found in or can be brought up from the same sound settings menu we have been navigating. In some cases these settings may need to also be configured in your Digital Audio Software (i.e. Logic, Cakewalk, ProTools), which we’ll discuss later in this worksheet. The most basic of settings is the input or output volume, which may need to be adjusted to achieve sufficient levels or to prevent too high levels from overloading the sound card. Try starting out with the volume levels relatively low, and raise them to suitable levels later on when testing your entire DAW setup. This will keep you from damaging your equipment, your ears, or your relationship with the neighbors. Your computer or audio interface may also have a built-in test feature to help you adjust your settings to optimal levels. Settings such as bit depth and sampling rate are usually handled beneath the surface, and your sound card will automatically select which settings to use based on the software-side configurations defined in your Digital Audio Software environment. Typical settings for CDquality audio are 16-bit sample size with a sampling rate of 44,100 Hz. Setting Up Your DAW PRACTICAL EXERCISE Page 5 of 14 This material is based on work supported by the National Science Foundation under CCLI Grant DUE 0717743, Jennifer Burg PI, Jason Romney, Co-PI. MIDI Playback Device We’ve chosen our new audio interface as the Aside: When would you want to choose sound input/output (recording/playback) your audio interface as your MIDI playback device? There are certain external device. You may also notice an option in hardware products you can buy that your computer’s sound settings for the MIDI possess extensive sample libraries or playback device. When we talk about MIDI, synthesizers with particular sounds you really like. In that case, you would connect in particular MIDI keyboards and input these pieces of equipment to your audio devices in Chapter 1, we briefly discuss the interface via MIDI cables, select your audio fact that MIDI itself does not generate interface as your MIDI playback device, and your computer would then be able to send sounds. (MIDI will be discussed more in MIDI data to your external sampler or depth in a later chapter.) MIDI is simply a synthesizer for playback. form of data and commands that can tell a software or hardware synthesizer or sampler how and when to play a sound. Your audio interface likely has MIDI inputs and outputs built in as well, and you’ll see their names as a choice for the MIDI playback device. Your audio interface itself probably does not have its own synthesizer or sampler, so selecting it as your MIDI playback device is not a good choice. However, your internal sound card will typically have a basic MIDI synth built in (usually selected by default), and you can leave this selected as your MIDI playback device. We’ll actually override this setting later in our Digital Audio Software environment. Monitor Loudspeaker Setup Now that you have your audio interface set up and working, you’ll need to setup your monitor loudspeakers to hear it. Remember, your new audio interface is taking over all the sound duties your computer itself had previously been burdened with. Your built-in microphone and computer speakers are superseded by your audio interface and professional monitoring/recording equipment. Positioning Your Loudspeakers There are many options for positioning your loudspeakers, whether on professional loudspeaker stands or mounts, on foam loudspeaker pads, or simply on your desk or a shelf. You can try experimenting with these additional items and see how position affects your listening quality, so long as you keep the following principles in mind. Symmetry Your basic, two-loudspeaker monitoring system is a stereo setup, supporting a 2-channel left/right output signal, split left and right into the two loudspeakers. In order to properly receive the stereo image, the loudspeakers should be symmetrically placed in relation to the listening position (your head/ears, when seated), as in Figure 4. Setting Up Your DAW PRACTICAL EXERCISE Page 6 of 14 This material is based on work supported by the National Science Foundation under CCLI Grant DUE 0717743, Jennifer Burg PI, Jason Romney, Co-PI. Figure 4 – Symmetrical Loudspeaker Placement Ear Height For ideal listening conditions, your loudspeakers should be on the same horizontal axis as your ears. That is, if the top of your desk is elbow height, simply placing them flat on the desk will not give the optimal response. If you have your loudspeakers on stands or mounts, you should adjust them to achieve this height. If your loudspeakers are not on axis with your ear height, you should tilt the loudspeakers so that they are angling up to your ear height at the listening position. You do not want to tilt your loudspeakers very much, as that can affect the listening response, so try to stay within 15 degrees. If a greater angle is required you should instead try a combination of elevating and tilting. If you are placing your loudspeakers on your desktop, there are foam pad products available that will raise and angle your loudspeakers, which may be a helpful solution. Sweet Spot Both the symmetry and ear height guidelines all relate back to the concept of a loudspeaker’s “sweet spot.” The sweet spot is essentially a small, defined area for a certain loudspeaker placement that will provide the optimal listening conditions. You want to make sure your listening position falls within this sweet spot Aside: The sweet spot described here is area. The sweet spot, as you may have for near-field monitors (compared to farguessed, is located symmetrically between field). Most home studio or desktop the two loudspeakers, on the horizontal axis monitor loudspeakers are commonly nearat which the loudspeaker is pointing field. (hopefully at ear height), and a given distance away (typically a few feet). Loudspeaker manufacturers typically provide instructions on how to position their specific loudspeakers, and where the sweet spot will occur, so consult your user manual for additional information on this matter. Connecting Your Loudspeakers Your loudspeakers may have several different input connection options, usually on the back of the loudspeaker. This may be so that you can connect multiple sources, or simply to provide flexibility for different interfaces and systems users may have. Your audio interface may also have various types of output connections to choose from. Generally your audio interface will Setting Up Your DAW PRACTICAL EXERCISE Page 7 of 14 This material is based on work supported by the National Science Foundation under CCLI Grant DUE 0717743, Jennifer Burg PI, Jason Romney, Co-PI. have a stereo pair of outputs labeled “main out” or “monitor out.” Typical connections types on your loudspeakers or audio interface are RCA, 1/4" TRS, or XLR, as shown in Figures 5 and 6. Figure 5 – Common Audio Connectors Figure 6 – Common Loudspeaker Inputs XLR and TRS are balanced input/outputs, and your best signal connection option (if your audio interface and loudspeakers support balanced signals, which is likely). RCA and TS are unbalanced input/outputs and may work fine for short cable lengths, but if your loudspeakers have a significant “hum” you may want to try balanced cables instead to eliminate it. You will likely want to use the type of connector that matches on both the interface output and the loudspeaker input, but adapter cables exist for mixing connector types. Home studio/desktop monitor loudspeakers are powered (also called active) loudspeakers, meaning the amplifier is built in to the loudspeaker itself. You’ll need to plug your loudspeakers into a wall outlet and turn them on when in use. Be careful where you plug your loudspeakers in. Ideally, you will have an isolated ground circuit to power all of your audio equipment, but this will not usually be the case in your basic home studio setup. If your loudspeakers are plugged into an outlet that shares its electrical ground with other electronics in your home (lights, appliances, etc), there is a good chance for noise from the electrical system to leak into your audio signal, which will result in an audible “hum.” This is why balanced connections are so important, as they can help greatly reduce this hum. Once you’ve connected your loudspeakers to your audio interface and turned them on, you should be able to listen to sound from your computer. Microphone Setup In order to get sound into your computer, you need to set up your microphone. The microphone converts sound into an electrical signal, which your audio interface can then digitize for your computer to store and manipulate as audio data. Your microphone will use a balanced XLR connection on both the microphone’s output and the audio interface’s input side of the connection. Your audio interface may have separate inputs for mic and line inputs, or it may have a combined input for both. Your microphone should be connected to the mic input, and if the input is multipurpose, there may be a switch or button to set it between mic and line (make sure to switch it to mic). Setting Up Your DAW PRACTICAL EXERCISE Page 8 of 14 This material is based on work supported by the National Science Foundation under CCLI Grant DUE 0717743, Jennifer Burg PI, Jason Romney, Co-PI. Phantom Power As discussed in Chapter 1, there are several different types of microphones. If your microphone needs phantom power, such as a condenser microphone, you’ll need to turn the phantom power switch to the On position on your audio interface. Most audio interfaces have a phantom power supply, but if not you may need to get an external phantom power supply to use your microphone. If your microphone is a dynamic microphone, phantom power is not required. For safest use, you should only turn on phantom power once your microphone is connected, and turn off phantom power before disconnecting your microphone. Input Gain You’ll also need to set the gain for your microphone input on the audio interface. The gain (sometimes called “trim”) adjusts the pre-amplification of the microphone signal, boosting it to the optimal level for digital conversion. The gain should be adjusted so that the loudest sound it picks up will not clip or overload the input. To set the gain, sing or play your instrument as loudly as you expect to play it, and slowly turn up the gain until the input begins to clip (usually indicated by a red LED). Once you’ve reached the point of clipping, turn the gain down by 6 dB to allow for headroom, typically two clicks or markers on the gain dial. Often it is difficult to accurately estimate your loudness during setup as compared to your playing during the actual recording, and if you end up clipping the input you may need to readjust your gain. MIDI Keyboard Setup MIDI keyboards are used to send MIDI data to your computer, both as musical data and control data captured during your performance. Many MIDI keyboards are equipped with a USB interface so you can plug your keyboard straight into your computer’s USB port. This may be handy when traveling light with your equipment, or for applications where an audio interface isn’t available or necessary. Alternatively, you can connect your keyboard’s MIDI output to your audio interface’s MIDI input with a MIDI cable. This may be a preferred as all of your audio and MIDI data is handled with one device, and it frees up your USB ports for other peripherals. Drivers If you are connecting your MIDI keyboard via USB, before you can use it you may need to install a driver for it. Please refer to the previous section “Driver Installation” for more information on setting up drivers. Using Your Keyboard Once your MIDI keyboard driver is installed (if applicable) your computer should recognize it. Since your MIDI keyboard is designed for use within audio and MIDI software, most of the configuration options will take place within the particular software’s environment. In the software’s MIDI settings, you should see your MIDI keyboard listed as a possible MIDI input device (or MIDI control interface). Once you’ve selected it as your MIDI device, your software should be able to see all the MIDI data coming in as you play. Setting Up Your DAW PRACTICAL EXERCISE Page 9 of 14 This material is based on work supported by the National Science Foundation under CCLI Grant DUE 0717743, Jennifer Burg PI, Jason Romney, Co-PI. If your MIDI keyboard has control knobs, faders or buttons, you also may be able to program and customize those buttons to better suit your needs and performance styles. Some keyboards come with their own proprietary software to help you configure your keyboard. Customization of your MIDI controls is not necessary to function with most digital audio software, but understanding how the controls work will help you get the most out of your MIDI keyboard and control surface. We’ll be talking more about MIDI in a later chapter, but if you’re really interested in how MIDI works, you can find it all in the “Complete MIDI 1.0 Detailed Specification” available from the MIDI Manufacturers Association. Digital Audio Software Setup Setting up your digital audio software is often the most complicated part of the setup, simply due to the number and complexity of options and settings within the software. Here we’ll try to take you through the initial and most difficult settings and get your software ready to record. We won’t be going in to the specifics of how to use your digital audio software. You’ll have to take some time to learn that on your own. The user manual that comes with your software is a helpful reference for learning setting up and learning how to use the software. Most of the popular digital audio software systems have third party books available to supplement and simplify the more technical user manuals, and these books are great additional references to have on hand. Creating a New Project Open your digital audio software, and the first thing it will likely ask you is to create a new project. Different software may call it something else, e.g., a “session,” but they’re essentially the same. The software may ask you how many audio or MIDI tracks you want to start with, but don’t worry too much about this, as you can always add tracks later. Most software will require you to save your project before you can begin working. This is because a typical project will involve many different sub-files, keeping track of your audio data, fades, bounces, backups, etc., and the system wants to create a directory structure to organize all of this information before it starts to pile up. If it doesn’t immediately ask you to save, it’s a good habit to get into anyway. Audio Preferences and Settings Once you’ve told it to create a new project, the software should start up with its default windows and settings. The first step is to locate the menu containing the audio settings for your digital audio software. They may be organized differently depending on which program you are using, and they may also be found in more than one menu. For instance, your audio settings may be in a file menu named “Options > Audio,” or “Preferences > Audio,” or “Settings > Audio,” or all three. Within those menus, you’ll have to look around further for the specific settings we’ll be discussing below. Please refer to your digital audio software manual for specifics on how and where to access your audio settings. Selecting Your Device Setting Up Your DAW PRACTICAL EXERCISE Page 10 of 14 This material is based on work supported by the National Science Foundation under CCLI Grant DUE 0717743, Jennifer Burg PI, Jason Romney, Co-PI. In the audio settings, there should be a dropdown list containing the possible audio devices you have connected to your system. Select your audio interface from the list. Note that there may be more than one list, with separate selections for input and output. Sampling Rate and Bit Depth Sampling rate and bit depth are the two fundamental audio settings, telling the computer at what resolution to record and process your audio data. It is important to remember what settings you use, particularly when going between different projects or using audio files from another source. Mixing sampling rates and bit depths can have a detrimental effect on your audio. The sampling rate tells the computer how many data points (or samples) to digitize for each second of audio, while the bit depth tells it how many data bits to use when encoding each sample. Typically the higher the sampling rate and bit depth, the higher quality the audio, but that also means increased file size, and there are other limitations to consider as well. It is also important to know which sampling rates and bit depths are compatible with your audio interface; otherwise, it won’t be able to handle or playback the audio. We’re not going to go into any more detail about sampling rate and bit depth here, but common values to use for these settings are 16-bit to 24-bit for your bit depth, with a sampling rate of 44,100 Hz to 48,000 Hz. What is called “CD-quality audio” is 16-bit with a sampling rate of 44,100 Hz. This is often the default setting for digital audio software. In a later chapter, we’ll give more information about sampling rates and bit depths of digital audio signals. Audio Drivers Previously when discussing drivers, we’ve talked about how they allow your computer to recognize and communicate with a piece of hardware connected to your system. Similarly, the audio driver is a specific set of rules and instructions that tells your digital audio software how to communicate audio with your audio interface sound card. The most important factor in choosing which driver to use is the latency involved. Latency is the time it takes your computer to handle the audio, or in other words, the delay between when you press a key on your MIDI keyboard, and when your computer finally plays the sound. You’ll want your latency to be as low as possible, so you can play and manipulate audio in as close to real time as possible. Low latency comes with a trade-off, however, which we’ll discuss a little bit later on, but ideal latency times can fall anywhere in the range of 2 to 10 milliseconds. There are several types of audio drivers you may encounter, and it is important to know which one to use. On Windows systems you will run into several different types of drivers: MME (MultiMedia Extension) This is an older windows audio protocol, usually used as the system default for general applications. Each sound card manufacturer has to write its own set of instructions to utilize the MME driver, so performance can vary dramatically. Additionally, MME is handled by the operating system, using up additional system resources and processing power resulting in slower audio performance. You should avoid using this driver with audio intensive applications such as your digital audio software. Setting Up Your DAW PRACTICAL EXERCISE Page 11 of 14 This material is based on work supported by the National Science Foundation under CCLI Grant DUE 0717743, Jennifer Burg PI, Jason Romney, Co-PI. WDM (Windows Driver Model) WDM is a newer, low latency audio driver that doesn’t require processing by the operating system, allowing direct access to the audio for faster handling. WDM is only supported by certain digital audio software manufacturers, so it will not always be an option. ASIO (Audio Streaming Input/Output) ASIO is a fast, low latency driver that allows direct communication from your software to your audio interface sound card. Because of its speed, reliability, and open availability, it has essentially been adopted as the industry standard. However, be careful that you choose the correct ASIO driver, as several different ones may be listed, such as an ASIO Multimedia driver, which is not necessarily a true ASIO driver. If more than one is present, look for the ASIO driver with the name of your audio interface in it. You will likely want to choose this driver to use within your software’s audio settings. Apple has developed their own audio driver for Mac OS X, known as Core Audio, which does not suffer the same latency issues inherent in other operating systems. Typically the Core Audio will be the best (and only) choice on a Mac system, but some manufacturers such as MOTU and Digidesign may also provide their own special drivers for use with certain audio interfaces they make that can offer improved performance. Typically, for Windows systems you will want to choose the ASIO driver, and for Mac systems the Core Audio. When in doubt, it’s usually always best to go with the drivers the audio interface or sound card manufacturer recommends for their equipment. Once you select or change your audio driver, your software may require you to restart it for the settings to take effect. You can always refer to the user manual of your audio interface and digital audio software for recommendations and more information on audio drivers. Buffer Size Buffer size is directly related to latency, which we discussed previously. The buffer is the chunk of audio data that is allowed to pile up before the sound card processes it and sends it out to the audio output. The smaller the buffer size, the less time you give the computer to process the data, making it work hard to spit out the audio very quickly. This results in a nice, low latency, but requires the computer to use lots of effort to process the data as fast as possible. With a larger buffer size, you allow your computer more time to handle the audio data, improving its processing capability, but at the same time increasing latency. Imagine you’re working as a cashier at a grocery store. If each customer buys only one item at a time, you may get the customers checked out relatively quickly, but each one requires a decent amount of effort and resources to bag the item, give change, print a receipt, etc. What if all the customers consolidated their shopping, so that you checked out ten items at a time per customer instead of just one? It would take a bit longer to get through each customer, but the amount of effort Setting Up Your DAW PRACTICAL EXERCISE Page 12 of 14 This material is based on work supported by the National Science Foundation under CCLI Grant DUE 0717743, Jennifer Burg PI, Jason Romney, Co-PI. and resources you expend would be significantly less. You could handle many more customers that way and move a lot more of the product before you tired out. As you try to make your computer handle more and more audio data, particularly with multitrack projects or processor intensive effects plug-ins, the greater the chance the software will drop some of the audio data or even crash the system. Thus the trade-off is between processing power and latency. If you are working with a small project, you may be able to get away with a smaller buffer and thus lower latency. As your project begins to grow and you notice audio dropouts, try increasing the buffer size to compensate. This is a setting that you may have to play with, adjusting it up or down, until you’ve found a balance that gives you smooth operation with a low enough latency for your audio and performance needs. Recording to Tracks Now that your audio settings are configured for the software to communicate with your audio interface, you should be almost ready to record audio and MIDI. Before you can record or hear what you’ve recorded, you’ll need to adjust a few settings on your audio or MIDI tracks. If you didn’t create a project with an audio and MIDI track already included, insert one now, typically a simple menu command such as “Insert Track” or “Track > New.” Some software will use the term “instrument track” instead of “MIDI” track, but they are essentially the same thing. You’ll need to tell the track which inputs and outputs to grab and send audio or MIDI data to. Select the track you want to record to, and on the track view or inspector there should be an input item, possibly labeled “input” or simply “i," or in a group of items labeled “I/O” (short for “input/output”). If you click and hold the input item, a list of available inputs should appear. If your audio interface is properly connected and turned on, you should see an input option labeled with the device name and each available input as a choice (i.e. “Device Name Input 1”, “Device Name Input 2”, “Device Name MIDI A”). Choose the input that corresponds to the physical input you have your microphone connected to on your audio interface. Nearby the track input item you should also find the track output item, similarly labeled “output” or simply “o.” Click and hold to select your audio interface output from the available output list. It may be called by your device name, or simply “main out” or “stereo out.” The output for the MIDI/Instrument track will usually not be another MIDI output (unless using an external synth or sampler), but instead the same audio output as for your audio tracks. This is because the MIDI data itself is not being sent out, but rather the sound that the computer generated from the MIDI input data. Now that your track input and output have been chosen, the last step is to record enable the track. The record enable is important because it tells the software which track (or tracks, if multiple are enabled) you are recording to at any point in time. Otherwise, in a multitrack project the computer would wastefully record multiple tracks of identical data. On the track view or inspector there should be a few buttons labeled “S,” “M,” and “R.” The “R” stands for record enable, and when you click it, it typically will light up red, showing that it is now active and ready to record. When you now press RECORD on the transport, you should see the audio Setting Up Your DAW PRACTICAL EXERCISE Page 13 of 14 This material is based on work supported by the National Science Foundation under CCLI Grant DUE 0717743, Jennifer Burg PI, Jason Romney, Co-PI. or MIDI data recording to the track. If you stop the recording and move the playhead to the beginning of the timeline, you should be able to press the PLAY button and hear what you just performed. Conclusion That’s as far as we can take you in setting up your new digital audio workstation. You should be at a good place to begin exploring your new system and tools more in depth, and use them successfully as you progress through our written chapters and exercises, and with your own personal projects. Remember, it’s okay to go back and reference your user manuals when you run into problems or explore new features, and there are lots of additional resources out there to help you master your new equipment. The learning supplements we develop related to your DAW software will assume you have a working knowledge of your software. Below is a list of references you might find helpful as you learn to use your DAW software. In some cases, you might find a newer or older edition of the same book that covers the features specific to your version of the software. Nahamani, David. Apple Pro Training Series: Logic Pro 9 and Logic Express 9. Berkley, CA: Peachpit Press, 2009. Garrigus, Scott R. Sonar 8 Power! Florence, KY: Course Technology PTR, 2008. Adobe Creative Team. Adobe Audition 2.0 Classroom in a Book. Berkley, CA: Adobe Press, 2006. Setting Up Your DAW PRACTICAL EXERCISE Page 14 of 14 This material is based on work supported by the National Science Foundation under CCLI Grant DUE 0717743, Jennifer Burg PI, Jason Romney, Co-PI.