1
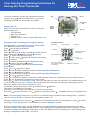
Floor Sensing Programming Instructions for
Devireg 535 Timer Thermostat
If a screen is flashing, you are being prompted to make a
change. Press
buttons to alter & press
to accept.
A flashing value will auto accept after 10 seconds.
LED
Btn “a”
Child Proof
Btn
Setting your 535
When you first connect your 535 to the Power source the
default settings are:
• Floor Sensing
• Max Floor Temp 35°C
• Display in °C
• Manual mode P1 and the Clock requires to be set
Setting (altering or checking) your Program settings
Power
On/Off
Button
Btn “b”
The display indicates:
Weekdays
Frost protection
Childproof
Now Press Btn “b” (see picture) to enter the Setup Fields.
Your 535 now shows the Time Clock field.
Press and the Hour field flashes
Settings
Alter with
buttons
Actual temperature
Press to accept your settings & the Minutes field will now
is displayed
flash. Alter with the
buttons & Press to accept.
Room temperature
Press to move to the Week Day field
Floor
Press to alter & use
buttons to select the correct day
temperature
Press to accept
Press to select the Morning Start Heating time field
Day rhythm periods
Press & alter to suit using
buttons
and comfort / economy
Maximum / Minimum
temperature
Press and the display now shows the Morning Stop
Heating time
Press & use
buttons to adjust.
Press to accept and the display now shows the Evening Start Heating time
Press & use
buttons to adjust.
Press to accept and the display now shows the Evening Stop Heating time
Press & use
buttons to adjust
Press to accept & the display now shows the Floor Comfort Temp (the Temperature your floor will operate at)
Press & use
buttons to adjust & Press to accept.
Now press to move to the Savings Temp – this is the temp the floor will never fall below. The default setting is 5°C.
(If you change this to say 18°C, the floor will never fall below this temperature, meaning the heating will come on
during the “Heating Off” period to maintain the 18°C).
To alter the Savings Temperature, press & adjust with the
buttons.
The setup of your 535 is now complete.
Push Btn “b” once to accept your settings & to exit the set-up process.
Now press & hold for 2 secnds. Use
buttons to select P2 & Press . Your 535 is now set for Programme use.
Note: Your Devireg 535 will be set at, or revert to, P1 (manual) mode everytime the clock setting is lost. You MUST
reset the Clock to be able to select the Timer Programme option - P2.
During the Heating ON period, use the
buttons to increase/decrease the Floor temperature & press
the change. These changes will be remembered for all future Heating On periods.
to accept
During the Heating OFF period, use the
buttons to increase/decrease the Savings temperature & press to
accept the change. This change will ONLY APPLY for the Savings Period applicable at the time of change. To make
permanent changes to the Savings Temperature, re-enter the Setup process by pressing Btn “b” and scrolling to the
Savings Temperature Setting field – see above.
Switching the Displayed Temperature
Your 535 will be displaying the temperature of the floor. To have the 535 display the
Room temperature (i.e. using the display as a thermometer), push & hold both &
buttons for 2 seconds. The Room Temp icon will now be displayed & the 535 will show
the actual room air temperature. However, the 535 will still be following the Floor Sensor
temperature setting.
If you push both & buttons briefly, the display will change to show the actual floor
temperature . Release both buttons & the air temp will again be displayed. Press & hold
both the & buttons for more than 2 seconds and the display will revert to displaying
the actual floor temperature.
Turning your 535 OFF (for Summer, when going on holiday or leaving for an extended period etc.)
DO NOT USE THE FRONT PUSH BUTTON. Press & hold the until the temp lowers to 5°C (the temp will
reduce in 0.1°C steps). Release the button & then immediately push it twice to instruct your 535 to turn OFF. Now
push the centre button to lock this setting. This process will stop all heating but leave the power supply on to
your 535, thus keeping the “battery” charged. To restart your 535, press & hold the button for a few moments
(approx. 0.5 seconds).
NOTE You may use the ON/OFF button on the front of the thermostat for short OFF periods or for a period of less
than 80 days. If you exceed the 80 days, your 535 will become discharged & the Clock Time setting will be lost.
You will then need to reset the Clock (refer to page 1 of this Guide for resetting instructions). All other previously
entered settings will remain unchanged.
General information
For full details and the other features available with your 535, refer to the Installation & Setup Manual supplied
with your Timer Thermostat.
From first installation, your 535 will take 18 hrs to fully charge the “battery” which will then provide a “standby”
power supply of around 80 days. Should your 535 become discharged, the Clock Time setting will be lost but all
other entered settings will remain unchanged.
Error Messages
If your Clock Symbol is flashing – Time settings lost due to power loss. Your 535 reverts to Manual operation.
Reset Time to restore Timer function.
E4 flashing in display – Your 535 has overheated & switched off. Allow to cool and then switch Off/On to reset.
E5 flashing in display – Floor Sensor has short circuited
E6 flashing in display – Floor Sensor disconnected
LED Indicators
No light – System is tuned off
Green Light – system on, Heating OFF
Green light flashing – Floor Sensor faulty
Red light – Heating ON
Unit 5, 83 Bassett Street Mona Vale \ PO Box 707 Mona Vale NSW 1660
T 1800 636 091 \ F 02 9997 7852
E [email protected] \ W www.devexsystems.com.au
Devex Systems Pty Ltd \ ACN 122 894 562
BROCDEV411.1