1
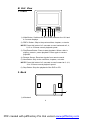
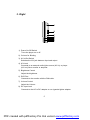
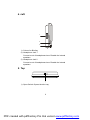
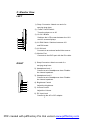
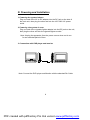
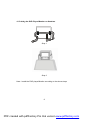
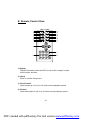
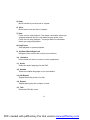
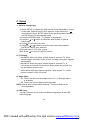
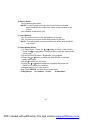
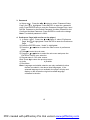
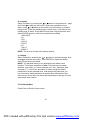
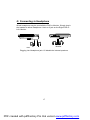
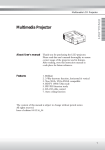
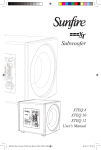
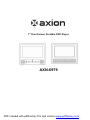
7" Dual Screen Portable DVD Player
AXN-6979
PDF created with pdfFactory Pro trial version www.pdffactory.com
Content
A. Cautions and Warning............................................3
B. Unit View..................................................................4
C. Monitor View............................................................7
D. Powering and Installation.......................................8
E. Remote Control View............................................10
F. Setup......................................................................13
G. Connecting to Headphones.................................17
H. Specifications.......................................................18
I. Trouble Shooting...................................................18
What’
s included:
1 x 7" LCD Screen with DVD Player
1 x 7" Extra LCD Screen for Dual Display
1 x AC to DC Adapter
1 x Remote Control with Battery (CR2025)
1 x Instruction Manual
1 x AV Cable
1 x Car Cigarette Lighter Adapter
2 x Straps
1 x Din Cable
1 x Carrying Bag
2
PDF created with pdfFactory Pro trial version www.pdffactory.com
A. Cautions and Warnings
1. Placement
To prevent fire or electric shock, do not expose this appliance to rain
or moisture. Do not place the set on an unstable cart, stand, tripod,
bracket or table to prevent it from falling. Keep the unit away from
strong magnets, heat sources, direct sunlight, excessive dust. If the
unit is brought directly from a cold to a warm location, moisture may
condense inside the unit. When you move it from a cold to a warm
location, wait for about one hour till the moisture evaporates before
operating the unit.
2. Installation
Ensure that the portable DVD player is installed in accordance with
the instructions and illustrations provided in this manual.
3. Caution
Do not push objects of any kind into the unit through openings; do
not spill or spray liquid of any kind on or in the system (this may result
in a fire or electric shock). Do not place anything heavy on the unit.
To ensure proper ventilation and proper operation, never cover or
block openings with a cloth or other material. Keep the unit away
from an open flame such as fire, candle etc. Do not use the unit in
temperatures higher than 104 degrees Fahrenheit or 40 degrees
Celsius.
4. Disc
Do not use irregularly shaped discs such as heart or star-shaped
discs as they may cause the unit to malfunction. Do not stick paper,
tape or glue on the disc. Do not expose the disc to direct sunlight or
heat sources. Do not touch the surface of disc. Handle the disc by
its edge. Clean the disc by wiping the disc from the center out with
a cleaning cloth. Remove the disc from the unit and store it in its case
after playing. Some playback operations of discs may be intentionally fixed by software producers. Since this unit plays discs according to the disc contents the software producers designed, some
playback features may not be available. Also refer to the instructions
supplied with the discs.
3
PDF created with pdfFactory Pro trial version www.pdffactory.com
B. Unit View
1. Front
IR
WIDE
1
PRE.
PLAY/PAUSE
2
3
NEXT
4 5
STOP
6
1). Wide Button: Switches the LCD screen between the 16:9 and
4:3 screen displays.
2). PREV. Button: Skip to the previous titles, chapters, or tracks.
NOTE: Press this button for 3 seconds to scan backward at 2, 4,
8, 16 or 32 times normal playback speed.
3). Play/Pause Button: Press to start playback. When a disc is
playing, press to pause playback. Press again to resume
playback.
4). Remote Sensor: Receives signals from remote control.
5). Next Button: Skip to the next titles, chapters, or tracks.
NOTE: Press this button for 3 seconds to scan forward at 2, 4, 8,
16 or 32 times normal playback speed.
6). Stop Button: Stop the playback of the DVD or CD.
2. Back
1
1). Kickstand
4
PDF created with pdfFactory Pro trial version www.pdffactory.com
3. Right
1
2
3
4
5
6
7
8
1). Power On/Off Switch
Turns the player on or off.
2). Column for Binding
3). AV In/Out Switch
Switches the A/V jack between input and output.
4). A/V Jack
Connects to an external audio/video source (A/V in) or player
(A/V out) like a monitor or amplifier.
5). Brightness Control
Adjust the brightness.
6). DVD Port
Connects to the monitor with the DIN cable.
7). Volume Control
Adjust the Volume.
8). DC Input Jack
Connects to the AC to DC adapter or car cigarette lighter adapter.
5
PDF created with pdfFactory Pro trial version www.pdffactory.com
4. Left
1
2
3
1). Column for Binding
2). Headphone Jack 1
Connect a set of headphones here. Disable the internal
speakers.
3). Headphone Jack 2
Connect a set of headphones here. Disable the internal
speakers.
5. Top
OP EN
1
1). Open Switch: Opens the disc tray.
6
PDF created with pdfFactory Pro trial version www.pdffactory.com
C. Monitor View
LEFT
1). Strap Connector: Attach one end of a
carrying strap here.
2). Power On/Off Switch
Turns the player on or off.
3). 16:9 4:3 Button
Switches the LCD screen between the 16:9
and 4:3 screen displays.
1
2
3
4). AV DIN Switch: Switches between A/V
4
and DIN mode.
5
5). AV IN Jack
6
Connects to an external audio/video source.
6). Monitor Port
Connects to the DVD port with the Din cable.
1). Strap Connector: Attach one end of a
RIGHT
carrying strap here.
2). Headphone Jack 1
Connect a set of headphones here. Disable
the internal speakers.
1
2
3
4
5
6
3). Headphone Jack 2
Connect a set of headphones here. Disable
the internal speakers.
4). Brightness Control
Adjust the brightness.
5). Volume Control
Adjust the Volume.
6). DC Input Jack
Connect to the AC to DC adapter.
7
PDF created with pdfFactory Pro trial version www.pdffactory.com
D. Powering and Installation
1. Powering the system indoors
Plug one end of the AC to DC adapter into the DC jack on the side of
the main unit, then plug the other end into the 100~240V AC power
outlet.
2. Powering the system in a car
Plug one end of the cigarette lighter adapter into the DC jack on the unit,
then plug the other end into the cigarette lighter socket.
Note: Unplug the apparatus from the power source when not in use
for an extended period of time.
3. Connection with DVD player and monitor
IR
WIDE
PRE.
PLAY/PAUSE
NEXT
STOP
Note: Connect the DVD player and Monitor with the attached Din Cable
8
PDF created with pdfFactory Pro trial version www.pdffactory.com
4. Positing the DVD Player/Monitor on Headrest
Step 1
Step 2
Note: Install the DVD player/Monitor according to the above steps
9
PDF created with pdfFactory Pro trial version www.pdffactory.com
E. Remote Control View
1
SET UP DIS PLAY
AUD IO
TITLE
SUB
11
12
2
3
4
REW
FF
A-B
REP EAT
13
14
5
S KI P
SK I P
TIT LE
MEN U
15
16
ZOO M
RET URN
17
18
6
7
STO P
8
9
SLO W
19
ANG LE
10
20
1) Display
Display information about the DVD, such as title, chapter number,
track number and time.
2) Setup
Enter or exit the setup menu.
3) Fast Forward
Scan forward at 2,4,8,16,or 32 times normal playback speed.
4) Rewind
Scan backward at 2,4,8,16,or 32 times normal playback speed.
10
PDF created with pdfFactory Pro trial version www.pdffactory.com
5) Skip+
Move forward to previous title or chapter.
6) SkipMove back to the next title or chapter.
7) Stop
Press once to stop playback. The player remembers where you
stopped playback and you can restart playing at this point.
Press twice to stop playback. The player dose not remember
where you stopped playback.
8) Play/Pause
Start playback or pause playback.
9) Up/Down/Enter/Right/Left
Navigate in the menus and confirm your selection.
10) Numbers
Use to select an item in a menu or enter a password.
11) Audio
Select the audio language for the DVD.
12) Subtitle
Select the subtitle language or turn on subtitles.
13) A-B Repeat
Repeat a specific portion of a disc.
14) Repeat
Repeat playing the title, chapter or track.
15) Title
Show the DVD title menu.
11
PDF created with pdfFactory Pro trial version www.pdffactory.com
16) Menu
Press once to show the DVD root menu. Press twice to show
title menu.
17) Zoom
Enlarge the image 2, 3, or 4 times the original size.
18) Return
Press once to return to the previous menu.
19) Slow
Play forward or backward at 1/2, 1/4,1/8 and 1/16 times speed.
20) Angle
Change the viewing angle of a scene.
12
PDF created with pdfFactory Pro trial version www.pdffactory.com
F. Setup
1. General Setup Page
1) Press ‘SETUP’ to display the Main screen of the Setup Menu on the
screen and “General Setup Page” appears. At the same time, “ ”
is highlighted. Press ‘SETUP’ again to exit the Setup Menu and the
unit will resume it’s last playback mode.
2) Press the ENTER button, “TV Display” is highlighted.
3) Press the
or
button to select the other menus in general
setup page.
4) Press to enter the sub menu.
5) Press the or button to select the sub menu and press the
ENTER to confirm your selection.
6) Repeat steps 3-5 for other menus.
Note: Press
to return the previous menu.
a) TV Display
* Normal/PS: When the player outputs signal to a normal TV, Widescreen images are shown on the screen. but with some parts cropped
automatically.
* Normal/LB: When the player outputs signal to a normal TV, a
normal picture is shown on the screen with a black strip at both the
top and bottom of the screen.
* Wide: When the player outputs signal to a wide screen TV, a wide
picture is shown on the full screen.
b) Angle Mark
* On: The screen will show the angle mark icon. (*If an angle option
is available).
* Off: The screen will not display the Angle Mark
NOTE: Not all discs contain above features. The above features are
disc dependent.
c) OSD Lang
You can choose one out of several different languages as the OSD
setup language
13
PDF created with pdfFactory Pro trial version www.pdffactory.com
d) Screen Saver
*On: Enables screen saver
NOTE: The DVD player will enter the Screen Saver mode after
approximately five minutes if the same image remains on the
screen.
*Off: Disables screen saver (off)
e) Last Memory
*On: The unit will return to the last position on the disc.
*Off: The unit will not return to the last position on the disc.
NOTE: The Last position memory function only effect when the DVD
tray is open.
2. Video Quality Setup
1) In Setup menu, Press the
or button to select “Video Quality
Setup” and is highlighted. Press ENTER to enter the video quality
setup page.
2) Press the ENTER button, “Brightness” is highlighted.
3) Press the or button to select the other menus in the video
quality setup page.
4) Press to enter the sub menu.
5) Press the or button to adjust the quantity and press the
ENTER to confirm your selection.
6) Repeat steps 3-5 for other menus.
Note: Press ENTER to return the previous menu.
a) Brightness
b) Contrast c) Hue
d) Saturation
14
PDF created with pdfFactory Pro trial version www.pdffactory.com
3. Password
In Setup menu, Press the or button to select “Password Setup
Page” and
is highlighted. Press ENTER to enter the password
page. Press ENTER twice to enter the Password Change Page. Input
the Old Password or the Default Password, the New Password, and
Confirmed the New Password. Press ENTER to confirm the change.
Note: The default password is 3308.
4. Preference Page (with no disc on the player)
1) In Setup menu, Press the
or button to select “Preference
Page” and
is highlighted. Press ENTER to enter the Preference
Page.
2) Press the ENTER button, “Audio” is highlighted.
3) Press the or button to select the other menus in preference
page.
4) Press to enter the sub menu.
5) Press the or button to select the sub menu and press the
ENTER to confirm your selection.
6) Repeat steps 3-5 for other menus.
Note: Press
to return the previous menu.
a) Audio
b) Subtitle
c) Disc Menu
Note: Language and subtitle selection are only available for discs
that are recorded in the above listed languages. If the
selected language is not available, the player will play and
display on the screen the original recorded language
contained in the disc.
15
PDF created with pdfFactory Pro trial version www.pdffactory.com
d) Parental
Select ‘Parental’ by pressing the or button in the preference page.
And Press to enter the sub menu. Select the parental level you
desire using or button for discs with lock-out function or multiple
rating levels. These are listed from the lowest level (1 Kid Safe) to the
highest level (8 Adult). Press ENTER and input 4 digit password, then
press ENTER again to confirm the parental level setting.
1 KID SAFE
2G
3 PG
4 PG-13
5 PG-R
6R
7 NC-17
8 ADULT
NOTE: The level of 8 Adult is the factory default.
e) Default
Select ‘Default’ by pressing the
or button in preference page. And
Press to enter the sub menu. Press ENTER to make the setting
return to the factory-set mode.
NOTE: The parental setting is not affected by the default reset
function. The master password is 3308. This password is always
effective even after you have selected your own password and
changed it. To avoid the possibility of others using the default
password to set the parental level and change the password, you
can record this master password in another area and delete it from
this manual. Some discs can be limited depending on the age of users
while some discs cannot.
5. Exit Setup Menu
Press Enter to Exit the Setup menu.
16
PDF created with pdfFactory Pro trial version www.pdffactory.com
G. Connecting to Headphone
Wired headphone may be used with the DVD or Monitor, Simply plug in
the headset to either Headphone 1Jack or 2 jack on the Right DVD or
Left Monitor.
*
*
*
*
Monitor
DVD
Plugging into Headphone jack 1/2 disable the internal speakers.
17
PDF created with pdfFactory Pro trial version www.pdffactory.com
H. Specifications
DVD Player
DVD/CD/MP3
NTSC
7 Inches
Better than 60 dB
Better than 85 dB
DC 9-12V
5°C~35°C
0.73Kg
8.19 X 6.93 X1.89 inches
Compatible DISC:
Signal system:
Panel size:
Audio S/N:
Dynamic range :
Power source:
Operating temperature:
Weight :
Dimensions (W x D x H):
208 X 176 X 48 mm
Single Monitor
Colour System:
Screen Size:
Power Supply:
Operating Temperature:
Operating Humidity:
Storage Temperature:
Dimensions (W x D x H):
NTSC
7 Inches
DC 9-12V
41~95ºF(5~35ºC)
10-75%
14~140ºF(-10~60ºC)
8.19 X 6.69 X1.26 inches
208 X 170 X 32 mm
0.41Kg
Weight:
Design and Specifications are subject to change for
product improvement without notice
I. Trouble Shooting
No sound or distorted sound?
Make sure your DVD is connected properly. Make sure all cables are
securely inserted into the appropriate jacks.
Can’t advance through a movie?
You can’t advance through the opening credits and warning information
that appears at the beginning of movies because the disc is programmed
to prohibit that action.
18
PDF created with pdfFactory Pro trial version www.pdffactory.com
Trouble Shooting
The icon (
) appears on screen?
The feature or action cannot be completed at this time because:
1. The disc’s software restricts it.
2. The disc’s software doesn’t support the feature (e.g., angles)
3. The feature is not available at the moment.
4. You’ve requested a title or chapter number that is out of range.
Picture is distorted?
1. The disc might be damaged. Try another disc.
2. It is normal for some distortion to appear during forward or reverse
scan.
No forward or reverse scan?
1. Some discs have sections that prohibit rapid scanning or title and
chapter skip.
2. If you try to skip through the warning information and credits at the
beginning of a movie, you won’t be able to. This part of the movies
often programmed to prohibit skipping through it.
IR sensor inoperative?
1. Verify that the batteries in the remote are fresh.
2. Verify that the remote sensor eye is not obstructed.
3. Verify that the infrared transmitter is affixed over the sensor eye
of the component to be controlled.
Disc won’t play?
1. Insert a disc with the label side facing up.
2. Check the type of disc you put into disc tray. This DVD only plays
digital video discs, audio CDs and MP3s.
Play starts, but then stops immediately?
1. Both the unit and the disc are coded by region. If the regional
codes don’t match, the disc can’t be played. This DVD is Region
Number 1.
2. The disc is dirty. Clean it.
3. Condensation has formed. Allow player to dry out.
19
PDF created with pdfFactory Pro trial version www.pdffactory.com
America Action, Inc. (“AXN”) Product Warranty
Information
What the warranty covers:
America Action, Inc. (“AXN”) warrants your AXN products against defects in material and
workmanship during the warranty period from the original date of purchase, subject to the
following terms and conditions. If a product proves to be defective in material or
workmanship during the warranty period, AXN will, at its discretion, repair or replace the
product with a similar product provided the purchaser adheres to certain return
authorization procedures and guidelines.
How long the warranty is effective:
AXN products are warranted for one (1) year for parts and ninety (90) days for labor, starting
from the original date of purchase/invoice.
What brand(s) can be covered under the warranty:
Any “ACTION” and “AXION” branded products sold by America Action, Inc.
Whom the warranty protects:
The warranty is valid only for the original purchaser within the continental of USA.
What the warranty does not cover:
1. Any product on which the serial number has been defaced, modified or removed.
2. Damage, deterioration or malfunction resulting from:
A. Accident, misuse, neglect, fire, water, lightning, or other acts of nature, unauthorized
product modification, or failure to follow instructions supplied with the product.
B. Repair or attempted repair by anyone not authorized by AXN.
C. Any damage of the product due to shipment.
D. Removal from or installation to the product.
E. Causes external to the product, such as electric power fluctuations or failure.
F. Use of supplies or parts not meeting AXN’s specifications.
G. Normal wear and tear.
H. Battery Leakage.
I. Any other cause which does not relate to a product defect.
3. Cosmetic damage by purchaser, such as markings, discoloration, scratches, dents, gouges
or any other defacement.
4. Physically damaged products by purchaser, such as broken PCB, Housing, damaged LCD
Module.
5. No Defect Found (product returned to AXN as defective but failure is not duplicated by
AXN’s test method).
6. Customer instruction, installation, set up adjustments, or signal reception problems.
7. Rechargeable batteries.
8. Product without proof of purchase. (The proof of purchase should be one of the following
documents: purchase receipt, gift receipt, sales invoice, and packing list that contains the
product model number, price, vendor, and purchase date.)
9. Ninety (90) days after the original purchase date of the AXN product, the customer is
responsible for the shipping fees incurred for the product delivery to and from AXN service
center.
PDF created with pdfFactory Pro trial version www.pdffactory.com
How to get service:
1. For additional information on obtaining an extended warranty service, contact your AXN
dealer or AXN’s Customer Service Department by e-mailing to
[email protected]
To obtain warranty service, you will be required to do one of the following: fill out an online
RMA Request Form, print the form, fill it out and fax it to 1-909-869-5545, or call AXN’s
Customer Service number at 1-909-869-6600. You will be asked to provide the following
information:
A. Customer information (name, day-time phone number, and/or residential address).
B. Proof of your purchase (purchase receipt, gift receipt, sales invoice, and/or packing list).
C. Product model number.
D. Product serial number.
E. A description of the problem.
F. Payment information (If any payment is required, you will be asked to provide this
information beforehand. Currently, we only accept personal check, money order or cashier’s
check. The time for us to clear a personal check is approximately 20 days; 10 days for any
money order or cashier’s check.
2. AXN will contact the customer upon receipt of the RMA Request Form, and will issue an
RMA number if the RMA Request Form is completed and delivered as requested.
3. Please take or ship RMA product to AXN or any AXN authorized service center with RMA
number clearly and marked on the outside of the packing. All RMA products should be
returned in secured packaging, preferably in the original package, with the complete set of
accessories. We recommend that you insure the package in case of loss or damage during
shipping.
4. Upon receiving the RMA product, if the correct RMA number is clearly marked on the
packaging, and if the repair payment is pre-paid or is enclosed with the package, depending
on the condition of the defects, AXN will repair or replace all RMA products, and ship the
product back to the customer.
5. For additional information or the name of the nearest AXN service center, please contact
your AXN dealer or AXN Customer Service.
Before contacting us:
In many cases, your product may not need repair. Before contacting us, please consult the
troubleshooting section in your user’s guide or AXN’s FAQ webs page to see if you can easily
remedy the problem yourself.
AXN technical support services:
During the period of product warranty, we support your basic configuration, setup and
troubleshooting questions; and when necessary, we will provide you with all the instructions on
how to return your product for repair.
For customer service and support inquiries, please call 1-909-869-6600 or e-mail us at
[email protected]
REPAIR OR REPLACEMENT AS PROVIDED UNDER THIS WARRANTY IS THE
EXCLUSIVE REMEDY OF THE CONSUMER. AXN SHALL NOT BE LIABLE FOR ANY
PDF created with pdfFactory Pro trial version www.pdffactory.com
INCIDENTAL OR CONSEQUENTIAL DAMAGES FOR BREACH OF ANY EXPRESS OR
IMPLIED WARRANTY ON THIS PRODUCT. EXCEPT TO THE EXTENT PROHIBITED
BYAPPLICABLE LAW,ANYIMPLIED WARRANTY OF MERCHANTABILITY OR FITNESS
DURATION TO THE DURATION OF THIS WARRANTY.
Some states do not allow the exclusion or limitation of incidental or consequential damages, or
allow limitations on how long an implied warranty lasts, so the above limitations or exclusion
may not apply to you. This warranty gives you specific legal rights, and you may also have
other rights, which vary from state to state.
AMERICA ACTION INC.
100 EXCHANGE PL
POMONA, CA 91768
PH: (909) 869-6600
FAX: (909) 869-5545
[email protected]
HTTP://WWW.AXIONZONE.COM
PDF created with pdfFactory Pro trial version www.pdffactory.com