1
P3AM-4772-10ENZ0
FUJITSU Storage
ETERNUS DX
Configuration Guide -Server Connection-
(FCoE) for VMware® ESX
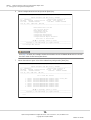
Driver Settings for Non-Fujitsu Converged Network Adapter Cards
This page is intentionally left blank.
Preface
This manual briefly explains the operations that need to be performed by the user in order to connect an
ETERNUS DX to a server running VMware® ESX and using Emulex Converged Network Adapter cards via an
FCoE interface.
This manual is used when performing the setup procedure described in "Setting Up the VMware ESX Server"
of the "FUJITSU Storage ETERNUS DX Configuration Guide -Server Connection- (FCoE) for VMware® ESX".
This manual should be used in conjunction with any other applicable user manuals, such as those for the
ETERNUS DX, server, OS, Converged Network Adapter cards, and drivers.
Refer to "FUJITSU Storage ETERNUS DX Configuration Guide -Server Connection- Notations" for the notations
used in this manual such as product trademarks and product names.
This manual references the following documents:
• Server Support Matrix
• FUJITSU Storage ETERNUS DX Configuration Guide -Server Connection- (Fibre Channel) ETERNUS DX60 S3/
DX100 S3/DX200 S3, ETERNUS DX500 S3/DX600 S3 Disk Storage Systems, ETERNUS DX200F All Flash Array
Settings
• FUJITSU Storage ETERNUS DX Configuration Guide -Server Connection- (Fibre Channel) ETERNUS DX80 S2/
DX90 S2, ETERNUS DX410 S2/DX440 S2, ETERNUS DX8100 S2/DX8700 S2 Disk Storage System Settings
• FUJITSU Storage ETERNUS DX Configuration Guide -Server Connection- (Fibre Channel) ETERNUS DX60/DX60
S2, DX80, DX90 Disk Storage System Settings
• FUJITSU Storage ETERNUS DX Configuration Guide -Server Connection- (Fibre Channel) ETERNUS DX400/
DX8000 series Disk Storage System Settings
• FUJITSU Storage ETERNUS DX Configuration Guide -Server Connection- (FCoE) ETERNUS DX100 S3/DX200 S3,
ETERNUS DX500 S3/DX600 S3 Disk Storage System Settings
• FUJITSU Storage ETERNUS DX Configuration Guide -Server Connection- (FCoE) ETERNUS DX80 S2/DX90 S2,
ETERNUS DX410 S2/DX440 S2, ETERNUS DX8100 S2/DX8700 S2 Disk Storage System Settings
• FUJITSU Storage ETERNUS DX Configuration Guide -Server Connection- (FCoE) for VMware® ESX
This manual is designed for use with the following ETERNUS DX storage systems:
• ETERNUS DX100 S3/DX200 S3 Disk storage system
• ETERNUS DX500 S3/DX600 S3 Disk storage system
• ETERNUS DX80 S2/DX90 S2 Disk storage system
• ETERNUS DX410 S2/DX440 S2 Disk storage system
• ETERNUS DX8100 S2/DX8700 S2 Disk storage system
• ETERNUS DX60/DX80/DX90 Disk storage system
• ETERNUS DX410/DX440 Disk storage system
• ETERNUS DX8100/DX8400/DX8700 Disk storage system
10th Edition
December 2014
3
FUJITSU Storage ETERNUS DX Configuration Guide -Server Connection- (FCoE) for VMware® ESX
Copyright 2014 FUJITSU LIMITED
P3AM-4772-10ENZ0
Preface
The Contents and Structure of this Manual
This manual is composed of the following two chapters and an appendix.
• "Chapter 1 Setup Procedure for Emulex Converged Network Adapter Cards" (page 6)
This chapter describes how to set up the server and Emulex Converged Network Adapter card driver when
connecting the ETERNUS DX storage systems to the server via Emulex Converged Network Adapter cards.
• "Chapter 2 Setup Procedure for QLogic Converged Network Adapter Cards" (page 22)
This chapter describes how to set up the server and QLogic Converged Network Adapter card driver when
connecting the ETERNUS DX storage systems to the server via QLogic Converged Network Adapter cards.
A WWN instance management table for the server which is used when checking the Converged Network
Adapter cards is described in the appendix.
4
FUJITSU Storage ETERNUS DX Configuration Guide -Server Connection- (FCoE) for VMware® ESX
Copyright 2014 FUJITSU LIMITED
P3AM-4772-10ENZ0
Table of Contents
Chapter 1 Setup Procedure for Emulex Converged Network Adapter Cards
6
1.1 Workflow ........................................................................................................................................ 6
1.2 Setting Up the Converged Network Adapter Cards.......................................................................... 8
1.2.1 Setting Up the Converged Network Adapter Cards ................................................................................................8
1.2.2 Setting Up SAN Boot ...........................................................................................................................................11
1.2.3 Installing VMware ESX ........................................................................................................................................17
1.2.4 Setting Up the Converged Network Adapter Card Driver......................................................................................17
Chapter 2 Setup Procedure for QLogic Converged Network Adapter Cards
22
2.1 Workflow ...................................................................................................................................... 22
2.2 Setting Up the Converged Network Adapter Cards........................................................................ 24
2.2.1 Setting Up the Converged Network Adapter Cards ..............................................................................................24
2.2.2 Setting Up SAN Boot ...........................................................................................................................................27
2.2.3 Setting the Selectable Boot ................................................................................................................................27
2.2.4 Installing VMware ESX ........................................................................................................................................29
2.2.5 Setting Up the Converged Network Adapter Card Driver......................................................................................30
Appendix A WWN Instance Management Table for the Server (Blank)
34
5
FUJITSU Storage ETERNUS DX Configuration Guide -Server Connection- (FCoE) for VMware® ESX
Copyright 2014 FUJITSU LIMITED
P3AM-4772-10ENZ0
Chapter 1
Setup Procedure for Emulex Converged Network
Adapter Cards
This chapter describes how to set up the VMware ESX server and Converged Network Adapter card driver
when connecting the ETERNUS DX storage systems to the server via Emulex Converged Network Adapter
cards.
1.1
Workflow
Workflow
Setting Up the Converged Network Adapter Cards
Install the Converged Network Adapter cards, acquire their physical addresses and WWN information.
• "1.2.1 Setting Up the Converged Network Adapter Cards" (page 8)
Setting Up SAN Boot
Set up the SAN Boot configuration (if SAN Boot is to be used).
• "1.2.2 Setting Up SAN Boot" (page 11)
Installing VMware ESX
Install the VMware ESX software.
• "1.2.3 Installing VMware ESX" (page 17)
6
FUJITSU Storage ETERNUS DX Configuration Guide -Server Connection- (FCoE) for VMware® ESX
Copyright 2014 FUJITSU LIMITED
P3AM-4772-10ENZ0
Chapter 1 Setup Procedure for Emulex Converged Network Adapter Cards
1.1 Workflow
Setting Up Converged Network Adapter Card Driver
Check the default setting values and number of ports for the Converged Network Adapter card, and set
up the driver parameter values.
• "1.2.4 Setting Up the Converged Network Adapter Card Driver" (page 17)
After completing all the required procedures in this manual, proceed to "Checking the LUNs" in "FUJITSU Storage ETERNUS DX Configuration Guide -Server Connection- (FCoE) for VMware® ESX".
7
FUJITSU Storage ETERNUS DX Configuration Guide -Server Connection- (FCoE) for VMware® ESX
Copyright 2014 FUJITSU LIMITED
P3AM-4772-10ENZ0
Chapter 1 Setup Procedure for Emulex Converged Network Adapter Cards
1.2 Setting Up the Converged Network Adapter Cards
1.2
Setting Up the Converged Network Adapter Cards
This section describes how to set up the VMware ESX server for use with the Emulex Converged Network
Adapter cards described in the "Server Support Matrix".
Depending on the Converged Network Adapter card used, the actual on-screen Converged Network Adapter card information may differ from that in the screenshots shown in this manual.
1.2.1
Setting Up the Converged Network Adapter Cards
Install the Converged Network Adapter card to the server, and acquire the physical address and World Wide
Name (WWN) for the Converged Network Adapter card.
• The physical address and WWN of a Converged Network Adapter card are required information in the following cases: when an error has occurred in the system, when using the ETERNUS DX storage systems (host
affinity function, etc.) to restrict server access, or when connecting the ETERNUS DX storage systems and
the server using a Fibre Channel switch and a CEE/FCoE switch.
• The relationship between a physical address and WWN cannot be determined from the BIOS. The physical
address and WWN must be recorded as a pair when each Converged Network Adapter card is installed.
Physical address and WWN must be assigned to "WWN instance management table for the server".
The workflow is shown below.
(1) Install the Converged Network Adapter card
(2) Turn on the server
(3) Acquire the physical address and WWN for the Converged Network Adapter card
(4) Add a record for the server in the WWN instance management table for the server
The procedure is as follows:
1
Install the Converged Network Adapter card in the server.
For the installation method, slot positions and notes regarding the Converged Network Adapter card,
refer to the manual provided with the Converged Network Adapter card or the user guide of the server.
2
Turn on the server, and press the [Alt] + [E] keys or [Ctrl] + [E] keys while the following message is
displayed.
Emulex OneConnect FCoE BIOS Utility starts.
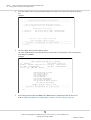
Example:
!!! Emulex OneConnect FCoE BIOS !!! , Version xxxxxxxx
Copyright(c) 1997-2010 Emulex. All rights reserved.
Press <Alt E> or <Ctrl E> to enter Emulex BIOS configuration.
utility. Press <s> to skip Emulex BIOS
8
FUJITSU Storage ETERNUS DX Configuration Guide -Server Connection- (FCoE) for VMware® ESX
Copyright 2014 FUJITSU LIMITED
P3AM-4772-10ENZ0
Chapter 1 Setup Procedure for Emulex Converged Network Adapter Cards
1.2 Setting Up the Converged Network Adapter Cards
3
Enter the number of the Converged Network Adapter card that is to be checked and press the [Enter]
key.
Example:
------------------------------------------------------------------------------Emulex OneConnect FCoE BIOS Utility, xxxxxxxx
------------------------------------------------------------------------------This utility displays and saves changes when selected.
You Will be prompted to reboot for all changes to take effect.
Emulex Adapter in the System:
1. OCe10102-F:
2. OCe10102-F:
Bus:03 Dev:00 Func:02
Bus:03 Dev:00 Func:03
WWPN:
WWPN:
10000000C9D043DD
10000000C9D043DF
Enter <Esc> to exit <PageDn> to Next Page
<↑/↓> to Highlight, <Enter> to Select
------------------------------------------------------------------------------Copyright (c) 1997-2009 Emulex. All rights reserved.
------------------------------------------------------------------------------==> Select 1
4
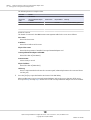
Check the [Mem Base] and [Port Name] values.
The value of [Mem Base] is the physical address and the value of [Port Name] is the Converged Network Adapter card WWN.
Example:
------------------------------------------------------------------------------Emulex OneConnect FCoE BIOS Utility, XB4.01a0
------------------------------------------------------------------------------01:
OCe10102-F:
Bus#: 03 Dev#: 00 Func#: 02
Mem Base:
CD4C0000 Firmware Version: 2.702.200.28
BIOS: Disabled!
Port Name:
10000000C9D043DD
Node Name: 20000000C9D043DD
Vlan ID: 1002
DCBX mode: CEE mode
-------------------------------------------------------------------------------
Enable/Disable Boot from SAN
Scan for Target Devices
Reset Adapter Default
Configure Boot Devices
Configure DCBX mode
Configure FCF CEE Parameters
Configure FCF CIN Parameters
Configure Advanced Adapter Parameters
Enter <Esc> to Previous Menu
< / > to Highlight, <Enter> to Select
------------------------------------------------------------------------------Copyright (c) 1997-2009 Emulex. All rights reserved.
------------------------------------------------------------------------------===>
5
Record the physical address and WWN in the "WWN instance management table for the server".
Refer to "Appendix A WWN Instance Management Table for the Server (Blank)" (page 34).
9
FUJITSU Storage ETERNUS DX Configuration Guide -Server Connection- (FCoE) for VMware® ESX
Copyright 2014 FUJITSU LIMITED
P3AM-4772-10ENZ0
Chapter 1 Setup Procedure for Emulex Converged Network Adapter Cards
1.2 Setting Up the Converged Network Adapter Cards
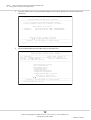
The following shows an example of this.
Host name
Server#1
IP Address
192.168.0.10
Physical slot
name
Converged Network Adapter
card WWN
slot0
10 00 00 00 C9 D0 43 DD
Instance name
Physical address
Cable tag
CD4C0000
SERV1_SLOT0 to SWITCH_1_port0
Details of contents
The details of contents for the WWN instance management table for the server are as follows:
Host name:
Record the host name.
IP Address:
Record the IP address of the server.
Physical slot name:
Record the slot position of installed Converged Network Adapter card.
Converged Network Adapter card WWN:
Record the value of [Port Name].
Instance name:
Not necessary to record.
Physical address:
Record the value of [Mem Base].
Cable tag:
Record a tag name which indicates the connection path (relationship between the connected device
and the port).
6
Press the [Esc] key to quit the Emulex OneConnect FCoE BIOS Utility.
When installing two or more Converged Network Adapter cards to the server, first turn off the server,
then repeat Step 1 through Step 5 shown here for each Converged Network Adapter card to be installed.
10
FUJITSU Storage ETERNUS DX Configuration Guide -Server Connection- (FCoE) for VMware® ESX
Copyright 2014 FUJITSU LIMITED
P3AM-4772-10ENZ0
Chapter 1 Setup Procedure for Emulex Converged Network Adapter Cards
1.2 Setting Up the Converged Network Adapter Cards
If multiple Converged Network Adapter cards are already installed in the server at the time of purchase, the one-to-one relationship between the WWNs and the Converged Network Adapter cards
cannot be recognized. The WWNs that are obtained in this section may need to be repeatedly registered and set up on the ETERNUS DX until a server recognizes the ETERNUS DX logical disks.
For details about ETERNUS DX settings, refer to the following manuals.
• "FUJITSU Storage ETERNUS DX Configuration Guide -Server Connection- (Fibre Channel) ETERNUS
DX60 S3/DX100 S3/DX200 S3, ETERNUS DX500 S3/DX600 S3 Disk Storage Systems, ETERNUS
DX200F All Flash Array Settings"
• "FUJITSU Storage ETERNUS DX Configuration Guide -Server Connection- (Fibre Channel) ETERNUS
DX80 S2/DX90 S2, ETERNUS DX410 S2/DX440 S2, ETERNUS DX8100 S2/DX8700 S2 Disk Storage System Settings"
• "FUJITSU Storage ETERNUS DX Configuration Guide -Server Connection- (Fibre Channel) ETERNUS
DX60/DX60 S2, DX80, DX90 Disk Storage System Settings"
• "FUJITSU Storage ETERNUS DX Configuration Guide -Server Connection- (Fibre Channel) ETERNUS
DX400/DX8000 series Disk Storage System Settings"
• "FUJITSU Storage ETERNUS DX Configuration Guide -Server Connection- (FCoE) ETERNUS DX100 S3/
DX200 S3, ETERNUS DX500 S3/DX600 S3 Disk Storage System Settings"
• "FUJITSU Storage ETERNUS DX Configuration Guide -Server Connection- (FCoE) ETERNUS DX80 S2/
DX90 S2, ETERNUS DX410 S2/DX440 S2, ETERNUS DX8100 S2/DX8700 S2 Disk Storage System Settings"
1.2.2
Setting Up SAN Boot
The following describes the procedure when performing SAN Boot.
Depending on the Converged Network Adapter card used, the actual on-screen Converged Network Adapter card information may differ from that in the screenshots shown in this manual.
1
Turn on the server, and press the [Alt] + [E] keys while the following message is displayed.
Emulex OneConnect FCoE BIOS Utility starts.
!!! Emulex OneConnect FCoE BIOS !!! , Version xxxxxxxx
Copyright(c) 1997-2010 Emulex. All rights reserved.
Press <Alt E> or <Ctrl E> to enter Emulex BIOS configuration.
utility. Press <s> to skip Emulex BIOS
11
FUJITSU Storage ETERNUS DX Configuration Guide -Server Connection- (FCoE) for VMware® ESX
Copyright 2014 FUJITSU LIMITED
P3AM-4772-10ENZ0
Chapter 1 Setup Procedure for Emulex Converged Network Adapter Cards
1.2 Setting Up the Converged Network Adapter Cards
2
Enter the number of the Converged Network Adapter card for which SAN Boot is to be set and press the
[Enter] key.
------------------------------------------------------------------------------Emulex OneConnect FCoE BIOS Utility, xxxxxxxx
------------------------------------------------------------------------------This utility displays and saves changes when selected.
You Will be prompted to reboot for all changes to take effect.
Emulex Adapter in the System:
1. OCexxxxx-F:
2. OCexxxxx-F:
Bus:xx Dev:xx Func:xx
Bus:xx Dev:xx Func:xx
WWPN:
WWPN:
xxxxxxxxxxxxxxxx
xxxxxxxxxxxxxxxx
Enter <Esc> to exit <PageDn> to Next Page
< / > to Highlight, <Enter> to Select
------------------------------------------------------------------------------Copyright (c) 1997-2009 Emulex. All rights reserved.
------------------------------------------------------------------------------==> 1
3
Select "Enable/Disable Boot from SAN" and press the [Enter] key.
------------------------------------------------------------------------------Emulex OneConnect FCoE BIOS Utility, xxxxxxxx
------------------------------------------------------------------------------01:
OCexxxxx-F:
Bus#: xx Dev#: xx Func#: xx
Mem Base:
CD4C0000 Firmware Version: xxx.xxx
BIOS: Disabled!
Port Name:
xxxxxxxx xxxxxxxx
Node Name: xxxxxxxx xxxxxxxx
Vlan ID: xxxx
DCBX mode: CEE mode
-------------------------------------------------------------------------------
Enable/Disable Boot from SAN
Scan for Target Devices
Reset Adapter Default
Configure Boot Devices
Configure DCBX mode
Configure FCF CEE Parameters
Configure FCF CIN Parameters
Configure Advanced Adapter Parameters
Enter <Esc> to Previous Menu
< / > to Highlight, <Enter> to Select
------------------------------------------------------------------------------Copyright (c) 1997-2009 Emulex. All rights reserved.
------------------------------------------------------------------------------===> Enable/Disable Boot from SAN
12
FUJITSU Storage ETERNUS DX Configuration Guide -Server Connection- (FCoE) for VMware® ESX
Copyright 2014 FUJITSU LIMITED
P3AM-4772-10ENZ0
Chapter 1 Setup Procedure for Emulex Converged Network Adapter Cards
1.2 Setting Up the Converged Network Adapter Cards
4
Select "Enable" and press the [Enter] key.
------------------------------------------------------------------------------Emulex OneConnect FCoE BIOS Utility, xxxxxxxx
------------------------------------------------------------------------------01:
OCexxxxx-F:
Bus#: xx Dev#: xx Func#: xx
Mem Base:
CD4C0000 Firmware Version: xxx.xxx
BIOS: Disabled!
Port Name:
xxxxxxxx xxxxxxxx
Node Name: xxxxxxxx xxxxxxxx
Vlan ID: xxxx
DCBX mode: CEE mode
-------------------------------------------------------------------------------
Boot BIOS is: Disabled
Enable
Disable
Enter <Esc> to Previous Menu
< / > to Highlight, <Enter> to Select
------------------------------------------------------------------------------Copyright (c) 1997-2009 Emulex. All rights reserved.
------------------------------------------------------------------------------===> Enable
BIOS is now enabled.
"Boot BIOS is : Disabled" should have changed to "Boot BIOS is : Enabled".
------------------------------------------------------------------------------Emulex OneConnect FCoE BIOS Utility, xxxxxxxx
------------------------------------------------------------------------------01:
OCexxxxx-F:
Bus#: xx Dev#: xx Func#: xx
Mem Base:
CD4C0000 Firmware Version: xxx.xxx
BIOS: Enabled!
Port Name:
xxxxxxxx xxxxxxxx
Node Name: xxxxxxxx xxxxxxxx
Vlan ID: xxxx
DCBX mode: CEE mode
-------------------------------------------------------------------------------
Boot BIOS is: Enabled
Enable
Disable
Enter <Esc> to Previous Menu
< / > to Highlight, <Enter> to Select
------------------------------------------------------------------------------Copyright (c) 1997-2009 Emulex. All rights reserved.
------------------------------------------------------------------------------===> Enter <Esc> to Previous Menu
5
Press the [Esc] key to return to the window shown in Step 3.
13
FUJITSU Storage ETERNUS DX Configuration Guide -Server Connection- (FCoE) for VMware® ESX
Copyright 2014 FUJITSU LIMITED
P3AM-4772-10ENZ0
Chapter 1 Setup Procedure for Emulex Converged Network Adapter Cards
1.2 Setting Up the Converged Network Adapter Cards
6
Select "Configure Boot Devices" and press the [Enter] key.
------------------------------------------------------------------------------Emulex OneConnect FCoE BIOS Utility, xxxxxxxx
------------------------------------------------------------------------------01:
OCexxxxx-F:
Bus#: xx Dev#: xx Func#: xx
Mem Base:
CD4C0000 Firmware Version: xxx.xxx
BIOS: Enabled!
Port Name:
xxxxxxxx xxxxxxxx
Node Name: xxxxxxxx xxxxxxxx
Vlan ID: xxxx
DCBX mode: CEE mode
-------------------------------------------------------------------------------
Enable/Disable Boot from SAN
Scan for Target Devices
Reset Adapter Default
Configure Boot Devices
Configure DCBX mode
Configure FCF CEE Parameters
Configure FCF CIN Parameters
Configure Advanced Adapter Parameters
Enter <Esc> to Previous Menu
< / > to Highlight, <Enter> to Select
------------------------------------------------------------------------------Copyright (c) 1997-2009 Emulex. All rights reserved.
------------------------------------------------------------------------------===> Configure Boot Devices
From Step 7 onwards, the examples assume that LUN00 is set and "ETERNUS DX400 series" is used as
the device name for the Primary Boot device.
7
Select a boot device. Input "1" for "Select a Boot Entry:"and press the [Enter] key.
------------------------------------------------------------------------------Emulex OneConnect FCoE BIOS Utility, xxxxxxxx
------------------------------------------------------------------------------01:
OCexxxxx-F:
Bus#: xx Dev#: xx Func#: xx
Mem Base:
CD4C0000 Firmware Version: xxx.xxx
BIOS: Enabled!
Port Name:
xxxxxxxx xxxxxxxx
Node Name: xxxxxxxx xxxxxxxx
Vlan ID: xxxx DCBX mode: CEE mode
------------------------------------------------------------------------------List of Saved Boot Devices:
1.
2.
3.
4.
5.
6.
7.
8.
Unused
Unused
Unused
Unused
Unused
Unused
Unused
Unused
DID:000000
DID:000000
DID:000000
DID:000000
DID:000000
DID:000000
DID:000000
DID:000000
WWPN:00000000
WWPN:00000000
WWPN:00000000
WWPN:00000000
WWPN:00000000
WWPN:00000000
WWPN:00000000
WWPN:00000000
00000000
00000000
00000000
00000000
00000000
00000000
00000000
00000000
LUN:00
LUN:00
LUN:00
LUN:00
LUN:00
LUN:00
LUN:00
LUN:00
Primary Boot
< / > to Highlight, <Enter> to Select
------------------------------------------------------------------------------Copyright (c) 1997-2009 Emulex. All rights reserved.
------------------------------------------------------------------------------===> 1
14
FUJITSU Storage ETERNUS DX Configuration Guide -Server Connection- (FCoE) for VMware® ESX
Copyright 2014 FUJITSU LIMITED
P3AM-4772-10ENZ0
Chapter 1 Setup Procedure for Emulex Converged Network Adapter Cards
1.2 Setting Up the Converged Network Adapter Cards
8
A list of the WWPNs and recognized LUNs (as device names) of the connected ETERNUS DX400 series is
displayed. Input the number of the device that is to be used for SAN Booting and press the [Enter] key.
Select "01" in this example.
------------------------------------------------------------------------------Emulex OneConnect FCoE BIOS Utility, xxxxxxxx
------------------------------------------------------------------------------01:
OCexxxxx-F:
Bus#: xx Dev#: xx Func#: xx
Mem Base:
CD4C0000 Firmware Version: xxx.xxx
BIOS: Enabled!
Port Name:
xxxxxxxx xxxxxxxx
Node Name: xxxxxxxx xxxxxxxx
Vlan ID: xxxx DCBX mode: CEE mode
-------------------------------------------------------------------------------
00. Clear selected boot entry!!
01. DID:xxxxxx WWPN:2040000B 5D6A0012 LUN:00
FUJITSU ETERNUS_DX400
0000
Enter <ESC> to Exit
<PageDn> to NextPage
< / > to Highlight, <Enter> to Select
------------------------------------------------------------------------------Copyright (c) 1997-2009 Emulex. All rights reserved.
------------------------------------------------------------------------------===> 01
9
Input the starting LUN as a two-digit hexadecimal number and press the [Enter] key.
Input "00" in this example.
--------------------------------------------------DID:xxxxxx WWPN:xxxxxxxx xxxxxxxx
Enter two digits of starting LUN (Hex):
00
<ESC> to Previous Menu
--------------------------------------------------===> 00 -> Enter
10
Select a boot device startup method (via WWPN or via DID). From the list of LUNs recognized by the
device, select the LUN number whose setting is to be changed, input the number for "Enter a Selection:"and press the [Enter] key.
LUN: 00 is used for SAN Booting, so input "01" and press the [Enter] key in this example.
------------------------------------------------------------------------------Emulex OneConnect FCoE BIOS Utility, xxxxxxxx
------------------------------------------------------------------------------01:
OCexxxxx-F:
Bus#: xx Dev#: xx Func#: xx
Mem Base:
CD4C0000 Firmware Version: xxx.xxx
BIOS: Enabled!
Port Name:
xxxxxxxx xxxxxxxx
Node Name: xxxxxxxx xxxxxxxx
Vlan ID: xxxx DCBX mode: CEE mode
------------------------------------------------------------------------------DID:xxxxxx WWPN:xxxxxxxx xxxxxxxx
01.
LUN:00
FUJITSU ETERNUS_DX400
0000
Enter <ESC> to Exit
<PageDn> to NextPage
< / > to Highlight, <Enter> to Select
------------------------------------------------------------------------------Copyright (c) 1997-2009 Emulex. All rights reserved.
------------------------------------------------------------------------------===> 01
15
FUJITSU Storage ETERNUS DX Configuration Guide -Server Connection- (FCoE) for VMware® ESX
Copyright 2014 FUJITSU LIMITED
P3AM-4772-10ENZ0
Chapter 1 Setup Procedure for Emulex Converged Network Adapter Cards
1.2 Setting Up the Converged Network Adapter Cards
11
Set the "Boot number". Select the boot device startup method (via WWPN or via DID), and change the
setting.
Input "Boot this device via WWPN" for WWPN in this example.
!!! --------------------------------------------------Emulex LPxxxx BIOS Copyright 1998 !!! xxxxxxxx
Press <Alt E> to go to Emulex BIOS Utility.
Press DID:xxxxxx
<s> to skipWWPN:xxxxxxxx
Emulex BIOS. xxxxxxxx LUN:00
Boot this device via WWPN
Boot this device via DID
<ESC> to Previous Menu
< / > to Highlight, <Enter> to Select
--------------------------------------------------===> Boot this device via WWPN
12
The window shown in Step 7 reappears.Check the settings.
In this example, check that item #1 is listed as "Used", that the "WWPN" is set to the actual ETERNUS
DX400 series WWPN, and that the "LUN" is set to "00" and that it bears the "Primary Boot" label.
------------------------------------------------------------------------------Emulex OneConnect FCoE BIOS Utility, xxxxxxxx
------------------------------------------------------------------------------01:
OCexxxxx-F:
Bus#: xx Dev#: xx Func#: xx
Mem Base:
CD4C0000 Firmware Version: xxx.xxx
BIOS: Enabled!
Port Name:
xxxxxxxx xxxxxxxx
Node Name: xxxxxxxx xxxxxxxx
Vlan ID: xxxx DCBX mode: CEE mode
------------------------------------------------------------------------------List of Saved Boot Devices:
1.
2.
3.
4.
5.
6.
7.
8.
Used
Unused
Unused
Unused
Unused
Unused
Unused
Unused
DID:xxxxxx
DID:000000
DID:000000
DID:000000
DID:000000
DID:000000
DID:000000
DID:000000
WWPN:2040000B
WWPN:00000000
WWPN:00000000
WWPN:00000000
WWPN:00000000
WWPN:00000000
WWPN:00000000
WWPN:00000000
5D6A0012
00000000
00000000
00000000
00000000
00000000
00000000
00000000
LUN:00
LUN:00
LUN:00
LUN:00
LUN:00
LUN:00
LUN:00
LUN:00
Primary Boot
< / > to Highlight, <Enter> to Select
------------------------------------------------------------------------------Copyright (c) 1997-2009 Emulex. All rights reserved.
------------------------------------------------------------------------------===> Enter <Esc> to Previous Menu
13
Press the [Esc] key twice to return to the window shown in Step 2.
If the Converged Network Adapter card has a dual port, or if multiple Converged Network Adapter cards
to be installed, repeat Step 2 through Step 13.
14
Press the [Esc] key to reboot.
-------------------------------------------------------Your changes have been saved.
Reboot the system for all changes to take effect.
REBOOT THE SYSTEM? (Y/N):
-------------------------------------------------------===> Y
16
FUJITSU Storage ETERNUS DX Configuration Guide -Server Connection- (FCoE) for VMware® ESX
Copyright 2014 FUJITSU LIMITED
P3AM-4772-10ENZ0
Chapter 1 Setup Procedure for Emulex Converged Network Adapter Cards
1.2 Setting Up the Converged Network Adapter Cards
1.2.3
Installing VMware ESX
• VMware ESX should be installed now if it has not yet been installed in the server. Refer to the following
URL for details.
http://www.vmware.com/support/pubs
• Converged Network Adapter card driver should be downloaded and installed from the following URL:
https://my.vmware.com/web/vmware/downloads
1.2.4
Setting Up the Converged Network Adapter Card Driver
Change the parameters for the Converged Network Adapter card driver.
1.2.4.1
For VMware vSphere 5.5
1
Record the module name for the Converged Network Adapter card that is loaded into VMware ESXi.
The underlined portion indicates the loaded module name. In the following example, "lpfc" is the module name.
# esxcli system module list | grep lpfc
lpfc
true
true
Module names may vary depending on the Converged Network Adapter card that is used.
2
Check the number of ports on the Converged Network Adapter card.
The number of CNA Names for the Converged Network Adapter card that is displayed represents the
number of ports.
In the following example, the number of ports is "two" since "vmhba1" and "vmhba2" (two underlined
portions) are displayed as the CNA Names of the card.
# esxcfg-scsidevs -a | grep lpfc
vmhba1 lpfc
link-up
fc.20000000c98df7c4:10000000c98df7c4
mulex OneConnect OCe11100 10GbE, FCoE UCNA
vmhba2 lpfc
link-up
fc.20000000c98df7c5:10000000c98df7c5
mulex OneConnect OCe11100 10GbE, FCoE UCNA
3
(0:2:0.0) ServerEngines Corporation E
(0:2:0.1) ServerEngines Corporation E
Check the default value for the Converged Network Adapter card.
Specify the module name for the Converged Network Adapter card that you recorded in Step 1 and
check the default value.
~ # esxcli system module parameters list -m lpfc | grep lpfc[0-1]_lun_queue_depth
lpfc0_lun_queue_depth
int
Max number of FCP commands we can queue to a specific LUN
lpfc1_lun_queue_depth
int
Max number of FCP commands we can queue to a specific LUN
[0-1] indicates that the number of ports is two.
4
Change the setting values of the parameter for the Converged Network Adapter card driver.
Driver parameter
Setting value
lpfcX_lun_queue_depth
Arbitrary (*1)
(Up to 512 for each FCoE port of the ETERNUS DX)
17
FUJITSU Storage ETERNUS DX Configuration Guide -Server Connection- (FCoE) for VMware® ESX
Copyright 2014 FUJITSU LIMITED
P3AM-4772-10ENZ0
Chapter 1 Setup Procedure for Emulex Converged Network Adapter Cards
1.2 Setting Up the Converged Network Adapter Cards
*1: Recommended value = 512 ¸ (number of FCoE ports that are connected to a single CA port) ¸
number of LUNs
(Round the result down)
Use the value of "8" if the actual result is lower.
When the value for this setting is changed, refer to "FUJITSU Storage ETERNUS DX Configuration
Guide -Server Connection- (FCoE) for VMware® ESX" and change the setting value for the Maximum
Outstanding Disk Requests for virtual machines as well.
Use the following command to change the setting values when the driver parameter name is
"lpfcX_lun_queue_depth", the number of I/Os is "8", the module name is "lpfc", and the number of ports
is "2".
# esxcli system module parameters set -p "lpfc0_lun_queue_depth=8 lpfc1_lun_queue_depth=8" -m lpfc
Input the number of I/Os ("8" in this example) for each driver parameter setting.
5
Reboot VMware ESXi.
# reboot
6
After rebooting VMware ESXi, check the setting values.
~ # esxcli system module parameters list -m lpfc | grep lpfc[0-1]_lun_queue_depth
lpfc0_lun_queue_depth
int
8
Max number of FCP commands we can queue to a specific LUN
lpfc1_lun_queue_depth
int
8
Max number of FCP commands we can queue to a specific LUN
18
FUJITSU Storage ETERNUS DX Configuration Guide -Server Connection- (FCoE) for VMware® ESX
Copyright 2014 FUJITSU LIMITED
P3AM-4772-10ENZ0
Chapter 1 Setup Procedure for Emulex Converged Network Adapter Cards
1.2 Setting Up the Converged Network Adapter Cards
1.2.4.2
For VMware vSphere 5.1 or 5.0
1
Record the module name for the Converged Network Adapter card that is loaded into VMware ESXi.
The underlined portion indicates the loaded module name. In the following example, "lpfc820" is the
module name.
# esxcli system module list | grep lpfc
lpfc820
true
true
Module names may vary depending on the Converged Network Adapter card that is used.
2
Check the number of ports on the Converged Network Adapter card.
The SCSI Host numbers of the Converged Network Adapter card that are displayed represent the number
of ports.
In the following example, the number of ports is "two" since "4" and "5" (two underlined portions) are
displayed as the SCSI Host numbers of the Converged Network Adapter card.
# ls /proc/scsi/lpfc820
4 5
3
Check the default value for the Converged Network Adapter card.
Specify the module name for the Converged Network Adapter card that you recorded in Step 1 and
check the default value.
# esxcli system module parameters list -m lpfc820 | grep lpfc[0-1]_lun_queue_depth
lpfc0_lun_queue_depth
int
Max number of FCP commands we can queue to a specific LUN
lpfc1_lun_queue_depth
int
Max number of FCP commands we can queue to a specific LUN
[0-1] indicates that the number of ports is two.
4
Change the setting values of the parameter for the Converged Network Adapter card driver.
Driver parameter
Setting value
lpfcX_lun_queue_depth
Arbitrary (*1)
(Up to 512 for each FCoE port of the ETERNUS DX)
*1: Recommended value = 512 ¸ (number of FCoE ports that are connected to a single CA port) ¸
number of LUNs
(Round the result down)
Use the value of "8" if the actual result is lower.
When the value for this setting is changed, refer to "FUJITSU Storage ETERNUS DX Configuration
Guide -Server Connection- (FCoE) for VMware® ESX" and change the setting value for the Maximum
Outstanding Disk Requests for virtual machines as well.
19
FUJITSU Storage ETERNUS DX Configuration Guide -Server Connection- (FCoE) for VMware® ESX
Copyright 2014 FUJITSU LIMITED
P3AM-4772-10ENZ0
Chapter 1 Setup Procedure for Emulex Converged Network Adapter Cards
1.2 Setting Up the Converged Network Adapter Cards
Use the following command to change the setting values when the driver parameter name is
"lpfcX_lun_queue_depth", the number of I/Os is "20", the module name is "lpfc820", and the number of
ports is "2".
# esxcli system module parameters set -p "lpfc0_lun_queue_depth=20 lpfc1_lun_queue_depth=20" -m lpfc820
Input the number of I/Os ("20" in this example) for each driver parameter setting.
5
Reboot VMware ESXi.
# reboot
6
After rebooting VMware ESXi, check the setting values.
# esxcli system module parameters list -m lpfc820 | grep lpfc[0-1]_lun_queue_depth
lpfc0_lun_queue_depth
int
20
Max number of FCP commands we can queue to a specific LUN
lpfc1_lun_queue_depth
int
20
Max number of FCP commands we can queue to a specific LUN
1.2.4.3
For VMware vSphere 4
1
Record the module name for the Converged Network Adapter card that is loaded into VMware ESX.
The underlined portion indicates the loaded module name. In the following example, "lpfc820" is the
module name.
# vmkload_mod -l | grep lpfc*
lpfc820
Module names may vary depending on the Converged Network Adapter card that is used.
2
Check the default value for the Converged Network Adapter card.
Specify the module name for the Converged Network Adapter card that you recorded in Step 1 and
check the default value.
# esxcfg-module -g lpfc820
lpfc820 enabled = 1 options = ' '
Check that no value appears in the underlined portion.
3
Check the number of ports on the Converged Network Adapter card.
The SCSI Host numbers of the Converged Network Adapter card that are displayed represent the number
of ports.
20
FUJITSU Storage ETERNUS DX Configuration Guide -Server Connection- (FCoE) for VMware® ESX
Copyright 2014 FUJITSU LIMITED
P3AM-4772-10ENZ0
Chapter 1 Setup Procedure for Emulex Converged Network Adapter Cards
1.2 Setting Up the Converged Network Adapter Cards
In the following example, the number of ports is "two" since "4" and "5" (two underlined portions) are
displayed as the SCSI Host numbers of the Converged Network Adapter card.
# ls /proc/scsi/lpfc820
4 5
4
Change the setting values of the parameter for the Converged Network Adapter card driver.
Driver parameter
Setting value
lpfcX_lun_queue_depth
Arbitrary (*1)
(Up to 512 for each FCoE port of the ETERNUS DX)
*1: Recommended value = 512 ¸ (number of FCoE ports that are connected to a single CA port) ¸
number of LUNs
(Round the result down)
Use the value of "8" if the actual result is lower.
Use the following command to change the setting values when the driver parameter name is
"lpfcX_lun_queue_depth", the number of I/Os is "8", the module name is "lpfc820", and the number of
ports is "2".
# esxcfg-module -s "lpfc0_lun_queue_depth=8 lpfc1_lun_queue_depth=8" lpfc820
Input the number of I/Os ("8" in this example) for each driver parameter setting.
5
Check the setting values.
# esxcfg-module -g lpfc820
lpfc820 enabled = 1 options = 'lpfc0_lun_queue_depth=8 lpfc1_lun_queue_depth=8'
6
Reboot VMware ESX.
# reboot
21
FUJITSU Storage ETERNUS DX Configuration Guide -Server Connection- (FCoE) for VMware® ESX
Copyright 2014 FUJITSU LIMITED
P3AM-4772-10ENZ0
Chapter 2
Setup Procedure for QLogic Converged Network
Adapter Cards
This chapter describes how to set up the VMware ESX server and driver when connecting the ETERNUS DX
storage systems to the server via QLogic Converged Network Adapter cards.
2.1
Workflow
Workflow
Setting Up the Converged Network Adapter Cards
Install the Converged Network Adapter cards, acquire their physical addresses and WWN information.
• "2.2.1 Setting Up the Converged Network Adapter Cards" (page 24)
Setting Up SAN Boot
Set up the SAN Boot configuration (if SAN Boot is to be used).
• "2.2.2 Setting Up SAN Boot" (page 27)
Installing VMware ESX
Install the VMware ESX software.
• "2.2.4 Installing VMware ESX" (page 29)
22
FUJITSU Storage ETERNUS DX Configuration Guide -Server Connection- (FCoE) for VMware® ESX
Copyright 2014 FUJITSU LIMITED
P3AM-4772-10ENZ0
Chapter 2 Setup Procedure for QLogic Converged Network Adapter Cards
2.1 Workflow
Setting Up Converged Network Adapter Card Driver
Perform the settings for the Converged Network Adapter card driver.
• "2.2.5 Setting Up the Converged Network Adapter Card Driver" (page 30)
After completing all the required procedures in this manual, proceed to "Checking the LUNs" in "FUJITSU Storage ETERNUS DX Configuration Guide -Server Connection- (FCoE) for VMware® ESX".
23
FUJITSU Storage ETERNUS DX Configuration Guide -Server Connection- (FCoE) for VMware® ESX
Copyright 2014 FUJITSU LIMITED
P3AM-4772-10ENZ0
Chapter 2 Setup Procedure for QLogic Converged Network Adapter Cards
2.2 Setting Up the Converged Network Adapter Cards
2.2
Setting Up the Converged Network Adapter Cards
This section describes how to set up the server with the QLogic Converged Network Adapter cards described
in the "Server Support Matrix".
Depending on the Converged Network Adapter card used, the actual on-screen Converged Network Adapter card information may differ from that in the screenshots shown in this manual.
2.2.1
Setting Up the Converged Network Adapter Cards
Install the Converged Network Adapter card to the server, and acquire the physical address and World Wide
Name (WWN) for the Converged Network Adapter card.
• The physical address and WWN of a Converged Network Adapter card are required information in the following cases: when an error has occurred in the system, when using the ETERNUS DX storage systems (security function, host affinity function, etc.) to restrict server access, or when connecting the ETERNUS DX
storage systems and the server using a Fibre Channel switch and a CEE/FCoE switch.
• Acquire the physical address and WWN when installing the Converged Network Adapter card, because they
cannot be determined from BIOS and OS. Physical address and WWN must be assigned to "WWN instance
management table for the server".
The workflow is shown below.
(1) Install the Converged Network Adapter card
(2) Turn on the server
(3) Acquire the physical address and WWN for the Converged Network Adapter card
(4) Add a record for the server in the WWN instance management table for the server
(5) Set the Converged Network Adapter card BIOS
When installing two or more Converged Network Adapter cards in the server, first turn off the server, then
repeat Steps (1) through (5) above for each Converged Network Adapter card to be installed.
24
FUJITSU Storage ETERNUS DX Configuration Guide -Server Connection- (FCoE) for VMware® ESX
Copyright 2014 FUJITSU LIMITED
P3AM-4772-10ENZ0
Chapter 2 Setup Procedure for QLogic Converged Network Adapter Cards
2.2 Setting Up the Converged Network Adapter Cards
The procedure is as follows:
1
Install the Converged Network Adapter card in the server.
For the installation method, position (PCI bus slots), and notes regarding the Converged Network
Adapter card, refer to the Converged Network Adapter card documentation or the User's Guide of the
server.
2
Turn on the server, and press the [Ctrl] + [Q] keys while the following message is displayed.
QLE8142 PCI Fibre Channel ROM BIOS Version 3.00 - Beta 14
Copyright (C) QLogic Corporation 1993-2010. All rights reserved.
www.qlogic.com
Press <CTRL-Q> or <ALT-Q> for Fast!UTIL
Firmware Version 5.04.01
The "Fast!UTIL" program starts up (Startup may take longer than usual).
3
Check the value of [Address] of the [Selected Adapter] window.
The value of [Address] is the physical address.
Selected Adapter
Adapter Type
QLE8142
Address
5800
Slot Bus Device Function
05
04 00
2
4
Select [Adapter Settings] from the [Configuration Settings] menu and press the [Enter] key.
5
Check the value of [Adapter Port Name].
The value of [Adapter Port Name] is the Converged Network Adapter card WWN.
Adapter Settings
BIOS Address:
BIOS Revision:
Adapter Mac Address:
Interrupt Level:
Adapter Port Name:
Host Adapter BIOS:
6
D1800
3.00
00-C0-DD-11-A0-21
9
210000C0DD11A021
Enabled
Record the physical address and WWN in the "WWN instance management table for the server".
(found in "Appendix A WWN Instance Management Table for the Server (Blank)" (page 34)).
The following shows an example of this.
Host name
Server#1
IP Address
192.168.0.10
Physical slot
name
Converged Network Adapter
card WWN
slot5
21 00 00 C0 DD 11 A0 21
Instance name
Physical address
Cable tag
5800
SERV1_SLOT05 to B8000_1_port05
25
FUJITSU Storage ETERNUS DX Configuration Guide -Server Connection- (FCoE) for VMware® ESX
Copyright 2014 FUJITSU LIMITED
P3AM-4772-10ENZ0
Chapter 2 Setup Procedure for QLogic Converged Network Adapter Cards
2.2 Setting Up the Converged Network Adapter Cards
7
Perform the BIOS settings for the Converged Network Adapter card.
Check the parameter values in the [Adapter Settings] window against those in the following table. For
details on how to set the values, refer to the BIOS Readme file and Converged Network Adapter card
user's guide.
Parameter
Adapter Settings
Remarks
BIOS Address
Fixed for each card
Settings cannot be changed.
Host Adapter BIOS
Enabled or Disabled
• Set [Enabled] for SAN Boot.
• Set [Disabled] for non SAN Boot.
Frame Size
2048
Loop Reset Delay
5
If the current parameter values are different, change them to the indicated
values.
Spinup Delay
Disabled
Fibre Channel Tape Support
Disabled
BIOS Revision (*1)
Adapter Mac Address
Interrupt Level
Adapter Port Name
*1: The BIOS version of the Converged Network Adapter card is displayed. Check that the BIOS version
is the same as shown in "Server Support Matrix".
8
Return to the [Configuration Settings] menu by pressing the [Esc] key.
9
Select [Advanced Adapter Settings] from the [Configuration Settings] menu and press the [Enter] key.
Check the parameter values in the [Advanced Adapter Settings] window against those in the following
table.
10
Parameter
Setting value
Remarks
Execution Throttle
65535
LUNs per Target
8
If the current parameter values are different, change them to the indicated
values.
Enable Target Reset
Yes
Login Retry Count
8
Port Down Retry Count
30
Link Down Timeout
30
Operation Mode
0
Interrupt Delay Timer
0
Enable Interrupt
NO
EV Controller Order
Disabled
LR Enable
Disabled
Primary FCF VLAN ID
Disabled
Press the [Esc] key twice to return to the [Fast!UTIL Options] menu.
If the BIOS settings were changed, save the settings using [Save xxxxxx]. When two or more Converged
Network Adapter cards are installed in the server, select the second or later Converged Network Adapter
card using the following steps, and set the BIOS of the selected card.
(1) Select [Select Host Adapter] from the [Fast!UTIL Options] menu and press the [Enter] key.
26
FUJITSU Storage ETERNUS DX Configuration Guide -Server Connection- (FCoE) for VMware® ESX
Copyright 2014 FUJITSU LIMITED
P3AM-4772-10ENZ0
Chapter 2 Setup Procedure for QLogic Converged Network Adapter Cards
2.2 Setting Up the Converged Network Adapter Cards
(2) Select the Converged Network Adapter card to be set (BIOS setting) in the [Select Host Adapter]
window.
The [Fast!UTIL Options] menu appears. Then perform Step 3 through Step 10.
11
Select [Exit Fast!UTIL] and press the [Enter] key.
12
Select [Reboot System] and press the [Enter] key.
Exit Fast!UTIL
Reboot System
Return to Fast!UTIL
The server reboots.
To return to the [Fast!UTIL] menu, select [Return to Fast!UTIL].
2.2.2
Setting Up SAN Boot
Refer to "Server Support Matrix" to check the support status of SAN Boot and refer to the manual of the server, OS, or the Converged Network Adapter card that is to be used.
When using a logical unit (LUN) of the ETERNUS DX storage systems as a boot disk, make sure that the LUN
has enough capacity to install the OS.
2.2.3
Setting the Selectable Boot
1
Select [Selectable Boot Settings] from the [Configuration Settings] menu and press the [Enter] key.
2
Set [Selectable Boot] to "Enabled".
3
Select a boot path (ETERNUS DX port WWN) and boot LUN#.
The boot path and boot LUN# selection window only appears when [Host Adapter BIOS] is "Enabled"
in [SAN Boot].
If [Host Adapter BIOS] is "Disabled", the boot path and boot LUN# selection window does not appear.
Instead, the window shown in Step 4 appears when [Selectable Boot Settings] is selected.
27
FUJITSU Storage ETERNUS DX Configuration Guide -Server Connection- (FCoE) for VMware® ESX
Copyright 2014 FUJITSU LIMITED
P3AM-4772-10ENZ0
Chapter 2 Setup Procedure for QLogic Converged Network Adapter Cards
2.2 Setting Up the Converged Network Adapter Cards
4
Check the values for each parameter.
Selectable Boot Settings
Selectable Boot:
(Primary) Boot Port
Boot Port
Boot Port
Boot Port
Name,
Name,
Name,
Name,
Enabled
500000E0D4010590,
500000E0D4010590,
0000000000000000,
0000000000000000,
Lun:
Lun:
Lun:
Lun:
0
0
0
0
Press “C” to clear a Boot Port Name entry
Parameter
Setting value
Remarks
Selectable Boot
Enabled or Disabled
• Set [Enabled] for SAN Boot.
• Set [Disabled] for non SAN Boot.
Boot Port Name, Lun
ETERNUS DX port WWN, LUN#
or 0000000000000000, 0
• The boot path (ETERNUS DX port WWN)
and boot LUN# for SAN Boot are separated
by a comma.
• "0000000000000000, 0" for non SAN
Boot.
5
Return to the [Configuration Settings] menu by pressing the [Esc] key.
6
Press the [Esc] key twice to return to the [Fast!UTIL Options] menu.
If the settings were changed, save the settings using [Save xxxxxx].
When two or more Converged Network Adapter cards are installed in the server, select the second or
later Converged Network Adapter card using the following steps, and set the selected card.
(1) Select [Select Host Adapter] from the [Fast!UTIL Options] menu and press the [Enter] key.
Fast!UTIL Options
Configuration Settings
Scan Fibre Devices
Fibre Disk Utility
Loopback Data Test
Select Host Adapter
Exit Fast!UTIL
(2) Select the Converged Network Adapter card to be set (BIOS setting).
Select Host Adapter
Adapter Type
Address
Slot Bus Device Function
QLE8142
QLE8142
5800
5C00
05
05
04
04
00
00
2
3
(3) The [Fast!UTIL Options] menu appears. Then perform Step 1 through Step 6.
7
Select [Exit Fast!UTIL] and press the [Enter] key.
28
FUJITSU Storage ETERNUS DX Configuration Guide -Server Connection- (FCoE) for VMware® ESX
Copyright 2014 FUJITSU LIMITED
P3AM-4772-10ENZ0
Chapter 2 Setup Procedure for QLogic Converged Network Adapter Cards
2.2 Setting Up the Converged Network Adapter Cards
8
Select [Reboot System] and press the [Enter] key.
Exit Fast!UTIL
Reboot System
Return to Fast!UTIL
The server reboots.
To return to the [Fast!UTIL] menu, select [Return to Fast!UTIL].
2.2.4
Installing VMware ESX
• VMware ESX should be installed now if it has not yet been installed in the server. Refer to the following
URL for details.
http://www.vmware.com/support/pubs/
• If SAN Boot is used, use the QLogic "Fast!UTIL" tool to check the Fibre Channel path in the Converged Network Adapter card BIOS.
The Fibre Channel path can be checked on the server BIOS screen after the Fibre Channel switch and the
CEE/FCoE switch settings are completed.
The checking procedure is as follows:
1
Turn on the server, and press the [Ctrl] + [Q] keys while the following message is displayed.
The "Fast!UTIL" program starts up (Startup may take longer than usual).
QLE8142 PCI Fibre Channel ROM BIOS Version 3.00 - Beta 14
Copyright (C) QLogic Corporation 1993-2010. All rights reserved.
www.qlogic.com
Press <CTRL-Q> or <ALT-Q> for Fast!UTIL
Firmware Version 5.04.01
2
When there are two or more FCoE ports for the Converged Network Adapter card, select the appropriate
port.
3
Select [Scan Fibre Devices] from the [Fast!UTIL Options] menu.
The ETERNUS DX storage systems should appear.
If the ETERNUS DX storage systems appear, the settings were performed successfully. If the ETERNUS DX storage systems do not appear, recheck the setup procedures given in this manual, the ETERNUSmgr installation
and settings, or the Fibre Channel switch and CEE/FCoE switch settings.
29
FUJITSU Storage ETERNUS DX Configuration Guide -Server Connection- (FCoE) for VMware® ESX
Copyright 2014 FUJITSU LIMITED
P3AM-4772-10ENZ0
Chapter 2 Setup Procedure for QLogic Converged Network Adapter Cards
2.2 Setting Up the Converged Network Adapter Cards
2.2.5
Setting Up the Converged Network Adapter Card Driver
Change the parameters for the Converged Network Adapter card driver.
2.2.5.1
For VMware vSphere 5.5
1
Record the module name for the Converged Network Adapter card that is loaded into VMware ESXi.
The underlined portion indicates the loaded module name. In the following example, "qlnativefc" is the
module name.
# esxcli system module list | grep qlnativefc
qlnativefc
true
true
Module names may vary depending on the Converged Network Adapter card that is used.
2
Check the default value for the Converged Network Adapter card.
Specify the module name for the Converged Network Adapter card that you recorded in Step 1 and
check the default value.
# esxcli system module parameters list -m qlnativefc | grep ql2xmaxqdepth
ql2xmaxqdepth
int
Maximum queue depth to report for target devices.
3
Change the setting values of the parameter for the Converged Network Adapter card driver.
Driver parameter
Setting value
ql2xmaxqdepth
Arbitrary (*1)
(Up to 512 for each FCoE port of the ETERNUS DX)
*1: Recommended value = 512 ¸ (number of FCoE ports that are connected to a single CA port) ¸
number of LUNs
(Round the result down)
Use the value of "8" if the actual result is lower.
When the value for this setting is changed, refer to "FUJITSU Storage ETERNUS DX Configuration
Guide -Server Connection- (FCoE) for VMware® ESX" and change the setting value for the Maximum
Outstanding Disk Requests for virtual machines as well.
Use the following command to change the setting values when the driver parameter name is
"ql2xmaxqdepth", the number of I/Os is "8", and the module name is "qlnativefc".
# esxcli system module parameters set -p ql2xmaxqdepth=8 -m qlnativefc
Input the number of I/Os ("8" in this example) for the driver parameter setting.
30
FUJITSU Storage ETERNUS DX Configuration Guide -Server Connection- (FCoE) for VMware® ESX
Copyright 2014 FUJITSU LIMITED
P3AM-4772-10ENZ0
Chapter 2 Setup Procedure for QLogic Converged Network Adapter Cards
2.2 Setting Up the Converged Network Adapter Cards
This option cannot be individually applied to each port on the Converged Network Adapter card.
All ports on the target Converged Network Adapter card are configured with the same settings.
4
Reboot VMware ESXi.
# reboot
5
After rebooting VMware ESXi, check the setting values.
# esxcli system module parameters list -m qlnativefc | grep ql2xmaxqdepth
ql2xmaxqdepth
int
8
Maximum queue depth to report for target devices.
2.2.5.2
For VMware vSphere 5
1
Record the module name for the Converged Network Adapter card that is loaded into VMware ESXi.
The underlined portion indicates the loaded module name. In the following example, "qla2xxx" is the
module name.
# esxcli system module list | grep qla
qla2xxx
true
true
Module names may vary depending on the Converged Network Adapter card that is used.
2
Check the default value for the Converged Network Adapter card.
Specify the module name for the Converged Network Adapter card that you recorded in Step 1 and
check the default value.
# esxcli system module parameters list -m qla2xxx | grep ql2xmaxq
ql2xmaxqdepth
int
Maximum queue depth to report for target devices.
3
Change the setting values of the parameter for the Converged Network Adapter card driver.
Driver parameter
Setting value
ql2xmaxqdepth
Arbitrary (*1)
(Up to 512 for each FCoE port of the ETERNUS DX)
*1: Recommended value = 512 ¸ (number of FCoE ports that are connected to a single CA port) ¸
number of LUNs
(Round the result down)
Use the value of "8" if the actual result is lower.
31
FUJITSU Storage ETERNUS DX Configuration Guide -Server Connection- (FCoE) for VMware® ESX
Copyright 2014 FUJITSU LIMITED
P3AM-4772-10ENZ0
Chapter 2 Setup Procedure for QLogic Converged Network Adapter Cards
2.2 Setting Up the Converged Network Adapter Cards
When the value for this setting is changed, refer to "FUJITSU Storage ETERNUS DX Configuration
Guide -Server Connection- (FCoE) for VMware® ESX" and change the setting value for the Maximum
Outstanding Disk Requests for virtual machines as well.
Use the following command to change the setting values when the driver parameter name is
"ql2xmaxqdepth", the number of I/Os is "8", and the module name is "qla2xxx".
# esxcli system module parameters set -p ql2xmaxqdepth=8 -m qla2xxx
Input the number of I/Os ("8" in this example) for the driver parameter setting.
This option cannot be individually applied to each port on the Converged Network Adapter card.
All ports on the target Converged Network Adapter card are configured with the same settings.
4
Reboot VMware ESXi.
# reboot
5
After rebooting VMware ESXi, check the setting values.
# esxcli system module parameters list -m qla2xxx | grep ql2xmaxq
ql2xmaxqdepth
int
8
Maximum queue depth to report for target devices.
2.2.5.3
For VMware vSphere 4
1
Record the module name for the Converged Network Adapter card that is loaded into VMware ESX.
The underlined portion indicates the loaded module name. In the following example, "qla2xxx" is the
module name.
# vmkload_mod -l | grep qla*
qla2xxx
Module names may vary depending on the Converged Network Adapter card that is used.
32
FUJITSU Storage ETERNUS DX Configuration Guide -Server Connection- (FCoE) for VMware® ESX
Copyright 2014 FUJITSU LIMITED
P3AM-4772-10ENZ0
Chapter 2 Setup Procedure for QLogic Converged Network Adapter Cards
2.2 Setting Up the Converged Network Adapter Cards
2
Check the default value for the Converged Network Adapter card.
Specify the module name for the Converged Network Adapter card that you recorded in Step 1 and
check the default value.
# esxcfg-module -g qla2xxx
qla2xxx enabled = 1 options = ' '
Check that no value appears in the underlined portion.
3
Change the setting values of the parameter for the Converged Network Adapter card driver.
Driver parameter
Setting value
ql2xmaxqdepth
Arbitrary (*1)
(Up to 512 for each FCoE port of the ETERNUS DX)
*1: Recommended value = 512 ¸ (number of FCoE ports that are connected to a single CA port) ¸
number of LUNs
(Round the result down)
Use the value of "8" if the actual result is lower.
When the value for this setting is changed, refer to "FUJITSU Storage ETERNUS DX Configuration
Guide -Server Connection- (FCoE) for VMware® ESX" and change the setting value for the Maximum
Outstanding Disk Requests for virtual machines as well.
Use the following command to change the setting values when the driver parameter name is
"ql2xmaxqdepth", the number of I/Os is "8", and the module name is "qla2xxx".
# esxcfg-module -s "ql2xmaxqdepth=8" qla2xxx
Input the number of I/Os ("8" in this example) for the driver parameter setting.
This option cannot be individually applied to each port on the Converged Network Adapter card.
All ports on the target Converged Network Adapter card are configured with the same settings.
4
Check the setting values.
# esxcfg-module -g qla2xxx
qla2xxx enabled = 1 options = 'ql2xmaxqdepth=8'
5
Reboot VMware ESX.
# reboot
33
FUJITSU Storage ETERNUS DX Configuration Guide -Server Connection- (FCoE) for VMware® ESX
Copyright 2014 FUJITSU LIMITED
P3AM-4772-10ENZ0
Appendix A
WWN Instance Management Table for the Server
(Blank)
This table is used for setting up the Converged Network Adapter cards. Utilize this table if necessary.
Host name
IP Address
Physical slot
name
Converged Network Adapter
card WWN
Instance name
Physical address
Cable tag
34
FUJITSU Storage ETERNUS DX Configuration Guide -Server Connection- (FCoE) for VMware® ESX
Copyright 2014 FUJITSU LIMITED
P3AM-4772-10ENZ0
FUJITSU Storage ETERNUS DX Configuration Guide -Server Connection(FCoE) for VMware® ESX
Driver Settings for Non-Fujitsu Converged Network Adapter Cards
P3AM-4772-10ENZ0
Date of issuance: December 2014
Issuance responsibility: FUJITSU LIMITED
• The content of this manual is subject to change without notice.
• This manual was prepared with the utmost attention to detail. However, Fujitsu shall assume no responsibility for any
operational problems as the result of errors, omissions, or the use of information in this manual.
• Fujitsu assumes no liability for damages to third party copyrights or other rights arising from the use of any information
in this manual.
• The content of this manual may not be reproduced or distributed in part or in its entirety without prior permission from
Fujitsu.