1
ENGLI SH
• Although this saw will cut wood and many nonferrous
materials,these operating instructions refer to the cutting
of wood only. The sameguide-lines apply to the other
materials. Do not cut ferrous (iron and steel) materials or
masonry with this saw! Do not use any abrasive discs!
• Make sure to use the kerf plate. Do not operate the
machine if the kerf slot is wider than 10 mm.
• Placing the workpiece on a piece of wood will increase
the capacities to 300 mm.
OPERATION
Instructions for Use
WARNING: Always observe the safety instructions and
applicable regulations.
WARNING: To reduce the risk of injury, turn unit off
and disconnect machine from power source before
installing and removing accessories, before adjusting
or changing set-ups or when making repairs. Be sure
the trigger switch is in the OFF position. An accidental
start-up can cause injury.
The attention of UK users is drawn to the “woodworking machines
regulations 1974” and any subsequent amendments.
Ensure the machine is placed to satisfy your ergonomic conditions in
terms of table height and stability. The machine site shall be chosen so
that the operator has a good overview and enough free surrounding
space around the machine that allows handling of the workpiece
without any restrictions.
To reduce effects of increased vibration, make sure the environment is
not too cold, the machine and accessory are well maintained and the
workpiece size is suitable for this machine.
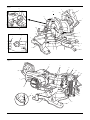
Switching On and Off (fig. 1)
A hole (dd) is provided in the on/off switch (a) for insertion of a padlock
to lock the tool.
1. To run the tool, press the on/off switch (a).
2. To stop the tool, release the switch.
SPEED CONTROL DIAL (DW771 ONLY)
The speed control dial (cc) can be used for advance setting of the
required range of speed.
Turn the speed control dial (cc) to the desired range, which is indicated
by a number (1–5).
• Use high speeds for sawing soft materials such as wood.
• Use low speeds for sawing hardwood.
Body and Hand Position
Proper positioning of your body and hands when operating the mitre
saw will make cutting easier, more accurate and safer.
WARNING:
• Never place your hands near the cutting area.
• Place your hands no closer than 150 mm from the blade.
• Hold the workpiece tightly to the table and the fence
when cutting. Keep your hands in position until the
switch has been released and the blade has completely
stopped.
• Always make dry runs (without power) before finish
cuts so that you can check the path of the blade.
• Do not cross your hands.
• Keep both feet firmly on the floor and maintain proper
balance.
• As you move the saw arm left and right, follow it and
stand slightly to the side of the saw blade.
Basic Saw Cuts
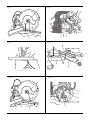
VERTICAL STRAIGHT CROSS CUT (FIG. 1, 20)
NOTE: Use 216 mm saw blades with 30 mm arbor holes to
obtain the desired cutting capacities.
1. Slacken the mitre latch (m) and subsequently lift it up.
2. Engage the mitre latch (m) at the 0° position and fasten the mitre
latch.
3. Place the wood to be cut against the fence (p).
4. Take hold of the carrying handle (c) and press the guard lock up
release lever (b) to release the guard. Press the trigger switch (a) to
start the motor. It is recommended to start the cut near the fence.
5. Depress the head to allow the blade to cut through the timber and
enter the plastic kerf plate (k).
6. When the head is fully depressed, slowly pull it across to complete
the cut.
7. After completing the cut, release the switch and wait for the saw
blade to come to a complete standstill before returning the head to
its upper rest position.
WARNING:
• For some types of plastic profiles, it is advisable to follow
the sequence in reverse order.
• The lower blade guard is designed to close quickly
when the lever (b) is released. If it does not close within
1 second, have the saw serviced by an authorized
DEWALT repair agent.
VERTICAL MITRE CROSS-CUT (FIG. 1, 21)
1. Squeeze the mitre latch (m). Move the arm left or right to the
required angle.
2. The mitre latch will automatically locate at 0°, 15°, 22.5°, 31.62°,
45° and 50° both left and right. If any intermediate angle is required
hold the head firmly and lock by fastening the mitre latch.
3. Always ensure that the mitre lock lever is locked tightly before
cutting.
4. Proceed as for a vertical straight cross-cut.
WARNING: When mitring the end of a piece of wood
with a small off-cut, position the wood to ensure that the
off-cut is to the side of the blade with the greater angle to
the fence, i.e.:
left mitre, off-cut to the right
right mitre, off-cut to the left
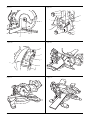
BEVEL CROSS-CUTS (FIG. 18, 22)
Bevel angles can be set from 0° to 48° to the left. Bevels up to 45°
can be cut with the mitre arm set between zero and a maximum of 45°
mitre position right or left.
1. Loosen the bevel clamp handle (t) and set the bevel as desired.
2. Set the override button (ee) if required.
3. Hold the head firmly and do not allow it to fall.
4. Tighten the bevel clamp handle (t) firmly.
5. Proceed as for a vertical straight cross-cut.
Quality of Cut
The smoothness of any cut depends on a number of variables, i.e.
the material being cut. When smoothest cuts are desired for moulding
andother precision work, a sharp (60-tooth carbide) blade and a slower,
even cutting rate will produce the desired results.
WARNING: Ensure that the material does not creep while
cutting; clamp it securely in place. Always let the blade
come to a full stop before raising the arm. If small fibres of
wood still split out at the rear of the workpiece, stick a piece
of masking tape on the wood where the cut will be made.
Saw through the tape and carefully remove tape when
finished.
Clamping the Workpiece (fig. 3, 25–27)
WARNING: Always use a material clamp.
For best results use the material clamp (kk) made for use with your saw.
TO INSTALL CLAMP
1. Insert it into the hole behind the fence. The clamp (kk) should be
facing toward the back of the mitre saw. Ensure the groove on
the clamp rod is fully inserted into the base of the mitre saw. If the
groove is visible, the clamp will not be secure.
2. Rotate the clamp 180º toward the front of the mitre saw.
11