1
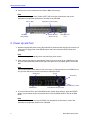
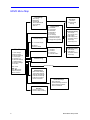
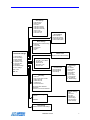
Quick Setup Guide
EDVR
Part Number 8200-0841-00 A0
EDVR Quick Setup Guide
A. Check System Components
American Dynamics EDVR Unit
Supplied Accessories
Two Power Cords:
(1) North American standard
(2) Continental European standard
CD-ROM (Viewer software and
user documents in electronic form)
and this printed Quick Setup Guide
Power Brick
(External Power Supply)
Rack Mount Kit
Alarm I/O Adapter
Required Items
• Composite Monitor (PAL or NTSC)
• Cameras and BNC Cables
B. Connect Devices to Rear Panel
If a computer is available, you may want to view the Installation and Operation Guide as you set up
your EDVR (included on the CD-ROM).
1 Remove all items from the carton. If anything is missing or broken, please inform Customer
Service immediately.
2 Save all cartons and packing materials to use for shipping or transporting EDVR.
3 Connect the main monitor to the Main Monitor BNC connector.
1
EDVR Quick Setup Guide
4 Connect one or more cameras to the Video In BNC connector(s).
Note
For video loop through, Touch Tracker (ADTT16E), and other connections, refer to the
Installation and Operation Guide that is included on the CD-ROM.
Video In (BNC)
Video Loop
Through (BNC)
Call Monitor Connector (BNC)
Main Monitor Connector (BNC)
Network Connector
(Ethernet; RJ-45)
Power Connector
(12v)
C. Power Up and Test
1 Attach the appropriate power cord to the Power Brick (external power supply) and connect to a
power source. Apply power to the EDVR system and to the connected video monitor and
camera(s).
Note
EDVR powers up automatically when connected to a power source.
2 If the unit does not power up automatically, insert a tool such as the tip of a ballpoint pen into
the front panel power/reset switch (near the lower right corner) and gently press. The unit will
start.
Note
The recessed power switch works in one of two ways: (1) Press quickly to turn the EDVR on or
off. (2) Press and hold for at least 3 seconds to restart the EDVR.
MENU button
Jog Dial
Shuttle Ring
Hard Disk Busy Indicator
ENTER button
Power/Reset Switch (recessed)
3 To set the Date and Time, press the MENU button. Select Quick Settings, press the ENTER
button. Use the shuttle ring to set date and time. Press the MENU button to Exit to the Main
Menu.
Note
Press the MENU button to set up the EDVR. For detailed set up instructions, refer to the
Installation and Operation Guide on the CD-ROM.
2
EDVR Quick Setup Guide
EDVR Quick Setup Guide
D. (Optional) Select Video Output: NTSC or PAL
From the factory, the EDVR is configured for NTSC video output. However, if you need to change
video output to PAL, or change PAL to NTSC, complete the following steps:
1 If the EDVR and the Main Monitor are not turned on, turn them on.
2 On the EDVR Front Panel, simultaneously press the Up and Pause buttons for at least 3
seconds. After you hear a long beep, release both buttons.
3 The camera images on the Main Monitor screen are replaced by the following text:
Set to PAL (or NTSC). . . . . OK
Please Press Any Button to Restart
Note
You will see the name of the video mode that you are switching to, either PAL or NTSC. You
will not see both terms.
4 Press any Front Panel button to restart the EDVR. Once the EDVR has restarted, the EDVR
will be in the video standard last selected.
5 After you restart, the EDVR will not be recording. Press the REC button to begin recording.
(Default record settings: high quality with 30 F/S for NTSC and 25 F/S for PAL.)
If you have color cameras and a color monitor but you only see black and white video images,
repeat the preceding process. It is likely that you have selected the incorrect video output for
your equipment configuration (that is, you selected PAL for a NTSC system or NTSC for a PAL
system).
E. Confirm Results
When you connect and apply power to the EDVR, the default setting is record on.
The EDVR should be recording live video and displaying information on the monitor. The hard disk
drive (HDD) activity LED on the front panel should be blinking. Is the EDVR functioning as
described?
Yes:
Shut down the unit and continue to install alarms and other accessories, as needed. Refer to
the EDVR Installation and Operation Guide for details.
No:
If the EDVR did not power up, reset it using the power/reset switch, described in step 2 of
section C (“Power Up and Test”).
Look at the main monitor to see if the unit restarts. If there are no indications on the monitor,
insert a tool into the power/reset switch again and press quickly to shut down the unit. Then
check the following:
• Connections
• Termination Settings
• Monitor(s)
• Cables, Cords, and Other connectors
• Cameras
If you have checked all of these items and the EDVR still fails to power up, or if you restarted
the EDVR and it still fails to operate properly, please contact American Dynamics Technical
Support.
8200-0841-00 A0
3
EDVR Quick Setup Guide
F. (Optional) Install EDVR Client Software
To remotely view and manage one or more EDVRs from a PC, install the included EDVR Client
Software.
Note
Both the EDVR and the PC must be physically connected to the same network (LAN).
1 Insert the enclosed CD in the CD-ROM drive of the PC from which you wish to remotely
monitor one or more EDVRs. The software installation automatically starts.
2 Follow the on-screen instructions. The default username is admin and the default password is
9999.
3 Refer to the Installation and Operation Guide (on the included CD) for step-by-step installation
and configuration instructions and an overview of the features.
Also refer to the Installation and Operation Guide for details about using a Web browser to
remotely view one or more EDVRs.
G. Connecting a SpeedDome Ultra or Optima to EDVR
1 Connect the hardware. Refer to the following diagram:
BNC Video
EDVR
RS 485 D+
D4800 Baud
Terminal Block
RS 422 RX+
RXDOME
2 To configure the COM port, press the MENU button. Select Advanced Settings >
Communication > RS485 Settings using the arrow buttons or jog dial and pressing the ENTER
button. Set the Baud Rate (for example 4800 for AD SpeedDome Ultra or Optima) using the
shuttle ring. Keep pressing the MENU button to return to the Main Menu.
3 To configure dome settings, press the MENU button. Select Advanced Settings > Dome
Settings using the arrow buttons or jog dial and pressing the ENTER button. Highlight the
appropriate camera, set the ID (integer 1-254) and select the protocol suitable for the dome
using the shuttle ring (for example: AD422 for AD SpeedDome Ultra or Optima). Keep pressing
the MENU button to return to the Main Menu.
4
EDVR Quick Setup Guide
EDVR Quick Setup Guide
H. Connecting ADTT16E to EDVR
1 Connect the hardware. Refer to the following diagram:
BNC Video
EDVR
Sensornet
RS232
9600 Baud
EIM
DOME
Power
RS232 over
Cat 5 Cable
Set Configure Deivces to
MUX 16 Duplex/Triplex
Note: Do not use MUX 16 posem
2 Configure the Touch Tracker (Config Devices). Set Configure Devices to MUX 16 Duplex or
Triplex.
Note
Do not use MUX 16 posem.
3 To configure the COM port, press the MENU button. Select Advanced Settings >
Communication > RS232 Settings using the arrow buttons or jog dial and pressing the ENTER
button. Set Baud Rate to 9600 using the shuttle ring and then press the ENTER button. Keep
pressing the MENU button to return to the Main Menu.
4 To configure dome settings, press the MENU button. Select > Advanced Settings > Dome
Settings using the arrow buttons or jog dial and pressing the ENTER button.. Highlight the
camera, set the ID (integer 1-254) using the shuttle ring. Move to the protocol column and
select the protocol using the shuttle ring. Press the ENTER button (AD422 only). Keep
pressing the MENU button to return to the Main Menu.
8200-0841-00 A0
5
EDVR Menu Map
Quick Settings
1. Time Setting
2. Date Setting
3. Title Settings
4. Normal Record Rate
5. Record Quality
6. Disk Full
Title Setting
Individual
Channel-based
Settings
Sequence Settings
1. 1- Channel Display
1.
2.
3.
4.
5.
6.
7.
8.
9.
Display Options
Time Mode
Time Setting
Date Mode
Date Setting
Time Zone
Title Settings
Main Monitor Display
Call Monitor Display
Daylight Saving Setting
1.
2.
3.
4.
Picture Adjust
H Position
V Position
Live Picture
Color Bar Pattern
Main Monitor Display
1. Time Display
2. Time Display Color
3. Date Display
4. Date Display Color
5. Time/Date Location
6. Title Display
7. Title Display Color
10. 13- Channel Display
Call Monitor
Full Screen Display
Main Menu
1. Quick Settings
2. Display Options
3. Sequence Settings
4. Picture Adjust
5. Operation Log
6. Advanced Settings
7. Default Settings
8. Password Settings
9. Exit Menu
Call Monitor Display
1. Time Display
2. Date Display
3. Time/Date Location
4. Title Display
Contents of Log
Advanced Settings
Enter: select
ST: item
Call +WX: English,
Francais, Espanol,
Italiano, Deutsch
Default Settings
1. Save Installer Settings
2. Load Installer Settings
3. Save SD Card Settings
4. Load SD Card Settings
5. Load Factory Settings
6. Version Information
1.
2.
3.
4.
Password Settings
Menu Password
Advanced Settings Password
Default Settings Password
Reformat Password
Exit Menu
1. Exit Menu with Saving
2. Exit Menu Without Saving
6
EDVR Quick Setup Guide
1.
2.
3.
4.
5.
6.
7.
8.
9.
Alarm Settings
Alarm Duration
Disk Full Alert
Pre-Alarm
Alarm Record Rate
Alarm Record Mode
Alarm Record Quality
Sensor Type
Alarm Input Link
Alarm Out Link
1.
2.
3.
4.
Record Settings
Record Quality
Normal Record Rate
Audio Sampling Rate
Audio Channel Mode
Motion Settings
Individual Channel-based Settings
1. Sensitivity
2. Target Zone
3. Track Detect
4. Duration
5. Size
Advanced Settings
1.
2.
3.
4.
5.
6.
7.
8.
9.
Camera Covert
Individual Channel-based Settings
Alarm Settings
Record Settings
Motion Settings
Camera Covert
Operation Locks
Communication
Disk Setup
Schedule Settings
Dome Settings
1.
2.
3.
4.
5.
Operation Locks
Front Key > Front Button
RS-232 Lock
Playback Lock
Record Key Lock
Network Lock
Communication
1. RS-232 Settings
2. RS-485 Settings
3. Net Settings
Enter: select
ST: item
1.
2.
3.
4.
5.
6.
Disk Setup
Disk Full
Days to Keep Data on HDD
HDD1 Reformat
HDD2 Reformat
CD Reformat
SD Card Reformat
Net Settings
1. DHCP
2. IP Address
3. Subnet Mask
4. Gateway:
5. DNS Address
6. HTTP Port
7. Device Name
8. Live Resolution
9. User Settings
10. DDNS Settings
HD1 Model: WDC WDXXXX
HD2 Model:
CD Model: LITE-ON CD-RWXXXX
Schedule Settings
Schedule 1…
Schedule 8
Schedule Settings
1. Date
2. Start Time
3. End Time
4. Start Record
5. Alarm Settings
6. Record Settings
7. Motion Settings
Dome Settings
Individual Channel-based Settings
8200-0841-00 A0
7
Settings
Record Only Alarmed Cameras
Alarm Settings
Main Menu > Advanced Settings > Alarm Settings
> Alarm Record Mode. On each desired camera
set mode value to Exclusive.
Alarm Buzzer On/Off
The Alarm trigger must also be turned on (see item
below).
Main Menu > Advanced Settings > Alarm Settings
> Alarm Out Link. Highlight Buzzer and then set
Sensor, V-Loss or Motion column to Yes or No.
Alarm Duration
Main Menu > Advanced Settings > Alarm Settings
> Alarm Duration, 0 (Transparent) -60 sec, 1-60
min or Nonstop (latch)
Alarm Input/Output Link
Main Menu > Advanced Settings > Alarm Settings
> Alarm Input Link/Alarm Output Link
Alarm Sensitivity Setting
Trigger Alarm on Sensor, V-Loss or Motion
Input
Main Menu > Advanced Settings > Alarm Settings
> Alarm Input Link. Highlight a channel and set the
value for Sensor, V-Loss and Motion to On.
The alarmed duration is determined by “Alarm
Duration” above.
Trigger Recording on Sensor or Motion Alarm
Main Menu > Advanced Settings > Alarm Settings
> Alarm Out Link > Start Record. Highlight the Sensor or Motion column and set value to Yes.
The Alarm trigger must also be turned on.
Main Menu > Advanced Settings > Alarm Settings
> Sensor Type. Set Sensitivity.
Communication Settings
Alarm Settings
Main Menu > Advanced Settings > Alarm Settings.
Set Alarm Duration, Alarm Record Rate, Alarm
Record Mode and Alarm Record Quality.
Com Port Baud Rate
Main Menu > Advanced Settings > Communication
> RS-232 Settings/RS-485 Settings > Baud Rate
Disk Full Alert Setting
Main Menu > Advanced Settings > Alarm Settings.
> Disk Full Alert. Set value to On or Off.
DHCP Turn On/Off
Main Menu > Advanced Settings > Communication
> Net Settings > DHCP. Set value to On or Off
Motion Detection Setting
Main Menu > Advanced Settings > Motion
Settings. Highlight a channel, hit Enter to set Sensitivity, Target Zone, Track Detect, Duration and
Size of Target (default is the whole view).
View IP Address
While in Live or Playback video mode press the
DISPLAY button three times to bring up the Ethernet screen to see the EDVR’s IP Address.
Pre-Alarm Setting
Main Menu > Advanced Settings > Alarm Settings
> Pre-Alarm. Set value to On or Off.
8
EDVR Quick Setup Guide
Date/Time Settings
General
Date/Time Settings
Access Protection
Quick: Main Menu > Quick Settings > Time, Date.
Detail: Main Menu > Display Options > Time Mode,
Time Setting, Date Mode, Date Setting
Main Menu > Advanced Settings > Operation Lock
> Highlight Front Button Lock, RS-232 Lock,
Playback Lock, Record Button Lock or Network
Lock and set value to On or Off.
Daylight Saving Setting
Main Menu > Display Options > Daylight Saving
Setting. Select Country.
Audio Settings
Main Menu > Advanced Settings > Record Settings
> Audio Sampling Rate/Audio Channel Mode
Time Zone Setting
Data Lifetime
Main Menu > Display Options > Time Zone
Main Menu > Advanced Settings > Disk Setup >
Days to Keep Data On HDD
Display Settings
View Operation Log
Main Menu > Operation Log
Channel Name Settings
Main Menu > Quick Settings > Title Settings
Playback
Device Name Setting
Main Menu > Advanced Settings > Communication
> Net Settings > Device Name
Forward/reverse: Shuttle ring, turn right/left.
Slow forward/reverse: Pause then use the shuttle
ring.
Picture-by-picture: Press Pause and again to
display forward one frame at a time. Use the
shuttle ring for moving in both directions
Monitor Settings, Main/Call
Main Menu > Display Options > Main Monitor
Display/Call Monitor Display. Set Time Display and
Title Display.
Record Settings
Main Menu > Advanced Settings > Record Settings
> Record Quality/Normal Record Rate
Sequencing on Call monitor
Main Menu > Sequencing Settings. Select option
11 Full Screen Display and set camera dwell time
Sequencing on Main Monitor
Recording Start/Stop
Start: Press REC button briefly
Stop: Press REC button for 3 seconds until it beeps
Save Clips
Main Menu > Sequencing Settings. Select one of
the 10 display options and set camera dwell time
on selected pane.
During display of a single camera, Pause > Menu
to bring up the Save Menu > Select media (SD
Card or CD) and format (JPEG or AVI). JPEG is
protected by digital signature. Starting FW v1.50
AVI is also protected.
8200-0841-00 A0
9
PTZ Cameras and Touch Tracker
Search
Control EDVR from an ADTT16e
CD Search
Button A: Menu mode
Button B: Play mode
Button C: Freeze live video
Button D: End Menu/Play
Track Ball: Navigate through the menus
Up/Down to select
Right/Left to activate
Search > CD
Search Filter
Search > Search Filter > Alarm Filter, Date Filter or
Time Filter
Search List
Direct PTZ Camera Control from the Front
Panel
Up, Down, Left, Right: PAN/TILT
Shuttle: Zoom
Menu/Enter: Focus
Seq/Search: Iris
Call: Goto Preset
Freeze: Set Preset
Display: Show hint
Search > Full List
Thumbnail Search
Search > Thumbnail
Use Left and Right to select target date/time and
slot and Up and Down to drill down
SD Card Search
Search > SD Card
Schedule Settings
System
Schedule Settings
Main Menu > Advanced Settings > Schedule.
Highlight a schedule and move to the Enter
column. Press ENTER button to bring up the
Schedule Settings Screen.
Drive Reformat
Main Menu > Advanced Settings > Disk Setup >
Reformat HDD, CD, or SD Card
Schedule Alarm Settings
Firmware Update
Continue from item Schedule Settings; On the
Schedule Settings screen highlight Alarm Settings
and set value to Enable. Further highlight the
Alarm Settings, Enter column and press the
ENTER button to bring up the Schedule Alarm
Settings screen.
Copy the Update.bin file into DVRVIDEO folder in
the SD Card. Insert the card into the SD slot on
machine which can be either on or off, and hold the
power/reset switch for at least 3 seconds to reboot.
Hold the button until FW upload is started as indicated by the change in Load Size on screen.
Schedule Enable/Disable
Load Factory Settings from SD Card
Main Menu > Advanced Settings > Schedule.
Highlight a schedule and set to Enable or Disable.
Main Menu > Default Settings > Load Factory
Settings
Load System Settings from SD Card
Main Menu > Default Settings > Load SD Card
Settings
10
EDVR Quick Setup Guide
NTSC/PAL Toggle
Notes:
Hold Up and Pause buttons for a least 3 seconds
then follow the on-screen instructions.
-------------------------------------------------------------------------------------------------------------------------------------
Save System Settings to SD Card
Main Menu > Default Settings > Save SD Card
Settings
-------------------------------------------------------------------------------------------------------------------------------------------------------------------------------------------------------
Set Password Protection With 4 Different
Passwords
Main Menu > Password Settings > Menu
Password, Advanced Settings Password, Default
Settings Password or Reformat Password (4-digit
alphanumeric password)
Transfer System Settings From One Machine to
Another
Save system setting to SD card from one machine
and then use the same SD card to load system
settings into another machine.
-------------------------------------------------------------------------------------------------------------------------------------------------------------------------------------------------------------------------------------------------------------------------------------------------------------------------------------------------------------------------------------------------------------------------------------------------------------------------------
View Drive Status
-------------------------------------------------------------------
While in Live or Playback video mode press the
DISPLAY button once to bring up the Drive Status
screen. After viewing, press three more times to
exit.
-------------------------------------------------------------------------------------------------------------------------------------------------------------------------------------------------------
Language Selection
While in the Main Menu press the CALL button.
Use the left or right arrow button to change
languages.
-------------------------------------------------------------------------------------------------------------------------------------------------------------------------------------------------------------------------------------------------------------------------------------------------------------------------------------------------------------------------------------------------------------------------------------------------------------------------------------------------------------------------------------------------------------------------------------------------------------------------------------------------------------------------------------
8200-0841-00 A0
11