1
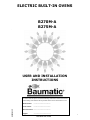
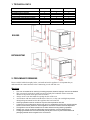
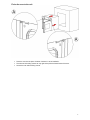
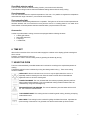
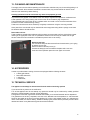
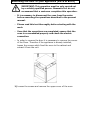
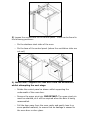
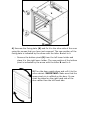
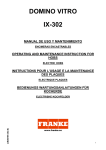
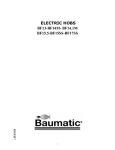
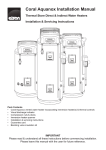
B270M-A/B275M-A 60cm Large capacity multifunction oven 1 ELECTRIC BUILT-IN OVENS B270M-A B275M-A . USER AND INSTALLATION INSTRUCTIONS LIB30112 For future reference please record the following information which can be found on the Rating Plate and the date of purchase which can be found in the invoice: Model Number ………………………………. Serial Number ………………………………. Date of Purchase ………………………………. Supplier ………………………………. DD MOD 20/12/06 1 1. TECHNICAL DATA MODELS Rating voltage Fun heating element (2300W) Lower heating element (1000W) Traditional upper heating element (900W) Traditional grill heating element (1900W) Current Maximum power Dimensions B260SS B270M B275M 230-240V ● ● ● ● 16 A 2800 W 596 x 596 x600 230-240V ● ● ● ● 16 A 2800 W 596 x 596 x600 230-240V ● ● ● ● 16 A 2800 W 596 x 596 x600 B260SS B270M-B275M 2. PRELIMINARY REMARKS Please read this booklet thoroughly before you install and use this appliance. It is important that you understand all the control functions before commencing to cook with this oven. Warnings • • • • • • • • • This oven is intended to be used only for baking purposes, therefore improper uses are not admitted. This oven must be used only by adult persons in good physical conditions. Please ensure that children are kept under close supervision at all times. Always use the oven door handle for opening the door of the oven. Avoid contact with inner surfaces and the door of the oven , as they can reach high temperatures during baking and remain hot also after appliance has been turned off. Cleaning operations must be carried out only when the temperatures are cold. In the event of any malfunctions with the oven and if no explanations are found in the fault analysis section of this manual, please turn off the appliance and call the customer services department. The appliance must be disconnected from the mains before executing cleaning operations. Repairs may only be carried out by Baumatic service engineers or their authorized agent. Packaging materials used are environmentally friendly and can be recycled. Please discard all packaging material with due regard for the environment. 2 • • Cleaning of the oven should be carried out on a regular basis. Keep this instruction manual safe for persons not familiar with the operation. 3. DECLARATION OF CONFORMITY In the parts destined to come into contact with foodstuffs, this appliance is in accordance with the requirements of the EC directive 89/109 transposed in the Italian Legislative Decree N° 108 of 25/01/92. CE Appliance conforming to the European directives 89/336/EEC, 93/68/EEC, 73/23/EEC and subsequent revisions. The manufacturer declares that the oven is built using certified materials and requires the appliance to be installed in accordance with the standards currently in force. This appliance must be used by trained person for domestic purposes only. This appliance is marked according to the European directive 20002/96/EC on waste Electrical and electronic Equipment (WEEE). This guideline is the frame of a europeanwide validity of return and recycling on Waste electrical and electronic Equipment 4. INSTALLATION The installation must be carried out by qualified personnel according to: • • Safety standards in force. Local electricity supply company advises. Electric connections • • • • • • • Check the details given on the rating plate situated on the oven making sure that the rated mains voltage and power available are suitable for its operation. The data plate is placed on the bottom of the control panel. Before making the electric connections, check the efficiency of the earthing system. Earthing of the oven is compulsory by law. The manufacturer will accept no liability for any personal injury or damage to property deriving from failure to comply with this requirement. For models without a plug, fit a standard plug capable of withstanding the specified load on the power cord. The cord’s earthing conductor is colored yellow and green. The plug must be accessible. This appliance should be wired into a suitably rated double pole switch with 3mm contact gap and placed in an easily accessible position adjacent to the appliance. To connect the oven power cord, loosen and remove the cover on the terminal block in order to access the contacts inside. Make the connection, blocking the cord in place with the cable clamp provided and then close the terminal block cover again immediately. If you have to change the cord, the earthing (yellow / green) conductor must always be 10 mm longer than the line conductors. If damaged, the cable must be replaced with one supplied by the technical assistance service. 3 Fixing the oven to the unit • • • Place the oven into the piece of kitchen furniture it is to be installed in. The holes of the holding screws are: top right and top left the frontal frame of the oven. Secure the oven with the fixing screws. 4 5. OVEN DESCRITPION Command button B260SS CONTROL PANEL B270M-B275M CONTROL PANEL DISPLAY DETAIL 1) 2) 3) 4) 5) 6) 7) 8) 9) 10) 11) 12) 13) 14) Oven function selector knob - set the oven operating mode depending on the type of cooking required. Oven tension light - displays that a function has been selected. Timer display. Timer Minute minder button – set the minute minder function. Timer “Duration” button – set the duration function. Timer “End of cooking” button – set the end of cooking button. Timer “Manual function” button – set the oven cooking mode without timer. Timer Minus regulating button – decrease the value showed into the display. Timer Plus Regulating button – increase the value showed into the display. Oven operating light - displays that the heating elements are in operation. Thermostat control knob “Auto” function symbol – displays that a timer operation has been selected Bell symbol – displays that the minute minder has been selected Heating symbol– displays that a time has been set 5 Oven Mode selector switch The oven switch selects the desired cooking function. (turn the knob anti-clockwise). The available cooking functions combine the different heating element with the cavity cooling. Oven thermostat The oven thermostat sets the required temperature of the oven. It is possible to regulate the temperature value within the range of 50-250°C. (turn the knob anti-clockwise). Oven operating light It informs that the oven heating elements are in operation. The light turns off as soon as the temperature set has been reached, and it is turned back on every time the oven is in a heating phase. It is a useful aid to check that the correct temperature has been reached before you place a dish in the oven. Accessories In order to provide a better cooking, the ovens are equipped with the following elements: • 2 Safety grill shelves; • Removable side racks; • 2 drip trays; • 1 handle trivet; 6. TIME SET After the first connection of the oven to the mains supply the numbers on the display (3) flash meaning that time is not set. Press the “manual function” button (7). Set the time in order to use the cooking mode, by pressing the buttons (8) and (9). 7. USING THE OVEN The oven is thermostatically controlled between 50°C and 250°C according to the required temperature of cooking. The desired cooking function is selected by turning the relating switch knob (1). There are 9 cooking functions available OVEN LIGHT: When this function is set, it turns on only the light inside of the oven. It is especially useful for cleaning the oven when the same is turned off as it illuminates the appliance interior to aid in the cleaning task CONVECTION MODE: The oven is heated both from above (top heating element) and from below (bottom heating element). This is the traditional cooking mode that allows food to be cooked evenly, using one rack height only. FAN ASSISTED BOTTOM HEATING: The oven is heated only from the below with the aid of fan. This is suited for delicate dishes. TOP ELEMENT MODE: This cooking function is suited for gentle cooking, browning or keeping cooked dishes warm GRILL MODE: This cooking function is suited for grilling the dishes from above. It provides the quick browning of the surface. The grill mode can also be used to toast up slices of bread. 6 FAN ASSISTED FULL GRILL MODE: The top heating element and the grill are turned on along with the fan. This combination increases the heating through forced circulation of the air throughout the oven. This helps prevent foods on burning on the surface, allowing the heat to penetrate into it FAN ASSISTED CONVECTION MODE: The top and bottom heating elements are turned on, as well as the fan inside the oven. Compared with the “convection mode”, an even more even distribution of heat is obtained thanks to the fan, and 2 different racks heights can be used at the same time FAN OVEN MODE: The circular heating element and the fan are turned on. The constant even heat cooks and browns food uniformly over its entire surface. With this mode, you can also cook various dishes at the same time, as long as their respective cooking temperatures are the same. It is ideal for baking cakes and pastries in general. DEFROST MODE: Only the fan is working. In this mode the air circulated by the motor action throughout the interior of the oven affects the food and speeds up the natural thawing process. Warnings o o o Keep the oven door closed when using the grill modes Do not use aluminium foil to cover the grill pan or heat items wrapped in aluminium foil under the grill – the high reflectivity of the foil can damage the grill element. The grill heating element becomes extremely hot during operation; avoid touching it inadvertently when handling the food to be grilled. Helpful hints Before cooking, check that any unused accessories are removed from the oven. Pre heat the oven at cooking temperature before use. Place cooking trays in the centre of the oven and allow gaps when using more than one tray for air to circulate. Try to open the door as little as possible to wiew the dishes (the oven light remains on during cooking). Be careful when opening the door to avoid contact with hot parts and steam Cooking guidelines • • • During cooking, never place pans or cookware directly onto the bottom ov your oven. This should be placed on the shelves or the trays provided. Please refer to the information on food packaging for guidance on cooking temperatures and times. Once familiar with the performance of your appliance, temperatures and times can be varied to suit personal preferences. Make sure that frozen foods are thoroughly thawed before cooking, unless instructed otherwise. 7 SUGGESTED COOKING TABLE The following table contains an advise f how to set the oven. The cooking times are approximate and may vary according to personal taste. Selector knob setting Type of food Weight Rack height Preheating time Thermostat Cooking Knob time setting [°C] [min] Convection mode Pork Roast Beef Cod-Sea bream turbot Plain Bread Pies 1,5 1,5 1,0 1,0 1,0 3 2 2 2 2 10 10 9 9 10 180 190 180 175 180 120 70 40 30 40 Fan assisted Bottom heating Fruit cakes Cheese cake Cake 1,5 1,0 1,5 2 2 2 8 10 10 165 165 170 45 90 40 Grill mode Chicken Wings Sliced pork belly Roast potatoes Tomatoes au gratin Toast Chicken tights Spare ribs Sea-bream parcels Chicken Vegetables 1,0 1,0 0,5 0,4 0,5 1,0 0,5 0,3 1,5 1,0 3 3 3 2 3 3 3 2 3 3 7 7 7 7 5 10 14 8 14 14 200 200 200 210 200 200 220 190 220 210 25 25 25 20 5 25 40 20 35 15 Fan assisted convection Mode Oven-baked Rabbit Oven-baked crayfish Cod-Sea bream turbot Fruit cakes Savoury pies 1,0 0,5 2,0 1,5 2,0 2 3 2-4 2 2-4 9,5 10 7,5 9 9 190 200 150 175 180 55 30 25 30 40 Fan oven mode Lomb Flaky pastry Vegetable pies Dry cakes Trout parcels 1,2 1,0 1,0 0,5 0,3 2 1-4 3 2 3 10 8 7 7 9 180 190 180 180 195 45 30 55 25 15 [kg] Fan assisted grill mode 8. TIMER MODES Minute minder / alarm clock This function is available at all times, independent of the mode set, and can therefore be activated in any operating mode, including when the oven is switched off. The minute minder does not control any of the oven cooking functions. o Press the related button (4). The display (3) will show the value 00:00. Set the desired time with the +/- buttons (9) and (8). o As soon as the time is set, it will start the countdown for the minute minder and the bell symbol (13) will appear on the display. o If you have set a minute minder alarm, it can be modified accessing by pressing the the +/- buttons (9) and (8). o An alarm will sound when the minute minder time has elapsed – this can be stopped by pressing the related button (4). 8 Duration (hrs/min) Set the oven to the required temperature. The Heating symbol (14) will illuminate. Once selected the operating mode via the selector knob (1), it is possible to set the duration of cooking time. o o o o o Press the Duration mode button (5). The display (3) will show the value 00:00. Set the desired time for the duration of cooking with the +/- buttons (9) and (8). As soon as the time is set, it will start the countdown and the word AUTO (12) will appear in the display. It can be modified accessing by pressing the the +/- buttons (9) and (8). When the set time has elapsed the oven will switch off and an alarm will be heard, the word AUTO (12) will flash and the Heating symbol (14) will disappear. The alarm can be stopped by pressing the Duration mode button (5).Touching the Manual Button (7) the memory of the timer will be erased and the word Auto will disappear As the oven is now set for manual operation, ensure that the oven controls are in the OFF position. End of operating period Set the oven to the required temperature. The Heating symbol (14) will illuminate. Once selected the operating mode via the selector knob (1), it is possible to set the end of operating period. o o o o o Press the “End of cooking” mode button (6). The display (3) will show the value 00:00. Set the desired time of end of cooking with the +/- buttons (9) and (8). The clock will calculate the running time and show it in the display. The Heating symbol (14) will illuminate. As soon as the time is set, it will start the countdown and the word AUTO (12) will appear in the display. It can be modified accessing by pressing the the +/buttons (9) and (8). When the time of day equals the cooking end time, the oven will switch off. An alarm will be heard, the word AUTO (12) will flash and the Heating symbol (14) will disappear. The alarm can be stopped by pressing the “End of cooking” mode button (6).Touching the Manual Button (7) the memory of the timer will be erased and the word Auto will disappear As the oven is now set for manual operation, ensure that the oven controls are in the OFF position Delayed start time Set the oven to the required temperature. The Heating symbol (14) will illuminate. Once selected the operating mode via the selector knob (1), it is possible to set the pre selected operating period. This function is obtained using both the “duration” and “end of cooking” modes o o o o o o o Press the Duration mode button (5). The display (3) will show the value 00:00. Set the desired time for the duration of cooking with the +/- buttons (9) and (8). The word AUTO (12) will appear in the display. Press the “End of cooking” mode button (6). The display (3) will show the value 00:00. Set the desired time of end of cooking with the +/- buttons (9) and (8). The clock will calculate the running time and show it in the display. Based on the difference between the set end of cooking period and the set duration, the oven will turn on at the time chosen and the heating symbol(14) will illuminate on the display. When the time of day equals the cooking end time, the oven will switch off. An alarm will be heard, the word AUTO (12) will flash and the Heating symbol (14) will disappear. The alarm can be stopped by pressing either the “End of cooking” mode button (5) or the Duration mode button (6) .Touching the Manual Button (7) the memory of the timer will be erased and the word Auto will disappear As the oven is now set for manual operation, ensure that the oven controls are in the OFF position Notes If a setting is made, this will be indicated by an audible signal and the word AUTO (12) will flash. This requires to cancel the time setting Touching the Manual Button (7) The audible signal that is emitted at the end of a timer program will continue for seven minutes unless Touching the Manual Button (7). At the end of this seven minutes, the word AUTO (12) will continue to flash until cancelled The audible signal has three pitch settings, low, medium and high. To adjust the pitch, ensure the timer is in manual mode, then press and hold the ? button to hear the selected pitch. Releasing the ? button, then pressing again and holding will select another pitch 9 13. CLEANING AND MAINTENANCE Thoroughly clean the oven before operating it for the first time and after every use, thus avoiding baking in of residual food stuffs. After residues have baked in several times, they are then difficult to remove. Never clean the oven surfaces by steam cleaning. Cleaning operations must be carried out only when the equipment get cold. Any stains that may appear on the bottom of the oven always originate from splashes or overflowed food. These splashes occur during cooking and are due to the use of excessively high temperature. The overflowed food is due to the use of a cookware which is to small or to an erroneous evaluation of the increase in volume of the dish during cooking. These two inconveniences can be averted by using deep cookware or using the oven tray provided. Outer parts of the oven should only be cleaned with warm soapy water using either a sponge or soft cloth. No abrasive cleaners should be used. Removable roof liner These models are supplied with traditional grill it has been set a removable roof liner which allows a better cleaning of the upper part of the oven. It is possible to extract it from the cavity as it slides over the grill element. When this liner is cleaned it is advisable to place it back on its housing. Replacing the lamp The oven must always be disconnected from the mains when you’re going to replace an oven part. With a tool remove the lamp cover (A) Unscrew the lamp (B) from the holder and replace with a new one. At the end of this operation place the cover again on its centre. 14. ACCESSORIES In order to provide a better cooking, the ovens are equipped with the following elements: • 2 Safety grill shelves; • Removable side racks; • 1 drip trays; • 1 handle trivet; 15. TECHNICAL SERVICE The appliance must always be disconnected from the mains when being repaired. If you cannot find any reason for the malfunction: Turn off the appliance and do not attempt any repairs this should only be conducted by suitably qualified personnel. Call the Baumatic customer service department. The appliance comes with a guarantee certificate that entitles you to use the Baumatic service department. The guarantee must be duly completed, and sent to the Baumatic service department, a valid document issued by the retailer at the time of purchase (delivery bill, invoice, cash register receipt, etc.) indicating the name of the retailer, the date of delivery, details for identifying the product and the purchase price should be retained and shown to any Baumatic engineer should the need arise. 10 Reversing the door of your appliance (B270 & B275) IMPORTANT: This operation must be only carried out by a suitably qualified person. Baumatic Ltd. do not recommend that a customer completes this operation. o It is necessary to disconnect the oven from the mains before executing the operations described in the present manual. o Please read this text thoroughly before starting with the work. o Once that the operations are completed, ensure that the oven is re-assembled properly and check the electric connection. o In order to reverse the door it is necessary to remove the covers of the Oven. Therefore if the appliance is already installed, loosen the screws which fixed the oven to the cabinet and extract it from the unit. 1) Loosen the screws and remove the upper cover of the oven 2) Loosen the screws that fix the control panel. These can be found in the following positions:o On the stainless steel sides of the oven. o On the base of the control panel (where the ventilation slots are cut out). 3) IMPORTANT: Support the oven door from the underneath whilst attempting the next stage. o Rotate the control panel as shown whilst supporting the underneath of the oven door. o Remove the upper pivot pin. IMPORTANT: The upper pivot pin must be retained, as it will be required when the door is being reassembled. o Pull the door away from the oven cavity and gently lean it on some padded material, to ensure that no damage is caused to the oven door or door glass. 4) Unscrew the fixing plate (A) and fix it to the other side of the oven using the screws that you have just removed. The new position of the fixing plate is indicated by the arrow with the letter A next to it. o Remove the bottom pivot (B) from the left lower holder and place it in the right lower holder. The new position of the bottom pivot is indicated by the arrow with the letter B next to it. 5) Turn the door upside down and refit it to the oven cabinet. IMPORTANT: Make sure that the upper pivot pin is refitted on the door. It now must be placed on the right hand side of the door rather than the left hand side. IMPORTANT: When the above steps have been followed, it is necessary to reassemble all of the components. o You should pay particular attention to the wiring, it is important to make sure that no wiring has been damaged during the door reversal operation. o You should ensure that all the electrical components and the oven programmer work correctly before refitting the upper cove r of the oven. Baumatic Ltd. Conditions of guarantee Dear Customer, Your new Baumatic appliance comes complete with a free 12 month guarantee covering both parts and labour costs resulting from defective materials or workmanship. Baumatic also gives you the opportunity to automatically extend the guarantee period for a further 12 months at no extra cost, giving an initial guarantee period of 24 months. The extended guarantee period applies to England, Scotland, Wales and Northern Ireland only. To qualify for your full 24 months guarantee you must register your appliance within 28 days of purchase to be covered under this guarantee. This can be done online via: www.baumatic.co.uk or through returning the guarantee card which can be found in each new Baumatic appliance. * In addition, your appliance is covered by a 5 year parts warranty. Baumatic Ltd will provide free of charge the parts required to repair the appliance, only if they are fitted by a Baumatic engineer, for any defect that arises due to faulty materials or workmanship within a period of 5 years from the original purchase date. * An additional 1 to 3 year insurance scheme for labour is available should you wish to extend the warranty period. Should any person other than an authorised representative of Baumatic Ltd interfere with the appliance, the policy is negated and Baumatic Ltd will be under no further liability. The guarantee covers the appliance for normal domestic use only, unless otherwise stated. Any claims made under the terms of the guarantee must be supported by the original invoice/bill of sale issued at the time of purchase. This guarantee is transferable only with the written consent of Baumatic Ltd. If the appliance fails and is considered either not repairable or uneconomical to repair between 12 months (2 years if registered) and five years, a free of charge replacement will not be offered. The guarantee for any replacement will only be for the remainder of the guarantee on the original product purchased. The guarantee does not cover: - Sinks and taps - Failure to comply with the manufacturers instructions for use. - The replacement of cosmetic components of accessories - Accidental damage or wilful abuse. - Subsequent loss or damage owing to the failure of the appliance or electrical supply - Incorrect installation - Losses caused by Acts of God, civil war, failure to obtain spare parts, strikes or lockouts - Filters, fuses, light bulbs, external hoses, damage to bodywork, paintwork, plastic items, covers, baskets, trays, shelves, burner bases, burner caps, decals, corrosion, rubber seals. In the course of the work carried out it may be necessary to remove the appliance from it operating position. Whilst all reasonable care will be taken, Baumatic Ltd cannot accept responsibility for damage sustained to any property whatsoever in this process. This guarantee is in addition to and does not diminish your statutory or legal rights. Contacting Baumatic Ltd Sales Service Spares TEL: 0118 933 6900 TEL: 0118 933 6911 TEL: 0118 933 6922 FAX: 0118 931 0035 FAX: 0118 986 9124 FAX: 0118 933 6942 For ROI (Republic of Ireland), please contact one of the numbers below: TEL: 01 – 6266798 FAX: 01 - 6266634 Technical/Advice 0118 933 6933 0118 933 6942 Thanks you for buying Baumatic. * Applies to UK, Scotland, Wales & Northern Ireland only (Republic of Ireland has 1 year labour & 1 year parts warranty only) 2