1
Please read before using this equipment.
Owner’s Manual
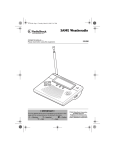
7 Channel SAME
Weatheradio
FCC DECLARATION
OF CONFORMITY
This device complies
with Part 15 of the
FCC Rules.
Operation is subject
to the following two
conditions: (1) this device may not
cause harmful interference, and (2)
this device must accept any
interference received, including
interference that may cause
undesired operation.
Product: 7 Channel SAME
Weatheradio
Model: 12-255
Responsible RadioShack
Party: 100 Throckmorton
Fort Worth, TX 76102
Phone: 817-415-3200
THE FCC WANTS YOU
TO KNOW
This Weatheradio complies with the
limits for a Class B digital device as
specified in Part 15 of FCC Rules.
These limits provide reasonable
protection against radio and TV
interference in a residential area.
However, your Weatheradio might
cause TV or radio interference even
when it is operating properly. To
eliminate interference, you can try
one or more of the following
corrective measures:
• reorient or relocate the receiving
antenna
• increase the distance between
the Weatheradio and the radio or
TV
• use outlets on different electrical
circuits for the Weatheradio and
the radio or TV
• consult your local RadioShack
store if the problem still exists.
Warning: Changes or modifications
to this unit not expressly approved by
the party responsible for compliance
could void the user’s authority to
operate the equipment.
© 2001, 2002 RadioShack Corporation.
All Rights Reserved.
RadioShack and RadioShack.com are trademarks used by RadioShack Corporation.
2
ˆ Contents
Introduction ...................................................................................................... 4
Weather Alerts ............................................................................................ 5
Locking Out Undefined Weather Descriptions .................................... 5
NWS Weather Alert Descriptions ........................................................ 6
Understanding the FIPS Codes .................................................................. 8
Obtaining Your Area’s FIPS Code(s) ................................................... 8
A Quick Look at Your Weatheradio ................................................................ 9
Preparation ....................................................................................................... 9
Connecting Power ...................................................................................... 9
Connecting the Weatheradio to AC Power ........................................ 10
Installing the Weatheradio’s Backup Battery ..................................... 10
Installing the Remote Sensor’s Batteries .......................................... 10
Setting the Clock ...................................................................................... 11
Choosing Locations .................................................................................. 11
Mounting the Remote Sensor ............................................................ 12
Programming the Weatheradio ................................................................. 12
Testing the Weatheradio ........................................................................... 14
Manually Testing the Alert Tone ........................................................ 15
Test or Demo Alerts ........................................................................... 15
Programming the Temperature Sensor .................................................... 15
Resetting Indoor/Outdoor .................................................................. 16
Setting °C/°F ..................................................................................... 16
Setting the Remote Channel ............................................................. 16
Viewing the Temperature Display ............................................................. 17
Operation ........................................................................................................ 17
Listening to a Weather Broadcast ............................................................ 17
Using the Alert Function ........................................................................... 17
Setting the Alert Volume .................................................................... 18
Changing/Checking the Alert Pattern ................................................ 18
Enabling/Disabling Alert Tones .......................................................... 19
Reviewing Overlapping Alerts ........................................................... 20
Troubleshooting ............................................................................................. 21
Care .......................................................................................................... 22
Specifications ................................................................................................ 23
Contents
3
ˆ Introduction
Your RadioShack 7 Channel SAME
Weatheradio represents the latest
generation of weather alert
technology. Your Weatheradio uses
SAME (Specific Area Message
Encoding) circuitry to provide
complete information about weather
conditions in your immediate area, so
you are not bothered by alerts that do
not affect you. Your Weatheradio
includes an indoor thermometer,
wireless outdoor thermometer and
digital clock.
SAME Operation — lets you
program up to 15 FIPS (Federal
Information Processing System)
codes into the Weatheradio’s
memory, so alerts only sound when a
weather emergency is declared in
those specific locations.
Missed Alert Reminder — sounds a
tone every 10 seconds while an alert
is active, to prevent you from missing
an alert.
Alert Status Indicators — help you
determine at a glance the type of alert
the Weatheradio is receiving.
Traditional weather radios simply
receive the National Oceanic and
Atmospheric Administration (NOAA)
weather broadcast (usually within a
50-mile radius), then sound an alarm
if any emergency code was
transmitted along with the broadcast.
4
This means that people outside an
affected area are often alerted even
though their area is not affected,
causing some to ignore weather
warnings that apply to their area.
In 1994, NOAA began broadcasting
signals called FIPS (Federal
Information Processing System)
codes along with their standard
weather broadcasts. These codes
identify the type of emergency and
the specific geographic area (such as
a county) affected by the emergency.
Your Weatheradio receives,
interprets, and displays information
about the codes, so you can
determine if the emergency might
affect your area. Only SAMEcompatible weather radios are able to
take advantage of this new
technology.
Each FIPS code identifies a specific
geographic area defined by the
National Weather Service (NWS), so
your Weatheradio sounds an alert
only when a weather emergency is
declared in that area. This helps you
more efficiently track the weather
conditions in and around your area.
Introduction
WEATHER ALERTS
When the Weatheradio receives a
weather alert:
• it sounds an alert (siren or beep)
• it displays a description of the
alert and the alert duration
• an indicator lights
Note: If the Weatheradio receives
more than one weather alert at the
same time, it displays information for
each alert in sequence.
The alert descriptions your
Weatheradio can display are based
on a list of specific weather alert
types published by the NWS. For a
list of all the alert descriptions that
your Weatheradio can display, see
“NWS Weather Alert Descriptions” on
Page 6.
Warning: The NWS uses
sophisticated weather models to
determine an alert’s effective time.
However, the end of an alert does not
necessarily mean that the related
weather emergency is over.
Locking Out Undefined
Weather Descriptions
those used by radio or TV stations).
Your Weatheradio’s memory does not
contain a specific, corresponding
description for the signals related to
these commercial weather types.
Additionally, your Weatheradio is
designed to recognize all common
weather alert types currently used by
the NWS. However, the NWS
occasionally creates and broadcasts
new alert types (for which the
Weatheradio’s memory does not
contain a specific, corresponding
description). If your Weatheradio
receives a signal for a new alert type,
it is preset (if the alert function is
turned on) to display 81.12:1 and the
alert description ((0(5*(1&<,
67$7(0(17, :$51,1*#or :$7&+) then
sound an alert siren.
Depending on your preference, you
can follow these steps to change the
way the Weatheradio responds to
new weather alert broadcasts.
1. Turn off the Weatheradio by
unplugging the AC adapter from
the AC outlet and disconnecting
the 9V battery.
2. Slide off the control panel cover
to the right of the display.
The NWS might occasionally
broadcast several types of weather
information intended for commercial
or other non-private use. This
information could include, for
example, message intended for
automated weather services (such as
3. While holding down WEATHER
for about 2 seconds, turn on the
Weatheradio by plugging the AC
adapter back into the AC outlet.
86(5#6(783#appears.
Introduction
5
4. Press MENU to reset all the
setting to default. '()$8/7 21
then 86(5#6(783 appears.
5. Turn off the Weatheradio.
NWS Weather Alert Descriptions
Your Weatheradio can display these NWS weather alert descriptions. For easy
reference, this list also shows the type of alert (siren or beep) that sounds during
each alert.
Weather/Alert Description
Avalanche Warning
Avalanche Watch
Blizzard Warning
Civil Danger Warning
Civil Danger Watch
Civil Emergency
Coastal Flood Warning
Coastal Flood Watch
Emergency Action Warning
Emergency Action Termination
Evacuate Immediately
Fire Warning
Flash Flood Statement
Flash Flood Warning
Flash Flood Watch
Flood Statement
Flood Warning
Flood Watch
Hazardous Material Warning
Hazardous Material Watch
High Wind Warning
High Wind Watch
Hurricane Statement
6
Display
$9$/$1&+(#:$51,1*
$9$/$1&+(#:$7&+
%/,==$5'#:$51,1*
&,9,/#'$1*(5#:$51,1*
&,9,/#'$1*(5#:$7&+
&,9,/#(0(5*(1&<
&2$67$/#)/22'#:$51,1*
&2$67$/#)/22'#:$7&+
(0(5*(1&<#$&7,21#:$51,1*
(0(5*(1&<#$&7,21#7(50,1$7,21
(9$&8$7(#,00(',$7(/<
),5(#:$51,1*
)/$6+#)/22'
)/$6+#)/22'#:$51,1*
)/$6+#)/22'#:$7&+
)/22'#67$7(0(17
)/22'#:$51,1*
)/22'#:$7&+
+$=$5'#0$7(5,$/#:$51,1*
+$=$5'#0$7(5,$/#:$7&+
+,*+#:,1'#:$51,1*
+,*+#:,1'#:$7&+
+855,&$1(#67$7(0(17
Introduction
Sound
Siren
Siren
Siren
Siren
Siren
Siren
Siren
Siren
Siren
Beep
Siren
Siren
Beep
Siren
Siren
Beep
Siren
Siren
Siren
Siren
Siren
Siren
Beep
Weather/Alert Description
Hurricane Warning
Hurricane Watch
Immediate Evacuation Warning
Law Enforcement Warning
Local Area Emergency
National Hazard Warning
National Information Center
National Periodic Test
Practice/Demo
Radiological Hazard Warning
Radiological Hazard Watch
Required Monthly Test
Required Weekly Test
Severe Thunderstorm Warning
Severe Thunderstorm Watch
Severe Weather Statement
Shelter In-Place Warning
Special Marine Warning
Special Weather Statement
Tornado Warning
Tornado Watch
Tsunami Warning
Tsunami Watch
Volcano Warning
Volcano Watch
Winter Storm Warning
Winter Storm Watch
Unrecognizable PIL ending with S
Unrecognizable PIL ending with E
Unrecognizable PIL ending with A
Unrecognizable PIL ending with W
Display
+855,&$1(#:$51,1*
+855,&$1(#:$7&+
,00(',$7(#(9$&8$7,21#:$51,1*
/$:#(1)25&(0(17#:$51,1*
/2&$/#$5($#(0(5*(1&<
1$7,21$/#+$=$5'#:$51,1*
1$7,21$/#,1)250$7,21#&(17(5
1$7,21$/#3(5,2',(67
'(02#0(66$*(
5$',2/2*,&$/#+$=$5'#:$51,1*
5$',2/2*,&$/#+$=$5'#:$7&+
0217+/<#7(67
:((./<#7(67
6(9(5(#7+81'(567250#:$51,1*
6(9(5(#7+81'(567250#:$7&+
6(9(5(#:($7+(5#67$7(0(17
6+(/7(5#,103/$&(#:$51,1*
63(&,$/#0$5,1(#:$51,1*
63(&,$/#:($7+(5#67$7(0(17
7251$'2#:$51,1*
7251$'2#:$7&+
7681$0,#:$51,1*
7681$0,#:$7&+
92/&$12#:$51,1*
92/&$12#:$7&+
:,17(5#67250#:$51,1*
:,17(5#67250#:$7&+
81.12:1#67$7(0(17
81.12:1#(0(5*(1&<
81.12:1#:$7&+
81.12:1#:$51,1*
Introduction
Sound
Siren
Siren
Siren
Siren
Siren
Siren
Siren
Beep
None
Siren
Siren
Beep
Beep
Siren
Siren
Beep
Siren
Siren
Beep
Siren
Siren
Siren
Siren
Siren
Siren
Siren
Siren
Siren
Siren
Siren
Siren
7
Note: If the Weatheradio displays a
warning (emergency) alert message,
the WARNING indicator lights. If the
Weatheradio displays a Watch alert
message, the WATCH indicator
lights. If the Weatheradio displays a
Statement alert message, the
STATEMENT indicator lights.
UNDERSTANDING THE
FIPS CODES
For the purpose of broadcasting
weather information, the NWS has
divided the United States into regions
by state and county (or parish, where
applicable) then assigned a 6-digit
FIPS code to identify each county or
parish. For example, the code for
Tarrant County, Texas, is 048439.
The first digit in a FIPS code identifies
the county subdivision, the next two
digits identify the state, and the last
three digits identify the county or
parish.
Note: Most FIPS codes begin with 0,
which means the code represents an
entire county. The NWS, however,
plans to eventually subdivide some
large counties. When that happens,
each subdivision will be assigned a
digit from 1–9, resulting in codes such
as 148439, 248439, and so on.
counties within that area, you can
program up to 15 FIPS codes into the
Weatheradio’s memory. This lets you
avoid hearing an alert that applies to
an area within a 50 mile radius but not
necessarily to your county or parish.
Obtaining Your Area’s FIPS
Code(s)
To obtain the necessary FIPS codes,
contact your local RadioShack store
or call the NWS toll free at 1-888NWR-SAME (1-888-697-7263).
You can also visit the NWS website:
www.nws.noaa.gov/nwr/
Note: If you are close to a county or
parish line, you might want to obtain
the codes for the nearby counties or
parishes.
Hint: Since you can program up to 15
FIPS codes into the Weatheradio’s
memory, you might want to obtain the
codes for other local areas that you
frequently travel through (as long as
those areas are within a 50 mile
radius of your location and within an
area covered by your local NWS
broadcast station). That way, you can
program those codes into the
Weatheradio and receive broadcasts
covering those locations, too.
Your Weatheradio can receive all
SAME alert signals broadcast within
about a 50 mile radius. To receive
SAME alerts and broadcasts about
weather occurring only in particular
8
Introduction
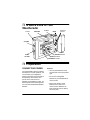
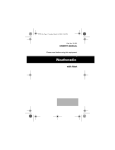
ˆ A Quick Look at Your
Weatheradio
Antenna
WEATHER
CLOCK
Directional
Controls
MENU
VOLUME
ALERT
ALERT
VOLUME
WARNING Indicator
WATCH Indicator
STATEMENT Indicator
ˆ Preparation
CONNECTING POWER
Your Weatheradio uses the supplied
AC adapter for normal operation, and
one 9V battery (not supplied) for
backup power when AC power fails or
is temporarily disconnected. The
remote sensor uses three AA
batteries (not supplied) for power. For
the best performance and longest life,
we recommend RadioShack alkaline
batteries.
Cautions:
• Use only fresh batteries of the
required size and recommended
type.
• Do not use rechargeable
batteries in your Weatheradio or
remote sensor.
• Never leave dead or weak
batteries in the radio or the
remote sensor. Batteries can
leak chemicals that can destroy
electronic parts.
A Quick Look at Your Weatheradio
9
• Dispose of batteries promptly
and properly; do not bury or burn
them.
compartment, then place the
battery inside the compartment.
3. Replace the cover.
Notes:
• Always connect the Weatheradio
to AC power for normal use.
• If the backup battery becomes
weak, your Weatheradio might
not sound a tone when an
emergency or test alert is
broadcast. Test your radio’s
reception periodically, and
replace the battery if the tone
does not sound.
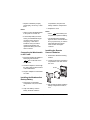
Connecting the Weatheradio
to AC Power
1. Insert the supplied AC adapter’s
barrel plug into the DC 9V
jack on the back of the
Weatheradio.
Notes:
• When
(indoor battery low
icon) flashes, replace the battery.
• The Weatheradio’s backlight
lights for about 10 seconds each
time you press a key, or until the
alert’s effective time expires
when an alert message is
received.
Installing the Remote
Sensor’s Batteries
1. Remove the attached mounting
bracket.
2. Loosen the screws on the battery
compartment cover and remove
the cover.
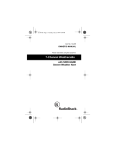
2. Route the adapter’s cord through
the strain relief slot at the bottom
of the Weatheradio.
CH 1 2 3
3. Plug the adapter into a standard
AC outlet.
Installing the Weatheradio’s
Backup Battery
1. Press down on the battery
compartment cover, then slide it
off.
2. Snap a 9V battery onto the
battery terminals inside the
10
3. Set the channel switch inside the
battery compartment to CH 1, 2,
or 3.
Preparation
5. Press >. $0 or 30 appears. Press
∧ or ∨ to select 7C or FC.
4. Install three AA batteries as
indicated by the polarity symbols
(+ and –) marked inside the
compartment.
6. Press >. A beep sounds.
5. Replace the cover and secure it
with the screws.
7. Press MENU to return to the clock
display.
Notes:
• At temperatures below –4 °F
(–20 °C), we suggest using
RadioShack lithium batteries in
the remote sensor.
• If
flashes in the remote
sensor information area of the
Weatheradio’s display, and the
battery indicator on the remote
sensor flashes twice in 30
seconds, replace the batteries.
• The remote sensor sends data to
the Weatheradio once when the
batteries are installed, and every
30 seconds after that.
SETTING THE CLOCK
1. Press MENU. When 7(03(5$785(
appears, repeatedly press ∧ or ∨#
until 6(7#&/2&. appears.
2. Press > to set the time. The hour
digits flash.
3. Repeatedly press (or hold down)
∧ or ∨ to set the hour.
4. Press >. The minute digits flash.
Repeatedly press (or hold down)
∧ or ∨ to set the minutes.
When there is no alert displayed, the
time continuously appears. When an
alert appears in the display, press
CLOCK to view the time for 10
seconds.
CHOOSING
LOCATIONS
Caution: Do not place the
Weatheradio or remote sensor where
they will be in direct sunlight, near
electrical appliances, or heating/air
conditioning vents.
You can set your Weatheradio on any
flat surface (such as a shelf or
counter top). For the best reception,
choose a location where:
• it can receive alert signals
• you can hear its alert tone (see
“Setting the Alert Volume” on
Page 18)
• you can fully extend the built-in
antenna
Note: Position the Weatheradio away
from obstructions such as metal
cabinets or bookshelves. Do not
place the Weatheradio near any
metal surface such as a refrigerator, a
Preparation
11
metal door or wall, or a water pipe
hidden behind a wall.
Choose a location for the remote
sensor that is within 20–30 yards of
the Weatheradio, either indoors or
outdoors. The construction of your
home or office might affect the
transmission range between the
Weatheradio and the remote sensor.
If you have a choice of several
locations, try each to see which
provides the best performance.
Note: The remote sensor is resistant
to water damage. However, it is not
waterproof and should not be
submerged in water or put directly in
front of shower spray.
Each time you install batteries in the
remote sensor, it sends data and its
indicator flashes once so you can
check its transmission range. See
“Setting the Remote Channel” on
Page 16.
Mounting the Remote
Sensor
You can mount the remote sensor on
a wall using two 1/8 inch (3 mm)
screws (not supplied) with heads that
fit into the keyhole slots on the back
of the supplied mounting bracket.
2. Align the keyhole slots on the
mounting bracket with the screws
and slide the bracket downward
to secure it.
3. Slide the remote sensor into the
mounting bracket.
PROGRAMMING THE
WEATHERADIO
While programming your
Weatheradio, you can select a
weather frequency, turn the Missed
Alert Reminder on or off, and specify
the geographical areas for which you
receive alerts.
Your Weatheradio is preprogrammed with the seven NOAA
broadcast frequencies (channels 1–
7). Depending on your location, you
might need to select a different
channel.
Your Weatheradio is preset to receive
any weather alert broadcast within its
reception range (about a 50 mile
radius in most locations). The first
time you use your Weatheradio, it
automatically scans the strongest
channel and receives all SAME alert
signals broadcast within a 50 mile
radius of its location.
Notes:
1. Drill two holes 13/4 inches apart.
Thread a screw into each hole
and let the heads extend
about 1/4 inch from the
mounting surface.
12
• The Weatheradio does not
receive alert signals while it is
being programmed.
Preparation
• If you do not press a key for 45
seconds, the Weatheradio stores
all valid entries and exits the
programming mode.
location, then select that
channel.
Automatic Channel Setup:
When 7KJE appears, press >.
9>7DD;B, I;7H9>?D=°ýappears.
• If you make an invalid entry, an
error tone sounds.
If there is an available channel,
• If you press MENU during
programming, the Weatheradio
stores all valid entries (except
the clock settings) and exits the
programming mode.
9>7DD;B N and 7L7?B78B; appear,
indicating the channel is saved in
memory. Then 7KJE appears and
the Weatheradio beeps.
If there is no available channel,
DEý9>7DD;B, 7L7?B78B;, 879AýJEý
and 9>7DD;BýN (the preset
channel) appear. Then 7KJE
During the programming sequence,
except where otherwise noted, press
< to return to the previous menu.
appears and the Weatheradio
beeps.
1. Connect the Weatheradio to AC
power.
Press < to exit. I;B;9Jý9>
reappears. Proceed to step 6.
2. Press MENU.
3. Repeatedly press ∧ or ∨ until
M;7J>;H7:?E appears.
Manual Channel Setup:
When C7DK7B appears, press >.
The preset channel appears.
Repeatedly press ∧ or ∨ until the
desired channel appears.
4. Press#>. I;B;9Jý9> appears.
5. Press > to enter channel setup.
Press ∧ or ∨ to select 7KJE or
C7DK7B channel setup.
Note: If you receive a NOAA
broadcast on more than one
channel, the one with the best
reception might not be the one
broadcasting information for your
location. Contact your local
RadioShack store or the NWS to
find out which frequency NOAA
is using to broadcast for
information regarding your
Press > to confirm your
selection. A beep sounds and 9>Bý
NýI;B;9J (the new selected
channel) appears. Then I;B;9Jý
9>ýreappears.
6. Repeatedly press ∧ or ∨ until
H;C?D:;H appears. Press > to
reset the Missed Alert Reminder
setting (on or off). H;C?D:;HýED or
H;C?D:;HýE<< appears.
Preparation
13
7. Press ∧ or ∨ to toggle between
H;C?D:;H ED (beep on) and
H;C?D:;HýE<< (beep off), then
press > to confirm. A beep
sounds and H;C?D:;H appears.
Note: If you enable the Missed
Alert Reminder beep, the tone
sounds every 10 seconds after
the broadcast ends until the alert
time expires.
8. Press ∧ or ∨ until H;IFEDI;ýBE9
appears, then press >. Press ∧
or ∨ to toggle between I?D=B;ý
BE9, CKBJ?FB;ýBE9 and 7BBý
BE97J?ED.
I?D=B; BE90 The Weatheradio
receives a SAME alert signal for
one FIPS code stored in the
radio’s memory location 1.
CKBJ?FB; BE90 The Weatheradio
receives SAME alert signals for
up to 15 FIPS codes stored in the
radio’s memory.
Note: When you choose
CKBJ?FB;ýBE9 or I?D=B;ýBE9, BE9'
&&&&&& appears.
7BB BE97J?ED0 The Weatheradio
receives all SAME alert signals
broadcast within about a 50-mile
radius.
Note: When 7BBýBE97J?ED
appears, press > to select ALL
LOCATION mode. Then skip to
Step 14.
14
9. If you selected CKBJ?FB;ýBE9,
press ∧ or ∨ to scroll through the
15 location codes.
10. Press > to edit a location code.
The first digit of the code flashes.
11. Press < or > to move the cursor
backwards or forwards, and ∧ or
∨ to select a digit.
Note: When you hold down < for
one second, all entries are
cleared and the cursor returns to
the first digit.
12. Press > to confirm the setting
(and move to the next location
code, if you selected CKBJ?FB;ý
BE9). A beep sounds.
13. Repeat Steps 9 – 12 (if you
selected CKBJ?FB;ýBE9)ýto enter
up to 15 FIPS codes in memory.
Press < to return to the previous
menu.
14. Press MENU. The Weatheradio
stores all valid entries and exits
programming.
TESTING THE
WEATHERADIO
In the United States, the NWS
broadcasts a test alert every week on
Wednesday between 11 AM and 1
PM. To find out the specific test
schedule in your area, contact your
local NOAA or NWS office. These
offices are usually listed in the
Preparation
Test or Demo Alerts
telephone book under “US
Government, Department of
Commerce.”
Important: Clear reception of a
weather broadcast signal does not
guarantee that an emergency alert
will trigger your Weatheradio’s alert
function. Be sure you choose the
proper location for the Weatheradio
and regularly check the Weatheradio
to be sure it is operating properly.
Manually Testing the Alert
Tone
1. Unplug the AC adapter from the
AC outlet and disconnect the 9V
battery.
2. Hold down WEATHER and turn on
the power by plugging the AC
adapter back into the AC outlet.
KI;HýI;JKF appears.
3. Press ∧ or ∨ to choose 8;;FýED
or I?H;DýED. The Weatheradio
sounds the corresponding alert
tone.
4. Press > to silence the tone.
5. Press MENU to clear the
Weatheradio’s memory and
restore the factory settings.
:;<7KBJýED appears, then KI;Hý
I;JKF appears.
6. Unplug the AC adapter to exit.
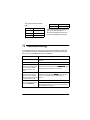
The NWS sends out daily and weekly
test signals you can use to confirm
that your Weatheradio is working
properly. To find out the specific test
schedule in your area, contact your
local NOAA or NWS office.
When the Weatheradio’s alert
function is turned on and the
Weatheradio receives a test
broadcast for a programmed FIPS
code, it responds in one of these
ways:
NWS Alert Type
Display
Alert
Demo Message
:;CEý
C;II7=;
None
Required Weekly
SAME test
M;;ABOýJ;IJ
Beep
Required Monthly
SAME Test
CEDJ>BOýJ;IJ
Beep
PROGRAMMING THE
TEMPERATURE
SENSOR
Paired with the remote sensor, your
Weatheradio registers temperatures
indoors and outdoors. When you set
the Weatheradio and the remote
sensor to the same channel (1–3),
your Weatheradio displays the
current temperatures for the selected
sensor. You can view the minimum
and maximum temperatures and
display the temperature in °C or °F.
Preparation
15
1. While the clock appears, press
MENU. J;CF;H7JKH; appears.
Press >.
2. Press ∧ or ∨ to select ?D:EEH,
EKJ:EEH, °9/°<, or H;CEJ;ý
9>7DD;B. Then press >.
1. When °9/°< appears, press >. °9
appears.
2. Press ∧ or ∨ to select the °9 or °<
format, then press >. Both indoor
and outdoor temperatures
appear in the selected format,
and a beep sounds.
Resetting Indoor/Outdoor
In INDOOR mode, you can reset the
minimum and maximum
temperatures for the Weatheradio’s
location. In OUTDOOR mode, you
can reset the minimum and maximum
temperatures for the remote sensor’s
location.
1. When H;I;JýC7N appears and
C7N and ,1 (INDOOR icon) or
287 (OUTDOOR icon) flash,
press > to reset the maximum
temperature. A beep sounds and
the maximum temperature resets
to ##$# °9ýor °<.
2. Press ∧ or ∨ until H;I;JýC?D
appears. C?D and ,1 or 287
flash.
Setting the Remote Channel
For the remote sensor to operate,
both the sensor and the Weatheradio
must be set to the same channel. If
the Weatheradio does not display the
remote temperature after about 2
minutes while the remote sensor is off
(##$# appears), that channel is free for
use. If a remote temperature appears
while the sensor is off, there is
interference on that channel. To clear
the interference, set the sensor and
the Weatheradio to a different
channel.
1. When H;CEJ; then 9>7DD;B
appears, press >.
3. Press > to reset the minimum
temperature. A beep sounds and
the minimum temperature resets
to ##$# °9 or °<.
4. Press < twice. J;CF;H7JKH;
appears.
Setting °C/°°F
Note: H;CEJ; and 9>7DD;B do
not appear at the same time.
2. Press ∧ or ∨ on the Weatheradio
to select the same channel that is
set on the remote sensor (see
“Installing the Remote Sensor’s
Batteries” on Page 10).
3. Press > when the desired
channel appears. A beep
sounds.
16
Preparation
VIEWING THE
TEMPERATURE
DISPLAY
Note: If the Weatheradio loses
power, all stored temperatures are
lost.
The remote sensor sends
temperature data to the Weatheradio
every 30 seconds. The Weatheradio’s
internal sensor updates the indoor
temperature every 10 seconds.
Press ∧ or ∨#to view the maximum or
minimum, indoor and outdoor
temperatures for 10 seconds.
ˆ Operation
To turn on the Weatheradio, insert the
supplied AC adapter’s barrel plug into
the DC 9V
jack on the back of
the Weatheradio, then plug the
adapter into a standard AC outlet.
Notes:
• If no signal is received from the
remote sensor for about 2
minutes after power is
connected, ##$# appears. Be sure
the sensor’s batteries are
properly installed, the sensor is
within range of the Weatheradio,
and the sensor and the
Weatheradio are set to the same
channel.
• If the clock is not set or a weather
alert has not been received, ##0##ý
7C flashes in the center of the
display.
• If a weather alert has been
received, an alert message
appears instead of the time.
To turn the Weatheradio off, unplug
the AC adapter from the AC outlet.
LISTENING TO A
WEATHER
BROADCAST
To listen to a weather broadcast,
press WEATHER, then adjust VOLUME
to the desired listening level. To turn
off the weather broadcast, press
WEATHER again.
USING THE ALERT
FUNCTION
To set the Weatheradio to sound an
alert when the NWS broadcasts a
warning, watch, or statement, set
ALERT ON/OFF to ALERT ON. A beep
sounds and 7B;HJýED appears.
Notes:
• If you programmed more than
one FIPS code into memory, be
sure the Weatheradio is set to
Operation
17
CKBJ?FB;ýBE9 or 7BBýBE97J?ED
(such as JEHD7:E M7HD?D=) until the
alert’s effective time received as part
of the NWS broadcast code expires.
An alert could be in effect for several
hours.
mode. Otherwise, the
Weatheradio only receives
broadcasts for the FIPS code
you stored in the first memory
position.
• If severe weather threatens, do
not wait for an alert tone. Turn on
the weather broadcast and
monitor the weather information.
To set the Weatheradio so it does not
sound an alert, set the ALERT ON/OFF
switch to ALERT OFF. Two beeps
sound and 7B;HJýE<< appears.
Setting the Alert Volume
Tone — the Weatheradio sounds an
alert for 5 minutes and displays an
alert description until the alert’s
effective time expires. To turn off the
alert sooner, press WEATHER. The
NWS broadcast turns on.
The Weatheradio automatically
selects Tone the first time you turn it
on. To change the alert pattern (or
check which pattern is currently
selected):
1. While the clock appears, press
MENU then ∧ or ∨ until
M;7J>;H7:?E appears. Then
press >.
To set your Weatheradio’s alert
volume, turn on the alert tone, then
rotate ALERT VOLUME clockwise to
increase (or counterclockwise to
decrease) the volume.
Note: We recommend you set the
alert volume to the highest volume
setting, then decrease it as needed.
2. Press ∧ or ∨ until 7B;HJýCE:;
appears. Then press >. The
currently selected alert pattern
(JED; or LE?9;) appears.
Changing/Checking the
Alert Pattern
3. To select the other pattern, press
∧ or ∨ so that pattern (JED; or
LE?9;) appears.
You can set the Weatheradio to
respond to an NWS alert broadcast in
one of two ways.
4. Press > again to store your
selection, then press MENU.
Voice — the Weatheradio sounds an
alert for about 8 seconds, then
automatically turns on the weather
(voice) broadcast for 5 minutes. It
also displays the alert description
18
Operation
Enabling/Disabling Alert
Tones
You can turn on or off some types of
alert tones received by your
Weatheradio. For example, you can
turn off the alert tone for a volcano
warning if you do not live near a
volcano.
1. To enable or disable alert tones,
while the clock appears, press
MENU then ∧ or ∨ until
M;7J>;H7:?E appears. Then
press >.
2. Repeatedly press ∧ or ∨ until
JED; :;<;7J appears. Then press
>.
3. Repeatedly press ∧ or ∨ until
M7HD?D=, J;IJ, IJ7J;C;DJ, or
M7J9>ýappears.
Note: The Weatheradio still detects
and displays the information even
after you disable the tone for those
alerts.
When M7HD?D= appears, you can
select:
You can set the Weatheradio so it
does not sound an alert tone during
these types of alerts:
š
š
š
š
š
š
š
š
š
Warnings
Avalanche
Blizzard
Flash Flood
Volcano
Winter Storm
Coastal Flood
Flood
High Wind
When M7J9> appears, you can
select:
Special Marine
Watches
Flash Flood
Coastal Flood
Flood
Avalanche
Volcano
Winter Storm
High Wind
Hurricane
7L7B7D9>;ý
8B?PP7H:
9E7IJ7Bý<BEE:
<B7I>ý<BEE:ý
<BEE:
>?=>ýM?D:
IF;9?7BýC7H?D;
LEB97DE
M?DJ;HýIJEHC
š
š
š
š
š
š
š
š
š
Severe Thunderstorm
Statements
7L7B7D9>;
9E7IJ7Bý<BEE:
<B7I>ý<BEE:ý
<BEE:ýM7J9>
>?=>ýM?D:
>KHH?97D;
I;L;H;ýJ>KD:;HIJEHC
LEB97DEý
M?DJ;HýIJEHCý
Flood
Severe Weather
Special Weather
Flash Flood
Hurricane
Unknown
When IJ7J;C;DJ appears, you
can select:
Practice/Demo
š <B7I>ý<BEE:
š <BEE:
Other
Required Monthly Test
Operation
19
š
š
š
š
>KHH?97D;
I;L;H;ýM;7J>;H
IF;9?7BýM;7J>;H
KDADEMD
while a previous alert is still in effect,
it automatically displays the new alert
description and sounds the
corresponding tone.
When J;IJ appears, you can
select:
Note: While an alert is in effect, the
corresponding alert indicator lights.
š :;CEýC;II7=;
š CEDJ>BOýJ;IJ
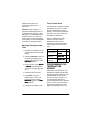
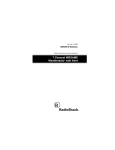
1. Press > to review the next
message or < to review the
previous message.
Note: If you disable '(02#
0(66$*(, no Demo message
appears and no Demo alert
sounds.
2. Press > to display the received
alerts in the order received. For
example:
4. Press >. A beep sounds. Press
∧ or ∨ to select the alert.
5. For each desired alert, press#>.
JED;ýED or JED;ýE<< appears.
6. Press ∧ or ∨ to toggle between
JED;ýED and JED;ýE<<, then press
>. A beep sounds.
7. Press < to return to the previous
menu category (M7HD?D=, J;IJ,
IJ7J;C;DJ, or M7J9>).
8. Once you have made all your
selections for each alert type,
press MENU to exit. The clock
appears.
1st Alert — <B7I>ý<BEE:ýM7HD?D=,
effective for 3 hours 15 minutes.
The red warning indicator lights.
1st message
2nd message
3rd message
4th message
5th message
2nd message
3rd message
4th message
Your Weatheradio can store up to
three different alerts (with overlapping
effective times) in its memory. If the
Weatheradio receives a new alert
20
Operation
)>h'+C_d
)ý;L;DJIý
<B7I>ý<BEE:
2nd Alert — >KHH?97D;ýM7J9>,
effective for 15 minutes. The
yellow watch indicator lights.
1st message
Reviewing Overlapping
Alerts
<B7I>ý<BEE:
M7HD?D=
>KHH?97D;
M7J9>
&>h'+C_d
)ý;L;DJI
3rd Alert — IF;9?7BýM;7J>;Hý
IJ7J;C;DJ, effective for 6 hours.
The green statement indicator
lights.
5th message
6th message
1st message
2nd message
3rd message
4th message
IF;9?7B
M;7J>;H
IJ7J;C;DJ
,>h&&C_d
)ý;L;DJI
IF;9?7B
While reviewing warning messages, if
you do not press > or < for 10
seconds, the display returns to the
most recently displayed message.
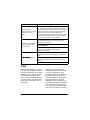
ˆ Troubleshooting
If your Weatheradio is not working as it should, these suggestions might help
you eliminate the problem. If the Weatheradio still does not operate normally,
take it to your local RadioShack store for assistance.
Problem
Suggestion
No power
Make sure the adapter is connected or the batteries are
installed.
No sound
Adjust VOLUME.
Multiple FIPS codes are
stored, but the Weatheradio
only responds to weather
alert broadcasts for one
code.
Make sure the Weatheradio is set to CKBJ?FB;ýBE9. See
“Programming the Weatheradio” on Page 12.
One or more FIPS codes are
stored in memory, but the
Make sure the Weatheradio’s 7BBýBE9 mode is not set in
memory. See “Programming the Weatheradio” on
radio responds to weather
alert broadcasts for areas not Page 12.
covered by those codes.
Make sure the telescoping antenna is fully extended.
No weather broadcast when
you press WEATHER.
Make sure the Weatheradio is set to the NOAA channel
that is being broadcast in your area. See “Programming
the Weatheradio” on Page 12.
Troubleshooting
21
Problem
Suggestion
The Weatheradio’s
continuous alert tone sounds
intermittent or seems to
warble.
The Weatheradio constantly monitors the channel you set
it to, even while it is sounding a continuous alert. Each
time the Weatheradio receives a signal on the channel, it
pauses very briefly to compare the signal against those
stored in its memory. If the Weatheradio pauses
frequently (depending on how often it receives a signal),
it might make the Weatheradio’s continuous alert tone
sound intermittent. This is not a malfunction.
Make sure you programmed the correct FIPS code(s) into
the Weatheradio’s memory. See “Programming the
Weatheradio” on Page 12.
The radio is not responding
properly to NWS weather
alert broadcasts.
Make sure 7B;HJýED appears. If not, set the ALERT ON/
OFF to ALERT ON.
Make sure the Weatheradio is set to receive new alert
types. See “Locking Out Undefined Weather
Descriptions” on Page 5.
The Weatheradio has not received any type of SAME
alert signal (include test or demo signals) for about one
week.
9>;9AýEF;H7J?ED appears.
Make sure the FIPS code(s) stored in memory are
correct. See “Obtaining Your Area’s FIPS Code(s)” on
Page 8.
Make sure the telescoping antenna is fully extended.
CARE
Keep the Weatheradio dry; if it gets
wet, wipe it dry immediately. Use and
store the Weatheradio only in normal
temperature environments. Handle
the Weatheradio carefully; do not
drop it. Keep the Weatheradio away
from dust and dirt, and wipe it with a
damp cloth occasionally to keep it
looking new.
22
Modifying or tampering with the
Weatheradio’s internal components
can cause a malfunction, might
invalidate its warranty, and void your
FCC authorization to operate it. If
your Weatheradio is not performing
as it should, take it to your local
RadioShack store for assistance. If
the trouble is affecting the telephone
lines, the phone company can ask
you to disconnect your Weatheradio
until you have resolved the problem.
Troubleshooting
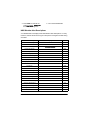
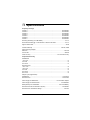
ˆ Specifications
Frequency Coverage
Channel 1 ......................................................................................................
Channel 2 ......................................................................................................
Channel 3 ......................................................................................................
Channel 4 ......................................................................................................
Channel 5 ......................................................................................................
Channel 6 ......................................................................................................
Channel 7 ......................................................................................................
162.400 MHz
162.425 MHz
162.450 MHz
162.475 MHz
162.500 MHz
162.525 MHz
162.550 MHz
Receiving Sensitivity (at 12 dB SINAD) .................................................................... 0.3 uV
FIPS Code Sensitivity @ ± 3 kHz Deviation / 90% Success Rate ........................... 0.3 uV
Signal to Noise Ratio ................................................................................................. 45 dB
Channel Selectivity ..................................................................................... ±25 kHz, 45dB
Power Output by Adapter:
Maximum ............................................................................................................... 250 mW
At 10% THD ........................................................................................................... 200mW
Clock Accuracy ................................................................................. 0.67 Second Per Day
Temperature Accuracy
Weatheradio:
–10 to 0°C ...................................................................................................................... ±4
0 to 40°C ........................................................................................................................ ±2
40 to 50°C ...................................................................................................................... ±4
Remote Sensor:
–40 to –2°C ....................................................................................................................
–20 to 0°C ......................................................................................................................
0 to 40°C .......................................................................................................................
40 to 50°C ......................................................................................................................
50 to 70°C ......................................................................................................................
±6
±4
±2
±4
±6
Sample Cycle (Approximate)
Weatheradio ..................................................................................................... 10 Seconds
Remote Sensor ............................................................................................... 30 Seconds
Power Supply for Weatheradio ....................................................... DC 9V 300mA Adapter
Power Supply for Remote Sensor ............................................................... 3 AA Batteries
Battery Back-up for Weatheradio .......................................................... One 9-Volt Battery
Remote Sensor RF Transmission Frequency ................................................. 433.92 MHz
Remote Sensor Transmission Range ................................................................... 100 Feet
Specifications
23
Antenna ..................................................................................... Telescoping Rod Antenna
Dimensions (HWD):
Weatheradio .................................................. 51/2 × 4 × 29/16 inches (140 × 101 × 65 mm)
Remote Sensor ............................................ 4 × 23/4 × 15/16 inches (101.6 × 70 × 24 mm)
Weight:
Main Unit .................................................................................................... 12.7 oz (361 g)
Remote Sensor .............................................................................................. 3.2 oz (92 g)
Specifications are typical; individual units might vary. Specifications are subject to change
and improvement without notice.
Limited Ninety-Day Warranty
This product is warranted by RadioShack against manufacturing defects in material and workmanship under normal use for ninety (90) days from the date of purchase from RadioShack company-owned stores and authorized
RadioShack franchisees and dealers. EXCEPT AS PROVIDED HEREIN, RadioShack MAKES NO EXPRESS
WARRANTIES AND ANY IMPLIED WARRANTIES, INCLUDING THOSE OF MERCHANTABILITY AND FITNESS
FOR A PARTICULAR PURPOSE, ARE LIMITED IN DURATION TO THE DURATION OF THE WRITTEN LIMITED
WARRANTIES CONTAINED HEREIN. EXCEPT AS PROVIDED HEREIN, RadioShack SHALL HAVE NO LIABILITY OR RESPONSIBILITY TO CUSTOMER OR ANY OTHER PERSON OR ENTITY WITH RESPECT TO ANY LIABILITY, LOSS OR DAMAGE CAUSED DIRECTLY OR INDIRECTLY BY USE OR PERFORMANCE OF THE
PRODUCT OR ARISING OUT OF ANY BREACH OF THIS WARRANTY, INCLUDING, BUT NOT LIMITED TO,
ANY DAMAGES RESULTING FROM INCONVENIENCE, LOSS OF TIME, DATA, PROPERTY, REVENUE, OR
PROFIT OR ANY INDIRECT, SPECIAL, INCIDENTAL, OR CONSEQUENTIAL DAMAGES, EVEN IF RadioShack
HAS BEEN ADVISED OF THE POSSIBILITY OF SUCH DAMAGES.
Some states do not allow limitations on how long an implied warranty lasts or the exclusion or limitation of incidental or consequential damages, so the above limitations or exclusions may not apply to you.
In the event of a product defect during the warranty period, take the product and the RadioShack sales receipt as
proof of purchase date to any RadioShack store. RadioShack will, at its option, unless otherwise provided by law:
(a) correct the defect by product repair without charge for parts and labor; (b) replace the product with one of the
same or similar design; or (c) refund the purchase price. All replaced parts and products, and products on which a
refund is made, become the property of RadioShack. New or reconditioned parts and products may be used in the
performance of warranty service. Repaired or replaced parts and products are warranted for the remainder of the
original warranty period. You will be charged for repair or replacement of the product made after the expiration of
the warranty period.
This warranty does not cover: (a) damage or failure caused by or attributable to acts of God, abuse, accident, misuse, improper or abnormal usage, failure to follow instructions, improper installation or maintenance, alteration,
lightning or other incidence of excess voltage or current; (b) any repairs other than those provided by a RadioShack
Authorized Service Facility; (c) consumables such as fuses or batteries; (d) cosmetic damage; (e) transportation,
shipping or insurance costs; or (f) costs of product removal, installation, set-up service adjustment or reinstallation.
This warranty gives you specific legal rights, and you may also have other rights which vary from state to state.
RadioShack Customer Relations, 200 Taylor Street, 6th Floor, Fort Worth, TX 76102
We Service What We Sell
RadioShack Corporation
Fort Worth, Texas 76102
12/99
12-255
AO0052ACA1
01A02
Printed in China