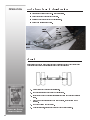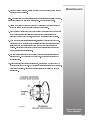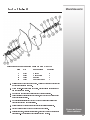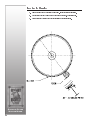
1
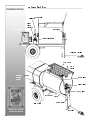
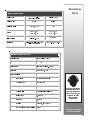
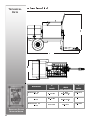
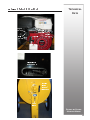
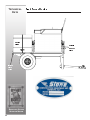
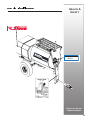
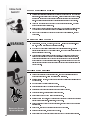
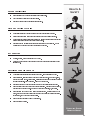
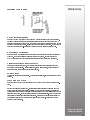
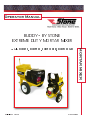
Operator Manual BUDDY BY STONE EXTREME DUTY MORTAR MIXER REVISION: D 4/2008 MORTAR MIXER Models: EXD850, EXD1100, EXD1300BD, EXD1300GD P/N : 56802BD Stone Construction Equipment, Inc. Right Built Pr oducts F rom A Right Built Com pan y. Products Fr Compan pany Right Built means tough, reliable, easy to use machines that lower lifetime costs. Theyre designed to be reliable, productive, operator friendly and serviceable, always with the end user in mind. LIMITED WARRANTY ................................................................... 5 FOREWORD / WARRANTY INFORMATION ......................................... 6 Table of Contents SECTION 1 - INTRODUCTION ......................................................... 7-9 Introduction ............................................................................ 8 Intended Use ........................................................................... 8 General Description ................................................................... 8-9 Machine Diagram ...................................................................... 10 SECTION 2 - TECHNICAL DATA ...................................................... 11-16 Machine Specifications .............................................................. 12 Lubrication Specifications ......................................................... 12 Engine Specifications ................................................................ 13 Machine Sound Level Test .......................................................... 13 Machine Dimensions ................................................................. 14 Operator Controls ...................................................................... 15 PIN & Plate Location .................................................................. 16 SECTION 3 - HEALTH & SAFETY ..................................................... 17-24 Decal Location .......................................................................... 18-19 Safety Precautions .................................................................... 20-23 Safety Use ................................................................................ 24 SECTION 4 - OPERATION .............................................................. 25-35 General Safety Notes .................................................................. 26-27 Safety Symbols ......................................................................... 28 Delivery Inspection ................................................................... 28 Break-In Period ........................................................................ 28 Before Starting ......................................................................... 28-29 Pre-Start Checklist .................................................................... 30 Fuel ........................................................................................ 30 Starting the Machine ................................................................. 31 To Operate Machine ................................................................... 31-32 Shutting the Machine Off ........................................................... 33 Operator Controls ...................................................................... 33 Attach Safety Chain to Towing Vehicle .......................................... 34 Towing .................................................................................... 34-35 Recommended Coupler Maintenance ............................................ 35 Notes Page ............................................................................... 36 SECTION 5 - MAINTENANCE .......................................................... 37-48 First Service 50 Hours ................................................................ 38 Buddy by Stone Mortar Mixer Buddy by Stone Mortar Mixer 3 Table of Contents Additional Service Information ................................................... 38 Fluids and Lubrication ............................................................... 38-39 Lubrication Points .................................................................... 40 Engine/Engine Oil/Air Filter .................................................... 40 Spark Plug / Engine RPM/Cooling System/Valve Clearance ........... 41 Hardware .............................................................................. 42 Wheel Bearing Lubrication ...................................................... 42 Wheel Bearing Adjustment ...................................................... 42 Drum Seals ............................................................................ 42 Gearcase Clutch Adjustment ....................................................... 42-43 Belt Adjustment ....................................................................... 44 Hand Clutch Adjustment for Belt Drive Units .............................. 44 Cleaning .................................................................................. 45 Storage/Long-Term Storage/End of Storage .................................. 45 Troubleshooting ....................................................................... 46 Maintenance Chart .................................................................... 47 Maintenance Log ...................................................................... 48 Seals and Bearings .................................................................... 49 Bull Gear Assembly .................................................................... 50 CALIFORNIA PROPOSITION 65 WARNING ......................................... IBC Buddy by Stone Mortar Mixer 4 LIMITED WARRANTY The Manufacturer warrants that products manufactured shall be free from defects in material and workmanship that develop under normal use for a period of 90 days for concrete vibrators, one year for Rhino® Single Drum Dirt Roller, Bulldog® Trench Rollers, WolfPac Asphalt Roller, Smooth Operator Power Trowels, Stomper® , Saw Devil® Concrete and Masonry Saws, Silver Fox Forward Plate, Lift Jockey , Mud Buggy , Groutzilla Placement Systems, and 6 months for all other products from the date of shipment. The foregoing shall be the exclusive remedy of the buyer and the exclusive liability of the Manufacturer. The Manufacturer extends the warranty period to Lifetime for the drum bearings and seals for the mortar mixers, and agrees to furnish, free of charge, the bearings and seals only upon receipt of the defective parts. The warranty is two years for eccentric bearings on the forward plate compactors, concrete and mortar mixer drums, trowel gearboxes, three years on the trench roller microprocessor (ECIB) and five years on the trench roller eccentric bearings. Our warranty excludes normal replaceable wear items, i.e. gaskets, wear plates, seals, O-rings, V-belts, drive chains, clutches, etc. Any equipment, part or product which is furnished by the Manufacturer but manufactured by another, bears only the warranty given by such other manufacturer. The Manufacturers sole responsibility for any breach of the foregoing provision of this contract, with respect to any product or part not conforming to the Warranty or the description herein contained, is at its option (a) to repair, replace or refund such product or parts upon the prepaid return thereof to location designated specifically by the Manufacturer. Product returns not shipped prepaid or on an economical transportation basis will be refused (b) as an alternative to the foregoing modes of settlement - the Manufacturers dealer to repair defective units with reimbursement for expenses, except labor, and be reviewed with the Manufacturer prior to repair. A Warranty Evaluation Form must accompany all warranty claims. Warranty is voided by product abuse, alterations, and use of equipment in applications for which it was not intended, use of non-manufacturer parts, or failure to follow documented service instructions. Except as set forth hereinabove and without limitation of the above, there are no warranties or other affirmations, which extend beyond the description of the products and the fact hereof, or as to operational efficiency, product reliability or maintainability or compatibility with products furnished by others. In no event whether as a result of breach of contract or warranty or alleged negligence, shall the Manufacturer be liable for special or consequential damages including but not limited to: Loss of profits or revenues, loss of use of the product or any associated product, cost of capital, cost of substitute products, facilities or services or claims of customers. No claim will be allowed for products lost or damaged in transit. Such claims should be filed with the carrier within fifteen days. The foregoing warranty is exclusive of all other warranties whether written or oral, expressed or implied. No warranty of merchantability or fitness for a particular purpose shall apply. The agents, dealer and employees of Manufacturer are not authorized to make modification to this warranty, or additional warranties binding on Manufacturer. Therefore, additional statements, whether oral or written, do not constitute warranty and should not be relied upon. Effective September 2007. Stone Construction Equipment, Inc. 8662 Main Street, P. O. Box 150 Honeoye, NY 14471-0150 Phone: 1-800-888-9926 1-585-229-5141 Fax: 1-585-229-2363 www.stone-equip.com e-mail: [email protected] P/N 51018 I-8691 09/2007 5 These instructions include: Foreword Safety regulations Operating instructions Maintenance instructions Location of warranty information: 1. Information on S/N tag. 2. Information on engine tag. 3. Information on S/N tag - if applicable. 4. Date you purchased machine. These instructions have been prepared for operation on the construction site and for the maintenance engineer. These instructions are intended to simplify operation of the machine and to avoid malfunctions through improper operation. Observing the maintenance instructions will increase the reliability and service life of the machine when used on the construction site and reduce repair costs and downtimes. Always keep these instructions at the place of use of the machine. Only operate the machine as instructed and follow these instructions. Observe the safety regulations as well as the guidelines of the civil engineering trade association. Observe the safety rules for the operation of road rollers and compactors and the pertinent regulations for the prevention of accidents. The manufacturer is not liable for the function of the machine when used in an improper manner and for other than the intended purpose. Operating errors, improper maintenance and the use of incorrect operating materials are not covered by the warranty. The above information does not extend the warranty and liability conditions of business of the manufacturer. 5. Dealer machine was purchased from. 6. Information on battery and battery warranty card. Warranty Information Please enter the following data. This will help expedite any service or warranty work. Stone Construction Equipment, Inc. P.O. Box 150 Honeoye, New York 14471 Phone: (800) 888-9926 Fax: (585) 229-2363 1. Machine Type: ________________________________________________________ Machine S/N: ________________________________________________________ 2. Engine Type: _________________________________________________________ Engine S/N: _________________________________________________________ 3. VIN: _______________________________________________________________ 4. Purchase Date: _______________________________________________________ 5. Dealer/Distributor Information: Name: ______________________________________________________________ Address: ____________________________________________________________ _____________________________________________________________________ Phone #: ____________________________________________________________ Fax # _______________________________________________________________ 6. Battery Manufacturer: _________________________________________________ Buddy by Stone Mortar Mixer 6 Battery Type: __________________________________________________________ Battery S/N: _________________________________________________________ Stone Construction Equipment, Inc. 1. Introduction 7 Introduction INTRODUCTION Congratulations on your purchase of the Buddy Mixer! You've made an excellent choice! Buddy mixers have been specifically designed as the ideal machine for the professional contractor. The Buddy Mixer is ergonomically engineered to optimize operator interface with the total machine--it's really "user friendly". Besides good visibility, you'll find that the controls are exactly in the right places for maximum comfort and safety. Our common sense approach to servicing is a valuable benefit on the BUDDY MIXER. Thanks to our modular design, everything that needs servicing is located behind the easyaccess cowl. The following instructions were compiled to provide you information on how to obtain long and trouble-free use of the mixer. Periodic maintenance of the mixer is essential. Read the manual in its entirety and follow the instructions carefully. Refer to the Technical Data Section to familiarize yourself with machine controls and components. Failure to do so may injure yourself or a bystander. I NTE N DE D USE These machines are designed to carry out the function of mixing mortar, plaster, fireproofing, grout and other small grained Portland cement products. Use of the machine in any other way is considered contrary to the intended use and will void the warranty. This safety alert system identif ies impor tant safety messages in this manual. When you see t his symbol, be aler t, your safety is involved. Carefully read t he message that follows and inform other operators. Danger Zone While the machine is in use unauthorized persons must remain outside the danger zone. GEN E RAL DESCRI PTION Your new EXD850, EXD1100, OR EXD1300 mixer comes standard with the following patented features: Patented Drum and Paddle Design The symmetrical drum shape eliminates the dead-zone and increases the mixers speed by up to 30%. The paddle design: Buddy by Stone Mortar Mixer 8 Increases the level of entrained air which then lowers the mortars temperature by up to 5 degrees. Proven longer pan life Makes the mix more creamy improving spreadability Extends the mortars plasticity, which allows a longer time period before tooling the mortar. Improves spreadability and extends the workability which allows you to lay more courses before tooling. Patent Pending Engine Cowl Design This unique engine cowl allows access to the engines controls without having to open the cowl. This allows the mixer to be operated with the cowl closed convenience of not having to open and close the cowl for engine starting and stopping. The front section of the engine cowl becomes a closed compartment housing the mixers drive train components. Provides the highest level of operating safety. Protects the drive train components from cement dust and dirt thus extending the components life. Introduction Quadruple Shaft Seal Provides a life-long urethane seal system that completely isolates the sealed ball bearings in the drum trunnions from the mix. Patented Automatic Guard Lifter Lifts the drum guard as the drum is tilted to prevent the mix from being poured through the guard and causing a build up on it. The guard and guard lifter system is designed for your safety and convenience. Engine The engine is a high quality 8hp or 11hp Honda with low oil shut down to protect the engine from the harshest environments. Buddy by Stone Mortar Mixer 9 Introduction MACHI N E DIAGRAM drum seals bullgear pillow block bearings air cleaner trunnions engine oil dipstick ball hitch coupler drum guard dump handle engine & engine cowl guard lifter clutch lever dump latch fork pocket axle & tires Buddy by Stone Mortar Mixer 10 frame safety chain tow pole Stone Construction Equipment, Inc. 2. Technical Data 11 Technical Data $WSQDLDÐ#TSXÐ!TCCXÐ,NQS@QÐ,HWDQRÐÐ2ODBHEHB@SHNMR .PEFM %JNFOTJPOT 0QFSBUJOH8U-CTLH 5PUBM7PMVNF DVGUDVN -Y8Y)JODN %JTDIBSHF)FJHIU JODN &OHJOFT IQL8 #VEEZ #VEEZ #VEEZ #VEEZ &9% &9% &9%#% &9%(% YY YY YY YY YY YY YY YY IQ)POEB IQ#BMEPS 1)7 IQ#BMEPS 1)7 IQ)POEB IQ#BMEPS 1)7 IQ#BMEPS 1)7 IQ)POEB IQ#BMEPS 1)7 IQ)POEB +TAQHB@SHNMÐ2ODBHEHB@SHNMRÐ$7#Ð$7#Ð$7#!#Ð &OHJOF$SBOLDBTFRUTMJUFS (SFBTF'JUUJOHTP[NN 5ZQF 2VBOUJUZ 4FF&OHJOF.BOVBM .PCJMHSFBTF9)1 /-(*&1MJUIJVNDPNQMFY +TAQHB@SHNMÐ2ODBHEHB@SHNMRÐ$7#&#Ð 5ZQF 2VBOUJUZ &OHJOF$SBOLDBTF 4FF&OHJOF.BOVBM 4FF&OHJOF.BOVBM (FBSDBTF 4"&8(FBS0JM 2VBSUT-JUFS 8IFFM#FBSJOHT .PCJMHSFBTF9)1 /-(*&1MJUIJVNDPNQMFY "T/FFEFE (SFBTF'JUUJOHTP[NN .PCJMHSFBTF9)1 /-(*&1MJUIJVNDPNQMFY Buddy by Stone Mortar Mixer 12 Technical Data $MFHMDÐ2ODBHEHB@SHNMRÐ &OHJOF5ZQF 4JOHMF$ZMJOEFS$ZDMF "JS$PPMFE(BTPMJOF &MFDUSJD.PUPS &OHJOF.BLF )POEB #BMEPS &OHJOF.PEFM (9(9 0%1 1PXFS IQLX IQLX IQLX IQLX 0QFSBUJOH4QFFE *EMF'VMM31. OPMPBE 31. 6OMFBEFE(BTPMJOF)JHI5FTU .JOJNVN0DUBOF 71)71) 'VFM5ZQF ,@BGHMDÐ2NTMCÐ+DUDKÐ3DRS .BDIJOF5ZQF #VEEZ.JYFS&9% 4PVOE-FWFM.FUFS$BMJCSBUJPO%BUF .BZ .FUFS5ZQF 4JNQTPO.PEFM5ZQF 5FTU%BUF /PWFNCFS 5FTU$POEJUJPOT 5FNQFSBUVSF EFHSFFT'BISFOIFJU "NCJFOU4PVOE ECBGBTUNPEF 4PJM$POEJUJPO TJMUTBOEDMBZ .PJTUVSF-JNJU "QQSPYJNBUFMZFRVBMUP &OHJOF4QFFE 31. 'SFRVFODZ )[ 5FTU4JUF )POFPZF/FX:PSL64" 4PVOE-FWFMBU0QFSBUPS1PTJUJPO ECB Since the permissable noise level rating of 89 dB(A) can be exceeded with this machine, the operator must wear suitable hearing protection! Buddy by Stone Mortar Mixer 13 Technical Data MACH I N E DI ME NSIONS C A B Ð +DMFSGÐ !Ð 6HCSGÐÐ @WKDÐQDSQ@BSDCÐ "Ð 'DHFGSÐ &9%-Y8Y) *ODN &9%-Y8Y) JODN &9%-Y8Y) *ODN #HLDMRHNMRÐ Buddy by Stone Mortar Mixer 14 Technical Data MACH I NE OPE RATOR CONTROLS choke on/off fuel on/off throttle control recoil engine on/off clutch lever EXD1300GD paddle clutch engage/ disengage dump latch Buddy by Stone Mortar Mixer 15 Technical Data engine plate license plate holes Buddy by Stone Mortar Mixer 16 PIN & PLATE LOCATION serial number plate Stone Construction Equipment, Inc. 3. Health & Safety 17 Health & Safety Rear View - Decal Placement Before using this equipment, study this entire manual to become familiar with its operation. Do not allow untrained or unauthorized personnel, especially children, to operate this equipment. Use only factory authorized parts for service. When warning decals are destroyed or missing, contact the Manufacturer immediately at 1-800-888-9926 for replacement. For the safety of yourself and others, it is imperative that the following rules are observed. Failure to do so may result in serious injury or death. For ordering, refer to Decal Identification in Parts Manual. IDLE ENGINE 5 MINUTES BEFORE STOPPING TO IMPROVE SERVICE LIFE DEJE FUNCIONAR EL MOTOR EN VACIO DURANTE 5 MINUTOS ANTES DE DETENERLO PARA EXTENDER SU VIDA DE SERVICIO. 55546 GREASE WEEKLY 55392 Buddy by Stone Mortar Mixer 55024 18 electric only 55023 Front View - Decal Placement Health & Safety GREASE WEEKLY 55392 Buddy by Stone Mortar Mixer 19 Health & Safety FOLLOW SAFETY INSTRUCTIONS Carefully read all safety messages and decals in this manual and on your machine safety signs. Keep decals in good condition. Replace missing or damaged decals. Be sure new equipment components and repair parts include the current safety signs. Replacement safety signs and decals are available through your dealer. Learn how to operate the machine and how to use controls properly. Do not let anyone operate without instruction. Keep your machine in proper working condition. Unauthorized modifications to the machine may impair the function and/or safety and affect machine life. If you do not understand any part of this manual and need assistance, contact your dealer. UNDERSTAND SIGNAL WORDS WARNING A signal word DANGER, WARNING, or CAUTION is used with the safety-alert symbol. DANGER identifies the most serious hazards. DANGER or WARNING safety signs are located near specific hazards. General precautions are listed on CAUTION safety signs. IMPORTANT also calls attention to safety messages in this manual. This notation appears before warnings in the text. It means that the step that follows must be carried out to avoid the possibility of personal injury or death. These warnings are intended to help the technician avoid any potential hazards encountered in the normal service procedures. We strongly recommend that the reader takes advantage of the information provided to prevent personal injury or injury to others. PRACTICE SAFE OPERATION Buddy by Stone Mortar Mixer 20 Users must be trained to operate this mixer. Read the Operators Manual and Engine Owners Manual. Learn to operate this mixer safely. Before starting machine, make sure that there are no persons or obstacles near or under machine. Do not operate the mixer in standing water. Ear protection required when operating this equipment. Exposure to loud noise can cause impairment or loss of hearing. For foot protection, wear steel toe shoes or toe pads. Never perform any work on mixer while it is running. Before working on mixer, stop the engine and disconnect the spark plug wire(s) to prevent accidental starting. If electric, unplug motor. Keep cowl closed and latched during operation, close and latch cowl immediately after starting. Keep hands, clothing and jewelry away from all moving parts. Keep all guards in place, including drum guards. Never place your hands or any solid object into drum while mixer is in operation. PROPER VENTILATION Never operate unit in a poorly ventilated or enclosed area. Avoid prolonged breathing of exhaust gases. Engine exhaust fumes can cause sickness or death. Health & Safety WEAR PROTECTIVE CLOTHING Wear close fitting clothing and safety equipment appropriate to the job. Prolonged exposure to loud noise can cause impairment or loss of hearing. Wear a suitable hearing protective device such as earmuffs or earplugs to protect against objectionable or uncomfortable loud noises. Operating equipment safely requires the full attention of the operator. Do not wear radio or music headphones while operating machine. HOT SURFACES Muffler, engine, and engine shroud may be hot. Allow all components in the engine compartment to cool before performing any service work. PRACTICE SAFE MAINTENANCE Understand service procedure before doing work. Keep area clean and dry. Never lubricate, service or adjust machine while it is moving. Keep hands, feet, and clothing from power-driven parts. Disengage all power and operation controls to relieve pressure. Stop the engine. Allow machine to cool. Securely support any machine elements that must be raised for service work. Keep all parts in good condition and properly installed. Fix damage immediately. Replace worn or broken parts. Remove any buildup of grease, oil, or debris. Never perform any work on the mixer while it is running. Before working on the mixer, stop the engine and disconnect the spark plug wire(s) to prevent accidental starting, block drums to prevent rolling. Keep engine cover closed during the operation. Keep all guards in place. Buddy by Stone Mortar Mixer 21 Health & Safety WARNING-TOWING Warning: Before attempting to tow mixer, ensure that all anti-theft devices are disabled and completely removed. Always close fuel valve. Warning: Do not tow the mixer with the drum in the dump position. Mixer may become unstable and tip over when hitting a curb, pothole or other obstruction. Warning: Always properly attach safety chains before mixer is towed. Maximum towing speed 55 m.p.h. (90 km/hr). Reduce speed according to highway conditions. WARNING-BEFORE TOWING DANGER BEFORE TOWING 1. Check vehicle hitch, ball and coupler for signs of wear or damage. Replace any parts that are worn or damaged before towing. 2. Use only the ball diameter indicated on your coupler. Use of any other ball diameter will create an extremely and dangerous condition that can result in separation of the coupler and ball or ball failure. 3. Be sure the coupler is secured to the hitch ball and the lock lever is down tight and locked. Assure that the ball clamp is properly nested under the ball and not sitting on top of the ball. Recheck tightness again after towing about 50 miles. 4. Check that trailer safety chains are properly connected. 5. Check that all trailer lighting is hooked up and working correctly. DISPOSE OF WASTE PROPERLY Improperly disposing of waste can threaten the environment and ecology. Potentially harmful waste used with equipment include such items as oil, fuel, coolant, brake fluid, filters, and batteries. Use leak proof containers when draining fluids. Do not use food or beverage containers that may mislead someone into drinking from them. Do not pour waste onto the ground, down a drain, or into any water source. Inquire on the proper way to recycle or dispose of waste from your local environmental or recycling center. WARNING - EYE PROTECTION Buddy by Stone Mortar Mixer 22 Always wear splash goggles when operating equipment. USE COMMON SENSE WHEN HANDLING FUELS Transport and handle fuel only when contained in approved safety containers. Do not smoke when refueling the engine or during any other fuel handling operation. If fuel is spilled during refueling, wipe it off from the engine immediately and discard the rag in a safe place. Do not operate the equipment if fuel or oil leaks exist-repair immediately. Never operate this equipment in an explosive atmosphere. Starting fluid (ether) is highly flammable, do not use or an explosion or fire may result. Health & Safety PREPARE FOR EMERGENCIES Be prepared if a fire starts. Keep a first aid kit and fire extinguisher handy. Keep emergency numbers for doctors, ambulance service, hospital, and fire department near your telephone. LOOSE HARDWARE With power off, DAILY check for loose hardware. Immediately inform your supervisor to have it corrected--Do Not Run Mixer. EXTENSION CORDS Always use the proper size grounded extension cord, conforming to the National Electric Code and Local Ordinances. Inspect all extension and electrical cords for cuts, frayed wire and broken connectors before use. Do not use cords if not in good condition. Do not route extension cords through standing water. Do not operate the mixer in standing water. When cleaning the mixer, never spray water over the motor. Buddy by Stone Mortar Mixer 23 Health & Safety SAFETY USE These machines are designed to carry out the function of mixing mortar, plaster, f ireproof ing, grout and other small grained Portland cement products. If used correctly, they will provide an effective and safe means of mixing and meet the appropr iate performance standards. It is essential that the operator of the machine is adequately trained in its safe operation, be authorized to operate it, and have sufficient knowledge of the machine to ensure that it is in full working order before being put to use. Buddy by Stone Mortar Mixer 24 Stone Construction Equipment, Inc. 4. Operation 25 Operation GENERAL SAFETY NOTES If Applicable, Obser ve t he Following Points for Your Safety and Protection Operators and maintenance personnel must always comply with the following safety precautions. These precautions are given here for your safety. Review them carefully before operating the machine and before performing general maintenance or repairs. Supervising personnel should develop additional precautions relating to specific work area and local safety regulations. Buddy by Stone Mortar Mixer 26 Before operating the machine, ensure you have had proper training and are fully conversant with the machine and its operation - If in Doubt ASK! Read this instruction manual carefully before operating the machine. Ensure this instruction manual is kept with the machine at all times and in good condition replace the manual immediately if it becomes dirty, damaged or lost. Decals are fitted to the machine for safety purposes and MUST be replaced immediately if they are not readable or lost. If the machine is repaired and parts have been replaced on which decals were fixed, ensure new decals are fitted before the machine is put into service. Always make sure there is adequate ventilation around the machine. Never run the engine in an enclosed area without good ventilation or next to combustible materials. Stop the engine before refuelling. If there is a spillage, mop it up and do not start the engine until it is safe again. The exhaust gets extremely hot. Do not place anything on top of it and keep all combustible materials clear. Do not attempt any maintenance on a hot engine. Check your local laws, the engine may require a spark arrester etc. Do not inspect or clean the machine with the engine running. Make sure you and anyone else who uses the machine have been shown how to operate it safely. A hard hat, safety boots, safety glasses and reflective clothing must be worn at all times. Establish a training program for all operators to ensure safe operation. Do not operate the machine unless thoroughly trained. Do not operate the machine if it is damaged, improperly adjusted or not completely and correctly assembled. PREVENT DAMAGE TO MACHINE Operation Obser ve t he Following Points, If Applicable, to Prevent Damage to t he Mac hine Always replace parts with parts supplied or recommended by Buddy Equipment. NEVER USE SPARE PARTS OF INFERIOR SPECIFICATION. Never allow unqualified people to perform repairs on the machine. Never overfill the engine oil or fuel tank. If a hose bursts, stop the engine immediately - ALWAYS replace with a hose of the correct specification. Follow the engine starting instructions in this manual and on the machine. If you see oil leaking, report it and get it fixed immediately. Make sure the correct fuel, oils and grease are used. Never use the machine for purposes other that those it was manufactured for. Always ensure workmates are aware of your work plan. If equipped, ensure all tires are serviceable before using the machine. Do not operate the machine if it is damaged, improperly adjusted or not completely and correctly assembled. Establish a training program for all operators to ensure safe operation. Buddy by Stone Mortar Mixer 27 Operation SAFETY SYMBOLS Safety symbols are used in these instructions to bring attention to actions that may cause personal injury or damage to the equipment. Always observe these symbols, they are included for your safety and for the protection of the machine. DELIVERY INSPECTION Upon receipt of your mixer, CAREFULLY CHECK FOR ANY FREIGHT DAMAGE. Any damage should be immediately reported to the carrier and a claim registered. This unit is manufactured to the strictest specifications and inspection procedures. If any material or manufacturing defects are found, return the tag on the machine with the assemblers signature and your findings to the manufacturer. We want to know when a product is less than perfect. We also welcome any and all input on how the product may serve you better. The following instructions were compiled to provide you information on how to obtain long and trouble free use of the mixer. Periodic maintenance of the mixer is essential. Read the manual in its entirety and follow the instructions carefully. Refer to the Technical Data Section to familiarize yourself with machine controls and components. Failure to do so may injure yourself or a bystander. BREAK-IN PERIOD This symbol is used to identify an action that requires particular attention and/or care. The BUDDY MIXER is ready for normal operation. However, extra care during the first 50 hours of operation will result in more satisfactory, long-term machine performance and cost of ownership. Do not exceed 50 hours of operation before conducting the break-in first service. Run engine at full throttle. Run engine under load. DO NOT overload the engine. Idle engine 3 minutes before stopping. DO NOT idle engine for long periods. Check engine oil level daily. BEFORE STARTING READ ENGINE OWNERS MANUAL. Mixers are shipped completely assembled and ready for operation except for installation of the safety chain. Safety Chain Installation Buddy by Stone Mortar Mixer 28 1. Remove the safety chain kit from the engine compartment. The kit includes (1) 12 ft. length of safety chain and (2) latch hooks. 2. Pull one end of the chain through the (2) key hole slots located in the front post of the mixer with a hook (see drawing below and decal on mixer front post). 3. Attach the latch hooks to each end of the chain. 4. Follow the instructions in the TOWING section of this manual and on the mixer front post to attach the safety chain to the towing vehicle. Installing Chain to Mixer Operation Dump Handle Installation Remove the dump handle from the mixer drum where it is attached to the paddle shaft. Consult the FRAME AND DRUM ASSEMBLY section of this manual and use the (2) 3/8 bolts and nuts provided near the top, tow pole end of the drum to install the drum handle as shown in the exploded view. Assemble nuts to the outside of the drum. Do not torque bolt that holds the guard - see note in the TORQUE CHART section of this manual. Oil Levels and Lubrication Be sure to check the oil levels in the engine and engine reduction unit BEFORE starting this unit. The engine warranty is VOID if it is run without oil. Consult the ENGINE MANUAL supplied with this unit for specific instructions and oil recommendations. Axle Blocks (Spring Axle Option Only) Before your mixer was shipped, wood blocks were placed in the axle springs to avoid bouncing during transport. Before operation, loosen spring bolts, remove blocks and retighten spring bolts until locknut is fully engaged. Rubber Blades The rubber blades are factory preset. Due to local preferences, some readjustment may be desired. Check Drum Dump Latch Make sure that the drum latch is engaged with the drum in the upright or mixing position. Review the following information. Specific information regarding these items can be found in the Technical Data Section or located by the Table of Contents. The following instructions were compiled to provide you information on how to obtain long and trouble free use of the mixer. Periodic maintenance of the mixer is essential. Read the manual in its entirety and follow the instructions carefully. Refer to the Technical Data Section to familiarize yourself with the machine controls and components. Failure to do so may injure you or a bystander. Buddy by Stone Mortar Mixer 29 Operation Fuel is highly flammable, handle with care. Do not refuel the engine while smoking or when near an open flame or sparks. Always stop engine before refueling. Clean up spilled fuel before starting. Avoid fires by keeping engine clean of accumulated grease and debris. Do not run unit in an enclosed, unventilated area. Avoid prolonged breathing of exhaust gases. PRE-START CHECKLIST Review the manual and check that operator and engine controls function properly before starting. Check engine oil level. Warranty is VOID if run without oil. Consult the Engine Manual supplied with this unit for specific instructions and oil recommendations. Check engine air filter. Check engine fuel level. Check hardware for looseness. If loose, tighten according to torque chart. WARNING ENGINE IS EQUIPPED WITH LOW OIL SHUT DOWN. UNIT WILL SHUT DOWN IF ENGINE OIL IS LOW. FUEL Always use fresh, unleaded high test gasoline (91 octane min). Fresh gasoline is blended for the season and reduces gum deposits that could clog the fuel system. Do not use gasoline left over from the previous season. The engine has a separate oil reservoir in the crankcase. Do not mix oil with the fuel. Unleaded gasoline is recommended for use in the engine since it leaves less combustion chamber deposits. Never tow mixer with fuel valve open. WARNING FUEL IS BOTH TOXIC AND FLAMMABLE. DO NOT SMOKE WHILE WORKING WITH FUEL. DO NOT USE NEAR OPEN FLAME. START, STORE AND REFUEL ON LEVEL GROUND TO PREVENT PERSONAL INJURY. DO NOT RUN UNIT IN AN ENCLOSED, NONVENTILATED AREA. AVOID PROLONGED BREATHING OF VAPORS AND SKIN CONTACT. SERIOUS ILLNESS OR LOSS OF LIFE COULD RESULT. Fuel Level Check the fuel level when the mixer is parked on level ground and the engine is off. WARNING Buddy by Stone Mortar Mixer 30 SET MIXER UP IN AN OPEN AREA. AVOID CLOSE PROXIMITY TO STRUCTURES OR OTHER EQUIPMENT. FAILURE TO DO SO MAY CAUSE INADVERTENT INJURY TO OPERATOR OR OTHER PEOPLE IN THE AREA. STARTING THE MACHINE Operation Warm and Cold Weather Starting 1. Disengage drive train. 2. Turn engine switch to the on position. 3. Open fuel valve. 4. Turn on choke. 5. Pull recoil until engine starts. 6. Then turn choke off gradually. 7. Always operate the engine at full speed when under load. Electric Motor Switch Located on the motor. It is used to start and stop the electric mixer. TO OPERATE Start the engine as instructed above and allow engine to reach operating temperature. Make sure that the engine cowl is closed. Never operate the mixer with the cowl open. Never operate the mixer with the drum guard open or removed. Paddle Rotation The proper rotation of paddles for mixing is clockwise rotation from the tow pole end of machine. Rotate clutch lever for paddle rotation to engage the paddles. The lever will remain in this position unless pulled and disengaged. Mixer Charging Sequence 1. Engage the paddles for mixing prior to charging the mixer. 2. Begin charging the mixer by pouring the required amount of water into drum. 3. Add bags of mortar mix. 4. Add the required amount of sand. 5. Add additional water if required to achieve desired mortar consistency. Note: When using a premix tower to charge the mixer, add the total required amount of water into drum prior to adding the premix. Buddy by Stone Mortar Mixer 31 Operation WARNING THE MIXER IS DESIGNED FOR MIXING ONLY MORTAR, PLASTER, FIREPROOFING, GROUT AND OTHER SMALL GRAINED PORTLAND CEMENT PRODUCTS. ANY OTHER USE OF THIS MIXER MAY CAUSE PREMATURE FAILURE OR GREAT PERSONAL RISK TO THE OPERATOR OR OTHER INDIVIDUALS CLOSE BY. DO NOT USE FOR MIXING ANY VOLATILE OR CORROSIVE MATERIAL. Drum Discharge After mixing for the proper length of time (homogenous mix obtained), discharge the mix from the drum using the dump handle. 1. Leave the mixing paddles engaged to help in the discharge of the mix. 2. Pull down drum dump handle to discharge the mix. 3. When the drum is completely discharged, pull up on the drum dump handle to retract the drum back to its mixing position. 4. Immediately pour in the required water for the next batch with the paddles continuing to mix. This will clean the paddles and drum between batches and help prevent dried lumps of mortar from forming and contaminating the next batch. WARNING ALWAYS WEAR SPLASH GOGGLES WHEN OPERATING THE MIXER. FAILURE TO DO SO WILL ALLOW FOREIGN PARTICLES TO ENTER EYES. WARNING NEVER OPERATE MIXER WITH ANYONE CLOSE BY. KEEP ALL UNTRAINED PERSONNEL AWAY FROM WORK AREA. Cleaning the Mixer For consistent performance, long life and continued high quality mixing of plaster or mortar, thoroughly clean the mixer inside and out at the end of each days operation. To prevent lumps of dried plaster from forming and contaminating future batches of plaster or mortar, do not allow build up of materials to form on drum guards, around paddles or anywhere inside the drum. Buddy by Stone Mortar Mixer 32 Before cleaning, shut the engine off and disconnect the spark plug wire to prevent accidental starting. Keep drum guard closed. Always keep guard lifter connected. Keep drum in upright, mixing position. Spray mixer with water before mix dries to remove accumulation. Power up mixer and rotate drum to dump position to remove debris. Sometimes it is necessary to strike the drum with a hammer to loosen dried mix. Above all, be careful not to dent the drum as this may damage the drum and void the warranty. WARNING FAILURE TO FOLLOW CLEANING INSTRUCTION AND/OR ROTATION OF DRUM WITHOUT GUARD LIFTER CONNECTED CAN RESULT IN SERIOUS INJURY. Operation SHUTTING THE MACHINE OFF 1. Retract drum until it is in its mixing position. 2. Disengage drive train by moving lever for paddle rotation to its neutral position. 3. To improve the engine service life, throttle engine down to idle for a period of 2 to 5 minutes before shutting down. 4. When idle period is up, use engine stop switch under gas tank to shut off engine. 5. Before towing mixer, always close the fuel valve and turn off gas! OPERATOR CONTROLS choke on/off throttle control recoil fuel on/off engine on/off paddle clutch engage/ disengage dump latch clutch lever EXD1300GD Buddy by Stone Mortar Mixer 33 Operation ATTACH SAFETY CHAIN TO TOWING VEHICLE Cross chain under tow pole with 4-5 inch vertical slack. Feed chain through frame of towing vehicle. Secure end of chain with latch hook as illustrated. Repeat with opposite end of chain. safety chain frame of towing vehicle latch hook TOWING Before attempting to tow this mixer, always shut off fuel supply and check the state and local laws that apply to your intended route and check the following: Buddy by Stone Mortar Mixer 34 1. Hitch attached to the towing vehicle securely. 2. Tow pole fully extended and bolted to mixer securely. 3. Safety chain hooked up properly (see illustration below and decal on mixer front post). 4 Drum in the mixing position and drum latch engaged, clutch lever in the up position. 5. Lug nuts and axle mount nuts tight. 6. On extendible axles, extend axle to full width and adjust bolts tight. Operation 7. On spring axles - spring mounting hardware tight, main springs and snubber springs not cracked or broken. 8. Tires in good shape and at proper inflation, for maximum safety and load capacity tires should be inflated to the following pressures: Tire size 6.50 x 13 @ 32 P.S.I. 9. On Spring Axles--wheel spindle on mixer dump end of machine is pinned to axle with two pins and secured with two hairpins. Make sure that spindle is fully assembled into axle and both pins are locked in place as shown prior to towing. WARNING FAILURE TO PIN SPINDLE INTO AXLE CAN RESULT IN SERIOUS DAMAGE OR INJURY. WARNING DO NOT EXCEED A TOWING SPEED OF 55 MILES/HR (90 KM/HR). FOR POOR ROAD CONDITIONS OR INCLEMENT WEATHER, REDUCE SPEED ACCORDINGLY. Refer to FRAME AND DRUM ASSEMBLY, STANDARD AXLE ASSEMBLY and SPRING AXLE ASSEMBLY sections of the Parts Manual for parts identification and location. RECOMMENDED COUPLER MAINTENANCE Read Entire Owners Manual 1. Smear ball socket and clamp face with chassis grease. Periodically, oil pivot points and sliding surfaces of coupler with SAE 30 wt. motor oil. 2. When parking or storing your trailer, keep the coupler off the ground so dirt will not build up in the ball socket. 3. Replacement instructions: Use (2) 1/2 inch grade 5 through bolts and locknuts, torque to 57 ft. lbs. Buddy by Stone Mortar Mixer 35 Notes/Notas/Notes/Note: __________________________________________________________________________________________________________________ ______________________________________________________________ _____________________________________________________________ _____________________________________________________________ ______________________________________________________________ _____________________________________________________________ _____________________________________________________________ _____________________________________________________________ ______________________________________________________________ _____________________________________________________________ _____________________________________________________________ _____________________________________________________________ ______________________________________________________________ _____________________________________________________________ _____________________________________________________________ _____________________________________________________________ ______________________________________________________________ _____________________________________________________________ _____________________________________________________________ _____________________________________________________________ ______________________________________________________________ _____________________________________________________________ _____________________________________________________________ _____________________________________________________________ ______________________________________________________________ _____________________________________________________________ _____________________________________________________________ _____________________________________________________________ ______________________________________________________________ _____________________________________________________________ _____________________________________________________________ _____________________________________________________________ ______________________________________________________________ _____________________________________________________________ _____________________________________________________________ _____________________________________________________________ ______________________________________________________________ _____________________________________________________________ _____________________________________________________________ _____________________________________________________________ ______________________________________________________________ _____________________________________________________________ _____________________________________________________________ _____________________________________________________________ ______________________________________________________________ _____________________________________________________________ _____________________________________________________________ _____________________________________________________________ 36 Stone Construction Equipment, Inc. 5. Maintenance 37 Maintenance FIRST SERVICE 50 HOURS After the 50 hour break-in period, perform the following services: Change the engine oil (See Engine Oil section). Check air filter (see Engine Air Filter section) ADDITIONAL SERVICE INFORMATION This is not a detailed engine service manual. If you want more detailed service information refer to engine manuals: Read engine Emission Warranty Statement and Engine Manual before operating or performing maintenance. IMPORTANT: FLUIDS AND LUBRICATION Engine Oil Straight SAE 30 API SH or SJ (oil with starburst certification mark) is recommended for general, all temperature use. Check daily for proper oil level; replace engine oil every 100 hours. DO NOT OVERFILL. See Engine Owners Manual for specifications. WARNING ENGINE IS EQUIPPED WITH LOW OIL SHUT DOWN. UNIT WILL SHUT DOWN IF ENGINE OIL IS LOW. Gasoline Fuel Always use fresh, unleaded high test gasoline (91 octane min). Fresh gasoline is blended for the season and reduces gum deposits that could clog the fuel system. Do not use gasoline left over from the previous season. The engine has a separate oil reservoir in the crankcase. Do not mix oil with the fuel. Unleaded gasoline is recommended for use in the engine since it leaves less combustion chamber deposits. At the end of the day, close the fuel valve. Fill fuel tank at the end of each days operation to prevent condensation in the tank. Drain and flush fuel tank every 1000 hours or 12 months. Avoid storing fuel over long periods of time. Proper fuel storage is critically important. Use clean storage and transfer tanks. Periodically drain water and sediment from bottom of tank. Store fuel in a convenient place away from buildings. Buddy by Stone Mortar Mixer 38 WARNING FUEL IS BOTH TOXIC AND FLAMMABLE. Maintenance DO NOT SMOKE WHILE WORKING WITH FUEL. DO NOT USE NEAR OPEN FLAME. ALWAYS STOP ENGINE BEFORE REFUELING. CLEAN UP SPILLED FUEL BEFORE STARTING. AVOID FIRES BY KEEPING ENGINE AND ENGINE COWL CLEAN AND FREE OF ACCUMULATED GREASE AND DEBRIS. START, STORE AND REFUEL ON LEVEL GROUND TO PREVENT PERSONAL INJURY. DO NOT RUN UNIT IN AN ENCLOSED, NON-VENTILATED AREA. AVOID PROLONGED BREATHING OF VAPORS AND SKIN CONTACTSERIOUS ILLNESS OR LOSS OF LIFE COULD RESULT. Buddy by Stone MortarMixer 39 Maintenance LUBRICATION POINTS gearcase (EXD1300GD drum seals only) pillow block bearings air cleaner trunnions engine oil dipstick wheel bearing ball hitch coupler Engine Refer to engine manual for specific engine information. Engine Oil 1. Replace oil at 20 hours, then change oil every 100 hours. Under heavy loads, change engine oil weekly. 2. Remove the oil filler cap and drain bolt. Drain oil into a suitable container 3. Clean and install the drain bolt, tighten securely. 4. Fill with recommended oil, fill to the upper limit mark on the dipstick, and tighten the oil filler cap securely. 5. Run engine for 2 3 minutes, stop engine and check oil level and check for leaks. Note: Please dispose of used motor oil in a manner that doesnt harm the environment. WARNING ENGINE IS EQUIPPED WITH LOW OIL SHUT DOWN. UNIT WILL SHUT DOWN IF ENGINE OIL IS LOW. Buddy by Stone Mortar Mixer 40 Air Filter Wash the parts with water and dry thoroughly. Remove the pre-cleaner cap to access the foam pre-cleaner and paper element. Maintenance Clean foam pre-cleaner in warm soapy water, rinse and dry thoroughly. Apply oil to the foam and squeeze out excess oil. The engine will smoke if too much oil is left in the foam. Clean the paper element by tapping the element lightly on a hard surface to remove excess dirt or blow pressurized air (30psi max) through the filter from the air cleaner cover side. Do not brush the dirt off. Reassemble the cleaned air cleaner components. Replace elements if damaged or excessively dirty. Spark Plug The recommended spark plug is a BPR6ES (NGK) or W20EPR-U (DENSO). To ensure proper engine operation, the spark plug must be properly gapped and free of deposits. Clean and replace at scheduled maintenance. Clean engine before removing spark plug. Visually inspect the spark plug and discard if insulator or tip is damaged. Check that the spark plug washer is in good condition. If spark plug is to be reused, clean with a wire brush and set gap .028-.031in(.70-.80mm). Thread the spark plug in by hand to prevent cross threading. After the spark plug is seated, tighten with a spark plug wrench to compress the washer. If installing a new spark plug, tighten ½ turn after the spark plug seats to compress the washer. If reinstalling a used spark plug, tighten 1/8 to ¼ turn after the spark plug seats to compress the washer. Note: The spark plug must be securely tightened. An improperly tightened spark plug can become very hot and may cause engine damage. Use only the recommended spark plug or equivalent. A spark plug that has an improper heat range may cause engine damage. Engine RPM Start the engine and allow it to warm up to normal operating temperature, check the idle speed 1400 +/- 100, and adjust the idle stop screw as required. · Check the full speed 3600 +/-100 and adjust the full speed stop screw as required. Cooling System The machine should be cleaned at scheduled maintenance. This should include cleaning the air inlet screens and the engine cooling fins. Wash machine with warm soapy water, rinse off mud and dirt with water, and use pressurized air(30psi max) to blow dirt and debris from engine. Valve Clearance Due to special tool requirements and training, an authorized engine dealer should perform this service unless the owner has the proper tools and proper shop manuals. Buddy by Stone MortarMixer 41 Maintenance Hardware Periodically inspect all hardware on the mixer and engine. Loose hardware can contribute to early component failure and poor performance. Some hardware is used to retain parts that have to move freely for correct operation of this unit. These items include the guard lifter and drum guard. The hardware for these items should be snug enough to prevent excessive play, yet loose enough to allow the parts to pivot freely. NOTE: Wheel Bearing Lubrication Fill wheel hub with grease to inside diameter of outer races and also fill hub grease cap. Never use grease heavier than 265 A.S.T.M. penetration (No. 2 grade). Grease bearing cone by machine or by hand method. Force grease between rollers, cone and cage. (If Ball Bearing Hub: force grease between balls.) It is not recommended that a pressure grease fitting be installed on the hub. Wheel Bearing Adjustment Tighten the adjusting nut with a 12" wrench, at the same time turn the wheel in both directions, until there is a slight bind to be sure all bearing surfaces are in contact. Then back off adjusting nut 1/6 to 1/4 turn or to the nearest locking hole to allow the wheel to rotate freely within limits of 0.001 inch to 0.010 inch end play. Lock nut at this position. Drum Seals Grease zerks daily with lithium based grease. GEARCASE CLUTCH ADJUSTMENT If the clutch begins to slip, it must be readjusted to prevent it from becoming overheated and damaged. For optimum performance, it is necessary to have between 35-55 lbs. pressure on the clutch lever when engaging the paddles. After the first 25 hours of operation, this pressure (35-55 lbs.) should be checked to assure proper engagement. It may be necessary to check periodically after that if the clutch slip. Refer to the GEARCASE ASSEMBLY drawing for parts identification and proceed as follows: Caution: Always disconnect spark plug wire(s) or electric cord before attempting to adjust the clutch. Counter-Clockwise 1. On gasoline powered models, stop engine and disconnect spark plug wire(s). On electric powered models, turn off motor and disconnect electric cord. 2. Drain the oil from the gearcase by removing the magnetic drain plug from the clutch access cover. 3. After draining the oil, remove the (4) 5/16 hex head bolts from the access cover. Remove the cover and gasket. 4. Make sure the clutch is disengaged by pulling the clutch lever towards the rear of the mixer. Buddy by Stone Mortar Mixer 42 5. Refer to the clutch drawing. Rotate the clutch until the adjustment lock bolt and adjustment lock are visible. Maintenance - on gas powered models it is easier to use the recoil starter to rotate the clutch. Make sure the spark plug wire(s) are disconnected--do not start the engine. NOTE 6. Loosen the adjustment lock bolt just enough to release the adjustment lock and rotate the adjustment lock towards the engine to get it clear. 7. Keep the clutch housing from turning and rotate the adjusting ring one notch at a time in a counterclockwise direction until a very firm pressure is felt when engaging the clutch with the lever, as the clutch snaps into engaged position. 8. When the clutch is adjusted satisfactorily, reposition the adjustment lock bolt. Reinstall the clutch access cover and access cover gasket (make sure the gasket isn't broken and that it fits properly) with (4) 5/16 hex head bolts and lock washers. Install the magnetic drain plug into the access cover and tighten the plug and access cover bolts securely. 9. Remove the oil fill plug from the upper right side of the gearcase and refill the gearcase with 2 - 1/4 quarts of SAE 90 weight oil. Replace the oil fill plug and tighten securely. 10.Reconnect spark plug wire(s) or electric cord, start engine / motor and run the mixer for a couple of minutes. Shut off allow oil level to settle and check for leaks. Double check oil level, it should be halfway across oil sight glass plug in clutch access cover. Buddy by Stone MortarMixer 43 Maintenance BELT ADJUSTMENT Belt tension should be checked weekly. The belts are adjusted by loosening the four bolts mounting the engine to the engine deck and moving the engine until the desired tension is obtained. Make sure there is a gap (1/4 inch - 3/8 inch) between the roller on the clutch lever link and the bottom of the motor mounting plate(See Picture) when the clutch is in the engaged position. Use a straight edge to maintain sheave alignment while tightening engine-mounting bolts. If the belts are in need of replacement do not mix old belts with new belts, replace all belts in the drive system. Check clutch operation for proper engagement and disengagement after the desired belt tension is obtained to ensure paddle rotation when clutch is engaged and the paddle rotation stops when clutch is disengaged. Hand Clutch Adjustment for Belt Drive Units The hand clutch mechanism for belt drive units uses an over center cam to engage and disengage the drive train at the engine sheave. Follow the belt adjustment procedure for proper operation in the engaged position. When the clutch is disengaged, belt tension is gap between roller and engine deck in engaged position released and a belt guide applies pressure to the belts to prevent them from coming off of the drive sheave. The paddles should not rotate in the disengaged position. If the paddles continue to rotate after the clutch has been disengaged, belt guide or belt tension adjustment may be necessary. To set the belt guide in the proper location, engage clutch without the motor or engine running. Set the belt guide so it just misses the top of the belt. The belt guide should not come into contact with the belts in the engaged position. Belt guide contact with the belt in the engaged position will cause premature belt wear and possible failure. Check for paddle rotation after belt guide adjustment is completed. Disengage the clutch and start the motor or engine. If paddles continue to rotate decrease the amount of belt tension using the belt adjustment procedure. Buddy by Stone Mortar Mixer 44 Maintenance CLEANING WARNING FAILURE TO FOLLOW CLEANING INSTRUCTION AND/OR ROTATION OF DRUM WITHOUT GUARD LIFTER CONNECTED CAN RESULT IN SERIOUS INJURY. For consistent performance, long life and continued high quality mixing of plaster or mortar, thoroughly clean the mixer inside and out at the end of each day's operation. To prevent lumps of dried plaster from forming and contaminating future batches of plaster or mortar, do not allow build up of materials to form on drum guards, around paddles or anywhere inside the drum. DO NOT beat on the drum with a shovel, hammer or other device to break up accumulations of dried mix, as this will dent and damage the drum. Before cleaning, shut the engine or motor and disconnect the spark plug wire or electric cord to prevent accidental starting. Keep drum guard closed. Always keep guard lifter connected. Keep drum in upright, mixing position. Spray mixer with water before mix dries to remove accumulation. Rotate drum to dump position to remove debris. STORAGE / LONG-TERM STORAGE Cleaning and Storage If equipment is taken out of operation for the Winter season or a prolonged period, follow below procedures to prevent machine or engine damage. 1. Ensure that the drum is in the dump position with engine off. 2. Completely clean mixer per cleaning instruction. 3. Drain the fuel system and fill it with the preservative fuel. If preservative fuel is not used, the system can be kept full with normal fuel, but the fuel must be drained and discarded at the end of the storage period. 4. Remove the air filter. Seal the vent pipe of the fuel tank or the fuel fill cap with waterproof tape. 5. With the fuel valve closed, allow the engine to run-out. This will ensure that the fuel bowl is dry. Buddy by Stone MortarMixer 45 Maintenance TROUBLESHOOTING Iocfjec ;d]_d[BWYai Fem[h 9Wki[ 9ehh[Yj_l[7Yj_ed <k[bb_d[fbk]][Z 9b[Wdehh[fbWY[ :_hjo\k[b\_bj[h 9b[Wdehh[fbWY[ 7_h\_bj[hZ_hjo 9b[Wdehh[fbWY[ MehdYob_dZ[hWdZf_ijedh_d]i H[fbWY[ JeeckY^e_b_dYhWdaYWi[ :hW_djefhef[hb[l[b MehdlWbl[]k_Z[i H[fbWY[ MehdYob_dZ[hWdZf_ijedh_d]i H[fbWY[ JeeckY^e_b_dYhWdaYWi[ :hW_djefhef[hb[l[b Beei[Xebjied[d]_d[ YhWdaYWi[ J_]^j[d MehdlWbl[i%lWbl[]k_Z[i H[fbWY[ MehdYob_dZ[hWdZf_ijedh_d]i H[fbWY[ JeeckY^e_b_dYhWdaYWi[ :hW_djefhef[hb[l[b E_bi[WbWj_djWa[lWbl[ Z[\[Yj_l[ H[fbWY[ ;cfjo\k[bjWda <_bbjWda Hkd%e\\im_jY^_i_dE<< fei_j_ed Cel[im_jY^jefhef[h fei_j_ed Beme_b 7ZZE_b 8[bjibeei[ J_]^j[dX[bji ;d]_d[dejfhef[hbomWhc[Z kf ?Zb[WXekj\_l[+ c_dkj[ijeh[WY^ ef[hWj_d]j[cf[hWjkh[ <k[bh[ijh_Yj_ed 9^Wd][\_bj[h E_b9edikcfj_ed 8bk[Icea[ :e[iDejIjWhj FWZZb[im_bbdej cel[ Kd_jbWYaifem[h Buddy by Stone Mortar Mixer 46 F IMPORTANT! The person attempting any of the following maintenance tasks must be authorized to do so and have read and understood all sections within this manual. Maintenance M6 M8 E2-E6 E3 M3 M4 M1 M5 M7 E7 E1 M2 99^[Ya%7Z`kij e 9b[Wd%H[fbWY[ ;D=?D; o ba [[ M o b_ W: h [^ jE ?dijhkYj_edi H;7:;C?II?EDM7HH7DJOIJ7J;C;DJ" EF;H7JEH;D=?D;C7DK7B ;'E_bB[l[b 9 ;(<k[b9WfIjhW_d[h 9 e H[fbWY[Wj)&#^hi"j^[d[l[ho'&&#^hiI7;)&M7F" I>ehI@ 9^[YaZW_bo"Yb[Wd[l[ho,#cedj^ieh'&&^hi e 9b[Wd[l[ho'&&#^hi 9 e 9b[Wd[l[ho+&#^hi"h[fbWY[[l[ho)&&#^hi ;+IfWhaFbk] e ;,;d]_d[HFC?Zb[%<kbb 9 9b[Wd[l[ho'&&#^hi"]Wfi[jj_d]$&(._dY^"h[fbWY[ [l[ho)&&#^hi 9^[Ya_Zb[Wj\kbbif[[ZHFC[l[ho)&&#^hi e 9b[Wd%XbemekjW_h_db[ji"[d]_d[\_di)&fi_cWn ;)I[Z_c[dj9kf<_bj[h ;*7_h<_bj[hFh[#Yb[Wd[h e ;-9b[Wd9eeb_d]Ioij[c 9 ;.LWbl[9b[WhWdY[ 9 9^[Ya%WZ`kij[l[ho)&&#^hi ;/<k[bJWda e C79>?D; 9b[Wd[l[hoo[Wheh)&&#^hi C'F_bbem8beYa8[Wh_d]i e B_j^_kc8Wi[=h[Wi[[l[ho+&#^hieh[l[hocedj^ C(M^[[b>kXi e H[fWYao[Whbom_j^M^[[b8[Wh_d]=h[Wi[ =h[Wi[\_jj_d]im_j^B_j^_kc8Wi[=h[Wi[ =h[Wi[\_jj_d]im_j^B_j^_kc8Wi[=h[Wi[ 9b[Wdc_n[h_di_Z[ekj%h[cel[WbbXk_bZ#kf C):hkcI[Wbi C*Jhkdd_edi 9 9 e C+C_n[h9b[Wd C,8kbb=[Wh e B_]^jbo]h[Wi[[l[ho(+&^hi C-9bkjY^Ef[hWj_ed%8[bjJ[di_ed 9 e 9^[Ya[l[ho(+^hiehm[[abo C.=[WhYWi[E_bB[l[b;N:')&&=: e 9^[Ya[l[ho.&&^him_j^I7;/&M=[WhE_b 9b[Wdkd_jWdZ_dif[Yj 9b[Wdkd_jWdZY^[Yajehgk[ C/B[WaiE_b<k[b C'&>WhZmWh[%;d]_d[Cekdji 9 9 IW\[jo' Æ:_iYedd[YjifWhafbk]eh[b[Yjh_YYehZX[\eh[i[hl_Y_d] :Wd][hÆ:edejh[\k[bm^[d[d]_d[_i^ejehicea[m^[dh[\k[b_d] 7le_Zfhebed][ZXh[Wj^_d]e\[n^Wkij]Wi[i I[[7KJ>EH?P;:;d]_d[I[hl_Y[:[Wb[hWdZ%ehH[\[hje;d]_d[I^efCWdkWb\ehFheY[Zkh[i ij Buddy by Stone MortarMixer 47 Maintenance MAINTENANCE LOG $WSQDLDÐ#TSXÐ!TCCXÐ,NQS@QÐ,HWDQRÐmÐ,@HMSDM@MBDÐ+NF .BDIJOF.PEFMÐ>>>>>>>>>>>>>>>>>>>>>>> 4FSJBM/VNCFS@@@@@@@@@@@@@@@@@@@@@@@ %BUFPG1VSDIBTF@@@@@@@@@@@@@@@@@ &OHJOF4FSJBM/VNCFS@@@@@@@@@@@@@ 6TFUIJTDIBSUUPSFDPSEEBUFTPGTFSWJDFBOEIPVSTPONBDIJOF .BJOUFOBODF 3FQMBDF0JM 3FQMBDF4QBSL1MVH 3FQMBDF&OHJOF'VFM4USBJOFS $MFBO"JS'JMUFS 3FQMBDF"JS'JMUFS $IFDL&OHJOF31. $MFBO$PPMJOH4ZTUFN $IFDL"EKVTU7BMWF$MFBSBODF (SFBTF1JMMPX#MPDL#FBSJOHT (SFBTF8IFFM)VCT (SFBTF%SVN4FBMT (SFBTF5SVOOJPOT $MFBO.BDIJOF Buddy by Stone Mortar Mixer 48 %BUF )PVST %BUF %BUF )PVST )PVST %BUF %BUF %BUF )PVST )PVST )PVST %BUF )PVST SEALS AND BEARINGS Maintenance Instructions for Seal & Bearing Assembly Kits P/N 23432 1. ITEM P/N DESCRIPTION 1 8 15 16 24017 25881 32003 32324 Washer Washer Split Bearing Seal DrumYellow QUANTITY 2 1 1 4 Disassemble drum from frame and remove. Unscrew end bolts from paddle shaft and remove spacers and bull gear. 2. Attach a three-jaw puller to ring on housing, center puller on paddle shaft and remove housing and bearing. 3. Remove worn components and clean shaft and housing as needed. 4. Assemble seals and spacers over paddle shaft, flush with drum end using soapy water mixture as lubricant. 5. Make sure seals are assembled tight up to drum end; inner lip of seals curve inwards towards drum end as illustrated. 6. Insert bearing into housing and slide over shaft and seals as illustrated. 7. Tighten housing evenly to drum end so as not to pinch seals. 8. Reassemble spacer, bull gear (if applicable), washer and bolt to paddle shaft and repeat steps 4-7 on opposite end and reassemble drum to frame. Buddy by Stone MortarMixer 49 BULL GEAR ASSEMBLY 1. Align Bull gear key way opposite to gear mesh. Never lubricate this surface. 2. Adjust pinion for tooth alignment and engagement using .010 feeler gauge. 3. Tighten all four (4) pillow block bolts before removing feeler gauge. Buddy by Stone Mortar Mixer 50 CALIFORNIA PROPOSITION 65 WARNING: Operation of this equipment and/or engine exhaust from this product contains chemicals known to the State of California to cause cancer, birth defects, and other reproductive harm. Buddy by Stone Mortar Mixer Buddy by Stone Mortar Mixer 51 Stone Construction Equipment, Inc. P.O. Box 150, Honeoye, New York 14471 Phone: (800) 888-9926 Fax: +585-229-2363 e-mail: [email protected] www: stone-equip.com A 100% employee-owned American manufacturer © 2006 Stone Construction Equipment, Inc. Printed in U.S.A. SPR