1
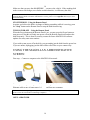
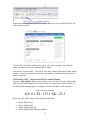
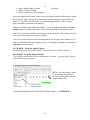
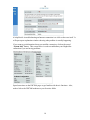
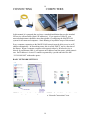
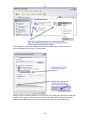
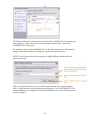
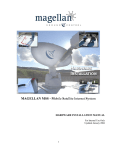
MAGELLAN MSS - Mobile Satellite Internet System
MAGELLAN MSS Users Manual
Updated 3/30/2006
2
INTRODUCTION ....................................................................................... 3
MAGELLAN FEATURES ................................................................ 3
SYSTEM OVERVIEW.......................................................................... 4
MAGELLAN SYSTEM COMPONENTS...................................................................... 7
STANDARD OPERATION ........................................................... 12
USING THE MAGELLAN ADMINISTRATIVE SCREEN...................................... 14
THE DW7000 HUGHESNET (DIRECWAY) MODEM STATUS............................ 17
CONNECTING COMPUTERS .................................................................................... 19
ROUTER/WI-FI CONFIGURATION.......................................................................... 25
CONFIGURING EMAIL ACCOUNTS ....................................................................... 25
OPTIMIZATION............................................................................................................ 26
APPENDIX A – EXPLANATION OF MAGELLAN ADMIN WINDOW............... 27
APPENDIX B – CONFIGURING THE ROUTER ..................................................... 34
APPENDIX C – TROUBLESHOOTING WI-FI CONNECTIONS .......................... 39
APPENDIX D - UPDATE MOBILE SOFTWARE..................................................... 40
APPENDIX E – EMERGENCY STOW....................................................................... 45
APPENDIX X – TROUBLESHOOTING..................................................................... 47
MAGELLAN SPECIFICATIONS ..................... 49
2
3
INTRODUCTION
Congratulations on your purchase of the
MAGELLAN MSS (Mobile Satellite System) from
Ground Control. This unique product will create a
high-speed Internet network for your Truck, Trailer
or RV at the touch of a button. The MAGELLAN is
manufactured by Ground Control and fully supported
27-7. If you have an issue, we will be there to help.
There are 3 manuals associated with the MAGELLAN:
USERS MANUAL – General instruction and operation of the MAGELLAN.
HARDWARE INSTALLATION MANUAL – (Dealer Only) The Hardware
Installation guide for the physical installing the MAGELLAN Satellite Internet System
by a certified dealer.
SYSTEM ACTIVATION MANUAL – (Dealer Only) Configuration and activation of
the MAGELLAN system by a certified installer, after the unit has been physically
installed.
MAGELLAN FEATURES
•
•
•
•
•
•
•
•
•
•
Automatic self-pointing mobile satellite Internet dish.
High-speed Internet access anywhere you park and have a clear view of the
southern sky.
Establishes a self-contained LAN at the touch of a button.
Connect additional computers… no per-seat licensing.
Establishes an optional Wi-Fi Hotspot at no additional cost.
No computer Interface control required.
All in-vehicle equipment may be located in a place different from computer
workstations.
No need to run wires to computers (if Wi-Fi is used).
Auto-Stow features if vehicle has moved.
Satellite acquire time from stowed is between 3 to 7 minutes.
3
•
•
•
•
•
•
4
compatible.
Mac, PC or any TCP-IP equipment
Remote Administration via browser…no software to load or run.
Easily swap satellite modems commissioned to different satellites for quick
backup solutions or extending a footprint range.
Optional DirecTV / Dish Network Satellite TV with universal bracket
Lightweight Design – Under 75 lbs.
Monthly Internet Service and Support provided by Ground Control 24x7
We hope you find using the MAGELLAN a liberating experience.
SYSTEM OVERVIEW
MOBILE OFFICE
Ground Control has been servicing a huge variety of companies who wish to extend their
area of influence with mobile offices.
Mobile classrooms, dental offices, oil
exploration, emergency response…
…there are literally hundreds of
applications for easy mobile high-speed
connectivity
MOBILE WI-FI HOTSPOT
Press a button and 3 to 7 minutes later, you’ve created a High-Speed Internet connection
within about a 100’ radius around your vehicle. Connect as many computers as you like
and use the MAGELLAN just like any other Internet connection you use at the office.
Freedom to work or play
…anywhere,
…anytime.
4
5
WORKS EVERYWHERE YOU TRAVEL
Well almost…The MAGELLAN will create a connection to the Internet from any
location you park your rig and where you have a clear view of the Southern sky. Satellite
transmissions need line of site, which means that if a tree or building is between you and
the satellite you wish to connect to, you will not be able to make a connection.
A handheld compass will allow you to
know the approximate direction of your
satellite so you may avoid obstacles
while parking.
For more information about the different satellites and their effective coverage areas,
please visit Ground Control at www.groundcontrol.com
MONTHLY SATELLITE INTERNET SERVICE
Ground Control manufactures the
Magellan, AND we are also the Internet
Service Provider of the system through
HughesNet (formally known as
Direcway). We also support your mobile
product 24-7 with our in-house trained
technicians.
HIGH-SPEED BROADBAND CONNECTION SPEEDS
Download speeds for the Mobile Internet service from Ground Control is normally
between 400Kbps and 2000Kbps in speed. Upload speeds are between 50 and 500 Kbps.
The Magellan .95 meter system will support the fastest speeds available.
CROSS PLATFORM COMPATIBLE
You may connect any kind of computer to the MAGELLAN system either directly by
Ethernet Cable to the router, or by wireless connection if your computer has a wireless
card.
5
6
Wireless (or Wi-Fi) is a great feature allowing you to work anywhere inside, or outside
(within range) of the rig. You also don’t need to connect anything. The MAGELLAN is
completely self-contained and will create a Local Area Network at the touch of a button.
SIMPLE OPERATION
The MAGELLAN Remote Control Panel
The MAGELLAN Administrative window
You may operate the MAGELLAN Automatic Dish from the 6 ¼ inch wide Remote
Control Panel by simply pressing the “Find Satellite” button. You may also operate the
system by any computer that is connected to the network. The MAGELLAN
Administrative screens allow you to observe and control the MAGELLAN in many ways.
TELEPHONE SERVICE
All Ground Control mobile accounts may use IG-VOIP software that allows you to make
a phone call to any phone number in the world.
This is handy when you’re in regions that are not services by cell phones.
Making a voice call to
anyone is as easy as entering
in a phone number and
clicking on "Call".
For more information on IG-VOIP, please visit the Ground Control web site.
6
7
MAGELLAN SYSTEM COMPONENTS
The MAGELLAN is made up of 4 components:
1. The Automatic Pointing Satellite Dish on the roof
2. The MAGELLAN Remote Control Panel
3. The Wireless Router
4. The HughesNet DW7000 or DW7700 Satellite Modems
THE MAGELLAN AUTOMATIC POINTING SATELLITE DISH
The first component is the MAGELLAN dish itself.
7
8
The MAGELLAN .74 meter system
stands 48” high when deployed, and
stows to 13” for traveling.
The MSS .95 meter system
stands approximately 54” high.
Height (stowed) – 14”
Length (stowed) – 59”
Width (stowed) – 53”
Weight – 85lbs
The .95 meter systems allows for
far greater speeds then the .74
meter system.
The dish weighs about 75 lbs (.74 system) and 85 lbs (.95 system) on top of the roof and
when stowed, is 13” or 14” high… well under the height of roof mounted AirConditioners. The dish moves on 3 axis: Azimuth (platform rotation), Elevation (dish
raising), and Skew (the rotation of the dish face). Unlike a dish for television, a
8
9
MAGELLAN is requires one more axis
(Skew) to be aligned with the
orbiting/stationary satellite 22,300 miles above the Equator.
THE REMOTE CONTROL PANEL
The Remote Panel is 6 ¼
inches wide and may be
mounted to any surface inside
of the rig. Two-sided Velcro
tape will work fine.
By pressing one of the buttons on the MAGELLAN Remote Panel you can “Find
Satellite” or “Stow Dish” without the need of a computer. The MAGELLAN is a selfcontained system and does not require computer intervention to create a local area
network. The Remote panel requires no power and is connected by a phone wire that
comes directly from the dish.
While the operation of the Remote Panel is fairly intuitive, more detailed instructions on
its use may be found in the OPERATIONS section of this user guide.
9
10
THE WIRELESS (Wi-Fi) ROUTER
The Magellan ships with a Linksys Wireless G Router that connects as many computers
to the dish it as you like, either directly by Ethernet cable or by Wireless connection (use
of a hub is needed for more than 3 directly connected computers).
SECURITY CONCERNS – Although the wireless functionality is a great benefit to most, you may easily
disable it with a simple button click from the router administrative screen. Once the wireless feature is
deactivated, it will behave like any non-wireless router. The Wireless Password Protection of the Linksys
is capable of 128 bit encrypted for added security.
THE HUGHESNET DW7000 SATELLITE MODEMS
The DW7000 satellite modem from HughesNet (formally known as Direcway) is the
component that allows your MAGELLAN dish to transmit and receive Internet traffic.
There are two Coax Cables that come from the dish and connect directly to the DW7000.
One coax cable is for Transmit (TX) and the other is for Receive (RX). The single
Ethernet Port on the DW7000 connects to the Linksys Router, which supplies the Internet
connection to all computers connected to the router (either by Ethernet cable or by
Wireless). The other cable goes to the AC/DC Power Supply.
10
11
DRYDOCKING - For those who need to draw as
little power as possible, you may turn off just the
MAGELLAN (by simply unplugging it from the power bar) and this will not affect your Internet
connectivity. Of course the dish must have acquired satellite before it can be unplugged.
11
12
STANDARD
OPERATION
BEFORE YOU RAISE THE DISH
Park the vehicle in as flat of a location as possible where you have a clear view of the
Southern sky. Use a compass to help you approximate the direction of the satellite so
you can quickly notice obvious obstacles. Owners of vehicles that have stabilizing jacks
should deploy them when using the mobile satellite system.
IMPORTANT FACTS – the more level you are parked, the quicker the MAGELLAN
will find the satellite. If you plan on parking often on uneven ground, you will want to
open up your Elevation Search Window size. Please refer to Appendix A on “Changing
Search Window Size”.
IMPORTANT FACTS 2 - This unit uses a compass to find the satellite. The compass can
not get an accurate if it is near large iron or steel objects, for example a nearby steel
bodied vehicle, tanks, bridges, etc. Move the vehicle away from such interference before
deploying the antenna. If search times increase above 15 minutes, recalibrate the compass
in a location free of magnetic disturbances. Caution - Do not recalibrate the compass the
first time you experience a longer than normal find time because you may be in a location
with a magnetic disturbance. Please refer to Appendix A on “Compass Calibration” on
how to perform this calibration.
All of the components of the MAGELLAN are normally plugged into the same power
bar. This is good when you need to complete reboot the whole system. Simply turn
off/on the power bar.
•
REMOTE PANEL OPERATION
12
13
RAISING THE DISH – Using the Remote Panel
Press the “Power” button on the MAGELLAN Remote Control Panel. The Green power
light will come on in a second or two. If red lights are blinking wait a minimum of 90
seconds for the system to fully boot. This booting process is actually the MAGELLAN
system waiting for the DW7000 HughesNet modems to boot. Once the modems are read
by the MAGELLAN, only the Power light will remain on but the other lights will stop
blinking.
Press the “Find Satellite” button. This dish will begin to rise up, and search for the
satellite. Once found, it will peak Azimuth and Elevation on the satellite signal, and then
move the skew of the dish face for a final “Cross Pol” test.
The “On Signal” light will glow a solid green when the satellite is found.
The “TX Enabled” light will go solid green when the system is online.
EXPLIANTION OF LED LIGHTS
Moving – The Dish is moving
Searching – The Dish is searching for the satellite in a rectangular search window.
Stowed – The dish is stowed
On Signal – The satellite has been found. It does not mean dish is online.
Error – There was an error in finding the satellite.
TX Enabeled – The HughesNet Transmitter is enabled. The system is operational.
That’s it… your network is online. You may connect any computer to the MAGELLAN
and connect to the Internet.
WARNING
The HughesNet dish transmit power
is about 1 Watt, and is relatively
harmless (Your cell phone transmits
about .7 watts). However, there is a
danger zone of the dish between the
LNB and the Dish Reflector.
Do not place any part of your body
in this danger zone while the dish
can transmit. The roof of the vehicle
is off limits to both adults and
children.
For Troubleshooting your connection.. Please visit APPENDIX X - Troubleshooting.
STOWING THE DISH – Using the Remote Panel
To Stow the dish… Simply press on the “Stow Dish” button. The dish will stow in a
couple of minutes.
13
14
Make sure that you stow the dish BEFORE you move the vehicle. If the standing dish
makes contact with bridges, trees limbs or other obstacles, it will destroy the dish.
EMERGENCY STOW - In the unlikely event that the dish is up and does not respond to stow commands,
(from the Remote Panel or from the Administrative screen), please review Appendix E for ways to stow
the dish manually.
STOP THE DISH – Using the Remote Panel
Anytime you believe the dish is in danger of hitting something while it is moving, press
the “Stop” button on the Remote Panel to stop the dish from moving.
TURN POWER OFF – Using the Remote Panel
When the Power button on the Remote Panel is on, you may press the Power button to
turn power off, but this will only turn power off on the Remote Panel itself and not the
dish electronics. This is done for security reasons for future MAGELLAN software
updates for safety auto-stow routines.
If you wish to turn power off at the dish, you can unplug just the dish from the power bar.
If you are online, unplugging just the dish will have no effect on your connectivity.
USING THE MAGELLAN ADMINISTRATIVE
SCREEN
First step… Connect a computer to the MAGELLAN network.
Connect your computer using a standard
Ethernet cable to any of router ports 1-4.
Or forget the wire and use a wireless
card from any computer.
For Instructions in configuring you computer’s network settings to connect to the MAGELLAN network,
please review the section titled “Connecting Computers”.
OPEN A BROWSER
14
15
Open a browser and type in 192.168.1.2 on the Address line to access the MAGELLAN
Administrative Screen.
The MAGELLAN Admin window will appear. (If it does not appear, check that all
cables are connected, reboot everything and try again).
Note that the “Find Satellite”, “Stow Dish” and “Stop” button at the bottom of the Admin
window. These buttons behave identically to the buttons on the Remote Panel when the
panel is turned on.
FIND SATELLITE – Using the MAGELLAN Admin Window
Press the “Find Satellite” button on the admin screen. The dish will go up, find satellite,
peak on it, and then establish a local area network. During this time, watch “Status” of
the dish and the changing angles of Azimuth, Elevation and Skew as the dish moves.
Status: Pointing Antenna
AZ: 6.1 EL: 133.1 SK: -25.3
Below are some of the status screens during a normal find:
•
•
•
•
Status: Dish Stowed
Status: Find Satellite
Status: Pointing Antenna
Status: Signal Found: Peaking Azimuth
15
•
•
•
16
Status: Signal Found: Peaking
Status: Crosspol: Testing
Status: Passed Tests: System Online
Elevation
Watch the Signal Quality meter as the system is Peaking Azimuth and Elevation. During
the “Crosspol” phase, the dish is communicating with the satellite in order to skew the
dish face. You will see mostly Skew movements during this phase. Once Crosspol
passes, the dish is connected to the Internet.
If there is a problem with finding the satellite… Press on Stop and then Press on Find
Satellite again. The dish will not stow, and will being looking for the satellite again.
If the dish is already on satellite, it will simply re-peak on signal. This is handy for when
a bus or truck air-brakes have settled overnight.
You may override GPS and Vehicle Heading and the size of your search window if you
think the MAGELLAN is not pointing correctly. Overriding commands are explained in
Appendix A of this manual.
STOW DISH – Using the Admin Window
Simply press on the “Stow Dish” button. The dish will stow in about 2 minutes.
STOP DISH – Using the Admin Window
If you need to stop the dish for any reason during it’s routine… press on Stop. The dish
will immediately stop in place.
TRICK – Save the Admin window
to your favorites list so that you
can access the MAGELLAN with
a simple button click.
A Detailed Explanation of the MAGELLAN Admin window is in APPENDIX A.
16
17
THE DW7000
STATUS
HUGHESNET MODEM
The DW7000 are the satellite modems that connect your network to the Internet via
HughesNet services. And similar to the MAGELLAN Mobile Satellite System, the
DW7000 is web accessible, and will show your current state of connectivity to
HughesNet.
To access it, type in 192.168.0.1 on the MAGELLAN network.
Note on the above screen that System Status is red and under it read “Problems”. This is
because your dish is stowed and not on signal. Click on the round System Status button
to bring up the system status screen.
Note the TX Code 6 error on the status screen because the modems are not online.
17
18
A helpful trick in troubleshooting an Internet connection is to click on the error itself. It
will open up an explanation window showing what problem is actually happening.
If you want to get information about your satellite connection, click on the round
“System Info” button. This screen below is used to troubleshoot your HughesNet
connection if you are having problems.
Spend some time on the DW7000 pages to get familiar with how it functions. Also,
make a link to the DW7000 modems to your favorites folder.
18
19
CONNECTING
COMPUTERS
In this manual, it is assumed that you have a standard installation that uses the standard
ISP service with no Public (Static) IP address(es). If you require a Public IP, your
network administrator should be more than capable of configuring the MAGELLAN
system for all connected computers. Static Routing is beyond the scope of this manual.
Every computer connecting to the MAGELLAN network must be able to receive an IP
address automatically. In networking terms, this is called “DHCP” and is a function of
the Router. When a computer connects to the network either by Wireless device or
directly by an Ethernet cable, it will request an IP address from the router, which grants it
one. An IP address is 4 sets of 3 numbers separated by a period and looks like this
“192.168.001.002” without the quotes.
BASIC NETWORK SETTINGS
STEP 1 – Open up the Networking Window
19
STEP 2 – Double Click on the “Network”
or “Network Connections” icon.
20
If you connect by Ethernet sometimes and Wireless other times, then you must set
network settings for both types of connections.
Double Click on “Internet Protocol (TCP/IP) from the window that appears (to make the
window below appear). Make sure to check the box that will bring up your network
connection on the task bar as show as a nifty trick to observer your connectivity.
20
21
Click on OK on all open windows. Once this is done, you may communicate with the
Router.
DIRECT ETHERNET CONNECTION
If you have set your Network settings to “Obtain and IP address automatically”, then
there is nothing more you have to do. You may connect to the MAGELLAN network.
Reboot your computer if you are having troubles connecting.
21
22
WIRELESS CONNECTION
If you are connecting by wireless card from your computer, you may sometimes be
presented one or more wireless connection if more than one access point is located in
your vicinity. You may also be presented by a login name and password if your wireless
network is password protected.
22
23
ACCESSING THE MAGELLAN
WIRELESS SYSTEM
STEP 1 – Open up the Control Panel
STEP 2 – Open up “Network” or
“Network Connections” from the control
panel
23
24
The Wireless Network Connection screen will list ALL available Wi-Fi connections you
may connect to. In this case, there are two networks to choose from. Notice that
CICWIRELESS is unsecured.
We named our Access Point “MyMobileNet” so this is the network you will connect to.
Simply double click on the box to bring up a password screen seen below.
NOTE - Your Wireless Network Screen may be slightly different, but they all work
relatively the same.
If the access password is correct, you will be connected to the access point as shown
below. Make sure that you type in the password perfectly. It is CaSE SeNSiTiVE. We
recommend that you cut and paste in the password and save it to a text file that you store
on your computer.
24
25
Now if the MAGELLAN dish is up and online, simply open a browser and start surfing
the Internet. If the MAGELLAN is not online, you may access the MAGELLAN
administrative screen (192.168.1.2) or the Router at (192.168.1.1), or the DW7000
modems at (192.168.0.1) from any browser window. (Make sure you add these to your
favorites list)
NOTE - The next time your computer connects to this network, you password will be
saved and you will automatically log in without having to type the password in again.
Troubleshooting – If you are having problems connecting to the Wi-Fi Network, please
visit Appendix C – Troubleshooting your Wi-Fi connection.
ROUTER/WI-FI CONFIGURATION
You Router has been configured by your installer and should function without your
intervention. If you to change the router settings, detailed instructions may be found in
Appendix B – Configuring the Router.
CONFIGURING EMAIL ACCOUNTS
25
26
Instructions for configuring you email
accounts may be found at:
http://www.groundcontrol.com/support.htm
There are several FLASH programs that
will easily guide you through this process.
OPTIMIZATION
It is wise to optimize all client computers connected to the MAGELLAN system to take
advantage of web acceleration and other speed accelerators of HughesNet.
Please visit http://www.groundcontrol.com/supportdirecway.htm and download the
LCCU (LAN Client Configuration) file. The manual for this program is also found on
this page. Make sure you reboot your computer after you’ve ran the LCCU program.
26
27
APPENDIX A –
Explanation of
MAGELLAN Admin Window
BETA ADMIN SCREEN
The MAGELLAN Administrative Screen may be reached from any connected computer
by typing in 192.168.1.2 on any browser. On the above screen, the HughesNet DW7000
modems shows a Signal Quality of 11 (anything under 31 is offline), the current Status of
the dish (Stowed), and the angles of Azimuth, Elevation and Skew. Below is a closer
look at the other screens.
27
28
INPUT DATA WINDOW
GPS – The Input Data window shows that GPS has been acquired. (The GPS Antenna is
located inside of the HughesNet Dish LNB cover at the end of the dish arm). It
sometimes takes a minute for GPS to be read after the dish is booted.
Vehicle Heading - shows a magnetic heading of 117.3 degrees. This should match a
handheld compass. If not, you will want to click on the “Compass Calibration” link on
the bottom of the “Status” window seen above.
Satellite – This shows that your modems are set to acquire satellite 99 (99 degrees
longitude, or satellite G11). DW7000 uncommissioned modems will show Satellite 99 as
the default satellite. If you have a satellite reading of 0.0, then it means that your
HughesNet modems are not responding. You can check this by clicking on the “Hughes
Modems” link on the Status Window. If the Hughes DW7000 administration screen does
not appear, then check to see the modems are connected to the Linksys router and reboot
the Magellan by unplugging it from the power bar.
OVERRIDE
Clicking on this link in the Input Data Window brings up the screen below.
You may manually override any of the selected options. For use in commissioning your
modems, you will select your chosen satellite from the “Satellite Transponders” drop
down box.
28
29
OVERRIDING GPS
Sometimes you will want to override your GPS settings if GPS can not be found… such
as being parked inside of a building where the dish may be pointing out a door, but the
GPS can not get a fix on your location.
Simply enter you GPS location and press on Calculate.
OVERRIDING SATELLITE TRANSPONDERS
The “SATELLITE:” item in the override screen is normally used for advanced cross-pol
alignments. Please refer to the MAGELLAN Activation Manual for more information on
cross-pol and switching satellite transponders.
OVERRIDING THE VEHICLE HEADING
If the dish is searching the wrong part of the sky, you on-board compass my be giving the
MAGELLAN wrong information. The Input Data window shows the “Vehicle heading”
which should be the direction you vehicle is headed. If you know it is not, you may
override the Vehicle Heading in the above screen. It’s always good to have a handheld
compass to know if your dish compass is fairly accurate.
29
30
CALCULATED SKY
POSITION WINDOW
The center box on the Magellan Administration screen
shows the estimated location of the satellite based for
Azimuth, Elevation and Skew in degrees.
OVERRIDE
These override controls allow you to calculate your own satellite coordinates. These
controls are not normally used in the normal use of the MAGELLAN.
STATUS WINDOW
The Status Window is a great resource to troubleshoot
your system if problems occur.
TX:6 RX:3 – This is the actual status of the DW7000 modems.
For a list of what TX and RX stats codes means, visit APPENDIX B
Version – This shows the current flash programming the Magellan is using. For
instructions on upgrading your Magellan to the most recent version, please visit
Appendix D – Upgrading Dish Software.
MANUAL MOVEMENTS
Clicking on this link will bring up the control panel that allows you to control the
movement of the dish manually.
30
31
You may enter the number of degrees you wish to move any of the axis by typing in the
number next to the “Step Size” on the axis you wish to move. Click on the arrows will
move that axis the number of degrees entered.
HUGHES MODEMS
This link opens the HughesNet DW7000 Administrative screen.
Note how the DW7000 window on the same screen as the MAGELLAN Admin Window.
You may always bring up the DW7000 screen on a different browser window. Simply
type in 192.168.0.1 to access this screen.
ADD TO YOUR FAVORITES
Add these links to your browsers “FAVORITES” Menu so you an easily access these screen with a simple
hyperlink in your favorites list.
192.168.1.2 - MAGELLAN Administrative Screen
192.168.1.1 - Linksys Router Administrative Screen
192.168.0.1 - DW7000 Satellite Modems Main Administrative Screen
31
32
SET UP SCREEN
This link on the MAGELLAN Status Window shows default IP address for your
DW7000 and MAGELLAN systems.
You may need to make changes to this screen if your customer has a Static IP address.
COMPASS CALIBRATION
The compass should have already been calibrated by your installer… But there may come
a time where you think the compass could be better set for normal operation.
There are two ways of doing this… The preferred way is when you are already online,
because once you’re online, the Dish knows what direction it’s pointed. Simply press on
the Compass Calibration from the MAGELLAN Main Screen, and then press on “Online
Compass Calibration”.
The other way is to use a handheld magnetic compass. To do this, take the compass and
locate the vehicle heading.
32
33
Click on Compass Calibration
Then enter in the vehicle heading
Once you click on “Save Settings” the dish will move about for a few minutes and then
“Finish” the calibration. The dish will not stow after the dish compass has calibrated.
After the calibration, the Vehicle Heading of
the Administrative window should match
(within 1-2 degrees) the vehicle heading you
entered.
That’s it for compass calibration… You do not
need to move the vehicle.
REMOVING THE ANNOYING CLICKING SOUND ON REFRESH
The MAGELLAN Admin Window is constantly refreshing itself and this makes an annoying clicking
sound. This is an Internet Explorer oddity, but the good news is that this sound may be deactivated. To do
so, open up the Windows Control panel (from the START button) and select Sounds and Audio Devices
(XP) or Sounds and Multimedia (Windows 95-98-2000). Select the SOUNDS tab at the top of the
window. Scroll down to the Program Events window until you see the “Windows Explorer” section.
Highlight the “Start Navigation” listing. Now use the drop down menu to select “None” and then click on
Apply. That’s it! The refresh clicking will disappear… Unfortunately, this is a system wide event and
Windows does not have a sound fix for individual web pages.
33
34
APPENDIX B –
ROUTER
CONFIGURING THE
The Linksys default setting is DHCP, which means it will assign any connected computer
an IP address, which is the standard installation for the MAGELLAN.
To start…Check to see that your computer is connected directly to the Router via an
Ethernet cable, (or by wireless device).
Type in 192.168.1.1 in the browser
window.
Above is the default login name and password to the router. If you forgot this password,
you will need to “HARD RESET” the router by pressing and holding the button on the
back of the router.
34
35
The router administrative screen defaults to the “Setup” menu option on the “Basic
Setup” screen. There is no need to change anything on this screen if you are doing a
standard DHCP install.
Make sure the “Local IP Address” is 192.168.1.1 (sometimes the router is not defaulted
at this number).
TURNING OFF/ON WI-FI
You may want the ability to create a Wi-Fi Hot-Spot for connecting their computer to the
Magellan system from anywhere inside (or outside) the vehicle. And then again, you
may not. To turn off the Wi-Fi feature of the MAGELLAN access the screen below:
35
36
NAMING YOUR WI-FI CONNECTION
You will want to name your Wireless Access Point.
The name you choose for your access point will broadcasted and displayed to any
computer trying to locate a wireless network to connect to.
CHANGING THE WIRELESS CHANNEL
36
37
You may choose one of eleven wireless
channels. The standard channel out of the
box is 6. Use the pull down window to select a different channel. This action will not
hide your network from view to those on different channels, but may help if you have
interference from other networks transmitting on the same channel.
ENABLE SECURITY ON WI-FI
You have the option of password protecting the customer’s Wi-Fi connection from being
accessed by outsiders. If you do not set security on the Wi-Fi network, anyone may
connect to it with ease. To set security, follow the screen below.
Once you’ve enabled security, you’ll need to generate passwords:
37
38
Write Down the Passwords for later use, or copy and paste them to a document or text
file for cutting and pasting later. Remember, these passwords are only for those who
want to connect to the Wi-Fi router. If you forget the passwords, you’ll need to directly
connect to the Wi-Fi router with an Ethernet cable.
38
39
APPENDIX C –
WI-FI CONNECTIONS
TROUBLESHOOTING
Make sure your computer’s network settings are correct (review the section on
“Connecting Computers”), and reboot your computer.
Try rebooting the MAGELLAN system via the Power Bar to reset the router. Sometimes
the router will simply lock up and it needs a power reboot.
Try accessing the router Administrative Screens by typing in 192.168.1.1. You will be
presented with the login window of the Linksys. The password to access the Linksys
Administrative Screens is different from the password use to establish a wireless
connection. The default password is below:
If you are able to connect to the Router, then it is functioning correctly.
Choose a different channel for the Router to transmit on… If there is another Wi-Fi
access point in the area, it could be causing interference. Change the Wireless Channel
on the router to a different one. Please refer to APPENDIX B for information on
changing channels.
If you forgot the password to the wireless connection, you will have to directly connect
your computer to the router with an Ethernet cable to access the router administrative
screen to review the login name and password for WEP. Please review APPENDIX B
for more information on Router Configuration.
Make sure the Router’s wireless feature is “Enabled”. Otherwise, you will not see it as
an available wireless network to connect to. Please review APPENDIX B for more
information on Router Configuration.
39
40
APPENDIX D SOFTWARE
UPDATE MOBILE
From time to time, Ground Control will make available new software to update your dish
electronics. The upgrades are always free and may be downloaded automatically while
the dish is online or from the Ground Control support pages of the MAGELLAN system.
AUTOMATIC MAGELLAN FLASH UPDATE
While you’re online, open up the MAGELLAN Main screen by typing in 192.168.1.2 in
the browser window.
From this screen, Click on the “Setup Screen” link
One of the options will list “Download Software Update”. Pressing this button while
online will updated your MAGELLAN automatically.
40
41
MANUAL MAGELLAN FLASH
UPDATE
If you are not able to use the Automatic update for one reason or another, you can
download the updater software from the Ground Control website and perform the update
using software.
Below are step-by-step instructions for properly updating your mobile system software.
STEP 1 – Download Software
From the support pages of the
Ground Control web site, click
on the version of software you
wish to update your mobile
mount to from the support
pages.
Note that the software
“revisions” are the actual date
and time of the software build.
Make sure that you download it to your computer desktop. Problems may result if you
run the Updater program from the main drive.
STEP 2 – Unzip the software
Extract or Move the contents of
this .zip file to the Desktop
STEP 3 – Check Connections
Make sure the computer is connected to the Router, as well as the MMS dish. Both
computer and the Dish should be connected to any of router ports 1-4.
41
42
IMPORTANT – Test the
connection to the dish by typing in
129.168.1.2 to make sure your
dish is responding.
STEP 4 – Run the Updater Program
Inside the folder you just unzipped, run the Update program AutoUpdate.exe. You may
wish to read the Revision History file to show you what changes have been made to this
version of software.
42
43
The AutoUpdate window will appear with the IP address 192.168.1.2 already in the
window. This is the IP address of the mobile satellite dish.
Make sure that the folder
you are looking at is the
correct folder. Use the
pull down window to
change it if you need to.
The Open window will
not always display the
folder that you ran the
program from.
Click on Update to update the Mobile Mount
The status bar window
will show progress of the
update.
43
44
(If you don’t see progress here and the
program times out, make sure that you
disable Zone Alarm or other firewall that keeps programs from accessing the Internet)
Click on OK.
STEP 5 – Reboot the dish
Unplug the dish power. Wait 15 seconds and then plug the power back in. Refresh the
Dish Administrative window.
The new version will appear on this window. That’s it… You’re dish is updated.
44
45
APPENDIX E –
EMERGENCY STOW
It is unlikely that your dish will not be able to stow through the Remote Panel or the
Administrative screen. Please review the ways below in which you may stow the dish.
MANUAL STOW PROCESS 1 – Try this first
If you do not have power to the dish, please review the other Manual Stow Procedures 2,
3 and 4 below.
•
Reboot the entire MAGELLAN system via the power bar and try again using the
Remote Control Panel Stow button or the Administrative screen on the computer.
(The Administrative screen is accessed by typing in 192.168.1.2 on any browser
window)
•
Reboot the computer and try again. Try using a different computer if you are
unable to access the Administrative screen.
•
Directly connect the Dish Ethernet Cable directly to the computer to access the
Administrative screen. Reboot the Dish after you connect the cable. Make sure
your computer is set up to automatically receive an IP address.
•
Make sure there is enough power for the Inverter… Turn on your car engine to
charge the batteries to a strength that will power the system.
MANUAL STOW PROCESS 2 – The Azimuth (Base Rotation) and Skew (Dish
face rotation) may be moved by hand by gently applying enough force to move the gears
of these two axis. To move Elevation, follow these steps:
STEP 1 – Move the Skew of the Dish Face by hand to its center position. This action
will not damage the motor if you apply gentle force until the dish moves.
STEP 2 – Rotate the Azimuth of the dish by hand as well. Again, this will not damage
the motors or gears if you apply gentle force against the dish.
STEP 3 - Remove the 4 screws that hold one side
45
STEP 4 - Remove the 6 screws from the other.
46
of the cover.
STEP 5 – Find the covered circuit board on
one side of the MAGELLAN.
Remove both plastic covers.
STEP 6 – Locate the holes on the circuit
board for you fingers. Pressing on one will
raise elevation, pressing on the other will
lower elevation.
MANUAL STOW #3 – Remove the Elevation Motor, which will allow the
Elevation gear to move freely.
MANUAL STOW PROCESS 4 – The worst of all scenarios is actually removing
the MAGELLAN. There are only 6 nuts that hold the MAGELLAN to the mounting
plate. Unscrew these nuts and the entire dish may move freely on the roof. You may
strap it down on the roof. It is not recommended that you cut the wire. Re-wiring a cut
wire is not covered by the warranty.
46
47
APPENDIX X –
TROUBLESHOOTING
REBOOT FIRST
One of the best solutions to most problems is to reboot everything and try again.
SEARCHING ISSUES
DISH GOES UP, SEARCHES, BUT THE SATELLITE IS NOT FOUND
If you believe your dish is searching the wrong part of the sky, you may “override” the
compass heading and enter your own heading on the MAGELLAN admin. Please refer
to Appendix A on “Overriding Vehicle Heading”. You may want to perform a compass
calibration… but only if you are sure there are no magnetic disturbances in the area,
which could be causing this problem.
DISH TAKES TOO LONG TO FIND SATELLITE
If you’re parking on uneven ground, the dish will take longer to find the satellite because
it is out of the primary search window. To avoid this, open up your elevation search
window (Instructions in Appendix A, Opening up your search window).
Ground Control Technical Support is available 24-7 at 805-542-0688 or by email at
[email protected]
CONNECTING TO THE NETWORK ISSUES
Never loop an Ethernet cable around a 110 VAC power line, even one twist over a large
distance can be a big problem. Keep Ethernet and power runs separated by 12 inches if
possible.
If you can’t communicate with any of the MAGELLAN equipment from your computer,
and you just powerbar reset the system, your computer may need to get a new IP address
from the router. To do this:
1. Disable the connection method (from the Network Connections inside of the
Control Panel), and re-enable it.
2. Reboot the computer, which will reassign itself an IP address when it comes back
up.
CROSS POL ISSUES
For problems connecting, you may have to manually connect to the Satellite Dish… If
you are an installer, steps in doing this are outlined in “System Activation” of the
MAGELLAN manual. PERFORMING A MANUAL CROSS POL
The Status Window is needed to help technical support.
47
48
MSS RESETTING
An MSS Magellan only resets for three reasons:
1.
The software will reset if connection to the modems is lost for 10 seconds. If the
modems are not present when the power is applied the unit will not reset because the
connection was not available at power up. To trouble shoot this problem unplug the
modem from the router and power up the mss, if the resetting problem stops you know
the problem is Ethernet related. Ethernet cables can pick up noise from 110 VAC, they
should never be looped around a 110 VAC cord (because this makes an inductive
connection like a transformer and conducts a lot of 60 HZ noise.)
2.
When the power is turned off on the keypad the mss is reset by the software. This
allows the unit to clear its memory when the customer turns it off from the keypad.
3.
If the power is noisy or removed from the MSS it will reset. We have seen poor
connections in the blue power connectors cause reset problems. We have seen noisy
generators cause reset problems. The Magellan should be plugged into a clean source of
ac, i.e. a UPS, inverter, or a computer quality power filter.
By watching the 192.168.1.2/history.htm page before the reset occurs, you can normally
find out what is causing the reset. If there is an "error connecting to" statement it’s
probably Ethernet related. If you see a "keyboard power button pressed" it’s related to the
keypad or noise on the keypad wiring. If there is no indication, but it resets or if it resets
after a find button is pressed it is probably related to noisy power or a poor power
connection.
48
49
MAGELLAN SPECIFICATIONS
BANDWIDTH SERVICE (Via HughesNet)
Download Speed……………………..
Normally 400 to 1500 Kbps
Upload Speed…….…………………..
Normally 30 to 100 Kbps
Public IP Address…………………….
Optional
Protocol……………………………….
TDMA
VOIP Phone Service…………………
Included
SATELLITE DISH (Both .74 and .95 systems)
Satellite Acquire Time (from stowed)..
Normally between 2-5 minutes
Automated Cross Poll acquisition……
Normally between 30 seconds to 2 minutes
Reflector Type………………………..
Effective Area Elliptical Offset
Mount Geometry……………………..
3 Axis Motor Drive (Elevation, Azimuth & Skew)
Polarization…………………………...
Dish Rotation Cross-Pol Isolation automated
Deployment Sensors………………….
GPS, Compass
MAXIMUM MOUNT ROTATION
Azimuth………………………………
Elevation……………………………...
Elevation Look Angles……………….
Skew………………………………….
-25 to +385 (410 degrees total)
152.5 degrees
0 to 76 Degrees from vertical
+/- 80 Degrees
NETWORK
DHCP…………………………………
NAT………………………………….
Port Mapping…………………………
Networkable………………………….
Wi-Fi Access Point…………………..
Ethernet Port…………………………
Supported by included router
Supported by included router
Supported by included router
Yes, no per-seat charges
Yes, included at no additional cost
10/100 Mbps
RF INTERFACE
Transmit Power………………………
Receive Frequency……………………
1 Watt for .74 Meter, 2 Watts on .95 system
Range 950-1450 mhz
DIMENSIONS .74 Meter System
Dish Mounting Plate………………….
Dish Stowed Dimensions…………….
Deployed Dish Height………………...
Dish Weight (with mounting plate)…..
Dish Weight without mounting plate…
Shipping Weight………………………
22” wide x 48” long
13” high x 39” wide x 48” long
Stands approximately 41” when deployed
75 lbs
65 lbs
120 lbs
DIMENSIONS .95 Meter System
Dish Mounting Plate………………….
Dish Stowed Dimensions…………….
Deployed Dish Height………………...
Dish Weight (with mounting plate)…..
Dish Weight without mounting plate…
Shipping Weight………………………
22” wide x 59” long
14” high x 53” wide x 59” long
Stands approximately 54” when deployed
85 lbs
75 lbs
140 lbs
ENVIRONMENT
Wind Deployed………………………..
Wind Stowed…………………………..
Temperature……………………………
40 MPH
140 MPH
Approx –20 degrees F to 120 degrees F
49
50
50