1
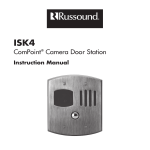
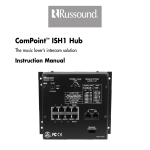
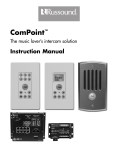
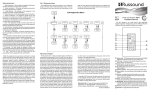
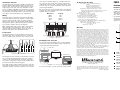
Installation and Trim
The ISK1 Keypad is designed to install in a standard US
electrical plastic wall box with an internal volume of at
least 18 cubic inches (295 cm3). The keypad occupies a
single gang and accepts a Decora® wall plate. For the
best accessibility, viewability, and microphone reception,
we recommend installing the keypads at a standard thermostat height of 58 to 60 inches (1.5 m). This may vary
according to personal preferences or requirements.
Wiring
ComPoint system components interconnect with CAT-5
cable. Run CAT-5 from the hub location to every keypad
location. If the ComPoint system is sharing speakers
with an audio system, loop the speaker cables through
the keypad locations. If dedicated speakers are being
used, run the speaker cables to the keypads.
When running CAT-5 and speaker cables, avoid running
them near AC power wiring. If you have to run the
cables parallel to electrical wiring, space the cables at
least two feet (0.6 m) from the AC power lines.
and connect a shorting jumper or a 2-watt power resistor of up to 8 ohms to the other channel. If the CAT-5
cable to the keypad is short, a jumper will suffice. If the
CAT-5 is long, use a resistor instead to reduce the load
on the keypad amplifier.
Be sure to observe correct polarity when connecting the
speaker wires. The standard color code for 4-conductor
speaker cable is as follows:
Wire Color
White
Green
Black
Red
Polarity
Left +
Left –
Right –
Right +
OUT TO SPEAKERS
L+
L-
R-
IN FROM AMPLIFIER
R+
L+
L-
R-
To speakers
To amplifier
Speaker connections
Backlight Color Selection
To select the keypad backlight color, use the miniature
slide switch located on the bottom edge of the first circuit board behind the keypad yoke.
Back view
BR BR/W G G/W O O/W BL BL/W
BR BR/W G G/W O O/W BL BL/W
110 punch-down connection
Note: Both speaker output channels must be connected,
since they are wired in series. If you are using only one
dedicated speaker, connect the speaker to one channel
ISK1 Basic Keypad
Instruction Manual
Product Overview
The ISK1 Basic Keypad is a single-gang Decora®-style
in-wall keypad for use in a ComPoint™ intercom system
with up to six zones. Besides a Talk key, it has keys for
selecting target zones and door stations, adjusting volume, and enabling Do Not Disturb mode. The keypad
has installer-selectable amber or green key backlighting.
The keypad uses one or two external speakers. A built-in
speaker relay allows it to share speakers with an audio
system for high-fidelity communications.
Warranty
The keypad provides a 110 punch-down connector for
the CAT-5 cable. Use a punch-down tool to connect the
wires according to the connector color code as shown:
The keypad also has an 8-pole screw-terminal connector
for accessing the internal speaker relay. The speakers
connect to the output terminals. The input connectors
are used for connecting an audio system amplifier when
it shares the speakers with the keypad.
User controls: 6 zone selection/indication keys
Talk key
2 door selection/indication keys
DND selection/indication key
Volume Up and Volume Down keys
Backlighting: Installer-selectable amber or green
Audio input: Built-in microphone with automatic gain control
Amplifier: Monaural (for system functions only)
Amplifier power: 2 watts
Min. load impedance: 6 ohms per channel
Speaker relay: 4-pole double-throw
Speaker relay rating: 50 watts RMS continuous
Speaker connector: 8-pole screw terminal
Speaker wire size: Up to 14 AWG (1.63 mm)
CAT-5 connector: 110 punch-down block
Power consumption: 15 VDC 800 mA maximum, 200 mA typical
Keypad style: Single-gang Decora®
Dimensions: 1.875” W x 4.188” H x 2.5” D
(4.8 x 10.6 x 6.4 cm)
Weight: 4.8 oz (136 g)
R+
Connections
BR BR/W G G/W O O/W BL BL/W
Technical Specifications
Bottom view
Amber
The Russound ISK1 Keypad is fully guaranteed for two (2) years from the
date of purchase against all defects in materials and workmanship. For
this warranty to apply, the unit must be installed and used according to its
written instructions. During this period, Russound will replace any defective parts and correct any defect in workmanship without charge for either
parts or labor. Accidental damage and shipping damage are not considered defects under the terms of this warranty. Russound assumes no
responsibility for defects resulting from abuse or servicing performed by
an agency or person not specifically authorized in writing by Russound. If
service is necessary, it must be performed by Russound. Damage to or
destruction of components due to excessive power voids the warranty. In
these cases, the repair will be made at the owner’s expense. To return for
repairs, the unit must be shipped to Russound at the owner’s expense,
along with a note explaining the nature of the service required. Be sure to
pack in a corrugated container with at least 3 inches of resilient material
to protect the unit from damage in transit.
1
2
3
1
ZONE KEYS – Select zones for intercom sessions
and indicate zones originating communications
2
TALK KEY – Activates microphone for outgoing
communications
3
DOOR KEYS – Select and indicate door stations;
also activate door strike release module
4
MICROPHONE – Picks up user’s voice for communications and ambient sounds for Listen mode
5
VOLUME KEYS – Control keypad output volume
6
DND KEY – Enables and disables Do Not Disturb
mode for the zone
Green
5 Forbes Road, Newmarket NH 03857 USA
Tel 603.659.5170 • Fax 603.659.5388
www.russound.com
Backlight color selection switch
For more information, see the ComPoint system manual.
Copyright © 2006 Russound. All rights reserved. All trademarks are the
property of their respective owners. Specifications are subject to change
without notice. Russound is not responsible for typographical errors or
omissions.
28-1212 03/31/06
5
6
Before returning a unit for repair, call Russound at 603.659.5170 for a
Return Authorization number. Write the RA number on the shipping label
and ship to: Russound, 5 Forbes Road, Newmarket NH 03857.
Russound sells product only through authorized dealers and distributors to
ensure that customers obtain proper support and service. Any Russound
product purchased from an unauthorized dealer or other source, including
retailers, mail order sellers and online sellers will not be honored or serviced under existing Russound warranty policy. Any sale of products by an
unauthorized source or other manner not authorized by Russound shall
void the warranty on the applicable product.
4
Operation
The ISK1 Keypad allows you to perform the following
functions:
• System-wide paging
• Point-to-point intercom
• Call and reply to door station
• Door strike release
• Listen to another zone
It also allows you to put the zone in Do Not Disturb
mode to prevent communications and doorbell chimes
from being heard in the room where it’s installed.
Paging
To send a page, press and hold the Talk key and speak.
Release the key when you’re done speaking.
When you press the Talk key on the sending keypad, the
receiving keypad sounds a single ping and indicates the
sending zone by lighting up that zone’s key in red.
When you release the Talk key, both the sending and
receiving keypads sound a single ping to signal the person receiving can reply hands free within 7 seconds.
After the 7 seconds, the keypads sound a double ping
to signal the end of the hands-free reply period.
To reply to an intercom from another zone before the
double ping, just speak. After the double ping, press and
hold the Talk key while you speak. You can reply as long
as the sending zone’s key is lighted red.
An intercom session is not allowed when there is a
page, door station call, or other intercom session in
progress. Also, a door station call takes precedence
and thus interrupts an intercom session in progress.
If one of the zone keys is lighted red before you press
the Talk key, first press the zone key to deselect that
zone before you send the page. Otherwise, your message will go only to the selected zone.
Door station call
If the system is busy when you press the Talk key, the
Talk key blinks red for 7 seconds.
When a visitor rings the doorbell from a door station, all
keypads indicate the calling door station for 15 seconds
by lighting the door key red.
When you press the Talk key, all keypads sound a single
ping tone to announce your message. They also indicate
which zone you’re sending from by lighting the zone key
red. The zone indication remains for 30 seconds after
you release the Talk key.
The keypads also sound a double ping when you release
the Talk key. This lets others know they can reply to the
page within 30 seconds.
To reply to a page from another zone within the 30-second limit, press and hold the Talk key and speak. Your
reply will be heard only in the zone that sent the page.
Paging is not allowed when there is a door station call,
intercom session, or other page in progress. Also, a
door station call takes precedence over a page and thus
interrupts a page in progress.
Intercom
To talk with someone in another zone, first press and
release that zone’s key. The key lights up red to indicate
the zone is selected. Press and hold the Talk key and
speak. Release the Talk key when you’re done speaking.
If the system is busy when you try to start an intercom
session, the Talk key blinks red for 7 seconds.
If the selected zone is in Do Not Disturb mode, the zone
key and DND key blink rapidly for 7 seconds.
The door station call function gives you the convenience
of answering the door from any keypad.
To reply to a door station call within the 15 seconds,
press and hold the Talk key on a keypad and speak.
Release the Talk key when you’re done speaking.
Listen to another zone
Safety Precautions
You can use your ComPoint system to continuously listen to any single zone from one or more other zones.
This is done by first turning on a keypad microphone in
the zone you want to listen to, then selecting that zone
on one or more other keypads.
For your safety, please read and follow these precautions
before installing or using this product:
To turn on a keypad’s microphone, select the keypad’s
own zone on that keypad. The Talk key lights up red and
the zone key blinks to indicate the microphone is active.
To listen to the zone with the active microphone from
other keypads, select that zone on the other keypads.
The zone key on each keypad blinks three times and
then remains lighted red to indicate the system is in
Listen mode.
To exit Listen mode, press any key other than Volume
Up or Volume Down in the zone you’re listening to.
Listen mode cannot be disabled from any other zone.
Other communication events have priority over Listen
mode and thus interrupt listening to another zone.
Do Not Disturb mode
You can prevent pages, intercom sessions, door station
calls, and doorbell chimes from being heard in any zone
by using Do Not Disturb (DND) mode.
To turn on DND mode, press and release the DND key.
The DND key lights up red to indicate DND mode is on.
Please note that you must use the Talk key when replying to a door station call. For your privacy, ComPoint
does not allow a hands-free reply to the door station.
To cancel DND mode, press any key other than Volume
Up or Volume Down. The red DND light shuts off.
When you release the Talk key, the door station sounds
a single ping to let the caller know they can answer your
reply hands free within 7 seconds. After the 7 seconds,
the door station pings twice to indicate the end of the
communication.
You can use DND mode in a zone you are listening to.
This way the zone you’re listening to won’t be disturbed
by the doorbell or communication events.
After 15 seconds, you can reconnect by selecting the
door station on the keypad and pressing the Talk key to
start a new intercom session. This does not ring the
doorbell.
Combined Listen and DND modes
To set up a zone for listening and DND, first select that
zone on its own keypad. Then press and release the
DND key.
➤ Read instructions. Read and understand all the applicable
instructions before installing or operating the product.
➤ Retain documents. Keep this manual in a convenient place
for reference.
➤ Heed warnings. Be aware of all warnings on the product
and in the instructions.
➤ Follow instructions. Install and use this product only as
described in the instructions. Don’t try to use this product in
ways it wasn’t designed for.
➤ Use indoors only. Don’t expose this product to the weather
or harsh environmental conditions such as continuous sunlight, excessive humidity, or rain.
➤ Keep product dry. Don’t use the product near water; for
example, near a bathtub, washbowl, kitchen sink, laundry
tub, in a wet basement, or near a swimming pool. Also, do
not handle the product when your hands are wet or damp.
➤ Avoid heat. Locate the product away from heat sources
such as radiators, heat registers, stoves or other appliances
that produce heat.
➤ Use the right power. Don’t connect the product directly to
electrical line voltage. Use only the power adapter provided
with the product, described in the product specifications or
installation instructions, or as marked on the product.
➤ Ground product properly. Make sure the product’s means
of grounding or polarization is not defeated.
➤ Keep product clean. From time to time, wipe off the prod-
uct with a clean soft cloth. Don’t use abrasive materials,
thinners, alcohol or other chemical solvents or materials.
➤ Avoid spills and foreign objects. Make sure liquids and
objects don’t get into the product through any openings.
➤ Get professional service. Have the product serviced only
by qualified service personnel when:
• Liquids have spilled or objects have fallen into the product
The Talk key and DND key light up red and the zone key
blinks to indicate the keypad’s microphone is on and the
zone is also in DND mode.
• The product has been exposed to rain
Door strike release
Volume adjustment
If your ComPoint system includes an optional ISDR1
Door Strike Release Module, you can activate it from a
keypad to unlock the door.
Don’t attempt to service the product yourself. Doing so will
void the warranty.
To adjust the output volume of the keypad, press either
the Volume Up or Volume Down key. This affects the
volume of all communications heard in that zone, and
depending on how the system hub is configured, may
also affect the doorbell volume in the zone.
To activate a Door Strike Release Module, press and
hold the appropriate door station key for 3 seconds.
The module then activates and the keypad confirms
activation with a buzz tone through the speakers.
The Volume Up and Volume Down keys do not affect the
volume of the multiroom audio program in the zone.
• The product doesn’t appear to operate normally
• The product is damaged
If you have any questions, call Russound at 1-800-638-8055 or
603-659-5170.