1
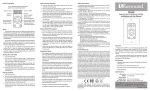
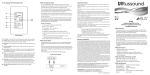
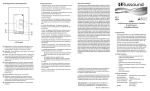
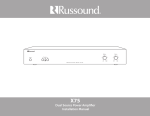
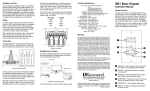
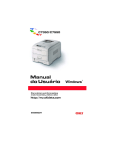
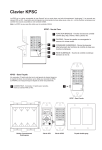
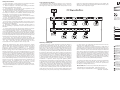
Safety Instructions
SLK-1 Diagnostics Menu
1. Read Instructions - All the safety and operating instructions
should be read before the equipment is operated.
2. Retain Instructions - The safety and operating instructions
should be retained for future reference.
3. Heed Warnings - All warnings on the equipment in the
operating instructions should be adhered to.
4. Follow Instructions - Follow all operating and user instructions.
5. Water and Moisture - The equipment should not be used
near water; for example, near a bathtub, washbowl, kitchen sink,
laundry tub, in a wet basement, or near a swimming pool.
6. Mounting - The equipment should be mounted or secured as
recommended by the manufacturer.
7. Heat - The equipment should be situated away from heat
sources such as radiators, heat registers, stoves, or other equipment
(including amplifiers) that produce heat.
8. Power Sources - The product should be connected to a power
supply only of the type described in the operating instructions or
as marked on the equipment.
9. Grounding or Polarization - Precaution should be taken so
that the grounding or polarization means of the product is not
defeated.
10. Avoid spills and foreign objects. Ensure liquids and objects
don’t get into the product enclosure through any openings.
11. Damage Requiring Service - The equipment should be
serviced by qualified service personnel when: the power supply
cord or the plug has been damaged; objects have fallen, liquid has
been spilled into the equipment; the equipment has been exposed
to rain; the equipment does not appear to operate normally; or the
equipment has been dropped or the enclosure is damaged.
12. Servicing - The user should not attempt to service the
equipment beyond that described in the operating instructions. All
other servicing should be referred to qualified service personnel.
13. Care – From time to time you should wipe any dust
accumulation from the equipment with a soft dry cloth.
The Diagnostics Menu allows the installer to run a diagnostic
check on the SLK-1 and to verify the firmware version. To access
the Diagnostics Menu, press and hold the Setup button on the
Note: This equipment has been tested and found to comply
with the limits for a Class B digital device, pursuant to part 15 of
the FCC rules. These limits are designed to provide reasonable
protection against harmful interference in a residential
installation. This equipment generates, uses and can radiate radio
frequency energy and, if not installed and used in accordance
with the instructions, may cause harmful interference to radio
communications. However, there is no guarantee that interference
will not occur in a particular installation. If this equipment does
cause harmful interference to radio or television reception, which
can be determined by turning the equipment off and on, the
user is encouraged to try to correct the interference by one of or
more of the following measures: reorient or relocate the receiving
antenna; increase the separation between the equipment and
receiver; connect the equipment into an outlet on a circuit
different from that to which the receiver is connected, or consult
the dealer or an experienced radio/TV technician for help.
This Class B digital apparatus complies with Canadian ICES-003.
Cet appareil numérique de la classe B est conforme à la norme
NMB-003 du Canada.
The Russound SLK-1 is fully guaranteed against all defects in
materialsand workmanship for two (2) years from the date of
purchase. During this period, Russound will replace any defective
parts and correct any defect in workmanship without charge for
either parts or labor. For this warranty to apply, the unit must be
installed and used according to its written instructions. If service
is necessary, it must be performed by Russound. The unit must
be returned to Russound at the owner's expense and with prior
written permission. Accidental damage and shipping damage are
not considered defects, nor is damage resulting from abuse or
from servicing by an agency or person not specifically authorized
in writing by Russound. This Warranty does not cover: Damage
caused by abuse, accident, mis-use, negligence, or improper
installation or operation; Power surges and lightning strikes;
Normal wear and maintenance; Products that have been altered
or modified; Any product whose identifying number, decal, serial
number, etc. has been altered, defaced or removed. Russound
sells products only through authorized Dealers and Distributors
to ensure that customers obtain proper support and service.
Any Russound product purchased from an unauthorized dealer
or other source, including retailers, mail order sellers and online
sellers will not be honored or serviced under existing Russound
warranty policy. Any sale of products by an unauthorized source
right side of the keypad until “Diags” appears on the display. The
menus are outlined in the diagram below. When finished, press
and release the Setup button again.
Single Line Keypad SLK-1
Installation Manual
The SLK-1 keypad is an in-wall, Decora® style single-gang
keypad designed for individual zone control of MCA-C3/MCA-C5
Multiroom Controller Amplifier (wall plate not included).
1
2
3
4
9
5
6
7
8
Warranty and Repair
or other manner not authorized by Russound shall void the
warranty on the applicable product.
Damage to or destruction of components due to application of
excessive power voids the warranty on those parts. In these cases,
repairs will be made on the basis or the retail value of the parts and
labor. To return for repairs, the unit must be shipped to Russound
at the owner's expense, along with a note explaining the nature of
service required. Be sure to pack the unit in a corrugated container
with at least three (3)inches of resilient material to protect the
unit from damage in transit. Before returning a unit for repair, call
Russound at 866.888.7466 for a Return Authorization number.
Write this number on the shipping label and ship to: Russound,
ATTN: Service, 5 Forbes Road, Newmarket, NH03857.
Copyright ©2012 Russound® All rights reserved. All trademarks
are the property of their respective owners. Russound is not
responsible for typographical errors or omissions. Specifications
are subject to change without notice.
Russound, Inc. 5 Forbes Rd., Newmarket, NH 03857, USA
tel 603.659.5170 • fax 603.659.5388 www.russound.com
technical support: 866.888.7466 e-mail: [email protected]
28-1375 08/28/12
1 System Info - SYS ON indicates other active zones and SHARED
indicates the selected source is in use in another zone.
2 LCD Panel - 5-character white backlit display shows source
name, volume and room status.
3 Volume Level - 21-segment volume level bars increase from
left to right to indicate volume level.
4 IR Confirmation/Loudness LED - Red LED blinks to confirm IR
signal reception.
5 Volume UP/Down - Raises/ lowers the volume for the room.
6 Source Select - Press and release scrolls through the available
sources.
7 Previous - Navigates backwards through menus or play
previous selectionk. Forward - Press to forward through
menu or play next selection
8 Power - Turns room ON or OFF when pressed once, button
remains lit when OFF if any other zone in the system is ON.
9 IR RECEIVER - Receives IR signals and passes them to the
controller and source equipment. Also used when the keypad
is operated using the SRC-C5 C-Series System remote controls.
Favorites - Selects preset user selected favorite settings per room
Play/Pause - Toggle between play and pause
SLK-1 Side Panel
The SLK-1 setup button is located on the right side of the
keypad (when facing front). This is covered when a trim
plate is installed.
Red LED will
blink to indicate
IR remote
reception
Press
Volume Up
or Down
buttons to
adjust volume
level
1 OS UPDATE/RUN JUMPER-The pins are jumpered
only when performing an OS update on the keypad,
and removed during normal operation.
Press and
release source
button to
scroll through
the available
sources
SLK-1-1 User Mode
2 SETUP BUTTON- Activates information and update
menus for the keypad.
3 OS UPDATE PORT- Used to directly update the
SLK-1 keypad operating system firmware. If an update is
released, it will be available online through the Support
Center on www.russound.com. Look in the
“C-Series System - Firmware & Software Updates” section
under C-Series System. The Advanced Programming
Cable is available from Russound, Part #2500-521065.
7. Reverse the order for installation, taking the following
precautions:
a. Place button caps correctly on the key mat. Make sure the key
mat is positioned properly on the circuit board and without dust
or debris on the button contact points prior to attaching the
Bezel Molding.
b. Make sure that there isn’t any debris or fingerprints on either
the display or back of the Display Lens prior to reattachment.
c. Use a clean, dry, lint-free soft cloth to gently wipe the display or back
of the Display Lens to clean if necessary. Never use cleaning agents as
this can cause streaking or permanent damage to either part.
SLK-1 Keypad to MCA Controller RJ-45 Connection
Each keypad connects to a Keypad Port on the back of the
controller (MCA-C3 controller shown below). Connections
are made using CAT-5 cable with an RJ45 connector (wiring
scheme shown below). An SA-ZX3 Keypad Splitter can be
used to add additional keypads to each zone.
Note:
Place individual
buttons on key mat
matching the
diagram below.
Key Mat
The User Mode allows the user to select an audio source,
adjust the volume level in the zone, turn the zone on / off,
and issue system-wide All On / All Off commands.
To turn the zone on or off , press and release the power
button. A press and hold while in the On state will issue an
All On command and a press and hold in the Off state will
issue an All Off command.
Key Mat
1
To select a source, press and release the source button
to increment to the next available source. The configured
source name will be displayed on the keypad's LCD panel.
Incremental volume adjustments can be made by either
pressing and releasing the volume up or down button,
while pressing and holding will ramp the level until
released or the maximum / minimum level is reached. The
volume level is displayed by a bar graph at the bottom of
the LCD panel and a numeric value is displayed during
adjustment.
The SLK-1 is designed for basic zone control. As such,
it does not provide control of connected sources or
adjustment of zone audio properties such as Bass, Treble,
Loudness or Balance. These can be configured through
SCS-C5 Configuration Software. The SLK-1 is an ideal
companion for systems using the My Russound application
on supported hand-held devices.
The FAV button is a user favorite preset. The preset can be
selected at any time to recall source selection and volume.
To store a preset, adjust the room setting and select a
source to be stored. Press and hold the Fav button until
"F1 SAVED" is displayed on the LCD panel. Now a press
and release will recall the favorite preset. When used with
the DMS-3.1, the current medial will always be saved (e.g.
SiriusXM station or internet radio station)
The FAV button corresponds to the F1 button on SRC-C5
remote.
Display
Lens
2
3
Metal Frame
Buttons
Bezel Molding
Individual Buttons
Keypad Installation
SLK-1 Front View
SLK-1 Top View
SLK-1 Color Conversion
You will need both small straight and Phillips head screwdrivers
to change the color plates on the keypad. The Bezel Molding and
Buttons will be switched for the new color plates.
1. If installed, remove the SLK-1 keypad from the wall. Gently
pull the Trim Plate off the mounting plate. Unscrew the unit
from the electrical box, and disconnect the cable.
2. Unscrew the plastic Frame Plate. Keep the Frame Plate and
screws for reattachment later.
3. Remove the Bezel Molding by gently pressing in each of the
4 locking tabs (2 per side) while pushing it away from the metal
frame. CAUTION: To avoid damage to the LCD panel, do not use
hard edged tools.
4. Remove the Display Lens from the Bezel Molding by gently
pushing from the rear to overcome the clips.
5. Once the Display Lens is removed, put aside for reattachment
later. Be careful to not damage the display.
6. Remove individual button caps by pulling them off the key mat.
1. Check whether or not you can route the wire to the
location you have chosen.
2. To install a single-gang keypad, you will need to use an
UL/CSA approved plastic single-gang (18 ci) electrical box.
3. Route CAT-5 cable to the junction box from the
MCA-C3/C5 system controller.
4. Terminate the CAT-5 cable with an RJ-45 connector,
using the T568A wiring standard.
5. Mount the keypad in the electrical box and attach the
trim plate.
Specifications
Power requirements: 12 VDC 180mA CAT-5
CAT-5e connection: RJ-45 (T568A standard)
Dimensions: 1.875"W x 2.7"D x 1.47"H
(4.7 x 6.9 x 3.7 cm)
Weight: 4.5 oz. (127.6 g)
Max cable length: 300’ (CAT-5)
Fits 1 Gang UL/CSA Approved 18 ci Junction Box
Electrical Box
SLK-1 Keypad
Frame Plate
Trim Plate