1
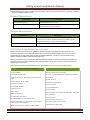
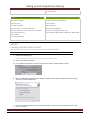
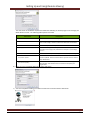
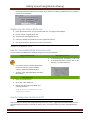
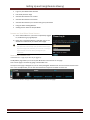
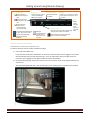
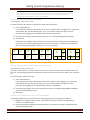
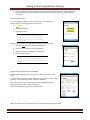
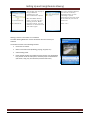
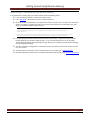
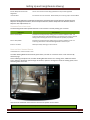
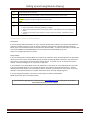
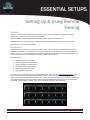
Setting Up and Using Remote Viewing Summary Setting Up & Using Remote Viewing Learn the basic concepts of WiLife Remote Viewing, and the Internet, cell phone, and Windows Mobile requirements necessary to successfully use the feature. Quickly complete remote viewing setups following the tasks listed in this document. Quick tips for remote viewing will have you watching live, streaming video from your cameras in minutes. Skill Level: Basic setup and Internet skills Background The WiLife Command Center, coupled with our WiLife Online services, delivers a powerful remote viewing capability that enables you to view live video from your cameras over the Internet and on video-enabled cell phones at any time and any where around the globe. The WiLife Remote Viewing Service intelligently links you to all of your cameras at each site where you have installed a WiLife system. Features include: Multiple-location management Password protected access control Single, multiple, and cycle viewing Selectable video quality controls Browser and cell phone access High-resolution color video In summary, you access video by first creating a WiLife Online user account at www.online.wilife.com. (This is part of the normal process of registering your WiLife system.) With each new WiLife system you install, you register the new site with your existing account. Then, when you want to check in on your property, simply login to your WiLife Online account from a Web browser or Windows Mobile cell phone and link to the video feed. The following screen depicts a WiLife account that has WiLife installed at three locations: Page 1 Setting Up and Using Remote Viewing With WiLife Online it is easy to monitor your home, office, cabin, or even grandma's house – anytime, anywhere – all from your WiLife Online account. Browser Requirements Requirement Description Common Requirements Windows Media Player 9 or later Browsers Microsoft Internet Explorer Version 6.0 and later (7.0 recommended). Firefox 2.0 and later. Network Requirements Requirement Description Network Speed Uplink and downlink speeds of 150kpbs or faster, per installation. For best results, a full-time broadband connection of 144K or greater. Lower speeds will work as long as they are broadband. Connection Type Always-on broadband connection Cell Phones & Handhelds Requirements WiLife provides remote viewing using Windows Mobile cell phones, handhelds, and web browsers. The common requirement for a compatible web browser is support for Windows Media Player 9. The common requirement for the cell phone is also support for Windows Media 9. Usually you can find these phones labeled as Windows Mobile or Windows Smartphones. WiLife is compatible with a wide range of Microsoft Windows Mobile cell phones and wireless handhelds. Of course, these devices require Internet access either through a cell service provider or wireless Internet hub, depending on your device. Note: Cell phone users should subscribe to an unlimited data plan to ensure cost effective access. Examples of Compatible Cell Phones Anextek SP230 Microsoft/Flextronics "Peabody" Audiovox PPC 6601; PPC 5050, PPC 4100; SMT 5600 Neonode N1 Asus P535, P525, P505 Cingular 8525; 8125; 3125; Dopod StrTrk S300 E-ten M600; P300B Gigabyte GSmart Gotive H41 GSMK Cryptophone Hitachi Pocket PC phone HP iPAQ hw6500 series; h6300 series HTC MteoR; TyTN; Universal; Wizard; Blue Angel; Typhoon; Amadeus; Magician iMate SmartFlip; SP5; SP5m; K-JAM; JASJAR Motorola Q; i930; CN620; MPx, MPx100 & MPx220 02 XDA; XPhone Orange SPV C600; C550 Palm Treo 700w Pantech PH-S8000T Qool Labs ADA Samsung BlackJack; SCH-i730; SCH-i600; SGH-i300 Sharp W-Zero3 Siemens SX66 Sierra Wireless Voq Phone Sprint PCS Vision; Power Vision; T-Mobile Dash; MDA; SDA Page 2 Setting Up and Using Remote Viewing Verizon XV6700 Examples of Wireless Handheld Devices: Above-Net Top100P Juniper Systems Archer Field PC Asus MyPal A730W Mitac Mio A201 Acer n20 series Dell Axim X51v; X51; X50v; X50; X30 HP iPAQ hx2400 series; hx2700 series; hx3700 series; hx4700 series i-mate PDA2 Lenovo ET960 MP2 Solutions MRT300 Olympus "Tough Digital Assistants" Toshiba e805; e400/e405; e750/e755; e800/e805 Intrinsyc Carbonado; SETUPS Creating a WiLife Online Account Note: Skip this step if you set up your Online account during the Setup Wizard! Note: To create your online account, you will need Internet access. 1) Click on the Setup button. Note: To create your online account, you will need Internet access. 2) Click on the Online tab screen. 3) In the WiLife Online Account section, click on the link (Create a WiLife Online account). 4) When the WiLIfe Setup Wizard screen displays, validate that the option "Create new remote viewing account" is selected. Click Next>. 5) Fill out the fields with basic account and site information -- first/last name and location name. Click Next> to continue. Page 3 Setting Up and Using Remote Viewing The next screen in the Wizard requests the details that will help you securely login in and manage your WiLife Online account. The following table explains each field: Field Name Description E-mail Your e-mail address doubles as your account name. Password We recommend you create a password using at least 7 characters, one of them being a number. Punctuation characters are allowed. Confirm Password Re-enter the password that you entered in the Password field. Security Question Create a security question that you can use to unlock your account should you ever forget your password. For example: “my first dog’s name.” Security Answer Enter the answer to your security question. For example: “Rocky.” I want to be notified of WiLife software and product updates Leave this checkbox marked to receive e-mail about software or camera updates. Remove the checkbox if you don’t wish to receive any notifications. I have read and agree to the Terms of Use and Privacy Policy Click this checkbox after you have read the Terms of Use page and Privacy Page. This checkbox must be marked to complete your registration. 6) When you have completed filling out the form, click Next>. 7) You have completed creating your online account from Command Center. Click Finish. Page 4 Setting Up and Using Remote Viewing Notice that the WiLife Online Account section of the Online tab screen is populated with your account's username and password: Registering with Online.WiLife.com 1) Open an Internet browser and go to online.wilfe.com. The Login screen displays. 2) Click on the link “Register Now!” link. 3) Complete the Free Registration form. 4) Follow any additional instructions from the registration process. 5) You may now view live video from your sites and cameras. REMOTE VIEWING TIPS How Do I Access My WiLife Online Account? You can access your WiLife Online Account using any one of these methods: Using the WiLife Button In Command Center, click Setup > Online tab. In the Online Connection section, click on the link http://my.online.wilife.com In Command Center, click the WiLife button located on both the Live and Playback screens. The WiLife website displays. Click the menu options My WiLife and select My Cameras. Using WiLife.Com Open an Internet browser. Click on the menu option My WiLife and select My Cameras. Online Setup Tab Link Go to http://www.wilife.com. NOTE: Go to http://online.wilife.com to go directly to your account. How Do I Remotely View From a PC? Note: This process assumes that you have completed the setup steps for Online Viewing. Online Viewing is a process that consists primarily of two easy steps – logging into your WiLife Online Account and selecting which camera or cameras you want to view. This section shows you how to accomplish those tasks. Page 5 Setting Up and Using Remote Viewing Log in to your WiLife Online Account View the video feed for one camera View the video feed for your cameras using the cycle feature Viewing video in Direct or Relayed Mode Use the My Cameras Page View the video feed for all cameras Using the Video Viewing Window LOGGING INTO YOUR WILIFE ONLINE ACCOUNT 1) Go to online.wilife.com. If you have not previously logged in, the Please Log In page displays. 2) Enter your e-mail and password. Then click Log In. You will then be redirected to your WiLife Online page. Hint: If you mark the “Remember me next time” check box, the system will automatically open your WiLife Online page. If you ever forget your password, you can come to the Log In page and click on the link “Have you forgotten your password?” USING THE MY CAMERAS PAGE online.wilife.com > Login (if you have not yet logged in) The My WiLife page allows you to see all your WiLife sites and cameras on one page. Your account page is accessed by going to online.wilife.com. The layout of the page is designed so you can easily distinguish between sites and the cameras used for each site. In the example below, you can see the information and options available for each site. Here are some hints to help you better understand the links on the page: Page 6 Setting Up and Using Remote Viewing Status LED Active Locations display with a green icon. Inactive Locations display with a red icon. Active locations without active cameras display with a yellow icon. Site Name Click on the site’s name to open the Manage WiLife Online page. [On] Connection Monitoring Is “On.” Click to turn “Off.” [St] Go to Storage page [RP] Go to Remote Playback. Manage connections with the Command Center Site and cameras Location Status Displays Available or Offline View All Allows you to see the live video from all of your cameras, all in one view. Cycle WiLife cycles through each camera’s Camera Name live video Click the link to open the viewing page feed. and view this camera’s live feed. Click to open the viewing page and view this camera’s live feed. VIEW THE VIDEO FOR ONE CAMERA online.wilife.com > Camera icon or Camera's name To view live video for just one camera, follow these steps: 1) Go to www.online.wilife.com. If you previously marked the “Remember me next time” check box when you last logged in, the system will automatically open your My Cameras page. If not, you will need to enter your login name and password. (See Logging into Your WiLife Online Account for instructions.) 2) On the My Cameras page, click on the camera icon or the camera's name, which displays beneath the camera icon. The Video Viewing Window opens and the video plays in the viewing panel, as shown in this example: Page 7 Setting Up and Using Remote Viewing Note: Complete information regarding the features you see on the Live Remote Viewing screen, as well as descriptions of Direct Mode and Relay Mode can be found in the Additional Remote Viewing Descriptions section at the end of this document. See the topics: “Using the Video Viewing Window” and “Viewing Video in Direct vs. Relayed Mode.” VIEW THE VIDEO FOR ALL CAMERAS IN ONE IMAGE online.wilife.com > Camera name or icon To view live video for all cameras at a specific site, follow these instructions: 1) Go to online.wilife.com. If you previously marked the “Remember me next time” check box when you logged in, the system will automatically open your My Cameras page. If not, you will need to enter your login name and password. (See Logging into Your WiLife Online Account for instructions.) 2) On the My Cameras page, click on cameras name or icon. The Video Viewing Window displays. 3) Click View All. Because you are viewing the video feed from all of your cameras, the viewing panel will be divided up into squares, each square displaying the video for one of the cameras. The illustration below shows what the viewing panel displays if you have 2, 3, 4, 5, or 6 cameras: 2-Camera View 3-Camera View 4-Camera View 5-Camera View 6-Camera View VIEW THE VIDEO FOR YOUR CAMERAS USING THE CYCLE FEATURE online.wilife.com > Camera name or icon The “Cycle” option allows you to view the live, secure video for all of the cameras at the selected location one at a time. The Viewing page will rotate through each camera and will continue to do so until you turn the option off. To use this feature, follow these steps: 1) Go to online.wilife.com. If you previously marked the “Remember me next time” check box when logging in, the system will automatically open your My Cameras page. If not, you will need to enter your login name and password. (See Logging into Your WiLife Online Account for instructions.) 2) On the My Cameras page, click on the cameras name or icon. The Video Viewing Window will display. Please wait while WiLife connects. 3) Click Cycle. VIEWING YOUR CAMERAS USING A CELL PHONE OR HANDHELD The following requirements must be met prior to viewing remotely using a cell phone or handheld: 1) Registered for a WiLife Online account? If not, please see the topic “Create Your WiLife Online Account” for complete details. 2) Have enabled Remote Viewing in Command Center? If not, please see the topic “Enable Command Center for Remote Viewing.” Page 8 Setting Up and Using Remote Viewing 3) Does your PDA or Cell Phone meet the system and browser requirements? To verify, please visit http://www.wilife.com/About/Requirements.aspx and view the section titled “Cell Phones and Handhelds.” First Time PDA Viewing If you are logging into WiLife Online for the first time, you will see the landing page. The landing page has three options: Login link Live Demo button WiLife Online button Hint: Click the LIVE DEMO button to connect to the demo site to view live video from a WiLife test location. This option can be used to test your handheld to make sure that it is compatible for remote viewing. Because this is the first time opening WiLife Online, you need to login. 1. Click the Login link or the WILIFE ONLINE button. 2. Enter the e-mail address and your password. 3. Mark the checkbox “Remember me next time.” 4. Click the LOG IN button. Note: Now that you have logged in, the website remembers you and will automatically direct you to the landing page. Simply click the button WILIFE ONLINE. Using the WiLife Online Page (for Handhelds) Your WiLife Online page allows you to see your WiLife network all on one page. In the example on the right, you will notice the names of your locations and cameras. You will see if a Location is Offline or Available. Each camera name is a link that opens the Video Viewing Window and displays live video for the camera you selected. Active cameras appear in green and underlined text. When you click on one of the camera links, you will see messages similar to these: Page 9 Setting Up and Using Remote Viewing This window will display as long as WiLife is connecting to the Command Center system. With handheld devices, there is a time limit of 3 viewing minutes. When the time expires, you are welcome to reconnect and view video again. For some handheld devices, you will see a security message similar to this: “Running a system command on the item might be unsafe? Do you wish to continue? Click “Yes.” Viewing a Camera’s Live Video on a Handheld The Video Viewing Window is used to show video from the camera you selected. The window consists of the following sections: Name of the Location. Video Viewing Panel. Status of the video feed (buffering, playing, stopped, etc.). Player control panel that includes the time counter, time progression bar, percent of size of video panel, and basic player control buttons (full screen, stop, play, and decrease/increase video size). Page 10 Setting Up and Using Remote Viewing Monitoring & Troubleshooting Remote Viewing If you experience a problem with your account please check the following items: I have completed the Setup > Remote tab screen setups. I have registered a WiLife Online account at online.wilife.com. My account name (email address) and password is entered correctly. You can verify this in Command Center. Go to Setup > Remote tab. Both the user name and password must match those you used when you created your WiLife Online account. Note: The password is case sensitive in both locations. If you have forgotten your WiLife online password, reset it by clicking on the “Forgotten your Password?” link on the Login page at online.wilife.com. Note: After you receive a new password from WiLife Online, you must also make the change in your host Command Center. Go to Setup > Remote tab screen to validate or edit the password. Is remote viewing enabled in WiLife Command Center? Go to Setup > Remote and check “Enable Remote Viewing” box and press "Apply Change." If you are still having an issue, try un-checking “Enable Remote Viewing,” pressing "Apply Change," followed by re-checking “Enable Remote Viewing” and pressing "Apply Change." Test your connection configurations. In Command Center, go to Setup > Remote tab screen and click the “Test” button. Test your Internet connection. Open an Internet browser. If successful, go to www.wilife.com. My Internet Browser or Cell Phone is compatible with WiLife requirements. Read system requirements. Page 11 Setting Up and Using Remote Viewing Additional Remote Viewing Descriptions ONLINE CONNECTION SECTION DESCRIPTIONS Setup > Online tab > Online Connection Section The Online Connection section of the Online tab screen allows you to check the status of your online connection and streaming video. The following screen shot is an example of this feature. ONLINE STATUS INDICATORS The Online Status field specifies whether or not you’re currently connected to our WiLife servers. For Online status, there are four primary indicators: Disconnected, Attempting Connection, Connected, and Disconnecting. Indicators Descriptions Disconnected Command Center is currently disconnected from remote viewing. Connected Command Center is connected and available for remote viewing. Attempted Connection Disconnecting Command Center is attempting to enable remote viewing. Command Center is disconnecting from remote viewing. There are also indicators that will display in the event of an error. The following table lists these indicators and describes the meaning of each. Indicators Unknown Site Account Already Exists Account Not Verified Account Unknown Data Error Communication Error Invalid Serial Connection Test Failed Descriptions Command Center has attempted to register cameras without first registering the site. The specified remote viewing account already exists. Please select another account. This WiLife remote viewing account has not been verified. Please check your email to verify this account. Unknown remote viewing account. Please verify that your email address and password are correct, and remember that the password is case sensitive. See Knowledge Base topic WiLife Online Setup for more information. Command Center cannot connect to WiLife at this time. Please try again later. If this error persists, contact your network administrator. Possible causes include firewall software, antivirus software, or a virus. Make sure you have installed all updates and patches and that your firewalls are configured to allow Werks to access the Internet. See the Knowledge Base topic WiLife Online Data Error Command Center cannot connect to WiLife at this time. Please try again later. If this error persists, contact your network administrator. Possible causes include firewall software, antivirus software, or a virus. Make sure you have installed all updates and patches and that your firewalls are configured to allow Werks to access the Internet. See the Knowledge Base topic WiLife Online Communication Error. The supplied serial number is invalid. Command Center has failed to establish a direct connection with the backend. Page 12 Setting Up and Using Remote Viewing Service Response Camera Not Registered Unknown Error One or more of the cameras being updated has not yet been registered An unknown error has occurred. Please check your event log and/or contact WiLife. Service-oriented indicators include Service Response Not Authorized, Service Response Expired, Service Response No Registered Product, Service Response Disk Full, Service Response Limit Reached, Service Response Not Implemented, etc. STREAMING STATUS INDICATORS The Streaming Status field specifies whether or not someone is actively viewing your cameras. Indicators Active - Direct Mode Active - Relay Mode Inactive - No Client Descriptions Someone is actively/currently viewing your live cameras in Direct mode - the streaming video feed is channeled directly to you because your system’s firewall settings aren't blocking the stream and the Internet capability is powerful. Someone is actively/currently viewing your live cameras in Relay mode - the streaming video feed is channeled through WiLife’s network to you. Nobody is actively viewing your live cameras. USING THE VIDEO VIEWING WINDOW online.wilife.com > Camera name or icon The Video Viewing Window automatically opens when you click on a camera's name or icon from the My Cameras page. As the following example shows, the Video Viewing Window consists of a viewing panel, additional camera icons, options to View All or Cycle through all cameras, options to change the size of the viewing panel, and a streaming video status bar. Here are some additional notes about the features and options on the screen: Components of the Viewing Window Page 13 Setting Up and Using Remote Viewing Name of the location of cameras. List of cameras set up at this location. Click on a camera to view the live, secure video. View All : Allows you to see the video from all of your cameras in one view. Cycle : Viewing panel rotates through each camera’s video. The video viewing panel displays the video. The status bar shows the following information: Status of the video-- connecting, buffering, or playing. The amount of viewing time left in the current session. Only displays if you are using Relayed Mode. The Normal and Large options allow you to alter the size of the video. The default setting is Normal. VIEWING VIDEO IN DIRECT VS. RELAYED MODE Direct Mode If you are viewing video Direct Mode, you are in the best possible mode. However, the Internet may still block video for a number of reasons. If you do not see video after a few minutes, consider switching to Relayed Mode, which uses our WiLife network and requires less browser ability. To switch to this mode, you simply click on the button SWITCH TO RELAYED MODE. You can switch back to Direct Mode at any time. There is no viewing time limit in this mode. Relayed Mode If you are viewing video in Relayed Mode, it is because your firewall or other Internet influences are preventing direct access to your video. Relayed Mode directs the video feed through WiLife’s network to you. Because of this, there is a time limit of 3 minutes for each viewing session. Of course, you can re-connect and receive another 3 minutes viewing time, as many times as you want. If you would like to use Direct Mode and not be restricted to a time limit, you can enable UPnP on your router. If you cannot enable UPnP, you can manually set ports in the router for Command Center to use. The port addresses Command Center uses are 20570 to 20575. (Contact the manufacturer of the router or see your firewall or router documentation for complete instructions about manually configuring ports.) If you are using Relayed Mode, you do not have the option to switch to Direct Mode. Mobile devices will always use Relayed mode. Send feedback regarding this Technical Note to [email protected] and reference the technical note number WL1001 R1 in the subject. Page 14