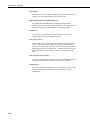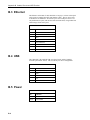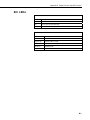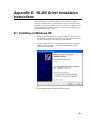
1
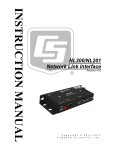
NL200 Network Link Interface
12/11
C o p y r i g h t © 2 0 1 1
C a m p b e l l S c i e n t i f i c , I n c .
Warranty
“PRODUCTS MANUFACTURED BY CAMPBELL SCIENTIFIC, INC. are
warranted by Campbell Scientific, Inc. (“Campbell”) to be free from defects in
materials and workmanship under normal use and service for twelve (12)
months from date of shipment unless otherwise specified in the corresponding
Campbell pricelist or product manual. Products not manufactured, but that are
re-sold by Campbell, are warranted only to the limits extended by the original
manufacturer. Batteries, fine-wire thermocouples, desiccant, and other
consumables have no warranty. Campbell's obligation under this warranty is
limited to repairing or replacing (at Campbell's option) defective products,
which shall be the sole and exclusive remedy under this warranty. The
customer shall assume all costs of removing, reinstalling, and shipping
defective products to Campbell. Campbell will return such products by surface
carrier prepaid within the continental United States of America. To all other
locations, Campbell will return such products best way CIP (Port of Entry)
INCOTERM® 2010, prepaid. This warranty shall not apply to any products
which have been subjected to modification, misuse, neglect, improper service,
accidents of nature, or shipping damage. This warranty is in lieu of all other
warranties, expressed or implied. The warranty for installation services
performed by Campbell such as programming to customer specifications,
electrical connections to products manufactured by Campbell, and product
specific training, is part of Campbell’s product warranty. CAMPBELL
EXPRESSLY DISCLAIMS AND EXCLUDES ANY IMPLIED
WARRANTIES OF MERCHANTABILITY OR FITNESS FOR A
PARTICULAR PURPOSE. Campbell is not liable for any special, indirect,
incidental, and/or consequential damages.”
Assistance
Products may not be returned without prior authorization. The following
contact information is for US and international customers residing in countries
served by Campbell Scientific, Inc. directly. Affiliate companies handle
repairs for customers within their territories. Please visit
www.campbellsci.com to determine which Campbell Scientific company serves
your country.
To obtain a Returned Materials Authorization (RMA), contact CAMPBELL
SCIENTIFIC, INC., phone (435) 227-2342. After an applications engineer
determines the nature of the problem, an RMA number will be issued. Please
write this number clearly on the outside of the shipping container. Campbell
Scientific's shipping address is:
CAMPBELL SCIENTIFIC, INC.
RMA#_____
815 West 1800 North
Logan, Utah 84321-1784
For all returns, the customer must fill out a "Statement of Product Cleanliness
and Decontamination" form and comply with the requirements specified in it.
The form is available from our web site at www.campbellsci.com/repair. A
completed form must be either emailed to [email protected] or faxed to
(435) 227-9579. Campbell Scientific is unable to process any returns until we
receive this form. If the form is not received within three days of product
receipt or is incomplete, the product will be returned to the customer at the
customer's expense. Campbell Scientific reserves the right to refuse service on
products that were exposed to contaminants that may cause health or safety
concerns for our employees.
NL200 Table of Contents
PDF viewers: These page numbers refer to the printed version of this document. Use the
PDF reader bookmarks tab for links to specific sections.
1. Introduction..................................................................1
2. Cautionary Statements................................................1
3. Quickstart .....................................................................1
3.1
3.2
3.3
3.4
Physical Set-up .........................................................................................1
Configuring the NL200 ............................................................................3
LoggerNet Set-up .....................................................................................3
Connect.....................................................................................................4
4. Overview.......................................................................5
5. Specifications ..............................................................7
6. Configuring the NL200 ................................................9
6.1 Configuring the NL200 via Network Connection ....................................9
6.2 Configuring the NL200 via USB..............................................................9
6.3 Configuring the NL200 via Telnet .........................................................10
7. Operation....................................................................11
7.1 Bridge Mode ...........................................................................................11
7.1.1 Physical Set-up..............................................................................11
7.1.2 Configuring the NL200.................................................................11
7.1.3 Configuring the Datalogger ..........................................................11
7.1.4 LoggerNet Set-up..........................................................................11
7.1.5 Connect .........................................................................................12
7.2 Serial Server ...........................................................................................12
7.2.1 Physical Set-up..............................................................................12
7.2.2 Configuring the NL200.................................................................13
7.2.3 LoggerNet Set-up..........................................................................14
7.2.4 Connect .........................................................................................15
7.2.5 Serial Sensors................................................................................15
7.3 PakBus Router ........................................................................................15
7.3.1 Physical Set-up..............................................................................15
7.3.2 Configuring the NL200.................................................................16
7.3.3 LoggerNet Set-up..........................................................................17
7.3.4 Connect .........................................................................................17
7.4 TLS .........................................................................................................17
7.4.1 HTTPS ..........................................................................................18
7.4.2 DevConfig TCP Encrypted Communication to the NL200 ..........19
i
NL200 Table of Contents
7.4.3 TLS Serial Server ......................................................................... 19
7.4.4 TLS Proxy Server......................................................................... 20
8. Applications ...............................................................21
8.1 Working around Firewalls ..................................................................... 21
8.1.1 Configuring the NL200 ................................................................ 22
8.1.2 Configuring the Datalogger.......................................................... 22
9. Troubleshooting.........................................................22
Appendices
A. Glossary ................................................................... A-1
B. Cables, Pinouts and LED Function........................ B-1
B.1
B.2
B.3
B.4
B.5
B.6
CS I/O.................................................................................................. B-1
RS-232................................................................................................. B-1
Ethernet ............................................................................................... B-2
USB ..................................................................................................... B-2
Power................................................................................................... B-2
LEDs ................................................................................................... B-3
C. NL200 Settings ........................................................C-1
C.1
C.2
C.3
C.4
C.5
C.6
Main Tab ............................................................................................. C-1
RS-232 Tab ......................................................................................... C-3
CS I/O Tab .......................................................................................... C-5
Net Services Tab ................................................................................. C-6
TLS Proxy Server Tab......................................................................... C-8
TLS Tab ............................................................................................ C-10
D. NL200 Driver Installation Instructions...................D-1
D.1
D.2
D.3
D.4
Installing on Windows XP .................................................................. D-1
Installing on Windows Vista............................................................... D-3
Installing on Windows 7 ..................................................................... D-4
Oops! What if you plug the NL200 into your computer before
installing the drivers? ...................................................................... D-4
E. Sending a New OS to the NL200 ............................ E-1
Figures
3-1.
3-2.
3-3.
4-1.
4-2.
4-3.
NL200 with CR800 (external power) ..................................................... 2
NL200 with CR800 (powered from datalogger) .................................... 2
LoggerNet Setup..................................................................................... 4
NL200..................................................................................................... 5
Bridge Mode enabled.............................................................................. 5
Bridge Mode Disabled............................................................................ 6
ii
NL200 Table of Contents
5-1.
7-1.
7-2.
8-1.
NL200 dimensions ..................................................................................7
Bridge Mode LoggerNet Setup .............................................................12
Serial Server LoggerNet Setup..............................................................14
Working around firewalls......................................................................21
B-1.
B-2.
B-3.
B-4.
B-5.
B-6.
B-7.
CS I/O Pinout......................................................................................B-1
RS-232 Pinout.....................................................................................B-1
Ethernet Pinout ...................................................................................B-2
USB Micro-B......................................................................................B-2
Power In..............................................................................................B-2
Power LED .........................................................................................B-3
Ethernet LED ......................................................................................B-3
Tables
iii
NL200 Table of Contents
iv
NL200 Network Link Interface
1. Introduction
The NL200 Network Link Interface allows Campbell Scientific dataloggers to
communicate over a local area network or a dedicated Internet connection.
This Ethernet interface can be connected to either the datalogger’s CS I/O port
or RS-232 port.
2. Cautionary Statements
•
The device driver for the NL200 must be installed on your computer
before you can connect to the NL200 via USB. See Appendix D for
instructions on installing the device driver.
•
Device Configuration Utility 2.01 or higher is required to communicate
with the NL200. The latest Device Configuration Utility can be
downloaded from our website, www.campbellsci.com/downloads.
•
CR1000, CR3000, and CR800-series dataloggers require operating system
version 23 or higher in order to operate with the NL200 in bridge mode.
The latest operating systems can be downloaded from our website,
www.campbellsci.com/downloads.
•
Ensure maximum protection against surges. Use a shielded Ethernet cable
or external surge protection. Keep RS-232 and CS I/O connections short.
3. Quickstart
Out of the box, the NL200 is configured for operation as a CS I/O and RS-232
serial server. In this mode, the NL200 can be used to communicate with nearly
all current Campbell Scientific devices over an Ethernet / Internet network
connection.
3.1 Physical Set-up
Power the NL200 through the barrel connector jack located on the edge of the
device. Connect the NL200 to your local network using an Ethernet cable,
attaching one end to the NL200's Ethernet port and the other end to your
network. Connect the supplied SC12 serial cable from the NL200’s CS I/O
port to the datalogger’s CS I/O port or from the NL200’s RS-232 port to the
datalogger’s RS-232 port.
1
NL200 Network Link Interface
FIGURE 3-1. NL200 with CR800 (external power)
FIGURE 3-2. NL200 with CR800 (powered from datalogger)
2
NL200 Network Link Interface
3.2 Configuring the NL200
NOTE
NOTE
INSTALL the DEVICE DRIVER BEFORE plugging the NL200
into your PC for the first time. You will need the device driver
properly installed before you can connect to the NL200 via USB.
See Appendix D for instructions on installing the device driver.
•
Ensure the NL200 is powered.
•
Connect the supplied USB cable between a USB port on your computer
and the USB port on the NL200.
•
Open Device Configuration Utility.
•
Under Device Type, select “NL200”.
•
Click the browse button next to “Communication Port”.
•
Select the port labeled “NL200”.
•
Click “OK”.
•
Click “Connect”.
•
To enter a static IP address, select ‘disable’ in the Use DHCP field. Then
input the IP Address, Network Mask and Default Gateway. These values
can be provided by your network administrator.
•
If a dynamic address is to be used, the network information acquired via
DHCP can be seen on the NL200 tab.
•
Click “Apply” to save your changes.
It is recommended that a static IP address be given to the NL200
for most applications so that the path to the device is always
known.
3.3 LoggerNet Set-up
The next step is to run LoggerNet and configure it to connect to the datalogger
via the NL200.
•
In LoggerNet’s Setup Screen press Add Root and choose IPPort. Input the
NL200’s IP address and port number. The IP address and port number are
input on the same line separated by a colon. If the NL200 is connected to
the datalogger via CS I/O, then enter the CS I/O Serial Server port number
after the IP address (e.g., 192.168.12.144:6783). If the NL200 is
connected to the datalogger via RS-232, then enter the RS-232 Serial
Server port number after the IP address (e.g., 192.168.12.144:6784). (The
CS I/O Serial Server default port number is 6783. The RS-232 Serial
Server default port number is 6784.)
•
Add a PakBus Port.
3
NL200 Network Link Interface
•
Add the datalogger and input the PakBus address of the datalogger.
•
Press Apply to save the changes.
•
You can verify your settings are correct by selecting the datalogger in the
Network Map, selecting the Clock tab, and pressing “Check Clocks”. If
your settings are correct, you should see the current clock of your server
and datalogger.
FIGURE 3-3. LoggerNet Setup
3.4 Connect
You are now ready to Connect to your datalogger using the LoggerNet Connect
Screen.
4
NL200 Network Link Interface
4. Overview
The NL200 Network Link Interface is a device used to communicate with
Campbell Scientific dataloggers and peripherals using an Ethernet 10/100
Mbps communications link. The NL200 includes a CS I/O port and a RS-232
port for communication. A USB device port is used for configuring the NL200
device.
FIGURE 4-1. NL200
The NL200 can be configured to bridge Ethernet and CS I/O communications
(Bridge Mode Enabled). This mode is used for providing access to the internal
IP functionality of the CR800/850, CR1000, and CR3000 (e.g., web page
access, email, FTP, etc.). Bridge Mode does not utilize PPP. Instead, raw IP
packets are transferred between the Ethernet and CS I/O connections.
FIGURE 4-2. Bridge Mode enabled
With Bridge Mode disabled, the NL200 can be configured to act as a Serial
Server and/or a PakBus Router. The NL200 can act as a Serial Server and
PakBus Router simultaneously. However, each communication port (R2-232
and CS I/O) can only connect to one client (Serial Server or PakBus Router).
Therefore, you can have an RS-232 Serial Server and a CS I/O Serial Server,
an RS-232 Serial Server and a CS I/O PakBus Router, an RS-232 PakBus
Router and a CS I/O Serial Server, or an RS-232 PakBus Router and a CS I/O
5
NL200 Network Link Interface
PakBus Router. In addition, the NL200 can act as TLS Proxy Server. The
TLS Proxy Server is independent of other modes.
FIGURE 4-3. Bridge Mode disabled
Some reasons you might want to use each of these modes are described below.
Refer to Sections 6 and 7 for information on setting up your NL200 for each
mode.
Campbell Scientific's LoggerNet software is used to communicate with the
dataloggers once the NL200 is configured properly and connected to a
network.
6
NL200 Network Link Interface
Bridge Mode
•
Adds an Ethernet network interface to a CR800/850, CR1000, CR3000,
CS110, ET107 or RAWS.
•
Allows you to use the datalogger’s internal IP functionality (web page
access, email, FTP, etc.).
Serial Server
•
Allows access to a CR10X-PB over Ethernet (CS I/O Serial Server).
•
Allows access to a CR200X over Ethernet (RS-232 Serial Server).
•
Allows access to a serial sensor over Ethernet (RS-232 Serial Server).
•
Provides an Ethernet to RF500M/RF4XX Base. (RS-232 Serial Server).
•
The connection can be secured via TLS. (See Section 7.4).
PakBus Router
•
Allows you to connect to a PakBus Device on the RS-232 port and a
PakBus Device on the CS I/O port using only one TCP port.
•
Allows a device on the RS-232 port and a device on the CS I/O port to
communicate without routing through the Ethernet.
TLS Proxy Server
•
Adds an encrypted Ethernet network interface to a CR800/850, CR1000,
CR3000, CS110, ET107 or RAWS.
5. Specifications
2.65
General
6.3 oz (177 g)
6.3" x 2.65" x 1" (16 x 6.73 x 2.54 cm)
1.0
FIGURE 5-1. NL200 dimensions in inches
7
NL200 Network Link Interface
Power
DC Barrel Connector (not CS I/O or USB)
7-20 VDC
50 mA active, 2 mA standby @ 13 VDC
NOTE
Standby power is when the IPNetPower instruction has been
used to turn off power to the Ethernet. See the CRBasic help for
an example of using the IPNetPower instruction. Note that the
IPNetPower instruction is only applicable in Bridge Mode.
Operating Temperature
Standard -25° to +50°C
Configuration
Device Configuration Utility over USB (Micro-B) or Ethernet
Telnet console over Ethernet
CS I/O Port
SDC 7, 8, 10, 11 (does not support ME)
9600 to 115.2 kbps
RS-232 Port
DTE
1200 bps to 115.2 kbps
Ethernet
10/100 Mbps, IEEE 802.3, Auto-MDIX
IPv4, TCP, DHCP, Ping, Telnet, TLS, PakBus
Miscellaneous
Supports 20 simultaneous TCP Connections
Up to 10 of the 20 TCP connections can be used for TLS
PakBus Router supports 50 routes
Compliance
RoHS Compliant
Magnetic Isolation, ESD and Surge tested
The NL200 is encased in metal and meets requirements for a Class B
device under European standards:
APPLICATION OF COUNCIL DIRECTIVE(S)
2004/108/EC
STANDARD(S) TO WHICH CONFORMITY IS DECLARED:
EN61326-1;2006
8
NL200 Network Link Interface
6. Configuring the NL200
The NL200 is configured using the Device Configuration Utility (DevConfig).
You can connect your NL200 to DevConfig using either a network connection
or USB.
6.1 Configuring the NL200 via Network Connection
NOTES
The NL200 must have an IP address before connecting via a
network connection. If the address cannot be obtained via
DHCP, you will need to configure your NL200 via USB the first
time it is set up.
When the NL200 is in Bridge Mode, it can not be configured via
a network connection. It can only be configured via USB.
•
Ensure the NL200 is powered and connected to your network.
•
Launch DevConfig.
•
Under Device Type, select “NL200”.
•
Check the box labeled “Use IP Connection”.
•
Click the browse button next to “Communication Port”.
•
Select the NL200 to be configured from the resulting pop-up window.
•
Enter “NL200” in the TCP Password box. (“NL200” is the default
administrative password. It can be changed via the DevConfig
Deployment/NL200 tab.)
•
Click “OK”.
•
Click “Connect”.
•
Configure the NL200 as needed for your application.
•
Click “Apply” to save your changes.
6.2 Configuring the NL200 via USB
NOTE
INSTALL the DEVICE DRIVER BEFORE plugging the NL200
into your PC for the first time. You will need the device driver
properly installed before you can connect to the NL200 via USB.
See Appendix D for instructions on installing the device driver.
•
Ensure the NL200 is powered.
•
Connect the supplied USB cable between a USB port on your computer
and the USB port on the NL200.
9
NL200 Network Link Interface
•
Open DevConfig.
•
Under Device Type, select “NL200”.
•
Click the browse button next to “Communication Port”.
•
Select the port labeled “NL200”.
•
Click “OK”.
•
Click “Connect”.
•
Configure the NL200 as needed for your application.
•
Click “Apply” to save your changes.
6.3 Configuring the NL200 via Telnet
NOTE
10
The NL200 must have an IP address before connecting via
Telnet. You will need to configure your NL200 via USB or
Network Connection with DHCP the first time it is set up.
Telnet is not available in Bridge Mode.
•
Ensure the NL200 is powered and connected to your network.
•
Type Telnet <NL200 IP address> at a command prompt. (If you have
changed the NL200’s Telnet Port Number from its default value of 23, you
will need to append this to the IP address with a space. For example, if the
Telnet Port Number has been changed to 40, type: Telnet 192.168.12.144
<space> 40.)
•
Input the NL200 Admin Password (default password is nl200).
•
Type help to see a list of the functionality available when connected to the
NL200 through telnet.
•
Type edit and press Enter to edit the settings of the NL200.
•
As each NL200 setting is shown, press Enter to accept the current value
shown in parenthesis. Type a new value and press Enter to change the
value.
•
After progressing through all of the NL200 settings, type Save to accept
the changes or Cancel to discard the changes.
•
Type bye to exit Telnet.
NL200 Network Link Interface
7. Operation
This section describes how to configure your NL200 for different operational
modes. See Section 4 for help in determining which mode to use.
7.1 Bridge Mode
7.1.1 Physical Set-up
Power the NL200 through the barrel connector jack located on the edge of the
device. Connect the NL200 to your local network using an Ethernet cable,
attaching one end to the NL200's Ethernet port and the other end to your
network. Connect the supplied SC12 serial cable from the NL200’s CS I/O
port to the datalogger’s CS I/O port.
7.1.2 Configuring the NL200
Connect to the NL200 in DevConfig (see Section 6). In the NL200 tab, set
Bridge Mode to ‘enable’.
7.1.3 Configuring the Datalogger
NOTE
•
Connect a serial cable from the PC COM port to the datalogger’s RS-232
port.
•
Open DevConfig. Select the device type of the datalogger (CR800,
CR1000, or CR3000), the appropriate Communication Port and baud rate.
Press the “Connect” button to connect to the datalogger.
•
Under CS I/O Interface on the TCP/IP tab, input the IP Address, Subnet
Mask and IP gateway. These values can be provided by your network
administrator. If using DHCP, the address will automatically be displayed.
•
Press the “Apply” button to save the changes and then close DevConfig.
The NL200 must be connected to the datalogger before
configuring the datalogger with DevConfig. If it is not
connected, the TCP/IP settings will not be displayed.
7.1.4 LoggerNet Set-up
The next step is to run LoggerNet and configure it to connect to the datalogger
via the Ethernet port. (See example in Figure 7-1 below.)
•
In LoggerNet’s Setup Screen press Add Root and choose IPPort. Input the
datalogger’s IP address and port number. The IP address and port number
are input on the same line separated by a colon. (The datalogger’s default
port number is 6785. It can be changed using DevConfig or by modifying
its value in the Status Table. Unless firewall issues exist, the port number
does not need to be changed from its default value.)
•
Add a PakBus Port.
•
Add the datalogger (CR800, CR1000, or CR3000) and input the PakBus
address of the datalogger.
11
NL200 Network Link Interface
•
You can verify your settings are correct by selecting the datalogger in the
Network Map, selecting the Clock tab, and pressing “Check Clocks”. If
your settings are correct, you should see the current clock of your server
and datalogger.
FIGURE 7-1. Bridge Mode LoggerNet Setup
7.1.5 Connect
You are now ready to connect to your datalogger using the LoggerNet Connect
Screen.
7.2 Serial Server
The NL200 can tunnel RS-232 and CS I/O serial communications over
Ethernet. Any packet sent to the configured Ethernet IP port will have the IP
layer removed, and the serial data is then directed to the serial connection.
7.2.1 Physical Set-up
Power the NL200 through the barrel connector jack located on the edge of the
device. Connect the NL200 to your local network using an Ethernet cable,
attaching one end to the NL200's Ethernet port and the other end to your
network. Connect the supplied SC12 serial cable from the NL200’s CS I/O
port to the datalogger’s CS I/O port or from the NL200’s RS-232 port to the
datalogger’s RS-232 port.
12
NL200 Network Link Interface
7.2.2 Configuring the NL200
RS-232 Serial Server
•
Connect to the NL200 in DevConfig (see Section 6).
•
Apply Factory Defaults. (Applying factory defaults is the easiest way to
put the NL200 in Serial Server mode. However, if you have other settings
that you do not wish to clear, you can just ensure that the settings below
are configured correctly.)
•
On the NL200 tab:
o
•
Set Bridge Mode to ‘disable’.
On the RS-232 tab:
o
Set Configuration to ‘TCP Serial Server’.
o
Set Baud Rate to baud rate of attached device.
o
Make note of the Serial Server Port. (The default RS-232 Serial
Server Port is 6784. Typically it is not necessary to change this entry
from its default.)
CS I/O Serial Server
•
Connect to the NL200 in DevConfig (see Section 6).
•
Apply Factory Defaults. (Applying factory defaults is the easiest way to
put the NL200 in Serial Server mode. However, if you have other settings
that you do not wish to clear, you can just ensure that the settings below
are configured correctly.)
•
On the NL200 tab:
o
•
Set Bridge Mode to ‘disable’.
On the CS I/O tab:
o
Set Configuration to ‘TCP Serial Server’.
o
Set SDC address. (Note that if multiple peripherals are connected to a
datalogger’s CS I/O port, each must have a unique SDC address.)
o
Make note of the Serial Server Port. (The default CS I/O Serial
Server Port is 6783. Typically it is not necessary to change this entry
from its default.)
13
NL200 Network Link Interface
7.2.3 LoggerNet Set-up
The next step is to run LoggerNet and configure it to connect to the datalogger
via the Ethernet port. (See example in Figure 7-2 below.)
•
In LoggerNet’s Setup Screen, press Add Root and choose IPPort. Input
the NL200’s IP address and port number. The IP address and port number
are input on the same line separated by a colon.
•
Add a PakBus Port.
•
Add the datalogger and input the PakBus address of the datalogger.
•
Press Apply to save the changes.
•
You can verify your settings are correct by selecting the datalogger in the
Network Map, selecting the Clock tab, and pressing “Check Clocks”. If
your settings are correct, you should see the current clock of your server
and datalogger.
FIGURE 7-2. Serial Server LoggerNet Setup
14
NL200 Network Link Interface
7.2.4 Connect
You are now ready to Connect to your datalogger using the LoggerNet Connect
Screen.
7.2.5 Serial Sensors
The NL200 configured as an RS-232 Serial Server as described above can be
used to communicate with a serial sensor. However, LoggerNet is not capable
of communicating with the serial sensor. You must have some other method of
communicating with the sensor.
7.3 PakBus Router
When the RS-232 or CS I/O port is configured as a PakBus router, the NL200
can route packets to other devices in the network that it has in its routing table.
These are devices that the NL200 has learned about through beaconing or
allowed neighbor lists.
Beacon Interval - Devices in a PakBus network may broadcast a hellomessage to other devices in order to determine "neighbor" devices. Neighbor
devices are devices that can be communicated with directly by the current
device without being routed through an intermediate device. A beacon in a
PakBus network helps to ensure that all devices in the network are aware of
which other devices are viable in the network. The beacon interval determines
how often a beacon will be sent out. Set the beacon interval to 0 to disable
beacons.
Verify Interval – This interval, in seconds, determines the rate at which the
NL200 will attempt to start a hello transaction with a neighbor if no other
communication has taken place within the interval. If Verify Interval is set to
0, the verify interval becomes 2.5 times the Beacon Interval. If both the
Beacon Interval and Verify Interval are set to 0, the verify interval becomes
300 seconds.
Neighbors Allowed List - You can set a list of “acceptable neighbors” which
the NL200 expects to hear from within set intervals (the Verify Interval). If
the NL200 doesn’t hear from neighbors in this list within the Verify Interval, it
will attempt to contact them on its own. It will ignore all devices it hears that
are not on the Neighbors Allowed List except if the PakBus address is ≥4000.
Hellos from devices with PakBus address ≥4000 are automatically accepted as
neighbors.
7.3.1 Physical Set-up
Power the NL200 through the barrel connector jack located on the edge of the
device. Connect the NL200 to your local network using an Ethernet cable,
attaching one end to the NL200's Ethernet port and the other end to your
network. Connect the supplied SC12 serial cable from the NL200’s CS I/O
port to the datalogger’s CS I/O port or from the NL200’s RS-232 port to the
datalogger’s RS-232 port
15
NL200 Network Link Interface
7.3.2 Configuring the NL200
RS-232 PakBus Router
•
Connect to the NL200 in DevConfig (see Section 5).
•
On the NL200 tab:
o
•
•
Set Bridge Mode to ‘disable’.
On the RS-232 tab:
o
Set Configuration to ‘PakBus’.
o
Set Baud Rate to baud rate of attached device.
o
Set Beacon Interval, Verify Interval, and PakBus Neighbors Allowed
as described above. Often the default values can be used. However,
an allowed neighbors list can be useful in restricting communication
paths.
On the Network Services tab:
o
Make note of the PakBus\TCP Server Port. (The default PakBus/TCP
Server Port is 6785. Unless firewall issues exist, it is not necessary to
change the port from its default value.)
CS I/O PakBus Router
•
Connect to the NL200 in DevConfig (see Section 6).
•
On the NL200 tab:
o
•
•
On the CS I/O tab:
o
Set Configuration to ‘PakBus’.
o
Set SDC address. (Note that if multiple peripherals are connected to a
datalogger’s CS I/O port, each must have a unique SDC address.)
o
Set Beacon Interval and Verify Interval as described above. Often the
default values can be used.
On the Network Services tab:
o
16
Set Bridge Mode to ‘disable’.
Make note of the PakBus\TCP Server Port. (The default PakBus/TCP
Server Port is 6785. Unless firewall issues exist, it is not necessary to
change the port from its default value.)
NL200 Network Link Interface
7.3.3 LoggerNet Set-up
•
In LoggerNet’s Setup Screen, press Add Root and choose IPPort. Input
the NL200’s IP address and port number. The IP address and port number
are input on the same line separated by a colon.
•
Add a PakBus Port.
•
Add the datalogger and input the PakBus address of the datalogger.
•
Press Apply to save the changes.
7.3.4 Connect
You are now ready to Connect to your datalogger using the LoggerNet Connect
Screen.
7.4 TLS
The implementation of TLS in the NL200 is provided so that secure encrypted
communications can be established between a TLS client and the NL200.
The TLS client can be a web browser using HTTPS, DevConfig, or a usersupplied TLS client. The NL200 can also act as a TLS Proxy Server with a
datalogger.
17
NL200 Network Link Interface
In order to use TLS, the user is responsible for obtaining their own TLS Private
Key and TLS Certificate.
The following NL200 settings apply to all TLS communications in the NL200:
NOTE
The TLS Settings described below cannot be edited over a
standard TCP DevConfig link. The TLS Private Key, TLS
Private Key Password and TLS Certificate can only be
edited/transmitted over a secure DevConfig link (USB or TLS).
See Section 7.4.2 for information on configuring these settings.
TLS Status
Specifies the current status of the NL200 TLS network stack, i.e., initialized or
not initialized. The status will read “Initialized” if a TLS Private Key and TLS
Certificate are loaded in the NL200.
NOTE
If the status of the TLS stack is “Initialized” then the NL200 will
automatically negotiate a secure TLS connection with
DevConfig if the Use IP Connection option is selected.
TLS Private Key Password
Specifies the password that is used to decrypt the TLS Private Key.
NOTE
This setting is only visible/editable if the DevConfig connection
is over USB or TLS.
TLS Private Key
Specifies the private key (in PEM format) for the encryption stack.
NOTE
This setting is only visible/editable if the DevConfig connection
is over USB or TLS.
TLS Certificate
Specifies the public certificate (in PEM format) for the encryption stack.
NOTE
This setting is only visible/editable if the DevConfig connection
is over USB or TLS.
7.4.1 HTTPS
HTTPS is a protocol that provides secure identification and encrypted
communication over TCP.
In order to use HTTPS, you will need to load your TLS Private Key and TLS
Certificate into the NL200. This is done from the Settings Editor | TLS tab in
DevConfig over a USB or TLS connection these settings are not visible over a
18
NL200 Network Link Interface
standard IP connection. Once the private key and certificate are loaded
successfully, the TLS Status field should read “Initialized”.
You are then able to open a secure browser connection to your datalogger.
NOTES
HTTPS is the only protocol that is currently supported. (FTPS,
Telnet SSL, and others are not supported.)
See your datalogger manual for more information on using
HTTPS with your datalogger.
7.4.2 DevConfig TCP Encrypted Communication to the NL200
In order to use DevConfig TCP Encrypted Communication to the NL200, you
will need to load your TLS Private Key and TLS Certificate into the NL200.
This is done from the Settings Editor | TLS tab in DevConfig. Once the private
key and certificate are loaded successfully, the TLS Status field should read
“Initialized”.
To use TCP Encrypted Communication, select the Use IP Connection check
box in DevConfig. Input the NL200’s IP address (or press the browse button
to select it from a list of NL200s connected to the network) and press Connect.
NOTES
If the status of the TLS stack is “Initialized” then the NL200 will
automatically negotiate a secure TLS connection with
DevConfig if the Use IP Connection option is selected.
Encrypted Communication is required to change the TLS Private
Key and/or TLS Certificate via TCP. The private key and
certificate cannot be initialized via TCP, since the connection is
not encrypted. They must be initialized through a direct USB
connection to the NL200.
When the NL200 is in Bridge Mode, it cannot be configured via
a network connection. It can only be configured via USB.
7.4.3 TLS Serial Server
The NL200 supports connections from TLS clients. However, Campbell
Scientific does not have any applications that support TLS. Therefore, the TLS
client must be supplied by the user.
In order to use TLS Serial Server, you will need to load your TLS Private Key
and TLS Certificate into the NL200. This is done from the Settings Editor |
TLS tab in DevConfig. Once the private key and certificate are loaded
successfully, the TLS Status field should read “Initialized”.
You can then use DevConfig to set your RS-232 port or CS I/O port to TLS
Serial Server.
Your user-supplied client will then be able to connect the NL200’s TLS Serial
Server.
19
NL200 Network Link Interface
7.4.4 TLS Proxy Server
A TLS proxy server is a device that acts as a secure intermediary for requests
from clients seeking resources from other servers. A client connects to the
proxy server, requesting some service, such as a file, connection, web page, or
other resource, available from a different server. The proxy server evaluates
the request according to its filtering rules. For example, it may filter traffic by
IP address or protocol. If the request is validated by the filter, the proxy
provides the resource by connecting to the relevant server and requesting the
service on behalf of the client.
The following NL200 settings apply to the implementation of a TLS Proxy
Server in the NL200. Set them from the Settings Editor | TLS Proxy Server tab
in DevConfig as required for your application:
TLS Proxy Server (enable/disable)
When the NL200 TLS Proxy Server is enabled, the NL200 TLS server
maintains a secure TLS connection with a remote TLS client and forwards
information to the datalogger using a standard unencrypted TCP connection.
TLS Proxy Server Port Number
In order to communicate with the NL200 TLS server, the client application
must open a socket to the NL200 TLS server. The socket of the NL200 TLS
server is uniquely identified by the IP address of the NL200 and a port number.
This entry defines the port number that the NL200 TLS Server is listening on.
If secure communications come in on this port, the NL200 will attempt to open
a TCP connection to the datalogger on the 'TLS Proxy Forward Port Number'
(default port is 6785).
Also, regardless of this setting, the NL200 TLS Proxy Server will always listen
on the secure HTTP (HTTPS) port number 443. If a secure connection is
established on this port the NL200 will attempt to communicate to the
datalogger on the HTTP port 80 (port number range is 1..65535).
TLS Proxy Forward Physical Port
If the 'TLS Proxy Forward Physical Port' is set to CS I/O port, the NL200 will
then open a TCP connection with the logger over the CS I/O port. Data
transfer between the NL200 and the datalogger is an unencrypted TCP
connection.
If the 'TLS Proxy Forward Physical Port' is set to Ethernet Port, then the
NL200 will open an unencrypted TCP connection over Ethernet to the defined
'TLS Proxy Forward IP Address.'
TLS Proxy Forward IP Address
This setting is used if Ethernet Port is selected under 'TLS Proxy Forward
Physical Port'. Secure communications received by the NL200 TLS Server
will be forwarded on a non-secure unencrypted TCP connection to this IP
address. A router may be used to create a private network to isolate the
unencrypted communications between the NL200 and the datalogger from the
unsecured network.
20
NL200 Network Link Interface
TLS Proxy Forward Port Number
If the 'TLS Proxy Forward Physical Port' is set to CS I/O port, the NL200 will
open an unencrypted TCP connection with the datalogger over the CS I/O port.
If the 'TLS Proxy Forward Physical Port' is set to Ethernet port, then the
NL200 will open an unencrypted TCP connection over Ethernet on the defined
'TLS Proxy Forward IP Address.' to the datalogger.
This entry defines the port number that the NL200's TCP client will use to
communicate with the dataloggers TCP server. The datalogger's PakBus/TCP
server port must be set to communicate on this port number (default port is
6785).
If secure communications come in on the 'TLS Proxy Server Port Number', the
NL200 will attempt to open a TCP connection to the datalogger on the 'TLS
Proxy Forward Port Number'. Also, regardless of this setting, the NL200 TLS
Proxy Server will always listen on the secure HTTP (HTTPS) port number
443. If a secure connection is established on this port the NL200 will attempt
to communicate to the datalogger on the HTTP port 80.
Leave this setting at its default unless the datalogger is expecting
communications on a different port (range 1..65535).
TLS Proxy Timeout (seconds)
This setting will determine how fast the proxy server/client sessions will
timeout if no activity is detected. Set to 0 for no timeout (not recommended).
(Range 0..999 seconds)
8. Applications
8.1 Working around Firewalls
The NL200 can be used to provide a connection between LoggerNet and a
datalogger when both are behind firewalls. The NL200 must be on a public IP
address and acts as a common meeting place for all PakBus communications.
FIGURE 8-1. Working around firewalls
21
NL200 Network Link Interface
8.1.1 Configuring the NL200
•
Connect to the NL200 in DevConfig (see Section 6).
•
On the NL200 tab:
•
o
Set Bridge Mode to ‘disable’.
o
Set Use DHCP to ‘disable’.
o
Input the IP Address, Network Mask and Default Gateway. These
values can be provided by your network administrator.
On the Network Services tab:
o
Make note of the PakBus/TCP Server Port.
8.1.2 Configuring the Datalogger
NOTE
The datalogger must first be configured for internet
communication (i.e., through an NL115, an NL120, a second
NL200, or a cellular modem).
•
Connect a serial cable from the PC COM port to the datalogger’s RS-232
port.
•
Open DevConfig. Select the device type of the datalogger (CR800,
CR1000, or CR3000), the appropriate Communication Port and baud rate.
Press the “Connect” button to connect to the datalogger.
•
On the Network Services tab:
o
•
Under PakBus TCP Client Connections, input the NL200’s IP address
and PakBus TCP Server Port.
Press the “Apply” button to save the changes and then close DevConfig.
9. Troubleshooting
This section covers some common problems that might be encountered when
using the NL200. This is not comprehensive but should provide some insight
and ability to correct simple errors without a call to Campbell Scientific
technical support.
When your Campbell Scientific software cannot establish a link to a remote
datalogger that is connected to the NL200, check the following:
1.
Check all your power connections.
•
22
Your NL200 and any hub and/or router being used must be connected
to power. Check power indicator lights to make sure your devices are
powered.
NL200 Network Link Interface
2.
3.
Check all your cables.
•
Verify that your Ethernet cable is securely plugged in between your
NL200 and your hub, router, or PC. The yellow Link/Act light on the
NL200 should start blinking when it is connected to the Ethernet.
•
If an Ethernet cable is connected but the Link/Act light is not
blinking, try a new Ethernet cable. You can also try moving the
existing Ethernet cable to a functioning system to determine if the
cable is good.
Power cycle the NL200 and your hub/router/PC.
•
4.
Turn off or unplug your hub/router/PC and NL200. Wait 10 seconds
and then plug them back in or turn them on. A full restart may take
30 to 60 seconds.
Check the settings of the NL200.
•
Make sure the assigned NL200 IP address (DHCP or static) and the IP
address of the PC you are trying to connect from are able to
communicate each other. (Your network administrator can help you
with this.)
For example, the following addresses are able to communicate:
NL200: IP address: 192.168.0.2, Network Mask: 255.255.255.0
PC: IP address: 192.168.0.3, Network Mask: 255.255.255.0
5.
•
If you are using DHCP to assign an IP address to the NL200, use
DevConfig to read the IP address assigned to your NL200. This is
done through a USB connection to the NL200 while the NL200 is
connected to your network.
•
The IP address assigned to the NL200 must be unique on your
network.
•
When Bridge Mode is enabled, the datalogger controls how the IP
address is assigned. Make sure your datalogger is connected correctly
to the NL200.
•
Try to ping the NL200 from your PC. (From the Windows Start
Menu, choose Accessories | Command Prompt. Then type ping
xxx.xxx.xxx.xxx where xxx.xxx.xxx.xxx is the IP address of your
NL200.) If no packets are returned, this indicates that there is no
network connection to that IP address.
Make sure the IP address and port number entered in
LoggerNet/PC400/RTDAQ match the settings in the NL200.
•
Note that PakBus and serial server communications use different port
numbers. The default port number for PakBus communications is
6785. The default port number for CS I/O serial server
communications is 6783. The default port number for RS-232 Serial
23
NL200 Network Link Interface
Sever communications is 6784. The correct port number must follow
the IP address of the NL200 in LoggerNet Setup in order for
LoggerNet to communicate through the NL200. For example, if the
NL200 is configured as a CS I/O Serial Server, in LoggerNet Setup
enter the correct IP address of your NL200 followed by :6783 (e.g.,
192.168.0.3:6783).
6.
If you are unable to communicate with the NL200 via the USB cable,
verify that you have installed the latest drivers for the NL200. These can
be downloaded from our website, www.campbellsci.com.
7.
If the NL200 is configured as a CS I/O Serial Server, verify that any other
SDC device attached to the datalogger is using a different SDC address.
For example, if the NL200 is configured for SDC7, any other device
attached to the datalogger cannot use SDC7.
8.
If communicating over a slow or intermittent connection, it may be
necessary to lower the Maximum Packet Size of the datalogger in
LoggerNet Setup and/or add Extra Response Time to the PakBus Port in
LoggerNet Setup.
9.
Reset the NL200 to its default settings.
•
24
If none of the above steps correct your communication problems, reset
the NL200 to its default settings. This can be done using the Factory
Defaults button in DevConfig or by using the Defaults command in a
telnet session with the NL200.
Appendix A. Glossary
Beacon Interval
Devices in a PakBus network may broadcast a hello-message to other
devices in order to determine "neighbor" devices. Neighbor devices are
devices that can be communicated with directly by the current device
without being routed through an intermediate device. A beacon in a
PakBus network helps to ensure that all devices in the network are aware
of which other devices are viable in the network.
Bridge (Bridging, Network Bridge)
In the context of this manual, bridging is the act of connecting two
network interfaces at the data link layer. The NL200 acts as a semitransparent bridge passing, without alteration, IP packets between the
Ethernet and CS I/O ports.
DHCP (Dynamic Host Configuration Protocol)
A TCP/IP application protocol in which IP addresses are assigned
automatically by a DHCP server. Note that an IP address obtained
through DHCP is not static but is leased for a period of time set by the
network administrator. The address may change, if the NL200 is powered
down.
Hello Exchange
A communication exchange that establishes two PakBus devices as
neighbors. A hello command packet is sent by one PakBus device (A) to
another device (B). Device (B) then sends a hello response (A). The
receipt of that packet establishes the two devices as neighbors. Only a
hello exchange can establish two devices as neighbors.
Neighbor (PakBus Neighbor)
A device in a PakBus network that can be communicated with directly
(i.e., not via a router). Every PakBus device maintains its own Neighbor
List.
PakBus
Campbell Scientific’s packet-switched communications protocol. Packets
of information transmitted between PakBus devices contain user data and
administrative information (a header) that routing devices use to move the
packets to their ultimate destination. PakBus devices examine the header
information and then either remove the header (at the packet’s final
destination) or forward the packet to another PakBus device.
PakBus Node
A device in a PakBus network. Each device in a network must have a
unique PakBus address.
A-1
Appendix A. Glossary
Port Number
A port number is a way to identify a specific process to which a network
message is to be forwarded when it arrives at the NL200.
SDC (Synchronous Device Communications)
A Campbell Scientific addressable, synchronous communications
protocol. The protocol allows multiple peripherals to be connected to the
same device as long as each peripheral has a unique SDC address.
Serial Server
A serial server (also referred to as a terminal server) allows serial
communication over an IP communications link.
Proxy (Proxy Server)
A device that acts as an intermediary for IP communications between two
clients. In the context of this manual, the NL200 acts an intermediary
between two or more clients requiring a secure connection (TLS) and one
client requiring an unsecured connection. Communications are encrypted
and decrypted as necessary for the two clients to communicate via the
proxy.
TLS (Transport Layer Security)
An encryption protocol allowing secure client/server communications. A
keyed message authentication code is used for message reliability.
Verify Interval
An interval of time that a PakBus device uses to determine when it is time
send a hello message to another device to verify that they can still
communicate.
A-2
Appendix B. Cables, Pinouts and LED
Function
B.1 CS I/O
The CS I/O cable is a 9-pin straight-through cable with all 9 pins connected.
The supplied SC12 cable (part number 16675) is recommended.
TABLE B-1. CS I/O Pinout
Pin
Datalogger (DE-9 Female)
Function
Peripheral (DE-9 Male)
Function
1
5 VDC
N/C
2
SIGNAL GND
SIGNAL GND
3
RING
RING
4
RXD
TXD
5
ME
ME
6
SDE
SDE
7
CLK/HS
CLK/HS
8
12 VDC
N/C
9
TXD
RXD
B.2 RS-232
A DB9 female to DB9 male cable (such as Campbell Scientific part number
10873) is used to connect the NL200’s RS-232 port to the datalogger’s RS-232
port. The supplied SC12 cable can also be used. A DB9 female null modem
cable (such as Campbell Scientific part number 13657) is used to connect the
NL200’s RS-232 port to a PC’s RS-232 port. The RS-232 cable should be kept
at lengths of <6 feet to maintain high data throughput rates.
TABLE B-2. RS-232 Pinout
Pin
Datalogger (DCE, DE-9 Female)
Function
Peripheral (DTE, DE-9 Male)
Function
1
DCD
DCD
2
TXD
RXD
3
RXD
TXD
4
DTR
DTR
5
SIGNAL GND
SIGNAL GND
6
DSR
DSR
7
CTS
RTS
8
RTS
CTS
9
RING
RING
B-1
Appendix B. Cables, Pinouts and LED Function
B.3 Ethernet
The Ethernet 10/100 Base-T cable should be a Category 5 or better twisted pair
cable (such as Campbell Scientific part number 13658). The two active pairs
in an Ethernet 10/100 Base-T network are pins 1 and 2 and pins 3 and 6. Use
only dedicated wire pairs (such as blue/white and white/blue, orange/white and
white/orange) for the active pairs.
TABLE B-3. Ethernet Pinout
Pin
Function
1
TD +
2
TD -
3
RD +
4
Not Connected
5
Not Connected
6
RD -
7
Not Connected
8
Not Connected
B.4 USB
The USB cable is the supplied USB A to micro B style cable (Campbell
Scientific part number 27555). This is used only for device configuration.
TABLE B-4. USB Micro-B
Pin
Function
1
VBUS (Not Used)
2
Data -
3
Data +
4
N/C
5
GND
B.5 Power
TABLE B-5. Power In
B-2
Pin
Function
Center
7 – 20 VDC
Sleeve
Power GND
Appendix B. Cables, Pinouts and LED Function
B.6 LEDs
TABLE B-6. Power LED
State
Description
Off
Device powered off
On
Device powered on and ready
Blink
OS Download in progress – DO NOT DISCONNECT POWER
TABLE B-7. Ethernet LED
State
Description
Yellow On
Valid Ethernet link
Yellow Off
Ethernet link not valid
Yellow Blink
Activity on Ethernet port
Green On
100Mbit/s link
Green Off
10Mbit/s link
B-3
Appendix B. Cables, Pinouts and LED Function
B-4
Appendix C. NL200 Settings
All of the NL200 Settings available from the Settings Editor in DevConfig are
described below.
C.1 Main Tab
Model (read only)
Model Name
Serial Number (read only)
Specifies the NL200 serial number assigned by the factory
OS Version (read only)
Operating System Version currently in the NL200
Compile Date (read only)
Operating System Compile Date
Bridge Mode
This setting is used to configure the device's mode of operation.
Bridge Mode Disabled
With Bridge Mode Disabled, the Serial Server (RS-232 or CS I/O),
PakBus, and Secure Proxy Server functionalities are available. Refer to
the respective device settings for the configuration of these functionalities.
Bridge Mode Enabled
With Bridge Mode Enabled, the device will act as a bridge from Ethernet
to CS I/O. All IP packets that come in to the device via Ethernet will be
communicated to a datalogger over the CS I/O port. Some filtering is done
in order to minimize the amount of traffic on the CS I/O port but every
packet that is transmitted to the logger is sent intact as a complete
Ethernet/TCP packet. This enables the datalogger to use its TCP/IP stack
to interpret the packet and therefore all of the datalogger's TCP services
are available. In Bridge mode none of the other device settings are valid
and all other functionality is disabled. All settings (i.e. IP, netmask,
gateway) are configured in the datalogger.
NOTE
When the device is configured in bridge mode it is not possible
to configure it via TCP or open a telnet session with it.
C-1
Appendix C. NL200 Settings
DHCP
Enable if the device should be configured to use DHCP (Dynamic Host
Configuration Protocol) to automatically acquire an IP address, subnet mask,
and gateway from the local DHCP server. After DHCP is enabled the device
will reboot and it may take a few moments to acquire the IP settings. In order
to see the acquired settings you may have to do a refresh by hitting F5.
IP Address
The IP address uniquely identifies this node on an internet. If DHCP is
enabled, this is the IP address obtained from the DHCP server. If DHCP is
disabled, a static IP address must be obtained from your network administrator
for use with this device. (It is recommended to configure a static IP address.)
NOTE
In Bridge mode this setting is obtained from the datalogger and
cannot be edited here. It must be edited in the datalogger
settings. If the setting has been successfully obtained from the
datalogger this setting will show "OK" otherwise it will show
"0.0.0.0"
Subnet Mask
The Subnet Mask is used to select that portion of the IP address which
identifies the network. It is used to facilitate routing and should be obtained
from the network administrator along with the IP address. If DHCP is enabled,
this is the Subnet Mask obtained from the DCHP server.
NOTE
In Bridge mode this setting is obtained from the datalogger and
cannot be edited here. It must be edited in the datalogger
settings. If the setting has been successfully obtained from the
datalogger this setting will show "OK" otherwise it will show
"0.0.0.0"
Default Gateway
Datagrams being sent to an unknown network are routed via the Default
Gateway. This entry specifies the Internet address of the Default Gateway. If
no Default Gateway exists, set this entry to "0.0.0.0". If DHCP is enabled, this
is the Default Gateway obtained from the DCHP server.
NOTE
C-2
In Bridge mode this setting is obtained from the datalogger and
cannot be edited here. It must be edited in the datalogger
settings. If the setting has been successfully obtained from the
datalogger this setting will show "OK" otherwise it will show
"0.0.0.0"
Appendix C. NL200 Settings
MAC Address
Hardware MAC Address.
NOTE
In Bridge mode the MAC address is shared with the datalogger.
If the MAC address has been successfully shared with the
datalogger this setting will show "OK" otherwise it will show
"00:00:00:00:00:00"
Ethernet Speed / Duplex Configuration
Specifies the Ethernet link speed and duplex settings
Speed: When used as a TCP/IP serial server the overall data transfer
speed is largely dependent on the speed of the serial port. Setting the
Ethernet link speed to 100 Mbps will increase the overall data throughput
rate by a relatively small amount, while setting it to 10 Mbps will
conserve power.
Duplex: Setting the Duplex to Full allows communication in both
directions simultaneously, while setting it to Half allows communication
in only one direction at a time.
Setting the Ethernet Speed/Duplex Configuration to Auto will cause the NL200
to auto configure to the faster of the two speeds and fastest duplex setting
according to the capabilities of the network.
Admin Password
To help guard against unauthorized access to the NL200 it is password
protected by the Admin Password. This password will be required to gain
access to the NL200 via DevConfig over TCP and telnet. If the password
setting is left blank, no password is required to access the NL200. After
settings are saved, the new password will be in effect.
TCP Configuration Port Number
The default TCP port number for configuration via TCP is 6786. This entry
makes it possible for the user to change the port number used in TCP
configuration if desired. Typically it is not necessary to change this entry from
its default. (range 1..65535)
C.2 RS-232 Tab
RS-232 Configuration
This setting controls which process will be associated with the RS-232 port.
The following values are defined:
TCP Serial Server
This port uses a TCP/IP based serial server.
TLS Serial Server
This port uses a TCP/IP/TLS based serial server.
PakBus
This port uses the PakBus protocol
Disabled
This port will not be used
C-3
Appendix C. NL200 Settings
RS-232 Serial Server Port Number
To communicate with a TCP/IP server, the client application must open a
socket to that server. The socket of a specific server is uniquely identified by
an IP address of the host where the server is running and a port number
associated with the server application on that host. This entry is where the port
number of the serial server is set. Typically it is not necessary to change this
entry from its default. (range 1..65535)
RS-232 Baud Rate
This setting specifies the baud rate of the RS-232 port. The connected device
must be set to communicate at the same baud rate.
RS-232 RTS
The NL200 asserts the RTS and DTR lines when doing RS-232 communications.
This setting allows the user to disable the RTS line if needed so that it will not be
asserted. Some hardware will not function if the RTS line is asserted but
typically it is not necessary to change this setting from its default (enabled).
RS-232 Serial Server Timeout
This setting, in units of seconds, will determine how fast the RS-232 Serial
Server will timeout if no activity is detected. Set to 0 for no timeout (not
recommended). (range 0..999)
RS-232 PakBus Beacon Interval
This setting, in units of seconds, governs the rate at which the NL200 will
broadcast PakBus messages on the associated port in order to discover any new
PakBus neighboring nodes. It will also govern the default verification interval
if the value of the Verify Interval setting for the associated port is zero.
RS-232 PakBus Verify Interval
This setting specifies the interval, in units of seconds, that will be reported as
the link verification interval in the PakBus hello transaction messages. It will
indirectly govern the rate at which the NL200 will attempt to start a hello
transaction with a neighbor if no other communication has taken place within
the interval.
Port Neighbors Allowed Settings
Example: (129,129) (1084, 1084)
In the example above, nodes 129 and 1084 are assigned as neighbors to the
NL200.
This setting specifies, for a given port, the explicit list of PakBus node
addresses that the NL200 will accept as neighbors. If the list is empty (the
default value) any node will be accepted as a neighbor. This setting will not
affect the acceptance of a neighbor if that neighbor's address is greater than
3999. The formal syntax for this setting follows:
C-4
Appendix C. NL200 Settings
neighbor := { "(" range-begin "," range-end ")" }.
range-begin := pakbus-address. ;
range-end := pakbus-address.
pakbus-address := number. ; 0 < number < 4000
C.3 CS I/O Tab
CS I/O Configuration
This setting controls which process will be associated with the CS I/O port.
The following values are defined:
TCP Serial Server
This port uses a TCP/IP based serial server.
TLS Serial Server
This port uses a TCP/IP/TLS based serial server.
PakBus
This port uses the PakBus protocol
Disabled
This port will not be used
CS I/O Serial Server Port Number
To communicate with a TCP/IP server, the client application must open a
socket to that server. The socket of a specific server is uniquely identified by
an IP address of the host where the server is running and a port number
associated with the server application on that host. This entry is where the port
number of the serial server is set. Typically it is not necessary to change this
entry from its default. (range 1..65535)
SDC Address
Communication with the datalogger via the CS I/O port is done using SDC
(Synchronous Device Comms). The datalogger will address the devices with
which it wishes to communicate using an SDC address. The CS I/O port can be
configured to respond to SDC address 7, 8, 10, or 11.
CS I/O Serial Server Timeout
This setting will determine how fast the CS I/O Serial Server will timeout if no
activity is detected. Set to 0 for no timeout (not recommended). (range 0..999)
(seconds)
CS I/O PakBus Beacon Interval
This setting, in units of seconds, governs the rate at which the NL200 will
broadcast PakBus messages on the associated port in order to discover any new
PakBus neighboring nodes. It will also govern the default verification interval
if the value of the Verify Interval setting for the associated port is zero.
C-5
Appendix C. NL200 Settings
CS I/O PakBus Verify Interval
This setting specifies the interval, in units of seconds, that will be reported as
the link verification interval in the PakBus hello transaction messages. It will
indirectly govern the rate at which the NL200 will attempt to start a hello
transaction with a neighbor if no other communication has taken place within
the interval.
C.4 Net Services Tab
Telnet
Enables/Disables the telnet service.
Telnet Port Number
The default TCP port number for the configuration monitor telnet session is 23.
This entry makes it possible for the user to change the telnet session port
number if desired. Typically it is not necessary to change this entry from its
default. (range 1..65535)
Telnet Timeout
This setting, in units of seconds, will determine how fast the configuration
monitor telnet session will timeout if no activity is detected. Set to 0 for no
timeout (not recommended). (range 0..999)
Ping (ICMP)
The NL200 will not respond to 'Ping' requests if this setting is disabled.
PakBus Address
This setting specifies the PakBus address for this device. The value for this
setting must be chosen such that the address of the device will be unique in the
scope of the datalogger network. Duplication of PakBus addresses in two or
more devices can lead to failures and unpredictable behavior in the PakBus
network. When a device has a neighbor list or neighbor filter setting filled in
for a port, any device that has an address greater than or equal to 4000 will be
allowed to connect to that device regardless of the neighbor filter.
PakBus/TCP Server Port
This setting specifies the TCP service port for PakBus communications with
the datalogger. Unless firewall issues exist, this setting probably does not need
to be changed from its default value.
PakBus/TCP Password
Specifies the password that will be used to authenticate any incoming (server)
or outgoing (client) PakBus/TCP sessions. This password is used by the server
to generate a challenge to any client that connects to the PakBus/TCP server
port. If the client fails to respond appropriately, the connection will be
terminated. If this password is blank (the default value), no such authentication
will take place.
C-6
Appendix C. NL200 Settings
PakBus/TCP Client Address (1-4)
This setting specifies the IP address of an outgoing PakBus/TCP client
connection that the NL200 should maintain. If the connection fails, the NL200
will retry until the connection succeeds. No entry or a setting of 0.0.0.0
specifies that no client connection will be made.
PakBus/TCP Client Port (1-4)
This setting specifies the TCP port of the outgoing PakBus/TCP client
connection. Typically it is not necessary to change this entry from its default.
(range 1..65535)
Routes (read only)
This setting lists the routes that are known to the NL200. Each route known to
the NL200 will be represented by the following four components separated by
commas and enclosed in parentheses. The description of each component
follows:
Port Number
Specifies a numeric code for the port that the router will use. Will
correspond with one of the following:
0
CS I/O
1
RS-232
100
PakBus/TCP Connection — If the value of the port number is
100 or greater, the connection is made through PakBus/TCP.
Via Neighbor Address
Specifies the address of the neighbor/router that will be used to send
messages for this route. If the route is for a neighbor, this value will be the
same as the address.
PakBus Address
Specifies the address that the route will reach.
Response Time
Specifies the amount of time (in milliseconds) that will be allowed for the
route.
C-7
Appendix C. NL200 Settings
C.5 TLS Proxy Server Tab
TLS Proxy Server Enabled
Enable/Disable the TLS Proxy Server. When doing TLS proxy communications,
the device's TLS server maintains a secure TLS connection with a remote TLS
client and forwards information onto a datalogger using a standard TCP
connection. TCP ports and physical connections are configured below.
NOTE
If the TLS Proxy Server is Enabled and a datalogger is connected
to the CS I/O port then the datalogger will load its TCP stack in
case it is required to do TCP communications. Running the TCP
stack causes the datalogger to use more memory, leaving less for
final storage etc. So if TCP/TLS server capability is not required
the TLS Proxy Server should be left disabled.
TLS Proxy Server Port Number
When doing TLS Proxy communications the NL200 TLS server maintains a
secure connection with a remote client. If the 'TLS Proxy Forward Physical
Port' is specified to be the CS I/O port the NL200 will then open a TCP
connection with the logger over the CS I/O port and do unecrypted data
transfer with the logger. If the 'TLS Proxy Forward Physical Port' is specified
to be the Ethernet port then the NL200 will open the TCP connection over
Ethernet on the 'TLS Proxy Forward IP Address.'
In order to communicate with the NL200 TLS server, the client application
must open a socket to that server. The socket of the NL200 TLS server is
uniquely identified by the IP address and a port number. This entry is where
the port number of the NL200 TLS server is set.
The TLS client needs to be set to communicate on this port number. If secure
communications come in on the 'Secure Proxy Server Port Number' the NL200
will attempt to open a TCP connection to the datalogger on the 'Secure Proxy
Forward Port Number'. Also, regardless of this setting, the NL200 Secure
Proxy Server will always listen on the secure HTTP (HTTPS) port number
443. If a secure connection is established on this port, the NL200 will attempt
to communicate to the datalogger on the HTTP port 80.
(range 1..65535)
TLS Proxy Forward Physical Port
When doing TLS Proxy communications, the NL200 TLS server maintains a
secure connection with a remote client. If the 'TLS Proxy Forward Physical
Port' is specified to be the CS I/O port the NL200 will then open a TCP
connection with the logger over the CS I/O port and do unecrypted data
transfer with the logger. If the 'TLS Proxy Forward Physical Port' is specified
to be the Ethernet port then the NL200 will open the TCP connection over
Ethernet on the 'TLS Proxy Forward IP Address.'
C-8
Appendix C. NL200 Settings
TLS Proxy Forward IP Address
Secure communications received on the NL200 TLS Server will be forwarded
on a non-secure TCP connection to this IP address. If the 'TLS Proxy Forward
Physical Port' is specified to be the CS I/O port, this setting is not set by the
user as the NL200 will obtain the IP address of the datalogger automatically. If
the 'TLS Proxy Forward Physical Port' is specified to be the Ethernet port then
the forward IP address must be specified. Enter the IP address of the destination
datalogger here.
TLS Proxy Forward Port Number
When doing TLS Proxy communications the NL200 TLS server maintains a
secure connection with a remote client. If the 'TLS Proxy Forward Physical
Port' is specified to be the CS I/O port, the NL200 will then open a TCP
connection with the logger over the CS I/O port and do unecrypted data
transfer with the logger. If the 'TLS Proxy Forward Physical Port' is specified
to be the Ethernet port then the NL200 will open the TCP connection over
Ethernet on the 'TLS Proxy Forward IP Address.'
In order to communicate with the connected datalogger's TCP server, the
NL200's TCP client application must open a socket to that server. The socket
of the datalogger's TCP server is uniquely identified by an IP address and a
port number. This entry is where the port number of the NL200's TCP client is
set. The datalogger's TCP server port must be set to communicate on this port
number.
If secure communications come in on the 'TLS Proxy Server Port Number' the
NL200 will attempt to open a TCP connection to the datalogger on the 'TLS
Proxy Forward Port Number'. Also, regardless of this setting, the NL200 TLS
Proxy Server will always listen on the secure HTTP (HTTPS) port number
443. If a secure connection is established on this port the NL200 will attempt to
communicate to the datalogger on the HTTP port 80.
Leave this setting at its default unless the datalogger is expecting
communications on a different port.
(range 1..65535)
TLS Proxy Timeout
This setting, in units of seconds, will determine how fast the proxy server/client
sessions will timeout if no activity is detected. Set to 0 for no timeout (not
recommended). (range 0..999)
C-9
Appendix C. NL200 Settings
C.6 TLS Tab
TLS Status (read only)
Specifies the current status of the TLS network stack.
NOTE
If the status of the TLS stack is "Initialized" then the device will
automatically negotiate a secure TLS connection with
DevConfig if the Use TCP option is selected. The TLS Private
Key, Private Key Password, and TLS Certificate can only be
edited/transmitted over a secure DevConfig link (USB or TLS).
These settings cannot be edited over a standard TCP DevConfig
link.
TLS Private Key Password
Specifies the password that is used to decrypt the TLS Private Key
NOTE
This setting can only be edited/transmitted if the DevConfig link
is considered secure (USB or TLS). If the TLS stack has been
initialized, the device will automatically negotiate a secure TLS
connection with DevConfig if the Use TCP option is selected.
TLS Private Key
Specifies the private key (in PEM format) for the encryption stack
NOTE
This setting can only be edited/transmitted if the DevConfig link
is considered secure (USB or TLS). If the TLS stack has been
initialized, the device will automatically negotiate a secure TLS
connection with DevConfig if the Use TCP option is selected.
TLS Certificate
Specifies the public certificate (in PEM format) for the encryption stack
NOTE
C-10
This setting can only be edited/transmitted if the DevConfig link
is considered secure (USB or TLS). If the TLS stack has been
initialized, the device will automatically negotiate a secure TLS
connection with DevConfig if the Use TCP option is selected.
Appendix D. NL200 Driver Installation
Instructions
If no NL200 has been previously plugged into your computer, it will be
necessary to install the drivers for the NL200 to enable communication with
this device. The driver is available on the driver disc that was shipped with the
NL200. If that disc is no longer available, you can also download the drivers
from Campbell Scientific's website.
D.1 Installing on Windows XP
1.
Before you plug the NL200 into a computer USB port, you must first run
the install utility on the NL200 install disc. This will ensure that the driver
files are copied where the operating system can find them.
2.
Connect a USB cable to the NL200 USB port and one of your computer's
USB ports. After some delay, your computer should display a dialog
similar to that shown below:
3.
Select Install the software automatically and click Next.
D-1
Appendix D. NL200 Driver Installation Instructions
D-2
4.
You will get a warning from the operating system indicating that the driver
is "unsigned". In order to continue with installation, you need to select the
Continue Anyway button.
5.
When the driver installation is completed, the following dialog should be
shown:
Appendix D. NL200 Driver Installation Instructions
D.2 Installing on Windows Vista
1.
Before you plug the NL200 into a computer USB port, you must first run
the install utility on the NL200 install disc. This will ensure that the driver
files are copied where the operating system can find them.
2.
Connect a USB cable to the NL200 USB port and one of your computer's
USB ports.
3.
After some delay, your computer should display a dialog similar to that
shown below:
4.
Select the option to Locate and install driver software (recommended).
Because the NL200 driver is not signed, the following will be displayed:
5.
Select the option to Install this driver anyway. At this point, the driver
should be installed and the NL200 will be ready to configure and use.
D-3
Appendix D. NL200 Driver Installation Instructions
D.3 Installing on Windows 7
1.
Before you plug the NL200 into a computer USB port, you must first run
the install utility on the NL200 install disc. This will ensure that the driver
files are copied where the operating system can find them.
2.
Connect a USB cable to the NL200 USB port and one of your computer's
USB ports.
3.
The operating system should now install the driver and will report that it is
ready for use once it has been installed.
D.4 Oops! What if you plug the NL200 into your
computer before installing the drivers?
D-4
1.
Run the install utility on the NL200 install disc. This will ensure that the
driver files are copied where the operating system can find them.
2.
Connect a USB cable to the NL200 USB port and one of your computer's
USB ports.
3.
Open the Device Manager from the Windows’ Control Panel.
4.
Find the NL200 under Other devices.
5.
Right click on the NL200 and select “Scan for hardware changes”.
6.
Windows should then install the NL200 properly.
Appendix D. NL200 Driver Installation Instructions
7.
You should then see the NL200 in the Device Manager under Ports.
D-5
Appendix D. NL200 Driver Installation Instructions
D-6
Appendix E. Sending a New OS to the
NL200
Whenever a new operating system is released for the NL200, it will be
available from our website: www.campbellsci.com/downloads.
Follow these steps to send the new OS to the NL200:
1.
Plug the wall charger into an AC outlet and the barrel connector into the
NL200’s power jack.
2.
Connect a USB cable between one of your computer’s USB ports and the
USB port on the NL200.
3.
Open DevConfig.
4.
Select the NL200 under Device Type.
5.
Select the appropriate Communication Port.
6.
Go to the Send OS tab.
7.
Press the Start button.
8.
In the resulting dialog box, select the file that should be sent to the device
as an operating system (this file should have an .obj extension) and press
the OK button.
9.
The operating system will be sent to the NL200.
10. After the file has been sent, the power LED on the NL200 will blink
repeatedly while the NL200 copies the OS into its internal flash. This
process takes about 10 seconds. While the LED is blinking, the NL200 is
in a vulnerable state where a removal of power will leave the NL200
without a valid operating system to run. DO NOT remove power until the
LED stops blinking.
E-1
Appendix E. Sending a New OS to the NL200
E-2
Campbell Scientific Companies
Campbell Scientific, Inc. (CSI)
815 West 1800 North
Logan, Utah 84321
UNITED STATES
www.campbellsci.com • [email protected]
Campbell Scientific Africa Pty. Ltd. (CSAf)
PO Box 2450
Somerset West 7129
SOUTH AFRICA
www.csafrica.co.za • [email protected]
Campbell Scientific Australia Pty. Ltd. (CSA)
PO Box 444
Thuringowa Central
QLD 4812 AUSTRALIA
www.campbellsci.com.au • [email protected]
Campbell Scientific do Brazil Ltda. (CSB)
Rua Luisa Crapsi Orsi, 15 Butantã
CEP: 005543-000 São Paulo SP BRAZIL
www.campbellsci.com.br • [email protected]
Campbell Scientific Canada Corp. (CSC)
11564 - 149th Street NW
Edmonton, Alberta T5M 1W7
CANADA
www.campbellsci.ca • [email protected]
Campbell Scientific Centro Caribe S.A. (CSCC)
300 N Cementerio, Edificio Breller
Santo Domingo, Heredia 40305
COSTA RICA
www.campbellsci.cc • [email protected]
Campbell Scientific Ltd. (CSL)
Campbell Park
80 Hathern Road
Shepshed, Loughborough LE12 9GX
UNITED KINGDOM
www.campbellsci.co.uk • [email protected]
Campbell Scientific Ltd. (France)
3 Avenue de la Division Leclerc
92160 ANTONY
FRANCE
www.campbellsci.fr • [email protected]
Campbell Scientific Spain, S. L.
Avda. Pompeu Fabra 7-9, local 1
08024 Barcelona
SPAIN
www.campbellsci.es • [email protected]
Please visit www.campbellsci.com to obtain contact information for your local US or International representative.