1
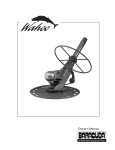
Wahoo Parts Diagram 1 2 13 11 6 12 14 7 3 15 4 8 5 TOP 9 No. Part Description 1. 2. 3. 4. 5. 6. 7. 8. 9. 10. 11. 12, 13. 14. 15. Wheel Deflector 12” Outer Extension Pipe w/Handnut Wahoo Weighted Spur Compression Ring Wahoo Body Threaded Inner Extension Pipe Diaphragm Retaining Ring Aboveground Diaphragm AIB Footpad Slotted Disc Flowkeeper Valve Valve Cuff 4 1/2” Connector 45° Elbow Hose, 1 Meter, White W70483 W70489 W70486 W74000 W70488 W56525 W81600 W81700 W70487 W70485 W60050 W70264 W33205 W70244 W38205 Qty 1 1 1 1 1 1 1 1 1 1 1 1 1 1 10 10 Zodiac Pool Systems, Inc. 2620 Commerce Way Vista, CA 92081 • Tel: 1-800-822-7933 Zodiac Pool Systems Canada, Inc. 2115 South Service Road West, Unit 3 Oakville, ON Canada L6l 5W2 • Tel: 1-888-647-4004 © 2009 Zodiac Pool Systems, Inc. All rights reserved. TL-2200 1/09 Owner’s Manual Wahoo Limited Warranty Introduction This Wahoo was carefully inspected before shipment from our warehouse. Upon unpacking, if any part proves defective or missing, please notify ZodiacPool Systems, Inc. or Zodiac Pool Systems Canada,Inc (“Zodiac”) immediately. Please refer to the information in this manual for complete instructions on the installation and operation of your Wahoo. ZODIAC WARRANTS THIS WAHOO POOL CLEANER AGAINST ALL MANUFACTURING DEFECTS AND ALL WEAR AND TEAR FOR ONE (1) YEAR. ALL WARRANTIES ARE EFFECTIVE FROM THE DATE OF PURCHASE. Should this product prove defective in workmanship, materials or wear during the applicable warranty period, the consumer’s sole and exclusive remedy shall be such repair or replacement of the product as provided below. THE LIMITED WARRANTY PROVIDED HEREIN IS THE SOLE AND EXCLUSIVE WRITTEN WARRANTY WITH RESPECT TO THE WAHOO POOL CLEANER. ALL IMPLIED WARRANTIES IMPOSED BY APPLICABLE LAW, INCLUDING ANY IMPLIED WARRANTY OF MERCHANTABILITY OR FITNESS FOR A PARTICULAR PURPOSE, ARE LIMITED TO THE DURATION OF THE EXPRESS LIMITED WARRANTY. SOME STATES DO NOT ALLOW LIMITATIONS ON HOW LONG AN IMPLIED WARRANTY LASTS, SO THE ABOVE LIMITATION MAY NOT APPLY TO YOU. THIS LIMITED WARRANTY EXCLUDES THE FOLLOWING: 1.Discoloration of the Wahoo pool cleaner. This is caused by reaction to ultraviolet rays and the chemicals used in the pool water. Discoloration does not affect the operating ability of the Wahoo. Therefore, this Limited Warranty does not cover the replacement of discolored parts. 2. Damage to or malfunction of the unit resulting from excess chlorination or improper water chemistry balance. 3.Replacement of parts which fail or become defective as a result of improper installation, negligence, misuse, abuse or tampering by unauthorized repair personnel. 4.Age, pool water imbalance, and improper installation can cause vinyl pool liners to become brittle or unduly wrinkled. Corrosion of the supporting walls and/or irregularities in the pool base may also cause liner failure. The use of this product in such an environment is at the pool owner’s risk. Therefore, the pool owner hereby releases the manufacturer from any and all claims for damage where these conditions exist. 5.The Wahoo is designed for use in aboveground pools only. If unit is used in any other application, the pool owner hereby releases the manufacturer from any and all claims. This misuse will void all warranty on the unit. 6. In no event shall Zodiac be liable in contract or in tort, or under any other legal theory, for lost profits or revenues, loss of use or similar economic loss, or for indirect, special, incidental, consequential or similar damages, even if it has been advised of the possibility of such claim. Some jurisdictions do not allow the exclusion or limitation of incidental or consequential damages, so the above limitation or exclusion may not apply to you. Congratulations on the purchase of your new Wahoo® automatic pool cleaner,. Built with proven Baracuda technology, the Wahoo is designed and manufactured for easy installation, and years of carefree operation. Before installing the cleaner, please take a few moments to become familiar with its components and to review the items listed under Important Information below Hose Section FlowKeeper® Valve Valve Cuff To ensure prompt warranty service, should it be required, please: • Complete and return the Warranty Card. • Record your purchase information. • Attach a copy of your purchase receipt to this document. Date of Purchase:___________ Purchased From: __________________________________ Serial Number (Located on underside of cleaner) ___________________________________ If service is required, simply present your manual with the attached receipt at any Zodiac authorized warranty center. This pool cleaner is covered by one or more of the following Canadian and U.S. patents and Canadian registered design: U.S. patents: 5315728 and 5418995. Canadian patent nos. 2134220 and 2181896. Other patents pending. 2 45° Elbow Cleaner Body IMPORTANT WARRANTY NOTICES FOR VINYL LINER POOL OWNERS • Certain vinyl liner patterns are particularly susceptible to rapid surface wear or pattern removal caused by objects coming into contact with the vinyl surface, including pool brushes, pool toys, floats, fountains, chlorine dispensers, and automatic pool cleaners. • Some vinyl liner patterns can be seriously scratched or abraded simply by rubbing the surface with a pool brush. Ink from the pattern can also rub off during the installation process or when it comes into contact with objects in the pool. Zodiac is not responsible for, and the Limited Warranty does not cover, pattern removal, abrasion or marking on vinyl liners. • Vinyl liners are subject to deterioration or damage due to age, the effect of chemicals, corrosion or failure of the supporting walls; as well as improper installation, maintenance or cleaning of the supporting walls or base. • Before installing the Wahoo, examine the interior of your pool carefully. If your vinyl liner is brittle or has stones, wrinkles, roots or metal corrosion in contact with the underside of the liner, or has damage to the base material or supporting walls, do not install the Wahoo before having a qualified professional perform the necessary repairs. Zodiac will not be responsible for liner damage caused by (1) a Wahoo cleaner which is in disrepair, (2) pattern removal from a vinyl liner, or (3) a Wahoo cleaner used in a pool having an aged or deteriorated liner. WARRANTY PROCEDURES No claim under this Limited Warranty will be recognized unless the registration card, included in your box, is completed and returned within thirty (30) days of the purchase date. Only the original purchaser may submit a claim under this Limited Warranty. Purchaser’s claims against Zodiac, shall be limited to those claims which may be asserted under the Limited Warranty relating to any defect, malfunction or wear of the Wahoo. To obtain warranty replacements or repair, contact Zodiac for authorization. When submitting a claim, always supply serial number, evidence of purchase date, retailer and a brief description of the problems/defects encountered. Zodiac reserves the right to repair or replace all defective or worn parts covered by this Limited Warranty and return same to purchaser, freight collect. Zodiac assumes no responsibility for any warranties or representations made by other individuals or businesses beyond the express terms contained in this Limited Warranty. This warranty gives you specific legal rights, and you may also have other rights which vary from jurisdiction to jurisdiction. For sale and use in the United States, Canada and Mexico only. This cleaner is not warranted or guaranteed outside of the United States, Canada or Mexico. 4-1/2" Connector Wheel Deflector Important Information Notice for Vinyl Liner Pools: Before installing your new Wahoo, examine the interior of your pool carefully. If the vinyl liner is brittle or has stones, wrinkles, roots or metal corrosion in contact with the underside of the liner, or has damage to the base material or supporting walls, do not install the cleaner before having a qualified professional perform the necessary repairs or liner replacement. Zodiac will not be responsible for liner damage caused by a cleaner which is in disrepair, pattern removal from a vinyl liner, or a cleaner used in a pool having an aged or deteriorated liner. Please see Limited Warranty. • Clean the skimmer basket, pump basket and pool filter before installing the Zodiac cleaner and on a regular basis thereafter. • Always disconnect the Wahoo before cleaning or backwashing the pool filter. After cleaning, let the filtration system run for at least five minutes before re-connecting the cleaner. • Always remove the Wahoo from the pool before chemical or shock treatments. Wait a minimum of four hours after super chlorination before re-installing the cleaner. For customer service or support: Zodiac Pool Systems, Inc. 2620 Commerce Way Vista, CA 92081-8438 1-800-822-7933 www.baracuda.com 3 Installation Prepare the Pool Connect the Cleaner Inspect the interior of your pool. If the liner is brittle, has wrinkles, root or metal corrosion from the underside, or damage to the supporting base or walls, do not install the cleaner until a qualified professional makes any necessary repairs. 1.Submerge the cleaner and flood it with water. 1. Manually vacuum the pool if excessive debris is present, and make sure the pool filter and pump basket are clean. 2. Adjust the return lines to blow downward to break up surface circulation and ensure complete cleaning coverage. 2. When bubbles stop coming from the extension pipe, connect the hose to the cleaner. 45 Elbow Hose Protector Net 3. Turn on the filtration system and fill the hose with water by placing the end in front of a return inlet until it is flooded. Turn off the pump. • Loosen the fitting lock ring • Redirect the eyeball downward Connect the Hose • Retighten the lock If the return fitting cannot be adjusted, the fitting must be replaced with Zodiac return line diverter (part #W90153 for 1-1/2", #W90155 for 2" or #W24100 for pools without return fittings). The FlowKeeper Valve must be used on all installations. The valve regulates flow to ensure the pool pump and cleaner run properly. It is preset at the factory to optimize the performance of the cleaner, but offers three settings to adjust the flow. The lower the setting number, the lower the flow. To adjust, pull the handle and move setting up or down. The red tab can be used to open the valve and stop the cleaner. Assemble the Cleaner Stretch the disc over the foot pad with the word “TOP” facing up. The disc should fit securely in the groove and rotate freely on the pad. Slide the wheel deflector onto the extension pipe until it is secure between the two lowest pipe ridges. The deflector should rotate freely. Using the parts as indicated, connect the hose to the skimmer. Be sure to keep the hose and cleaner completely submerged to keep air out of the system. Assemble the Hose Once the hose is connected, turn on the pool pump and begin cleaning. Installation is complete. For corner or end installations, connect enough hose to reach the farthest point of the pool and then add one more section. Skimmer For center installations, connect enough hose to reach the farthest point of the pool and then add two more sections. Skimmer Installation 4-1/2" Connector 4-1/2" FlowKeeper Valve Connector 45 Elbow FlowKeeper Valve Valve Cuff Valve Cuff Skimmer 1 Hose Section 4 Install the FlowKeeper Valve with the arrow facing down towards the skimmer pipe. FlowKeeper Adjustment 2 Hose Sections Skimmer or Wall Vacuum Line 5 Operation and Maintenance Troubleshooting Cycling on and off with the pool filtration system, the Wahoo moves randomly around the pool, vacuuming and cleaning the pool floor as it goes. The cleaner is not designed to climb the pool walls. As water flows through the cleaner, dirt and debris are pulled directly into the filtration system. To maintain cleaner performance: • Thoroughly clean the skimmer basket, pump basket and filter regularly. Always disconnect the cleaner before backwashing. Run the filtration system for at least five minutes before re-connecting. • Always remove the cleaner from the pool before super chlorinating or adding pool chemicals. Wait at least four hours before re-connecting the cleaner. • Never coil the hose. Straighten a coiled hose with warm water or by laying it in the sun for a day. A kinked or coiled hose will adversely effect the cleaner’s coverage of the pool. you experience a problem with your Wahoo, please follow the troubleshooting steps below to restore If performance. If further assistance is required, contact Zodiac Customer Service. Please have your serial number and date of purchase available when you call. Problem Solution Cleaner does not move or moves slowly. Note: In water 60° F (16° C) or less, it may be necessary to increase flow to compensate for the reduced flexibility of the hose and diaphragm. • Ensure FlowKeeper Valve is installed with arrow pointing down towards skimmer pipe. • Adjust FlowKeeper Valve to increase flow to cleaner. • When not in the pool, keep the disc flat to avoid warping. • Clean baskets and filter. • Periodically inspect cleaner parts for wear. • Check diaphragm for damage or wear. • If the pool has multiple skimmers, verify that the skimmer not connected to the cleaner is closed. • Check for air in system. If water level in pump basket drops or you see excessive air bubbles in the pump basket or coming from the return lines, there is air in the system. Check hose connections, tighten all fittings at pump and check gasket in pump basket for wear. Diaphragm Clearing the Diaphragm A quick access system allows easy access to inspect and clear the diaphragm. To remove: 1. Turn handnut counter-clockwise to loosen the outer extension pipe. Remove the pipe. Cleaner patterns, does not cover entire pool. • Adjust FlowKeeper Valve to increase flow to cleaner. 2.. Turn the cleaner over. Grasping the diaphragm flange, pull out the diaphragm and inner pipe. 3. Pull off the diaphragm. Diaphragm Retaining Ring Inner Pipe Inspect it for debris or wear, and rinse it thoroughly with water. Replace if necessary. To install: 1. Verify that the retaining ring is on the diaphragm. 2. Push diaphragm onto inner pipe. • Ensure return fittings are directed down. Add a return diverter if necessary. • Make sure hose is not kinked or coiled. Lay in sun to straighten if necessary. • Confirm proper hose length. Cleaner gets stuck at steps. • Confirm proper hose length. Shorten if necessary. • Lower the FlowKeeper Valve setting to reduce flow to the cleaner. • Order larger (16") wheel deflector, part #46155. Flange 3. Aligning the flange of the diaphragm with the slot in the cleaner body, push the diaphragm assembly into the cleaner until it is flush against the inlet plate. 4. Reinstall outer extension pipe and secure handnut. Do not over tighten. Cleaner moves extremely fast or climbs walls.• Lower the FlowKeeper Valve setting to reduce flow to the cleaner. • Open a second skimmer if there is more than one. Storage and Winterizing Never coil the hose. Always store the cleaner out of direct sunlight. When storing for the winter, drain all water from the cleaner. Remove all connectors and adapters from the skimmer. Store disc flat, and hose sections disconnected, drained and straight. 6 7