1
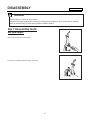
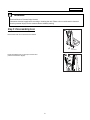
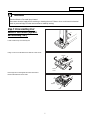
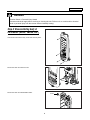
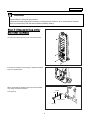
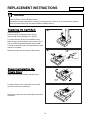
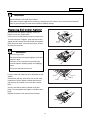
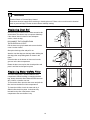
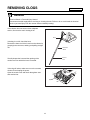
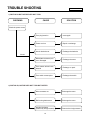
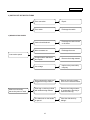
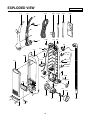
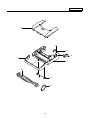
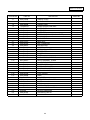
Repair services
America’s repair specialists
SEARS KENMORE UPRIGHT
VACUUM CLEANER
MODEL: 721.36078600
CONTENTS
MODEL 721.36078600
BEFORE SERVICING THE UNIT, READ THE "SAFETY PRECAUTIONS" IN
THIS MANUAL.
MODEL 721.36078600
MECHANICAL SERVICE INFORMATION
TABLE OF CONTENTS
1. SAFETY PRECAUTIONS ................................................................................3
2. CAUTIONS .......................................................................................................3
3. DESCRIPTION/ATTACHMENTS/SPECIFICATIONS ...................................... 4
4. DISASSEMBLY .............................................................................................5-9
5. REPLACEMENT INSTRUCTIONS ...........................................................10-12
6. REMOVING CLOG .........................................................................................13
7. TROUBLE SHOOTING .............................................................................14-16
8. WIRING DIAGRAM ........................................................................................17
9. EXPLODED VIEW/REPLACEMENT PARTS LIST ...................................18-21
2
SAFETY PRECAUTIONS
MODEL 721.36078600
BEFORE OPERATING THIS VACUUM CLEANER, READ THIS SERVICE MANUAL THOROUGHLY, AND
OBSERVE EACH POINT CAREFULLY.
3. Attachments
1. Filter
1) Dusting Brush and Crevice Tool :
For cleaning any crevice, inside corners of
window frames.
For delicate vacuuming of fabrics on the
furniture, curtains, etc.
2) Upholstery Tool : for vacuuming the dust on the
upholstery.
1) The filter is composed of a motor safety filter, a
exhaust filter and a paper bag.
2) Never use the vacuum cleaner without filters. It
may harm the motor.
NOTE : Re-use of the motor safety filter.
Never wash the filter in a washing machine or in
a dishwasher.
Never use hot water for washing the filter.
Re-use the filter after drying it completely in the
shade.
Do not dry near fire or direct sun ray.
4. Close supervision is necessary when this
vacuum cleaner is used by or near children.
Children's carelessness may cause damage to
the cleaner or injure persons.
2. Avoid sucking such materials as :
5. Air exhausted from the vacuum cleaner is
normally warm. But if extraordinarily hot air is
exhausted, check if the hose or dust bag is
clogged or not.
1) Liquid or wet dust :
Clogs the ventilation holes, reduces the suction
power significantly and harms the motor.
2) Inflammable liquids such as benzene, alcohol or
solvents.
3) Burning objects such as cigarette butts.
4) Bulky objects such as vinyl, paper etc.
5) Sharp objects such as needles, pins, metal or
glass particles etc.
6. Electric shock could occur if used outdoors or
on wet surfaces.
CAUTIONS
BEFORE ATTEMPTING TO SERVICE OR ADJUST ANY PART OF THE VACUUM CLEANER, DISCONNECT
THE ELECTRICAL POWER SUPPLY CORD FROM THE WALL OUTLET.
1. Motor exchange
2. In case of exchanging other parts, refer to the
exploded view.
1) Separate the Body Cover and Body Base by
unfastening the screws.
2) After disconnecting the lead wires, replace the
old motor with a new one.
3
DESCRIPTION
MODEL 721.36078600
Handle
Hose Holder
Quick Release
Cord Hanger
Dust Cover
Power Cord
Lower
Cord Hanger
Exhaust Panel
On/Off Switch
Height Adjustment
Knob
Bumper
Extension
Wand
Dusting Brush/
Upholstery Tool
Floor Nozzle
Light
E-Z Belt Check
Motor Protector
Agitator
Hose
Pedal
Crevice Tool
ATTACHMENTS
Dusting Brush
Upholstery Tool
Extension Wand
Crevice Tool
SPECIFICATIONS
• POWER SOURCE : ON NAMEPLATE
• PACKING WEIGHT : 7.7kg
• POWER CONTROL : ON/OFF SWITCH ON BODY
• NET DIMENSION : 364 x 1164 x 361 (W x D x H)mm
• CAPACITY : 5 l
• PACKING DIMENSION : 370 x 870 x 245 (W x D x H)mm
• CORD LENGTH: 7.7m
• ATTACHMENTS
DUSTING BRUSH............................................. 1EA
UPHOLSTERY TOOL ....................................... 1EA
EXTENSION WAND.......................................... 1EA
CREVICE TOOL................................................ 1EA
• NET WEIGHT: 7.7kg
4
DISASSEMBLY
MODEL 721.36078600
WARNING
Electrical Shock or Personal Injury Hazard
Disconnect electrical supply before servicing or cleaning the unit. Failure to do so could result in electrical
shock or personal injury from the vacuum cleaner suddenly starting.
Step 1: Disassembling handle
and cord hanger.
Remove screw and pull out the handle.
Full out the cord hanger forward strongly to remove.
5
MODEL 721.36078600
WARNING
Electrical Shock or Personal Injury Hazard
Disconnect electrical supply before servicing or cleaning the unit. Failure to do so could result in electrical
shock or personal injury from the vacuum cleaner suddenly starting.
Step 2: Disassembling hose
A
Remove the lower end of hose from the cleaner.
Hose
Connector
B
Press the release hook on the pipe connector and
pull the hose forward. (Fig.B)
6
MODEL 721.36078600
WARNING
Electrical Shock or Personal Injury Hazard
Disconnect electrical supply before servicing or cleaning the unit. Failure to do so could result in electrical
shock or personal injury from the vacuum cleaner suddenly starting.
Step 3: Disassembling floor
nozzle of the cleaner (agitator,
belt assembly, etc.)
Lower handle to lay vacuum body flat.
Using a coin to turn the latches and remove nozzle cover.
Latches
Nozzle
Cover
Lift the right end of the agitator and then the left end.
Remove the belt from motor shaft.
Agitator
Belt
7
MODEL 721.36078600
WARNING
Electrical Shock or Personal Injury Hazard
Disconnect electrical supply before servicing or cleaning the unit. Failure to do so could result in electrical
shock or personal injury from the vacuum cleaner suddenly starting.
Step 4: Disassembling body of
the cleaner (motor, switch, etc.)
Unscrew and remove the body cover from the body base.
Disconnect wires and remove motor.
Motor
Disconnect wires and disassemble switch.
Switch
8
MODEL 721.36078600
WARNING
Electrical Shock or Personal Injury Hazard
Disconnect electrical supply before servicing or cleaning the unit. Failure to do so could result in electrical
shock or personal injury from the vacuum cleaner suddenly starting.
Unscrew and remove the body cover from the body base.
Push the end of damper body strongly to detach the damper
body from the body base.
When reassemble the damper to the body base, assemble
cap, spring and damper body first.
Spring
Then press-fit.
Cap
Damper Body
Packing
9
REPLACEMENT INSTRUCTIONS
MODEL 721.30678600
WARNING
Electrical Shock or Personal Injury Hazard
Disconnect electrical supply before servicing or cleaning the unit. Failure to do so could result in electrical
shock or personal injury from the vacuum cleaner suddenly starting.
A
Unplug the cleaner.
Place the handle to parallel position. (Fig. A)
Unscrew and remove the light cover. (Fig. B)
To remove old bulb, push it in toward bulb socket
while turning counter-clockwise, then remove. (Fig. C)
Use a bayonet base bulb having the rating of 25W.
To install a new bulb, push it in toward the bulb socket
and turn it clockwise.
B
Replace the light cover and secure it with screws.
C
To Remove
Latches
Using a coin to turn the latches, and raise cover.
Nozzle
Cover
To replace nozzle cover, insert tabs on the nozzle
cover into slots in the nozzle base.
Then lower nozzle cover onto nozzle base and secure
the latches.
10
MODEL 721.36078600
WARNING
Electrical Shock or Personal Injury Hazard
Disconnect electrical supply before servicing or cleaning the unit. Failure to do so could result in electrical
shock or personal injury from the vacuum cleaner suddenly starting.
Latches
Check the belt and agitator frequently. If they are
broken or worn out, replace them.
Using a coin to turn the latches and remove nozzle cover.
To remove the belt or agitator, grasp the both ends of
agitator and lift it slowly. Remove the belt from agitator
pulley and motor shaft. If the belt was broken, be sure
all pieces are removed.
Nozzle
Cover
WARNING
Personal Injury Hazard
Be careful when removing the agitator as the belt
tension is high.
Agitator
Failure to do so could result in personal injury
from the agitator releasing quickly and snapping
away.
Belt
The motor shaft may be very hot!
Loop the other end of the belt on the belt pulley on the
agitator.
Nozzle
Agitator
Insert the left end cap, arrow down, into its slot in the
nozzle base. Pull the agitator forward and insert the
right end cap, arrow down, into its slot in the nozzle
base.
Base Slot
Bumper
End Cap
Check to see that the belt is centered on the belt
pulley. Turn the agitator with fingers to see that it turns
freely.
Replace the nozzle cover and secure the latches.
Agitator
Belt
11
MODEL 721.36078600
WARNING
Electrical Shock or Personal Injury Hazard
Disconnect electrical supply before servicing or cleaning the unit. Failure to do so could result in electrical
shock or personal injury from the vacuum cleaner suddenly starting.
g
Check the bag from time to time. When excessive dirt
accumulates, the cleaner may not operate effectively.
If the cleaner does not seem to have adequate
suction, check the bag.
Dust
Cover
DISCONNECT THE CLEANER FROM
THE ELECTRICAL OUTLET.
Pull the dust cover grip forward and remove the dust
cover from the cleaner.
Grasp the dust bag collar and pull it out.
Attach a new dust bag onto the bag holder holding the
dust bag collar and pushing back as shown in the
figure.
Insert the tabs on the bottom of dust cover into the
grooves on the dust compartment.
Dust
Bag
Rotate the dust cover up into the closed position and
press it until the hook snaps into place.
The motor safety filter is located inside the dust
compartment. When installing or changing the dust
bag, always check this filter. When the filter becomes
dirty, clean it or install a new one.
To remove this filter, open the dust cover and pull the
filter out from the bottom of dust compartment.
To clean the old filter, rinse it in water and dry it.
Slide this filter back into place. It should be fully
inserted into the ribs of the bottom of dust
compartment. Be sure the filter is dry.
12
REMOVING CLOGS
MODEL 721.36078600
WARNING
Electrical Shock or Personal Injury Hazard
Disconnect electrical supply before servicing or cleaning the unit. Failure to do so could result in electrical
shock or personal injury from the vacuum cleaner suddenly starting.
If the cleaner does not seem to have adequate
suction, first check to see if the bag is full.
Hose
If the bag is not full, check the hose.
Remove the lower end of the hose from the cleaner by
grasping hose connector, twisting, and pulling straight
out.
Extension
Wand
Crevice
Tool
Visually inspect the hose and the opening of the
nozzle cover into which the hose is inserted.
If the clog still exists, make sure to turn the vacuum
cleaner off and unplug the power.
Open the nozzle cover and check the agitator area
and suction inlet.
Agitator
13
TROUBLE SHOOTING
MODEL 721.36078600
1) SWITCH ON BUT MOTOR DOES NOT TURN
CHECKING
CAUSE
SOLUTION
Check the power source
Poor plug insertion
Insert again
Power cord cut
Repair or exchange
Interior lead wire cut
Exchange the lead wire
Motor(stator armature) coil
cut or damaged
Exchange the motor
Poor contact carbon brush
defaced
Exchange or repair
Poor switch contact point
Exchange the switch
Normal
2) SWITCH ON, MOTOR DOES NOT TURN BUT BUZZES
Motor armature cut
Exchange the motor
Ball bearing defacement
Exchange the motor
Impeller hindrance
(Caused by foreign matters)
Remove the foreign matters
14
MODEL 721.36078600
3) SWITCH OFF BUT MOTOR TURNS
Poor connection
Repair
Poor switch
Exchange the switch
Carbon brush defaced
Exchange the carbon brush
or the motor
Motor armature cut
Exchange the motor
Foreign matters attached to
the impeller
Remove the foreign matters
Low voltage
Inquire to the power utility
company
4) WEAK SUCTION POWER
Low rotation speed
Motor turns normally,
but suction power is weak
Hose and extension wands are
clogged with foreign matters
Remove the foreign matters
in the hose or extension wands
Filter bag or cloth bag is filled
with inhaled foreign matters
Remove the foreign matters
or exchange the filter bag or
clean the cloth bag
The slide knob on the handle
is opened
Close the slide knob by
sliding it
15
MODEL 721.36078600
5) VIBRATION NOISES
Loose parts
Secure firmly
Unbalanced motor assembly
Exchange or repair the motor
Foreign matters are attached
to the impeller
Remove the foreign matters
Poor carbon brush rectification
Exchange the carbon brush
or the motor
Armature is cut or foreign
matters attached
Exchange motor
Remove foreign matters
6) RADIO, TV RECEPTION DISTURBANCE
Poor cord, lead wire
Exchange cord, lead wire
Poor carbon brush rectified
Exchange the carbon brush
or the motor
Poor electric connector
or receiver
Repair the electric connector
or receiver
Poor capacitor
Exchange the capacitor
7) IMPROPER HOSE OR NOZZLE CONNECTION
Bent connection parts
Exchange the parts
Poor connection
(Caused by foreign matters)
Remove the foreign matters
and reconnect
16
SCHEMATIC DIAGRAM
MODEL 721.36078600
MODEL 721.33189, 721.33289
Neutral
Live
Switch
Thermal Protector
Motor
M
17
EXPLODED VIEW
1-1
MODEL 721.36078600
1-2
4-14
4-15
4-16
4-17
4-18
1-3
4-10
1-4
4-1 4-3
4-2
3-1
4-11
4-19
4-12
4-4
3-4
4-13
2-1
4-5
4-6
4-7 4-20
4-8
3-3
4-21
5-5
5-3
5-2
5-1
4-9
5-4
3-5
3-2
18
MODEL 721.36078600
6-1
7-3
7-4
7-2
7-1
8-1
7-7
7-6
8-2
19
MODEL 721.36078600
LOCATION NO.
PART NO.
DESCRIPTION
1-1
1-2
1-3
1-4
2-1
3-1
3-2
3-3
3-4
3-5
4-1
4-2
3650FI1503B
3650FI1504B
4990FI3033B
1TPL0403116
3550FI1944A
3550FI1674C
3550FI2564B
5231FI3757B
3920FI3837B
3525FI4001D
3040FI1510C
5200FI3791B
HANDLE, UPPER
HANDLE, LOWER
HANGER, CORD
SCREW TAPPING, PAN HEAD
COVER, DUST
COVER, BODY
COVER, TOP
FILTER ASS
’ Y EXHAUST(MICRON FILTER)
PACKING, CAP
BULB ASSEMBLY
BASE, BODY
PIPE, CONNECTOR
4-3
4-4
4-5
4-6
4-7
4-8
4-9
4-10
4-11
4-12
4-13
4-14
4830FI3001A
4930FI3803A
4930FI3805B
4930FI3804B
4970FI3001F
4660FI3752B
5215FI1338D
6601FI3487C
6631FI2003J
4930FI4669A
5230FI3749B
BUSHING,CORD
HOLDER, HOSE
ACCESSORY HOLDER
HOLDER, PIPE
DAMPER ASS'Y
WHEEL
HOSE ASSEMBLY, FLEXIBLE
SWITCH ASSEMBLY, POWER
CONNECTOR ASSEMBLY
HOLDER, CORD
FILTER, MOTOR SAFETY
6641FI2422V
5203FI3739E
5058FI2214B
5062FI2058B
5231FI2453F
1TPL0402818
4370FI3691B
4O80070A
4681FI2485A
3920FI3949A
4I23008B
4980FI3736A
3920FI3890B
POWER CORD ASSEMBLY
BRUSH ASS'Y DUST
TOOL, CREVICE
WAND
BAG, DUST
SCREW TAPPING, PAN HEAD
SHAFT
E-RING
MOTOR ASS'Y VC
PACKING, MOTOR MOUNTING
PACKING, ABSORBING
SUPPORTER, MOTOR
PACKING, SEAL
4-15
4-16
4-17
4-18
4-19
4-20
4-21
5-1
5-2
5-3
5-4
5-5
20
SEARS NO.
86878
50688
REPLACEMENT PARTS LIST
LOCATION NO.
6-1
7-1
7-2
7-3
7-4
7-6
7-7
8-1
8-2
PART NO.
3550FI1945A
3040FI1511B
4820FI2402B
4640FI2004A
3058FI2005B
4580FI3005B
4370FI4596A
5973FI1008A
4400FI3348A
DESCRIPTION
COVER, NOZZLE
BASE, HEAD
BUMPER, HEAD
STRAP, HEAD
PEDAL
WHEEL
SHAFT
AGITATOR ASSEMBLY
BELT
21
MODEL 721.36078600
SEARS NO.
5275
Get it fixed, at your home or ours!
Your Home
For repair - in your home - of all major brand appliances,
lawn and garden equipment, or heating and cooling systems,
no matter who made it, no matter who sold it!
For the replacement parts, accessories and
ownerís manuals that you need to do-it-yourself.
For Sears professional installation of home appliances
and items like garage door openers and water heaters.
1-800-4-MY-HOME®
(1-800-469-4663)
www.sears.com
Anytime, day or night
(U.S.A. and Canada)
www.sears.ca
Our Home
For repair of carry-in products like vacuums, lawn equipment,
and electronics, call or go on-line for the nearest
Sears Parts and Repair Center.
1-800-488-1222 Anytime, day or night (U.S.A. only)
www.sears.com
To purchase a protection agreement (U.S.A.)
or maintenance agreement (Canada) on a product serviced by Sears:
1-800-827-6655 (U.S.A.)
Para pedir servicio de reparación
a domicilio, y para ordenar piezas:
1-888-SU-HOGAR®
(1-888-784-6427)
1-800-361-6665 (Canada)
Au Canada pour service en français:
1-800-LE-FOYERMC
(1-800-533-6937)
www.sears.ca
P/No.: 3828FI5859G
© Sears Brands, LLC
® Registered Trademark / TM Trademark / SM Service Mark of Sears Brands, LLC
® Marca Registrada / TM Marca de F· brica / SM Marca de Servicio de Sears Brands, LLC
MC
Marque de commerce / MD Marque dÈposÈe de Sears Brands, LLC