1
SECTION 4: INSTALLATION
4.1 Above Counter Installation
(For SpaceSaver model, disregard mention of polycarbonate sound
enclosure)
1. Insure that an electrical receptacle is readily accessible when you
locate the equipment.
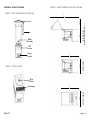
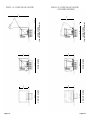
● If installing a sound enclosure, allow a clearance of at least 8 1/2 in.
(216 mm) from the sound enclosure to the wall and 26 in. (660 mm) from the counter top to any over-the-counter cabinetry.
● Ensure lower cabinetry allows adequate airflow. There should be at
least 8 1/8 in. (205 mm) from the counter top to the next lower shelf of
the cabinet, leaving a minimum space of 3 in. (76 mm) between the
bottom of the motor and the lower shelf. Cabinetry should not
be closed, but should allow free flow of air from outside to inside cabinet
space.
2. Be sure the unit is switched off and unplugged. Remove the lid (top)
of the sound enclosure by either sliding the piano hinge pin out of the
hinges. (For the Q Series model, lift the top straight off the bottom to
remove.) Lay the polycarbonate sound enclosure top and the hinge pin
aside.
NOTE: The blender unit draws ambient air into the louvers located on
the bottom of the motor. It then evacuates hot air through the louvers
located on the upper sides of the motor. Ensure a sufficient amount of
air circulates beneath the motor to allow cooling. Hot air should not be
trapped beneath the counter top. Plastic bags, cups, etc. should not be
stored closer than 3 inches (76mm) from the bottom of the motor.
3. Route the power cord from the top through the bottom of the clear
sound enclosure bottom and insert the motor carefully into the opening
in the bottom of the sound enclosure base. Be sure the rubber gasket fits
smoothly and tightly into the plastic base.
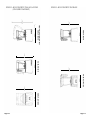
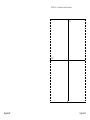
3. Cut a hole in the counter top 4 3/8 in. (111 mm) wide and 5 7/8 in.
(149 mm) long with the shorter side facing the operator (See Figure 4).
Make sure all space requirements and measurements are correct
BEFORE cutting.
4. Slide the power cord and the motor into the black plastic sound
enclosure base with the touch pad facing the front, fitting the motor and
clear sound enclosure bottom snugly into the black base. Extend the
cord out the bottom of the base to its full length.
4.3 In-Counter Installation
5. Set the equipment on the counter and re-install the clear sound
enclosure top.
1. Insure that an electrical receptacle is readily accessible when you
locate the equipment.
6. Insure clearance above the counter around the installation to allow for
unhampered operation of the sound enclosure.
2. Remove the clear sound enclosure lid (top) by sliding the piano hinge
pin out of the hinges. (For Q Series models, simply lift the top portion
of the sound enclosure off.) Place the clear sound enclosure bottom on
the counter making sure the hole in the bottom of the sound enclosure is
aligned with the hole in the counter top.
4.2 Preparation for In-Counter Installations
1. Identify desired blender location. Consider preferences such as
proximity to ingredients, how close you want to be to customers, and
available counter space.
2. Ensure potential site meets all dimensional requirements. (See
Figures 3.1-3.3.)
● Counter top can be no thicker than 3/4 in (19 mm). A counter top
thicker than 3/4 in. (19 mm) will obstruct ventilation louvers on the upper
sides of the motor.
● If installing more than one blender, allow 14 to 16 in. (356 - 406 mm)
center-to-center blender spacing.
Page (For SpaceSaver model, disregard mention of polycarbonate sound
enclosure)
3. Thread the power cord through the base of the sound enclosure
and the counter top hole being careful not to scratch or damage the
enclosure.
4. Gently place the motor into the sound enclosure and slide it into the
hole in the counter top. Make sure the LCD indicator and touch pad are
facing the operator’s side of the counter. Also insure that the rubber
gasket on the motor fits snugly and evenly into the sound enclosure and
counter top holes.
Page