1
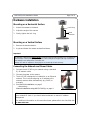
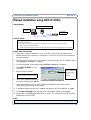
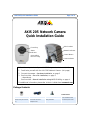
AXIS 205 Quick Installation Guide
Page 1 of 6
AXIS 205 Network Camera
Quick Installation Guide
Focus Ring
Serial number
Status
Indicator
Network Indicator
(surrounding
the focus ring)
Control Button
Power Indicator
Follow these steps to install your AXIS 205 on your local network (LAN):
1. Familiarize yourself with the AXIS 205 Network Camera - (this page)
2. Connect the camera - Hardware Installation, on page 2
3. See live video - One-click Installation, on page 3
- alternatively See live video - Manual Installation using AXIS IP Utility, on page 4
For additional information please refer to the Axis Web site at www.axis.com
Package Contents:
Printed Material
AXIS 205 Network Camera
Power adapter
Stand + 3 mounting screws
Ready assembled with lock
washer, swivel joint and lock
ring
Country-specific. Please
ensure that the correct
adapter is used
Stand and extension section
ready assembled.
AXIS 205 Network Camera
Quick Installation Guide
Axis Warranty Document
AXIS 205 Quick Installation Guide
Page 2 of 6
Hardware Installation
Mounting on a Horizontal Surface
1. Attach the camera to the stand
Lock Ring
2. Adjust the angle of the camera
3. Gently tighten the lock ring
Stand
extension
Mounting on a Vertical Surface
1. Remove the stand extension.
2. Angle and fasten the camera as described above.
Important!
The AXIS 205 is designed for indoor use only, and must always be positioned where it is not exposed to
direct sunlight or strong halogen light. Exposure to direct sunlight or halogen light may cause permanent damage to the image sensor in the AXIS 205.
Damage as a result of exposure to strong light is not covered by the Axis warranty.
Connecting the Network and Power Cables
1. Connect the AXIS 205 to your network using a standard
RJ-45 network cable.
2. Connect the power to the camera.
3. The AXIS 205 is designed for installation on an Ethernet
network. This involves assigning an IP address to the
network camera, either automatically (e.g. DHCP) or
manually.
4. See One-click Installation, on page 3
- alternatively Manual Installation using AXIS IP Utility, on page 4
Please consult your network administrator or refer to the user documentation of
your network to check if you should select automatic or manual IP address
assignment.
For additional information on this and other issues, please refer to the Axis Web site
at www.axis.com
AXIS 205 Quick Installation Guide
Page 3 of 6
One-click Installation
Requirements:
Computer
on a LAN
AXIS 205
Network Camera
Broadband router providing
automatic IP addressing
Internet
Broadband Modem
AXIS Internet Dynamic DNS Service
•
AXIS Internet Dynamic DNS Service is free of charge and is designed to supply you with a static name (DNS name) for
your product instead of a dynamic IP address. More information about AXIS Internet Dynamic DNS Service is available at
www.axiscam.net
•
Please note that this procedure will send the IP address, firmware version, product type and serial number of the AXIS
205 to the Axis Internet Dynamic DNS Service. No personal information is transferred.
•
To remove the DNS name and un-register from the Axis Internet Dynamic DNS Service, open the Setup pages in the AXIS
205, click TCP/IP, Services and check the Remove currently registered DNS name checkbox under the AXIS Internet
Dynamic DNS.
Follow these instructions:
1. Once the network and power cables have been connected (see page 2), wait for the
Status indicator to show a steady green.
2. Now press the control button on the back of the camera once. The Status indicator
will blink green while it connects to the Axis Internet Dynamic DNS service.
3. Wait for the Status indicator on the front of the camera to show a steady green.
4. From a PC connected to the Internet, you have 60 minutes to visit www.axiscam.net
to access the link to the AXIS 205.
5. Enter the serial number of your product and click Proceed.
The serial number (S/N) is on the label
on the back of the AXIS 205
6. Follow the on-screen instructions in the AXIS Internet Dynamic DNS Service.
7. Go to Accessing the AXIS 205, on page 5 for instructions on how to set the password
for the AXIS 205.
Note:
If this installation was not successful, try Manual Installation using AXIS IP Utility, on page 4
AXIS 205 Quick Installation Guide
Page 4 of 6
Manual Installation using AXIS IP Utility
Requirements:
AXIS 205 Network Camera
Computer
on a LAN
Hub/Switch
AXIS IP Utility
AXIS IP Utility is a Windows software application that installs the AXIS 205 Network Camera to your local network
using a static IP address.
• Download the AXIS IP Utility software to your computer, free of charge from the Support pages at
http://www.axis.com/techsup/software
•
Double-click the setup.exe file and follow the on-screen instructions to install the software on your computer.
Follow these instructions:
1. Acquire an unused IP address for your AXIS 205. (AXIS IP Utility detects the IP
address subnet your computer is connected in. The AXIS 205 must be connected on
the same subnet.)
2. Connect the AXIS 205 to your local network using a standard (RJ-45) network cable
(see Hardware Installation, on page 2).
3. Connect the power to the camera (see Hardware Installation, on page 2).
4. Start AXIS IP Utility on your
computer.
5. Enter the serial number:
The serial number (S/N) is on the
label on the back of the AXIS 205
The serial number
starts with 00408C
and is followed by
6 unique
characters
6. Enter the IP address acquired for
your AXIS 205 and click Set IP.
7. When prompted by AXIS IP Utility, restart the camera by disconnecting and
reconnecting the external power supply.
8. A message confirming that the IP address has been set will be displayed, click OK.
9. Click View Home Page to access the AXIS 205 Network Camera’s Web pages.
10. Please refer to Accessing the AXIS 205, on page 5 for instructions on how to set the
password to the AXIS 205.
Note:
If this installation was not successful, try the Alternative Installation Method - ARP / Ping, on page 6
11.
AXIS 205 Quick Installation Guide
Page 5 of 6
Accessing the AXIS 205
1. On installation, the ‘Configure Root
Password’ dialog will be displayed on your
screen:
2. Enter a password and then enter the same
password to confirm the spelling etc.
3. Click OK.
4. The ‘Enter Network Password’ dialog will
appear:
5. Enter the User Name: root
Note: root is the Administrator’s user name
6. Enter the unique password set in the preceding dialog (see step 2 above)
7. Click OK.
Note: If you forget your password, you must reset the AXIS 205 to the default
settings. See Reset to Factory Default Settings, on page 6.
8. If required, click Yes to install AxisCamControl.
Note: This requires that you have Administrator’s rights on the computer.
9. The Live View page of the AXIS 205 is displayed with links to the setup tools that
enable you to customize the AXIS 205 for your specific needs.
Live View - view live video from
the camera
Setup - customize the camera to
suit your needs
Online Help - for help on how to
customize the camera to suit your
needs.
Accessing the AXIS 205 from the Internet
Once installed, your AXIS 205 is accessible within your local network (LAN). To be able to access your AXIS 205 from
the Internet, you must configure your broadband router to allow incoming data traffic. For security reasons this is usually done on a specific port. Please refer to the user documentation of your broadband router for instructions on how
to do this.
For more information, please visit the AXIS Internet Dynamic DNS Service at http://www.axiscam.net or for Technical
notes on this and other issues, please visit the Axis Support Web at http://www.axis.com
AXIS 205 Quick Installation Guide
Page 6 of 6
Alternative Installation Method - ARP / Ping
The AXIS 205 can alternatively be installed using the ARP and Ping commands.
1. Acquire an unused IP address for the AXIS 205.
2. Locate the serial number (S/N) found on the label on the back of the AXIS 205.
3. Connect a standard network cable to your AXIS 205 and attach it to the network.
4. From a computer on your network, open a Command Prompt (Windows: from the
Start menu, select Run... and type cmd in the field. Click OK).
5. Enter the commands:
Syntax:
Example:
arp -s <IP Address> <MAC Address>
ping -l 408 -t <IP Address>
arp -s 192.168.0.125 00-40-8c-18-10-00
ping -l 408 -t 192.168.0.125
6. Connect the power to the camera.
7. Close the session once ‘Reply from 192.168.0.125: ...’ is displayed in the command
window.
8. The IP address is set when the Power Indicator is permanently lit and the Network
Indicator flashes intermittently.
9. Start a Web browser and enter the IP address of the camera in the Location/Address
field and press Enter on your keyboard.
10. Please refer to Accessing the AXIS 205, on page 5 for instructions on how to set the
password for the AXIS 205
Reset to Factory Default Settings
To reset all parameters, including the IP address, reset your AXIS 205 to the Factory
Default settings:
1. Disconnect the power cable from the AXIS 205.
2. Press and hold the Control button (located on the rear panel of the AXIS 205) and
reconnect the power cable.
3. Keep the button pressed until the Status Indicator displays yellow (this may take up to
15 seconds), then release the button.
4. When the Status Indicator displays green (which can take up to 1 minute) the camera
is reset to the factory default settings.
5. Re-install the AXIS 205 using one of the installation methods described in this
document.
AXIS 205 Network Camera Quick Installation Guide Rev. 1.0
October 2003
Part no: 21121
Copyright © Axis Communications AB, 2003